It is a known fact, that QuickBooks is one of the best accounting software available now. It is considered a boon for small and medium sized businesses as this software helps in managing their finances and accounting tasks, thereby streamlining their business operations. QuickBooks has various features and every year when Intuit launches a new version of the application it comes with new and improved features. In this segment, we will discuss about QuickBooks chart of accounts and it’s uses.
The QuickBooks Chart of Accounts (COA) is a list of accounts that assist in categorizing assets, owner’s equity amount, liabilities, and income. In simple words, it is basically a list of balances and accounts of the company. This basically helps in understanding how much money the firm has, how much it owns, how much it owes etc., by providing a full-proof financial report. The organized chart of accounts gives an insight into how the organization is performing. In fact, it is considered a very crucial aspect of the accounting system. So, it is important to know the procedure to set up a chart of accounts in QuickBooks. Thus, make sure to read this post till the end.
What is chart of accounts (COA)?
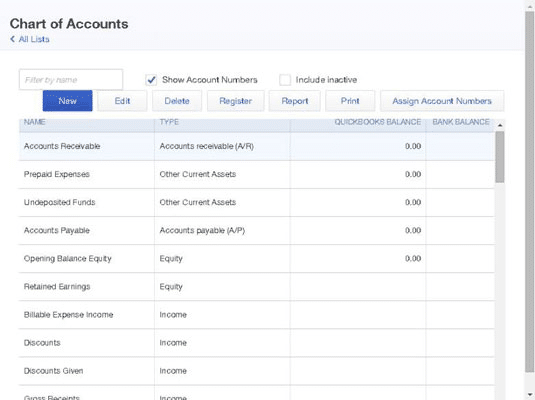
The Chart of Accounts is basically a list of account numbers and names that are relevant to the company. In general, the chart of accounts will have four categories. The four groups in a standard chart of accounts are as follows:
Asset accounts
Liability accounts
Income accounts
Expense accounts
These were the four basic categories, and within each of the categories, the line items will distinguish the specific accounts. Each line item represents an account within each category. A few charts of accounts might also display the equity accounts, which is a representation of anything that remains after accounting for all operating expenses and revenue accounts.
There are four types of chart of accounts that helps in business accounting error and hassle-free:
1. Asset Accounts
Asset accounts basically contain everything that has some value, such as buildings, vehicles, land, inventory, valuables, etc. So, this type of Chart of Accounts helps in tracking how much the user paid for a property and also other factors like depreciation. Items that are in liquid forms, like cheques and other bank accounts, are also included in this Chart of Accounts.
The asset accounts also include the things like liquid, such as checking accounts and other bank accounts. Other asset accounts can be the accounts receivables and notes receivable. The charts of accounts streamline various asset accounts by organizing them into line items so that one can track various components with much ease.
2. Liability Accounts
The Liability Accounts consist of things like mortgages, payroll taxes, promissory notes, credit card balances, bank loans, personal loans, and income tax payables. When users add a loan to this account, do ensure that users have also added the sum of the loan.
Users will have to log just the principal amount and forgo the interest owed. When one reaches each monthly payment and enter the payment in the account system, users will split the payment into an amount subtracted from what is owed and an amount of interest paid, which will go into an expense account.
3. Income Accounts
Income Accounts mostly has expenses, revenues, additional incomes or expenses, and cost of sales. Some of the accounts are the same for all businesses, while some accounts are definite to a particular business type. Few of the types of income are simple and economical to generate, while few others require time, expenses, and effort.
Creating separate line items in the chart of accounts is recommended for different types of income. Users are recommended to consider what various profitable activities may be and sort them by income type instead of limping all the income into one account. After the user is able to identify the locations or events bringing the most cash flow, then it is possible to manage things more properly.
4. Expense Accounts
This account keeps users informed about the amount of money that they have spent. In fact, it allows them to track the cash that is not with them. It is always suggested to break up the expenses into separate accounts, and users even get the opportunity to create sub-categories for their expenses.
Tips for organizing the chart of accounts
Before users begin with the steps to organize the chart of accounts, the following pointers or tips should be considered.
Many accounting systems are preset with a chart of accounts. The lines of preset accounts include numbered headers like 1430.2 and 530.8. These numbers can be effective for huge firms, but are usually a waste for entrepreneurs and small firms.
Users should keep the line items simple in the first go. And also, ensure that the line items have titles that make sense to the accountant and also to them. Using straightforward titles is recommended.
Another point that users should consider is to avoid creating a new line item for each transaction, as it would litter the entire chart of accounts. Instead of that, users should make use of the accounting software's subheadings.
For example, while creating a new account for PayPal fees, in such a case, instead of creating a new line, users can simply create a sub-account under the bank fees.
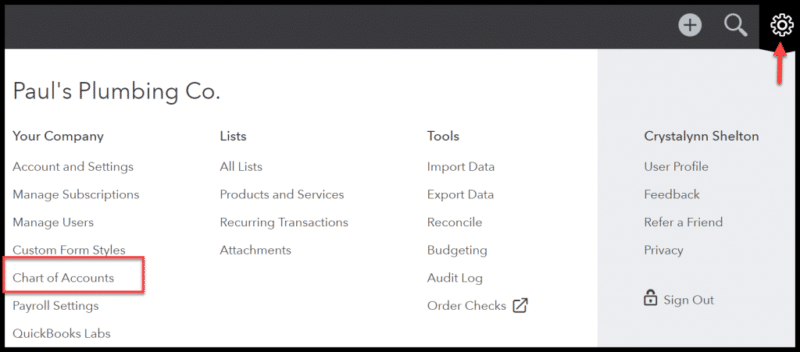
Start off by picking up the Chart of accounts from any of the following QuickBooks menu:
Go to the Company and then click on Lists, or Accountant.
On QuickBooks Online:
Herein, hit a click on the Settings ⚙ icon, and then choose Chart of accounts.
Easy Steps to Set up a Chart of Accounts in QuickBooks
Below are the steps to set up the chart of accounts that will help in making business health better:
Step 1: Select the Lists - Charts of Accounts Command
QuickBooks displays the Charts of Accounts window on the computer screen.
Step 2: Click on the Account Button
On the screen, QuickBooks will display the Account Menu. When users hit a click on the tab ‘Account menu option New’ will be pop up on their system’s screen.
Step 3: Add New Account by selecting Account and then New
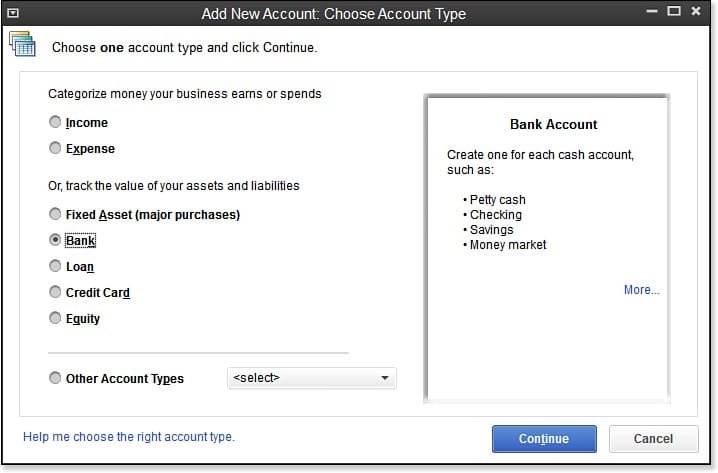
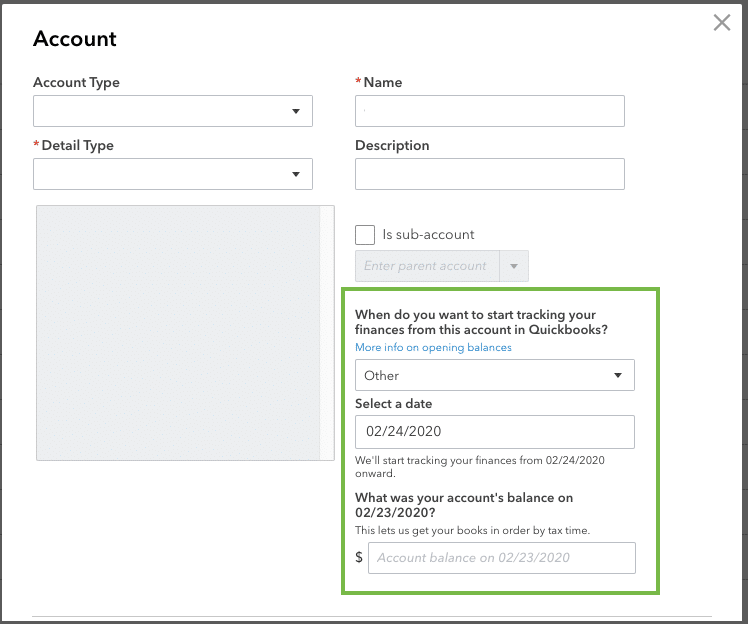
QuickBooks will showcase the Add New Account window on the screen.
QuickBooks provides different account types like Income, loan, Fixed Asset, Expenses, Credit Card, equity, Accounts Payable, Other Income, Costs of Good Sold, Accounts Receivable, Other Assets, Long Term Liability, Other Expenses, and more.
Moreover, through the Accounts, users will come to know about the location where their data is getting reported.
Step 5: Click on Continue
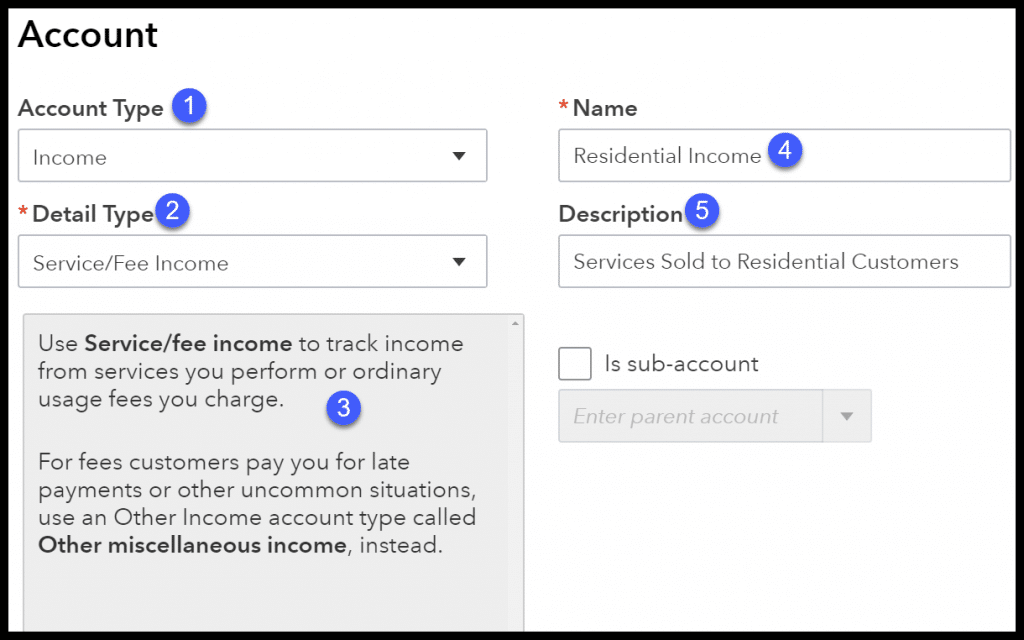
Once users click on Continue, QuickBooks will show the second Add Account window on the computer screen. Note that the name of the account will appear in the financial statements. So, users have to use the Account Name Box to give a very distinctive name to the new account.
Step 6: Check the Sub-account
Once users have selected the sub-account of the check box, they have to give a name to the Parent account.
Step 7: Bank Account
If QuickBooks understands that users work in different currencies, then it will prompt the users to look for all those customers, bank accounts, vendors, etc., who use different currencies.
Actually, there is no need to describe the new account. QuickBooks uses only the account name in the financial statements and so no description is required as such.
Step 9: Get Account Info
The credit card account type version of the Add New Account window will help in storing all the card details.
Step 10: Recognize the Tax Line
On the corporation’s Tax return, the cash account balances will be recorded. If users still want to add a bank account, then they can make use of the Tax-Line Mapping drop-down list.
Step 11: Save the New Account
The last step requires the user to hit click on the Next tab in order to save the account information and then head to the Add New Account Window.
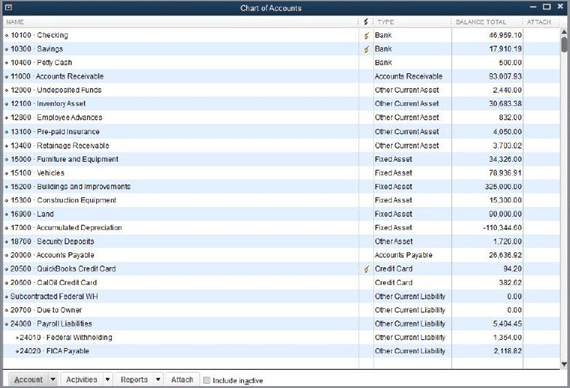
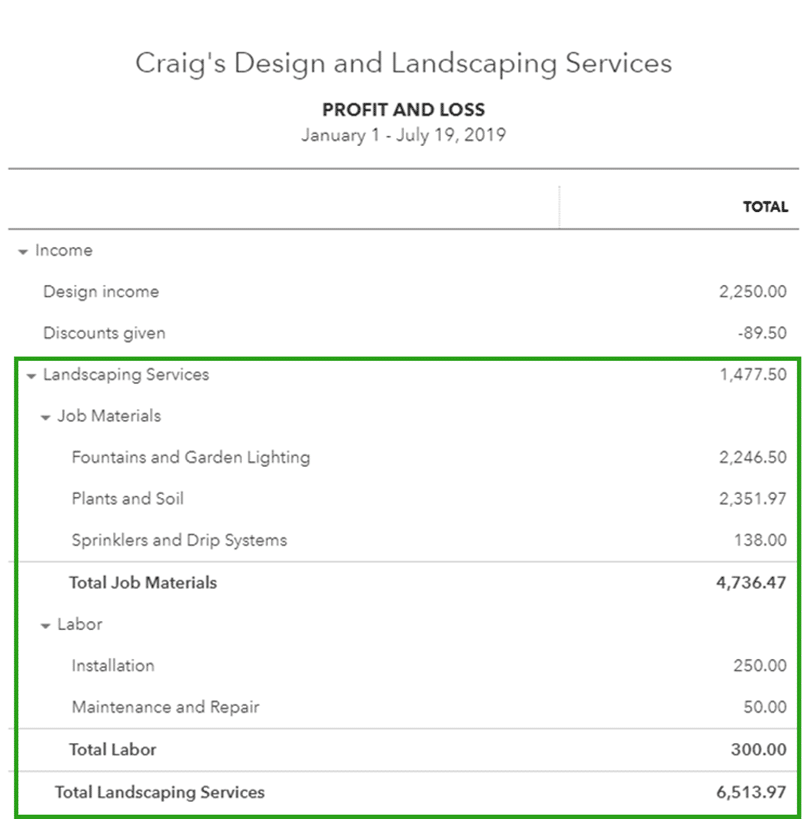
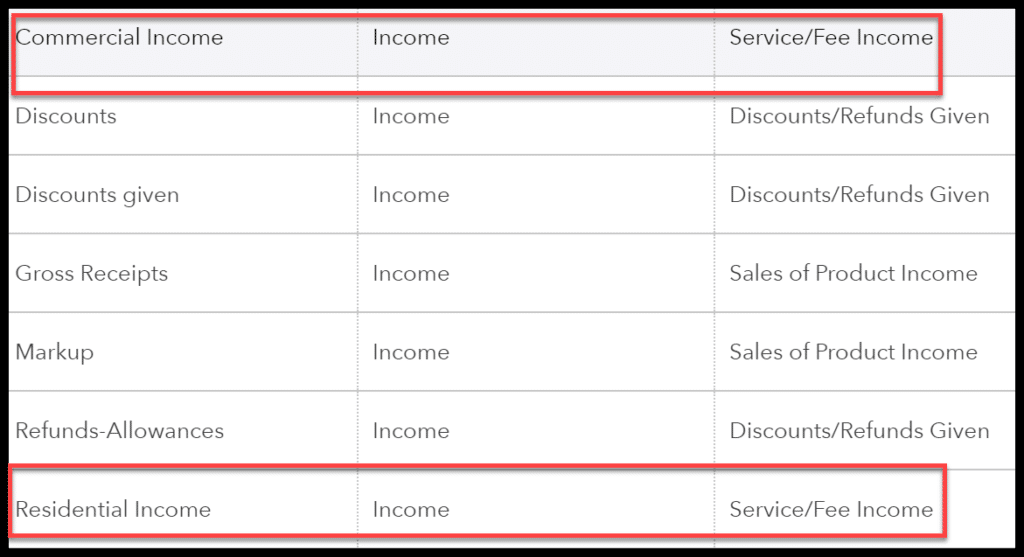
Once both accounts have been set up, the new accounts will appear on the chart of accounts list, as indicated below:
How to Modify an Account from the Chart of Accounts List?
The steps to modify an account from the chart of accounts are illustrated below:
Selecting the Account
The initial step is to choose the account which is to be modified. In QuickBooks, one can modify the accounts regardless of the time. From the chart of accounts, users should scroll down to the account that is to be modified and then click on the drop arrow, which is situated next to Run Report, and then select the Edit option.
Making modifications to the account
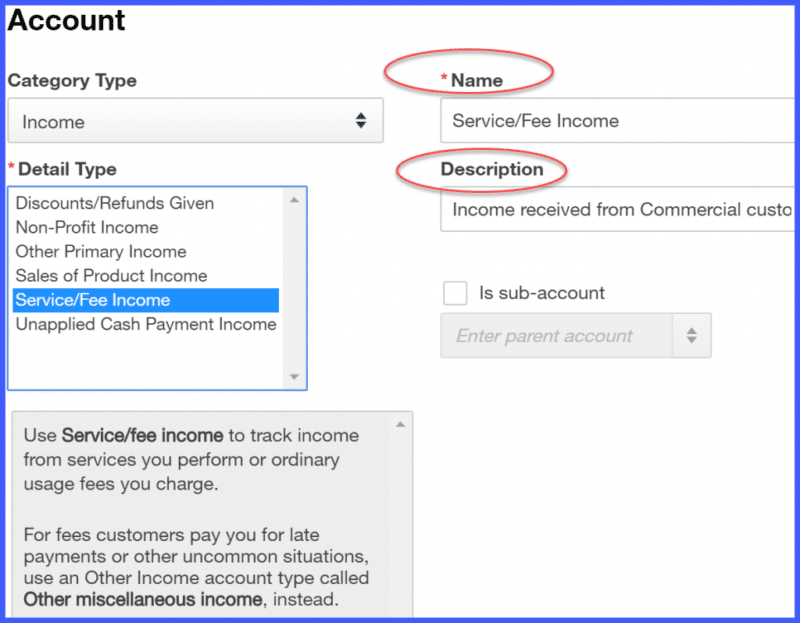
Users will then be guided to the window shown below, where they can make changes to the Account Name and Account Description fields. The point to be noted here is that users should not change the category type in case they have already entered transactions using the account. Doing so can lay a serious impact on the financial statements.
Save and Close
Users should not miss out on saving the changes before exiting the account, or else the work will be lost.
All the above steps will allow users to track your business activities on a daily basis, and you are now able to set up the chart of accounts in QuickBooks. However, if you get stuck anywhere while performing these actions or have any questions, then you can always connect with our US based accounting experts team using our dedicated helpline, i.e., 1-800-761-1787, which is available all through the day to assist you.
Do you know what file types and extensions are used by QuickBooks? Well, QuickBooks Desktop is a top-notch accounting software preferred by hundreds of thousands of people around the globe. It is a software which is used by both small as well as medium-sized companies. Now, as it is used by so many different companies and the regions as well, the preferred file formats are pretty varied from one another, there are a handful of file types and extensions that are used by QuickBooks desktop. So, in this comprehensive segment, we will go through all of the important and commonly used file types and extensions. By the end of this article, we all will be well-versed with all the extensions involved in the software. Thus, make sure to hang around till the end.
However, just in case you need any of our assistance, then don't feel any hesitation to reach out to our technocrats and live XpertBooks Pro Experts team using our support line i.e. 1-800-761-1787, and get instant assistance.
What is QuickBooks file extension?
File extensions in QuickBooks desktop are basically the extension used at the end of a file name, which define the purpose of the file. It is generally in the form .xxx. The file extension basically will help you in identifying the files and finding out the purpose is to be served by each of the files. QuickBooks file extensions are thus very essential for you as to identify the file and avoid any kind of mess related to the data.
How significant are QuickBooks file extensions?
It should be noted that every QuickBooks file extension carries a different significance and serves a different purpose. Let us check out how significant are file extensions:
Determining the type of content a particular file is containing becomes easy for users with extensions.
With extensions, it is possible for you to categorize the same kind of QuickBooks file extension to keep the accounting data categorized and prevent data from merging.
The extensions help in identifying the file type, which can ultimately help the desktop to launch the file in the right application.
They also assist in verifying the authentication of data files in a manner to secure them.
By simply looking at the file extension, you will be able to identify the file type and save a lot of time.
There are different types of file extensions that can be explored below. Extensions related to similar files are categorized below:
Common QuickBooks File Extensions
FileExtension
File Type
Description
QBW
QuickBooks company file
When you creates a company file, at that very time a file with .qbw extension is automatically created by the QuickBooks accounting software. The file so created basically holds the company file and the other relevant account info. To understand it in a better way, let us take an example, if you create a company with the name Mycompany, then in that case the file will be saved as Mycompany.qbw by QuickBooks accounting software.
QBO
QuickBooks Bank statement file
During the process of downloading transactions from the bank, the QuickBooks accounting software opens the transactions from a file with an extension as .qbo. You can easily import a QBO file, in order to get transactions into the bank register in a faster way.
Talking about this extension, when a user tries to email or transfer a company file, in that situation the QuickBooks accounting software crafts .qbm extension file, which is a compressed version of a company file.
Additional QuickBooks file extensions
FileExtension
File Type
Description
QWC
QuickBooks Web connector file
If you use the QuickBooks Web connector, then you might be required to open apps. When the web connector app is opened up by the third party developers, a file with .qwc file extension is crafted.
QBR
QuickBooks Report Template File
In case you export a memorized report template, QuickBooks software creates a file with the extension as .qbr
DES
Layout Designer Template file
In case you export a customized form template, QuickBooks accounting software creates a file with .des extension. QuickBooks offers a variety of templates. You might have to export the custom templates to use in the other company files or share with others.
Qbstbl2.usa
US Tax Table File
While running payroll on QuickBooks desktop, then you will be required to get the current tax tables. It has all of the latest payroll information required to calculate payroll taxes.
Accountant files
File Extension
File Type
Description
QBX
Accountant’s review copy (export file)
At the time while you generate an accountant’s review copy of QuickBooks company file, the QuickBooks software generates an accountant’s review copy with a QBX extension.
QBJ
General journal entries file
In case you want to add journal entries created by the accountant, then ask them to send a general journal entries file. This file comes with a .qbj extension.
QBA
Accountant’s copy file
An accountant copy is considered to be a file with .qbx extension sent by a client to the accountant for review purpose. This file comes with an extension as .qba
QBY
Accountant’s copy import file
Once the accountant reviews their account copy and makes necessary changes, they send a file with .qby extension to users. You can easily import or apply changes to the company file.
When you export the list info, QuickBooks accounting software creates a file with an .iif extension. You can make use of this file to share the lists with other company files.
LOG
Event log file
.log extension is used by QuickBooks to record essential events. There can be two types of Log files:
# Qbwin.log: this records the issues that are detected during a rebuild. # QWC.log: it records the web connect errors It should be noted that the log files can be used for troubleshooting purposes.
QBP
QuickBooks Print file
When you set the printing preferences, the QuickBooks software saves them in a file with the extension as .qbp. It should be noted that QuickBooks auto-saves the settings. However, you might be required to make changes to the file, in case of printer issues.
ECML
Entitlement file
At the time when you install and register QuickBooks, it creates an .ecml file extension. This file communicates to QuickBooks that you are using a licensed product.
TLG
Transaction log file
Since the last backup, any changes made to the company file are noticed by the QuickBooks accounting software. This software saves the information into a file, which is named with .tlg extension. The next time you take a backup of the company file, QB will automatically reset the file.
ND
Network data file
In case of multi user mode, QuickBooks accounting software creates a file with .nd as the extension. This .nd file helps the software in managing the user access settings.
QuickBooks statement writer files
File extension
File type
QSS
When you customize the statements and reports with QuickBooks statement writer, the software saves the settings in a file with .qss as the extension. You can make use of this file, in order to apply settings to other reports.
QSM
In case you make use of the QuickBooks statement writer, the software saves the information with .qsm extension. QSW file can be used in MS EXCEL.
QST
If a specific layout is required by you, a template file can be used, which is already available. These files generally have .qst as an extension.
QuickBooks for MAC
File Extension
FileType
Description
QB2016
Company file
This is the company file for the 2016 version of QuickBooks for Mac.
Plist
Apple property list files
This Plist file stores the registration and preferences.
QB201
Company file
Similar to the QB2016, this is the company file for the 2019 version of QuickBooks for Mac.
DM
Apple disk image file
This is the backup QuickBooks company file, which is saved as an apple disk image by QuickBooks.
MAC.QBB
Backup file
You can use a MAC.QBB file in order to move the QuickBooks Mac file over the QuickBooks desktop for windows.
Miscellaneous File Extensions
File Extension
File Type
Description
Temp 1234.qbt
Temp rebuild file
This file is created during “Pass 1 of the rebuild” & is deleted on its own when the rebuild is finished.
QBwin.log
QuickBooks Log file
The Qbwin.log file is created/updated when you run the verify/rebuild option. This file will help you to spot “Log problems and situations corrected”. The Qbwin.log file is generally stored in the QuickBooks installation directory.
QuickBooks Letters Templates folder
Letters Folder
The QuickBooks letters templates folders contain the word document templates for QuickBooks writer letters function.
QBrestor.TMP
Temp restore the file
This file is usually made at the time of restoring the QBB file, which was deleted automatically during the restore process.
Inet Folder
Inet
This folder was earlier used to store “License information” for QuickBooks.
Images folder
Images folder
The images folder stores the temporary copies of images that are used by QuickBooks.
QBInstanceFinder
Instance finder file
You can delete the file, but it might come up again in a few of the QuickBooks versions.
CONNLOG.TXT
Connection Log File
The CONNLOG.TXT file is the online banking connection log file, which is a log of each connection for online banking.
.TDB
QuickBooks Pro Timer files
There is a time tracking data from QuickBooks timer, which can be found in the QBTIMER directory.
DownloadQBXX folder
Download folder
The DownloadQBXX folder is made by QuickBooks for storing the updates that are downloaded at the time when you make use of the update QuickBooks function.
copy XX/XX/200X ABC.QBW
An archive copy of the data file
It should be noted that a separate QBW file is made with the name of Archive Copy XX/XX200X with QBW file name. It is an exact copy of the company file before being condensed. You can use this file in to order to view the info that was present in the unmodified file.
QBW.TLG
Transaction log file (for QuickBooks company file)
This file is made by QuickBooks database server manager and is a temporary file. It is generated at the time of opening the company file. The time when you open up the main file, the temporary file gets deleted on its own.
These file extensions are for the Windows users and these are divided into several parts as per their nominal features:
Common File Extensions for QuickBooks Desktop
QBW (QuickBooks Company File): This file extension format is used by the software when a new company file is created. This file format is useful in case you are looking to hold their account information and company files.
QBM (QuickBooks Portable File): This file format is created whenever you creates a new compressed version of the company file which is of the .qbm extension. Also, it is created when you move or e-mail a company file.
QBB (QuickBooks Backup file): This format is especially available only in the case of the creation of a backup file. So, in case the company file is backed up, you will get the file with a .qbb extension.
QBO (QuickBooks Bank Statement File): This format comes with the files which are Bank statements. Such files are easy to import and are lightning-fast in terms of getting the transactions into the bank register.
Additional QuickBooks File Extension
DES (Layout Designer Template File): A .des file extension is created whenever you exports a customized form template. This file is easy to export and can be used in other company files or for sharing with others.
QWC (QuickBooks Web Connector File): When you use the QuickBooks Web Connector, then you might be required to open up some apps. Now, whenever a third-party developer application creates a web connector app, it creates a .qwc file extension.
QBR (QuickBooks Report Template File): Whenever a memorized report template is exported, QuickBooks creates a file that is of .qbr extension.
QBSTBL2.USA (US Tax Table File): In case you run payroll in QuickBooks Desktop, a qbstbl2.USA file is required to get the current tax table. Now, with this file, you will be able to calculate the payroll taxes.
Accountant Files
QBY (Accountant’s Copy Import File): Once the files and accounts are reviewed by the accountant, the file that you sends forward is .qby extension.
QBX (Accountant’s Review Copy or Transfer File): Whenever a duplicate or backup of the company file is created, the newly created file comes up in the .qbx format.
QBJ (General Journal File): Any changes that are to be made by the accountant in the form of General Journal Entries, the file extension required to complete the same task is .qbj
QBA (Accountant’s Copy File): Once a client sends the accounts to the accountant by creating an accountant copy then the created files will be in the .qba file extension.
Following are the file types and file extensions that are available on a Mac OS System:
DMG (Apple Disk Image): Whenever a backup of a company file is created, the file is saved as an Apple Disk Image.
QB2016 (Company File): This file extension will appear with the company file on the 2016 version of QuickBooks Desktop.
QB2019 (Company File): This file extension will appear with your company file on the 2019 version of QuickBooks Desktop.
MAC.QBB (Backup File): The files of this file extension are used to move the QuickBooks Mac files over to the QuickBooks Desktop for Windows.
Plist (Apple Property list files): This file extension is created whenever you stores a preference or a registration.
Fixed Asset Manager Files
*.Fx0- Compressed FAM data file. Stores Asset data
*.Fx1- Stores system data
*.Mx0- Header File
*.FPx- Stores report data
*.FXR- FAM backup sync log file
*.FIM- Stores CSV import data headers
Connectivity factors in file extension
QuickBooks provides easy-to-use components for QuickBooks facilities tasks like adding, updating, development, seller information, and employee information, transaction, etc. QuickBooks will help you to access QuickBooks remotely, which includes QuickBooks attach component or free remote connector for QuickBooks utility:
These are the most frequently utilized and widely known extensions and file types used by QuickBooks desktop. It is essential for you to have an idea of as to what these extensions are and which file type they are related to. There are numerous different file types and extensions that are not mentioned in this piece of writing.
Therefore, be sure to check for the file related details prior to making changes to the file's name, edit or move any file stored on your network or storage. For more details, you can get in touch with our 24/7 professionals team with the help of our dedicated support line i.e. 1-800-761-1787. Our team will provide you with the most relevant information and will ensure that all your queries related to QuickBooks are answered in the best possible way.
FAQs
What is extension for QuickBooks Company file?
The Company file extension is QBW.
Which one is QuickBooks Company Backup File extension?
The file extension of Company file backup is QBB.
What is QWC file in QuickBooks?
QWC is "QuickBooks Web Connector". This file is made when web connector is opened.
What is the QBY in QuickBooks?
QBY is the extension for Accountant’s Copy Import File.
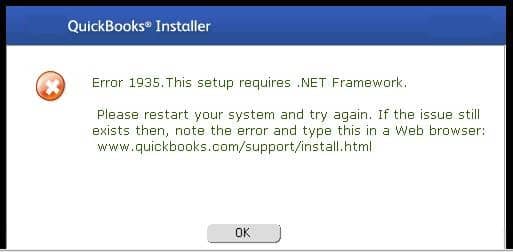
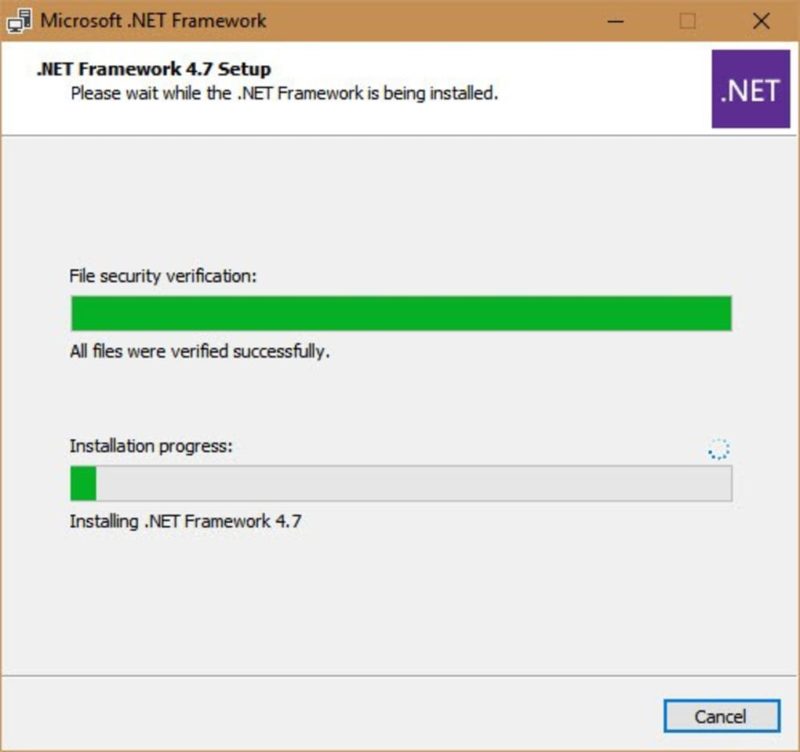
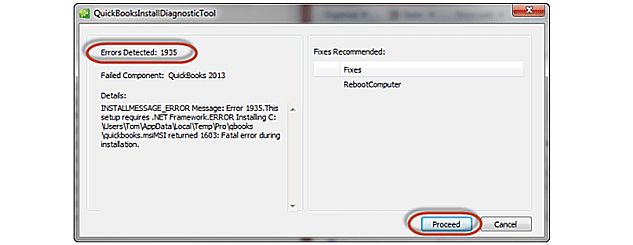
QuickBooks installer error code 1935 error usually occurs when a user tries to install QuickBooks or other programs running the Windows Startup. This error can also occur when you install Windows operating systems. While installing QuickBooks desktop or Microsoft .NET Framework, any of the below error messages might appear on the screen:
Error
Description
QuickBooks Installer
Error 1935: This setup requires .NET Framework.
Problem
Error 1935: An error occurred during the installation of assembly.
Many users consider this error to be among the most irritating errors to address. Understanding this, we have crafted this blog post for you, in which we will go over the various facts that surround this QuickBooks install error 1935. However, if you are short of time, then you can consult XpertBooks Pro error handling team. We are a hub of tech-savvy professionals, who leave no stone-unturned in providing the best possible support services to users.
What is QuickBooks Error Code 1935?
QuickBooks Error 1935 is an installation error that usually appears while installing QuickBooks or .NET Framework. It indicates that the installation process has failed due to missing components. Getting this error on your screen means that you require the .Net framework, an essential Microsoft component required for QuickBooks program to function properly. In the absence of this framework, you may receive various software issues, including error 1935.
When this error appears, you also receive a description that reads, “QuickBooks needs to be closed as it has faced a problem." This installation error is generally faced by Windows XP, Vista, Windows 8, Windows 10 and Window's 7 operating system users. This error does affect not only your ongoing work but also the other Windows applications such as Antivirus, Alchemy Catalyst, Pinnacle Studio, AutoCAD, and many Microsoft apps. Through this post, we are providing you with the steps to troubleshoot this issue and help you get rid of it on your own. Alternatively, if you are too occupied in other works to perform the troubleshooting steps yourself or want an expert to do that for you – contact our Certified ProAdvisor.
What are the causes of QuickBooks error 1935?
As we mentioned earlier, there can be certain possible factors that would lead to the QuickBooks error message 1935, which include the following:
Installation of hardware and software is incomplete
Windows system files have been deleted
.Net Framework got damaged somehow or hasn't been established yet
In case the .Net framework is outdated
How to Fix QuickBooks Error Code 1935?
In order to troubleshoot this error, below we have provided step-by-step instructions to rectify the error 1935 when installing QuickBooks desktop or .Net Framework.
Method 1: Activate Selective startup mode
The very first method is to activate the selective startup mode, which can be done by following the steps below:
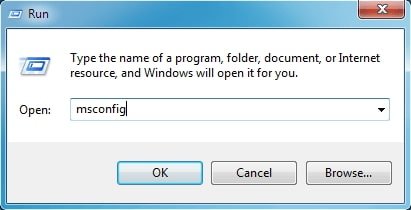
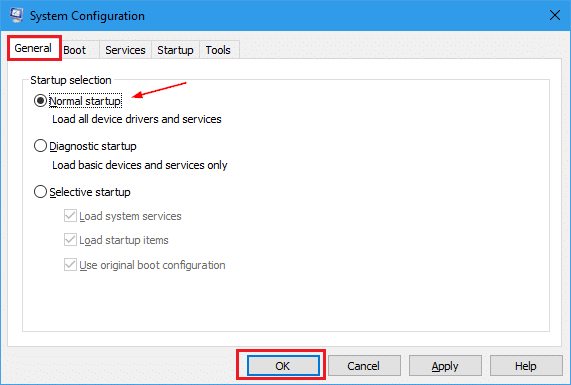
The very first step is to open Run command box by pressing Windows and R keys simultaneously.
And then, type ‘misconfig’ in the search bar and press OK.
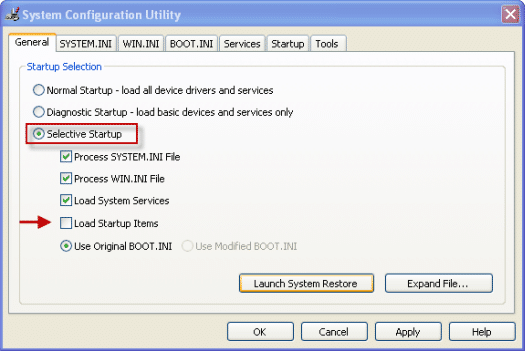
After that, hit a click on Startup > General Tab > Load System Services > Load Startup Items.
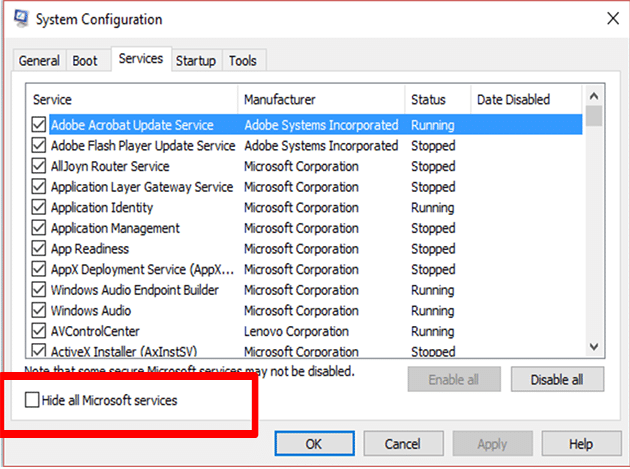
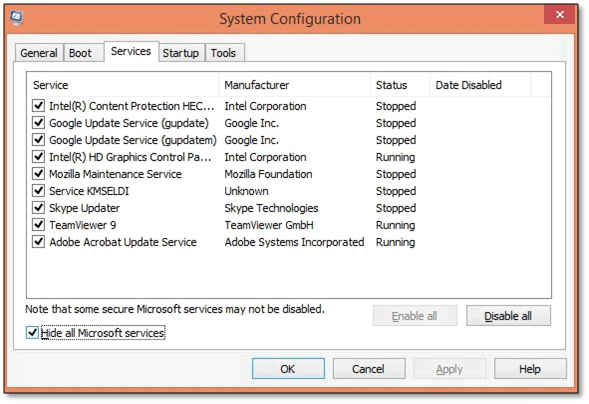
Next step is to press on ‘Services Tab’ option.
Once done with that, make sure to hit a click on ‘Hide all Microsoft services’ and ‘Disable’ option.
Followed by, unchecking ‘Hide all Microsoft services’ option.
Now choose the List of services and make sure that Windows Installer Checkbox is marked and click OK button.
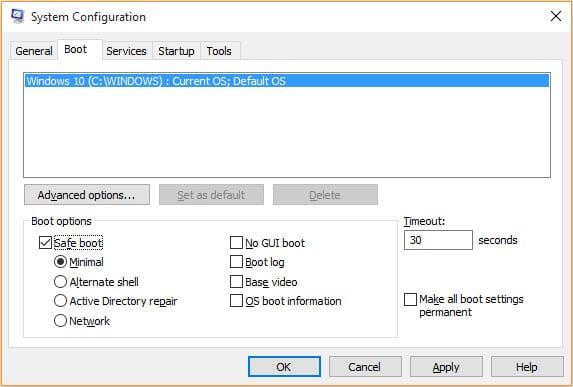
And further, hit a click on ‘Restart in the system configuration window’ and restart computer.
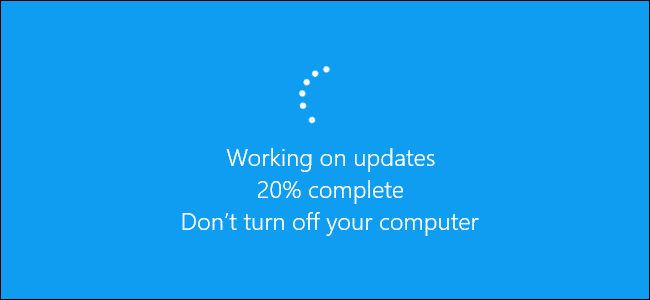
Updating the Windows operating system is also recommended, in order to fix the QuickBooks error 1935. As many times, the outdated Windows operating system might lead to such an issue. The steps to be followed here are follows:
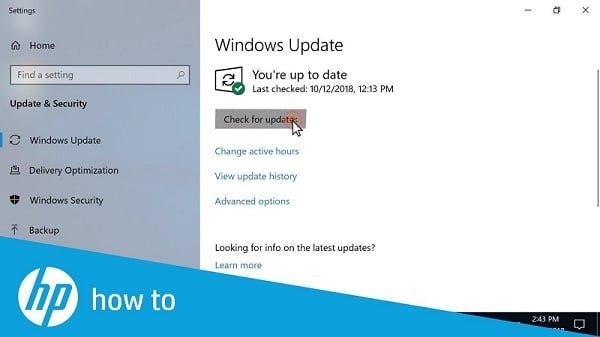
You need to first click on Start and enter ‘Update’ in the search box.
In the search dialog box, you will have to enter Update. And later, hit Enter tab.
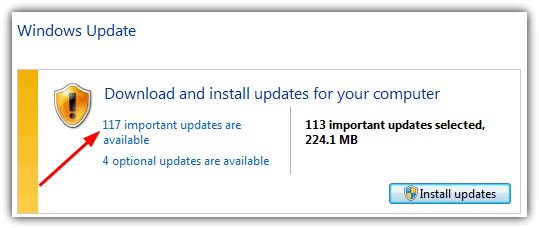
Here a Windows Update Dialog Box will appear.
If there are any updates required, click on ‘Install Update’.
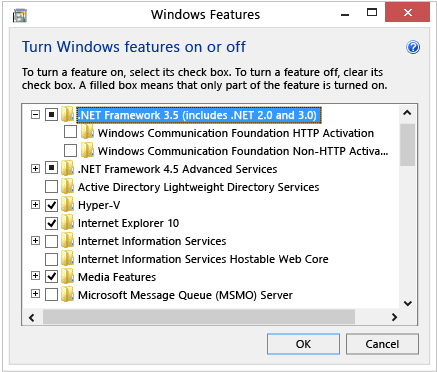
Method 5: Reinstall Latest .Net Framework
If you are not having the latest .NET framework, then you might have to reinstall the latest .Net framework. You can reinstall the latest .Net framework with the help of the below steps:
Restart the computer in which you had faced QuickBooks Install Error 1935 and redo the installation process.
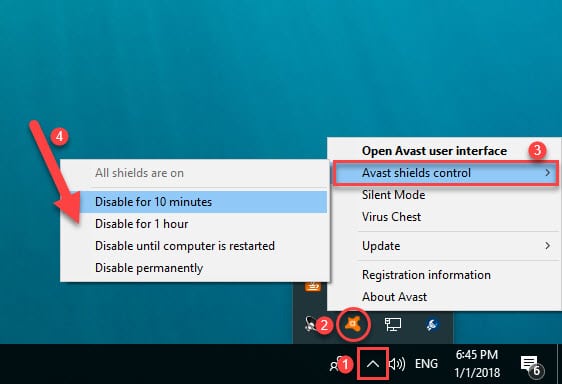
Make sure that you stop the anti-virus program during installation.
Install QuickBooks and .NET Framework.
Restart the anti-virus program once QB and .NET Framework are installed.
Method 6: Update Microsoft .Net framework to the latest version
Refresh Microsoft .NET Framework to most recent form.
Method 7: Run the QuickBooks install diagnostic tool
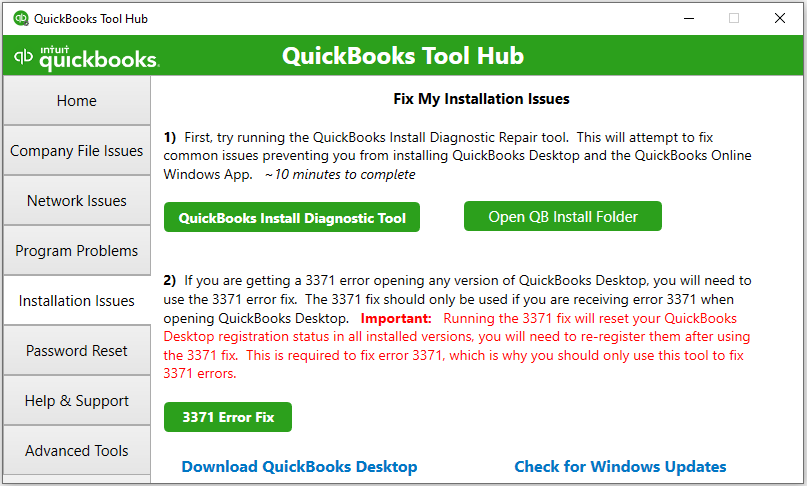
Running the QuickBooks Install Diagnostic Tool can also work in fixing the error code 1935. This tool works great in resolving the errors related to the installation of QuickBooks. The steps to be followed to use this tool are as follows:
Close your QuickBooks accounting software.
After that, you can download QuickBooks Tool Hub from the official site. Keep the file somewhere so that you'll be able to locate it easily.
NOTE: If you've installed Tool Hub before, you will be able to determine the version you're running. Choose from the Home tab. The version will be on the right side.
Open the file you have downloaded (QuickBooksToolHub.exe).
Follow the steps on screen to install and then agree to the Terms and conditions.
Once the installation is finished, double-click the Icon to the Windows desktop to launch your tool hub.
It will download the QuickBooks install diagnostic tool and save the file on the desktop where you can easily find it.
Now double-click on the QBInstall_tool_v2.exe file.
Also, close all programs in the background and run QBinstall diagnostic. This process will take 15 to 20 minutes as per your internet connection speed.
Once the tool is finished after the program is completed, reboot your system.
Finally, Install your QuickBooks desktop.
Method 8: Download and run QuickBooks Component Repair Tool
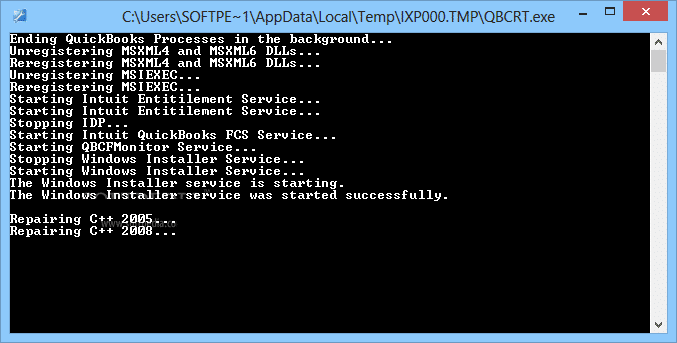
In case the above methods didn't helped in getting rid of the error, you can opt for QuickBooks component repair tool. It is a simple 3 steps process that can help you in fixing the error with much ease.
The initial step is to download 'QuickBooks component repair tool' from the official website of Intuit.
After that, run the QuickBooks component repair tool once it is installed.
And then end the process by turning off or restarting the system.
Method 9: Repairing the registry entries
Another method that one can opt for is to repair the registry entries. This method can work to fix the QB error code 1935. The steps to be followed in this are as follows:
The first step is to hit a click on the Start or Windows tab.
Then enter the command and avoid hitting Enter key.
Followed by pressing Ctrl+shift keys and then hitting the Enter tab.
In the next step, you will be redirected to the permission dialog box.
And then, hit on Yes. A command prompt window will appear.
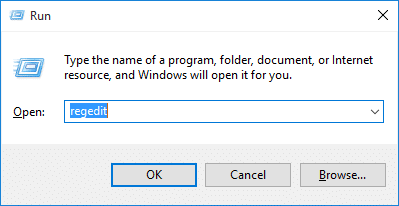
After that, in the command prompt windows and then enter the regedit command and press Enter key.
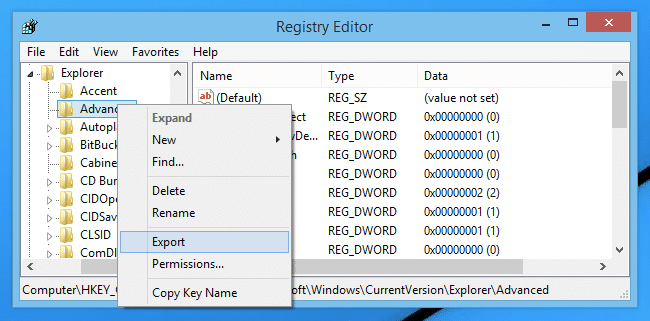
And also, in the registry editor, select the error 1935 associated key.
Under the File menu select the Export tab.
Now navigate to the save in list and then select the desired folder where you wish to create a backup of QuickBooks.
After that, visit the File name and then Enter the name of backup file.
Once done with that, move to the Export range tab and then ensure that you have chosen the selected branch.
And then, hit on Save option.
Followed by saving the file with .reg extension.
And to end the process, you will have to backup the QuickBooks registries.
Method 10: Uninstalling and reinstalling QuickBooks Programs associated with the error
For Windows 7 and Windows Vista users:
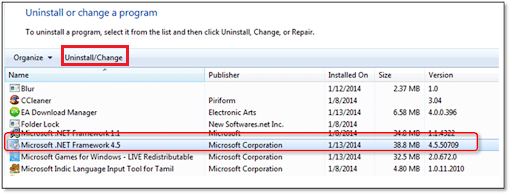
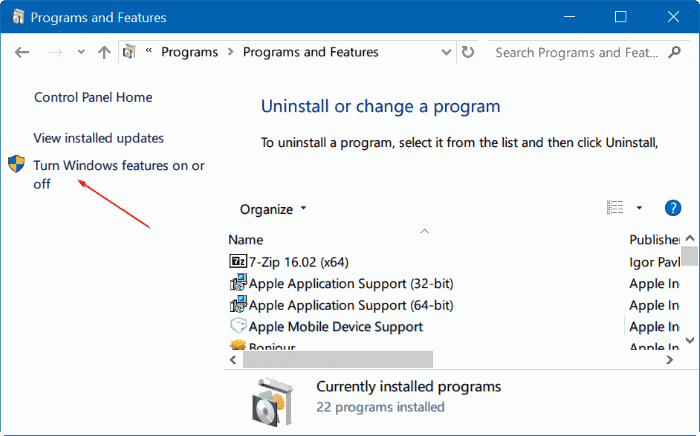
If you are a Windows 7 or vista user, then you need to click on Start or Windows tab, to open/access the Programs and features tab.
Then select the Control panel tab from the right side menu.
The next step is to choose Programs tab.
Followed by selecting the Programs and features tab.
Once done with that, you need to find the error 1935 associated programs in the name column.
And also, hit the QuickBooks associated entry.
Now, from the top menu, you need to hit onto Uninstall icon.
And you should carry out the on-screen instructions to uninstall the program.
Windows XP users:
At first, hit a click on the Start tab in order to open/access the program and features tab.
And then choose the Control panel tab from the right side menu.
Followed by selecting the Add or remove programs tab.
Once done with that, in the currently installed programs list find the error 1935 associated programs.
Now hit QuickBooks associated entry.
And finally hit a click on Remove icon.
Wrapping up!
That’s all for this blog post. We hope that find it informative and helpful and after trying these once your error is expected to vanish. In case you have any queries or the QuickBooks Error code 1935 still persists – you can contact our U.S. based accounting experts at 1-800-761-1787.
FAQ's
Do I need to update Windows to fix QuickBooks Error 1935?
Yes. Outdated Windows often causes this issue. Installing the latest Windows updates helps in repairing missing system files and ensures compatibility with QuickBooks installation.
Symptoms of QuickBooks Install Error 1935
Identifying the installation error code 1935 becomes easy for you, once you are thorough with the signs and symptoms. Here is a list of the possible symptoms of this error: 1. Error message appears- QuickBooks has faced a problem and needs to be shut down. 2. The Computer periodically freezes for a few seconds. 3. As you run a particular program, the computer crashes. 4. Windows run slowly and respond slowly as well. 5. This error comes up and crashes the Active Program window.
Can antivirus software cause QuickBooks Error Code 1935?
Yes, third-party antivirus and firewall programs can block the installation of QuickBooks. Temporarily disabling them during the installation process can help fix the error.
What tool can I use to repair QuickBooks Install Error 1935?
You can use the QuickBooks Install Diagnostic Tool, available in the QuickBooks Tool Hub, to automatically detect and repair issues related to installation errors.
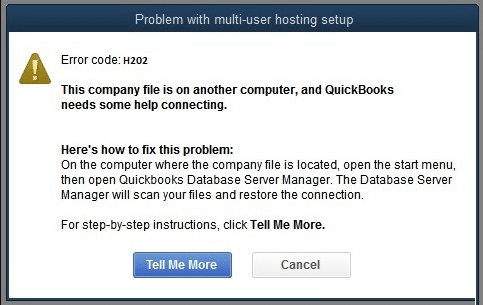
Are you annoyed by QuickBooks error code H202 while switching to the multi-user mode? Don't worry, we are here for your help. This error usually appears when a user try to use QuickBooks in multi-user mode or QuickBooks fails to open a company file that is stored on another system. Instead of opening the file, this error pops up an error message that indicate that "The multi-user connection to the server is blocked" or "Error H202: This company file is on another computer, and QuickBooks needs some help connecting." The H series of errors in QuickBooks are generally associated with hosting and network connectivity problems.
According to some users, they have received this error when trying to switch to QuickBooks desktop in multi-user mode. The error message that you receive with the occurrence of error code h202 denotes that the QuickBooks company file is located on a different computer and QuickBooks software requires some help in connecting to it. This multi-user mode error may also prevent you from opening a company file stored on another computer. If you a victim of this error, then we recommend you to fix it as soon as possible because it can lead to serious data damage. You can perform all the solutions provided herein or, alternatively, contact our error handling experts team. Our certified accounting professionals will provide you with the best possible support in resolving the error. Read this blog post till the end to learn about all the causes and troubleshooting methods to fix such an error.
What is QuickBooks Error H202 (Multi-User Switching Issue)?
Before you dig in deep and find out what factors are responsible for QuickBooks error H202, it is better to first find out what this error code is all about. This error indicates that the software cannot connect to the server computer hosting the company file. The error commonly appears when a user attempt to switch from single-user mode to multi-user mode. In simple terms, this error indicates that QuickBooks cannot reach the server due to damaged network configuration files, blocked communication ports or incorrect hosting settings. Also, such type of error generally seen, when a user attempt to access company file stored on another system. The error code comes up with an error message stating:
Error
Description
Problem
You are trying to work with a company file that is located on another computer, and this copy of QuickBooks cannot reach the server on that computer. (H202)
Problem with multi-user hosting setup
QuickBooks could not open the file in multi-user mode. (H202)
Error H202: when hosting company file on a non-Windows Server
This multi-user mode error may be triggered due to multiple reasons and at varied occasions. Many users have reported it that they received this error while trying to switch to multi-user mode from single-user mode or while opening a QuickBooks company file in multi-user mode. If you have also stumbled upon any such error code, then this article can be of great help to you. Herein, we have discussed all about to the QuickBooks error code H202, it’s possible causes, symptoms and few simple troubleshooting methods.
What are the causes behind to error H202 in QuickBooks?
A communication issue between your QuickBooks desktop and the server may be a major cause behind to this error. Below are some of the most common reasons that causes H202 error in QuickBooks.
Hosting settings are not configured properly.
Exchange of company data between QuickBooks and server is being blocked by the system firewall.
DNS settings are not inappropriately configured.
IP address of the Host or the server is not available to QuickBooks Desktop.
Important services like QBCFMonitor or QuickBooksDBXX are not running.
QuickBooks Database Server Manager might having some issues.
The Network file (.nd) is corrupted or damaged.
Ways to Resolve QuickBooks Error Code H202 Like a Pro
Before starting to perform any troubleshooting steps for QuickBooks error code H202, it is recommended to make ensure that you are logged into QuickBooks as an administrator.
Method 1: Ping your server from a workstation to check for network issues
Ping your server from a workstation to check the connection. Ping your server from each workstation getting error code H202
Step 1: Turn on Network Discovery on your server computer
At first, open the Windows Start menu on your server and workstations.
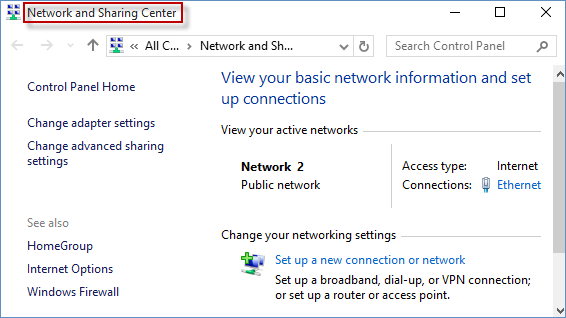
After that type Network into the search and open Network and Sharing Center.
Choose Change advanced sharing settings.
Now make sure that the Turn on network discovery opt is selected in the Network Discovery and File and Printer sharing sections.
Step 2: Get your server name from your server
Open the Windows Start menu on your server computer.
After that type Run into the search and open Run command.
Next step is to type CMD into the Run window, and then hit on Enter key.
Now type ipconfig/all into the CMD window, and then press Enter key.
Search the Host Name in the Windows IP Configuration section. Your server name is on the right.
Once you get it, write down the hostname, or copy it to a word document so you can access it quickly.
Step 3: Test network connectivity
Go back to your workstation to test the server. These steps can get complex for you, so you may reach out to an IT professional for help.
Open Run window by pressing the (Windows+R keys) in the system where you receive error code H202.
Then, type CMD in the box and click on OK button.
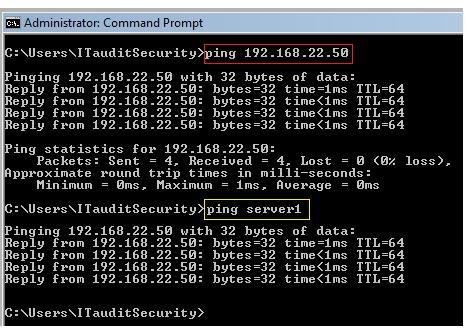
From your computer, ping your server.
Type ping_server name and hit the Enter key.
Perform the steps mentioned above on all the systems that receive the same error.
In case the response you receive is slow or you lost a packet, then there might be some issue with the network and a repair is needed.
Method 2: Verify QuickBooks services
If the server is running a full version of QuickBooks, you can follow the further provided steps to start multi-user hosting mode:
While on the server, open QuickBooks desktop.
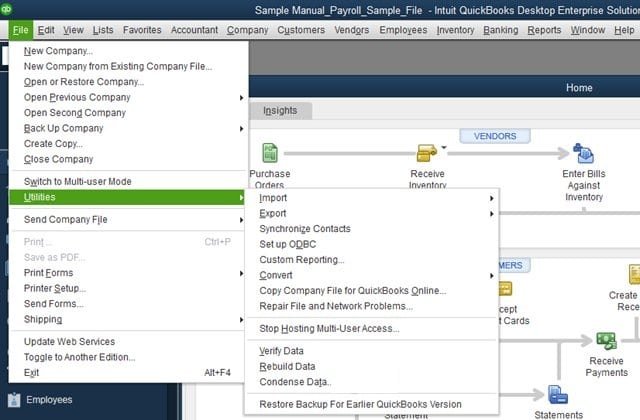
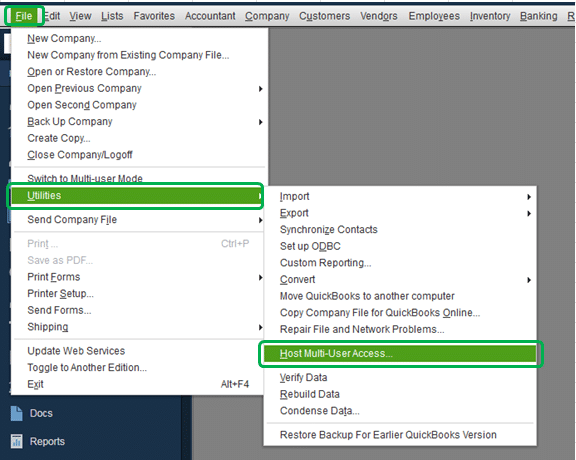
After that, navigate to File and then Utilities.
Now select Host multi-user access option.
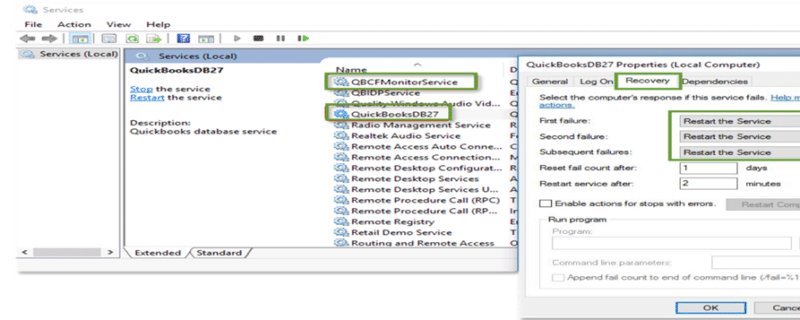
For verifying the running status of QuickbooksDBXX and QBCFMonitorService on the server, follow these given quick steps:
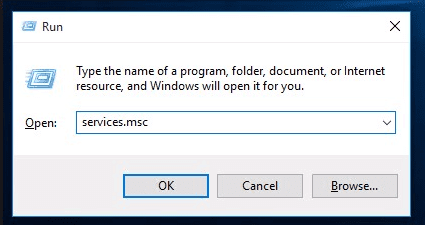
Open Run window.
After that type in services.msc in the text field and click on OK.
The next step is to select QuickBooksDBXX.
Also check the Startup type, if it is Automatic or not.
If in case the Startup type is not set as Automatic then do it now.
Check the Service status and ensure it shows Running.
Now click on Recovery tab and select it.
After that, navigate to the drop-down menus for first, second, and subsequent failures and select Restart the service of all these.
Now click on Apply and then OK button to confirm the changes.
Perform all the above-mentioned steps for QBCFMonitorService.
Method 3: Add the services QuickBooksDBXX and QBCFMonitorService to the admin group
Offer QuickBooksDBXX and QBCFMonitorService Windows admin permission on the server. If these services do not already have admin permission, then make sure they get it as this may also resolve QuickBooks error code H202. See if you can use the accounting software in multi-user mode. If not, move to the next step.
Method 4: Configure system firewall settings
Your system firewall may sometime block data exchange between QuickBooks and the server. In that case, you can perform the following steps to configure QuickBooks firewall settings to ensure unhindered communication between QB and the server.
Create exceptions in the settings of your System firewall.
Make changes to system firewall permissions and then open QuickBooks on all of the computers.
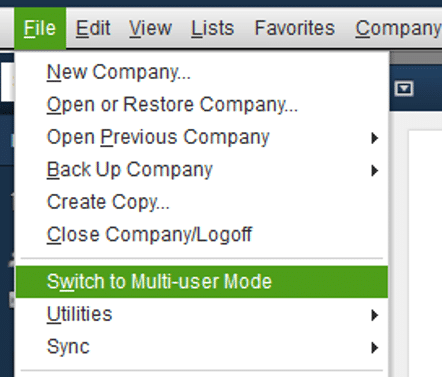
Then select Switch to multi-user mode option under the File menu.
Method 5: Run QuickBooks Tools Hub on your server
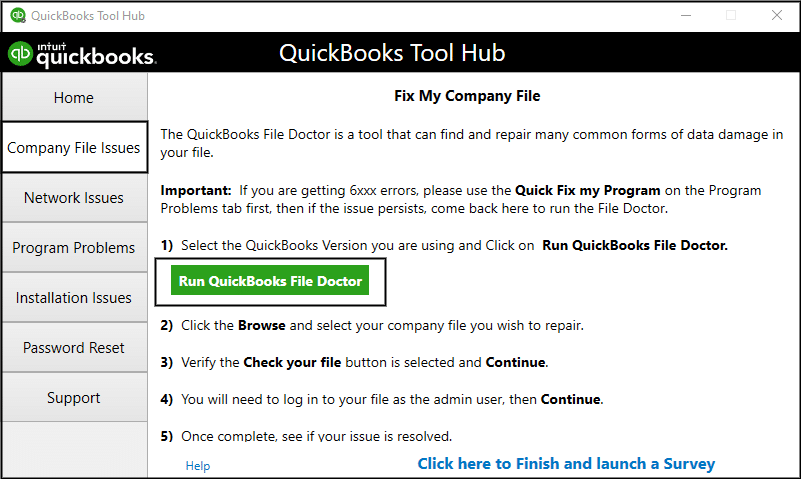
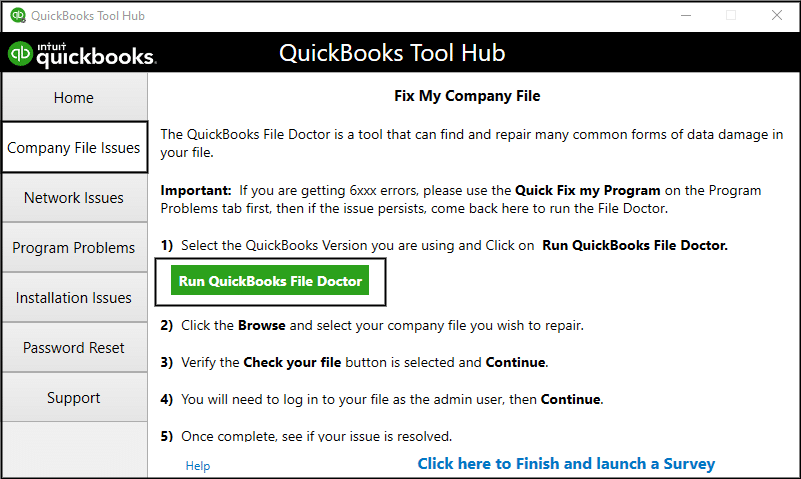
Step 1: From the tool hub program, Run QuickBooks file doctor
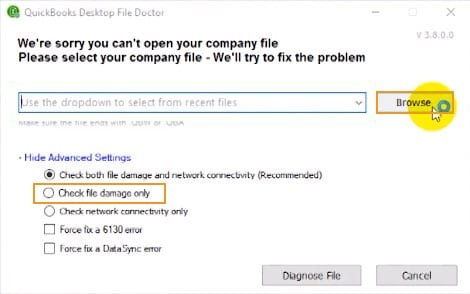
QuickBooks File Doctor is a reliable, troubleshooting tool by Intuit to diagnose and troubleshoot different types of errors such as Error H202, H101, H303 or H505. In order to use this tool, you must first download it (if not downloaded) from Intuit’s official website and run it. The steps involved in this process are as follows:
In the next step, click on Run QuickBooks File Doctor option.
Select the company file from the drop down menu. In case you are unable to identify the file, then hit Browse and search to find the file.
Once done, hit a click on Check your file and Network checkbox and then click on Continue.
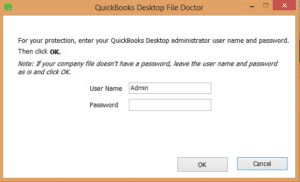
The last step is to enter your QuickBooks admin password and then tap on Next and OK.
Important Note: The scan time depends on the file size, and in majority of the cases, it might take up to 5 minutes. Once the scan completes, you are recommended to open QuickBooks software and the company file.
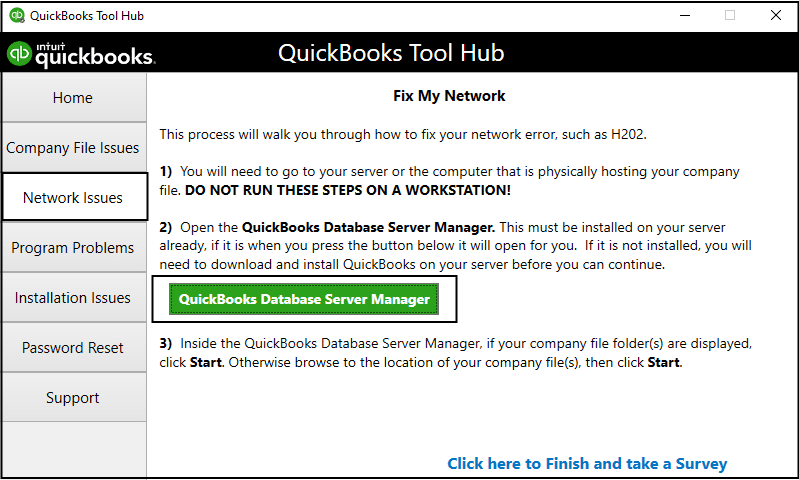
Step 2: Install and run QuickBooks Database Server Manager on your server
Launch the tool hub program and select Network Issues tab.
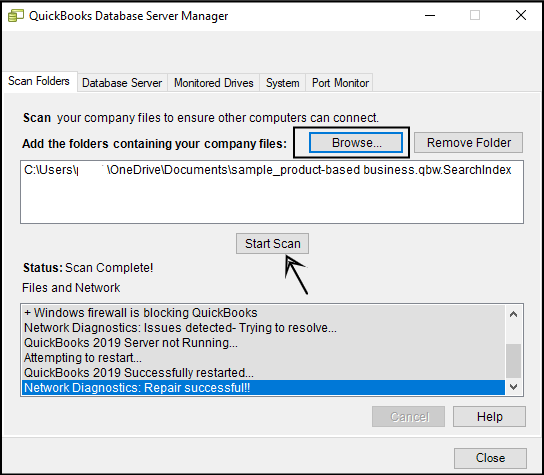
Look for the folder that has company files stored. You can also use the Browse feature to find this folder.
Now tap on Start Scan button.
QBDSM will repair your firewall settings automatically.
Once the scan is over, hit a click the Close button.
On each of the workstations on which the error appears, you have to open QuickBooks desktop.
Now go to the File menu and click on it.
After that, click on Switch to multi-user mode.
If you can use QuickBooks in multi-user mode now, then company file error H202 has been resolved. If the error persists, try using the the next solution.
Step 3: From the tools hub, use QuickBooks install diagnostic tool
Open QuickBooks tool hub on the server computer.
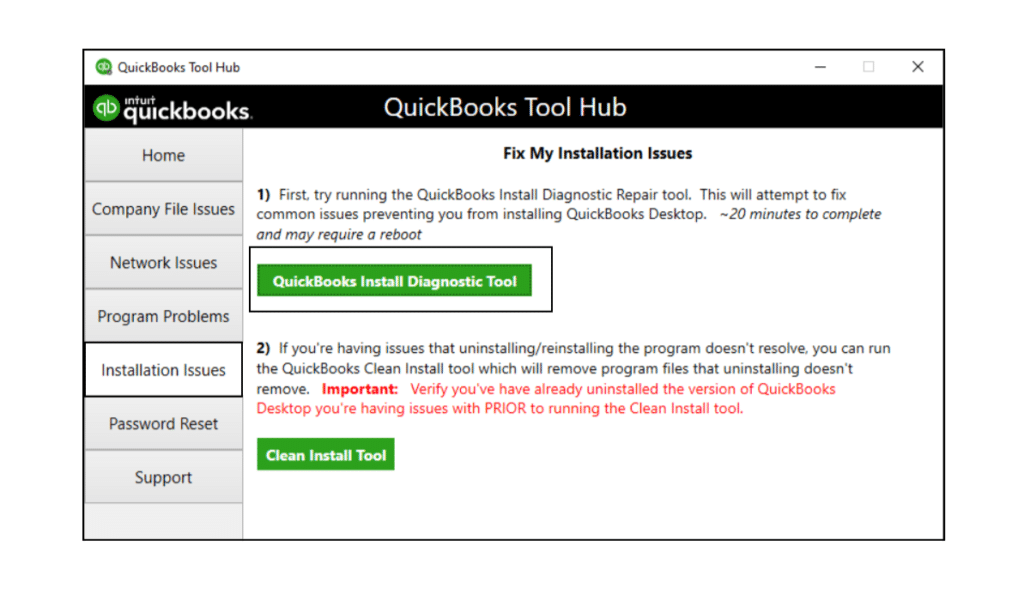
And then move to Installation Issues tab, from the tool hub.
Now select QuickBooks Install Diagnostic Tool from the options and let the tool run for few minutes. (Note: Most probably it will take up to 20 minutes).
Scan the folder, where the data file is situated.
After that note down the number of IP addresses and network interfaces.
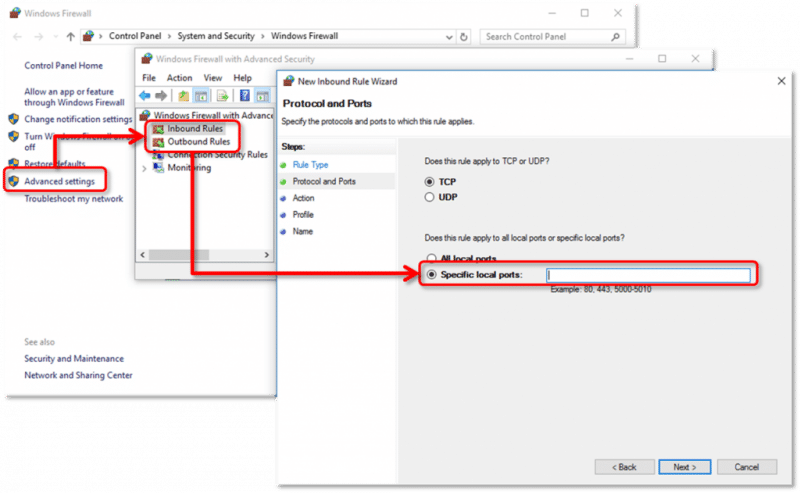
If the firewall status section has an Open ports tab, then enable the ports for QuickBooks.
Move on to Test the data file connectivity.
Method 6: Go to the Windows host file and add server
Close all Windows on your system.
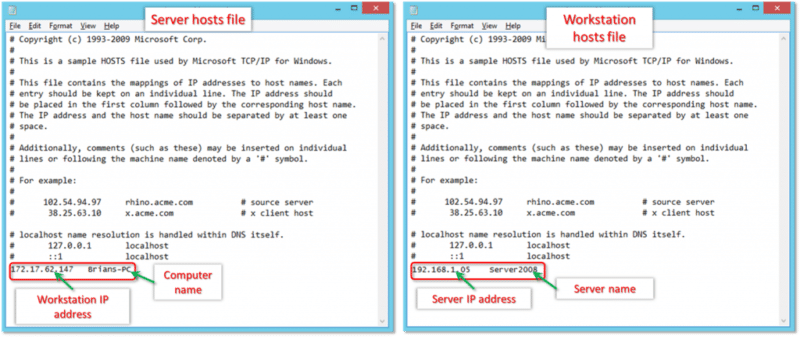
After that, go to C:\Windows\System32\Drivers\Etc or C:\Windows\Syswow64\Drivers\Etc on the server.
Click twice on Hosts file and choose Notepad upon being prompted for a program.
Manually type in the IP address and then the name of the computer. For the server, type the IP and name of the computer. For a computer, type the IP of the server and the computer name. In order to separate the computer name and IP address, press Tab key on your keyboard rather than the Space bar.
Now try to open QuickBooks in multi-user mode and check if QuickBooks error codeH202 is fixed.
Method 7: Create a new folder for the QuickBooks company file
This method requires you to create a new folder on the server.
After that, make changes in the permissions for this new folder and QuickBooks company files to be shared.
Now copy (CTRL+C keys) .qbw file to the new folder.
Lastly open your company file in multi-user mode.
Method 8: Use QuickBooks connection diagnostic tool
And then scan the folder storing the QuickBooks company files.
After that note down the IP address that shows up when the connection diagnostic tool is running.
Next step is to Configure the firewall ports as instructed by the diagnostic tool.
Follow the further instructions of the connection diagnostic tool.
And lastly try opening company files on the system in which the H202 error showed up.
Method 9: Change the company file location
Create a new folder, preferably in Drive C: on the system, to store the company file.
After that choose the company file and the .TLG file from the Existing company file folder and then press Ctrl + C keys to copy.
Go to the New company file folder and press Ctrl + V keys to paste the company file.
Check if you can open the file in the Multi-user mode.
Method 10: Edit the QBGlobalAppConfig.ini file on the Fedora Linux Server
If the above provided methods didn't able to resolve the QuickBooks error message H202, the try method number 10. You need to edit QBGlobalAppConfig.ini file on the server. Here's how:
Under this method, open Linux Terminal Window and also open QBGlobalAppConfig.ini file.
Then check the Default range for ports and delete any spaces before and after the (=) equal sign.
QuickBooks 2019 doesn't have any static Firewall Ports: The ports are automatically renewed once you can run the company file in the database server manager.
Method 12: Setting hosting to local files
You need to ensure that no other client system is trying to host the same company file. The steps involved in this process are as follows:
Launch QuickBooks software and then press F2 key to open the product information window.
On the lower left corner, select Hosting to reflect local files only under local server information.
Method 13: Opening Windows control panel
Close QuickBooks on all the systems. QuickBooks repair can be done on all systems at the same time.
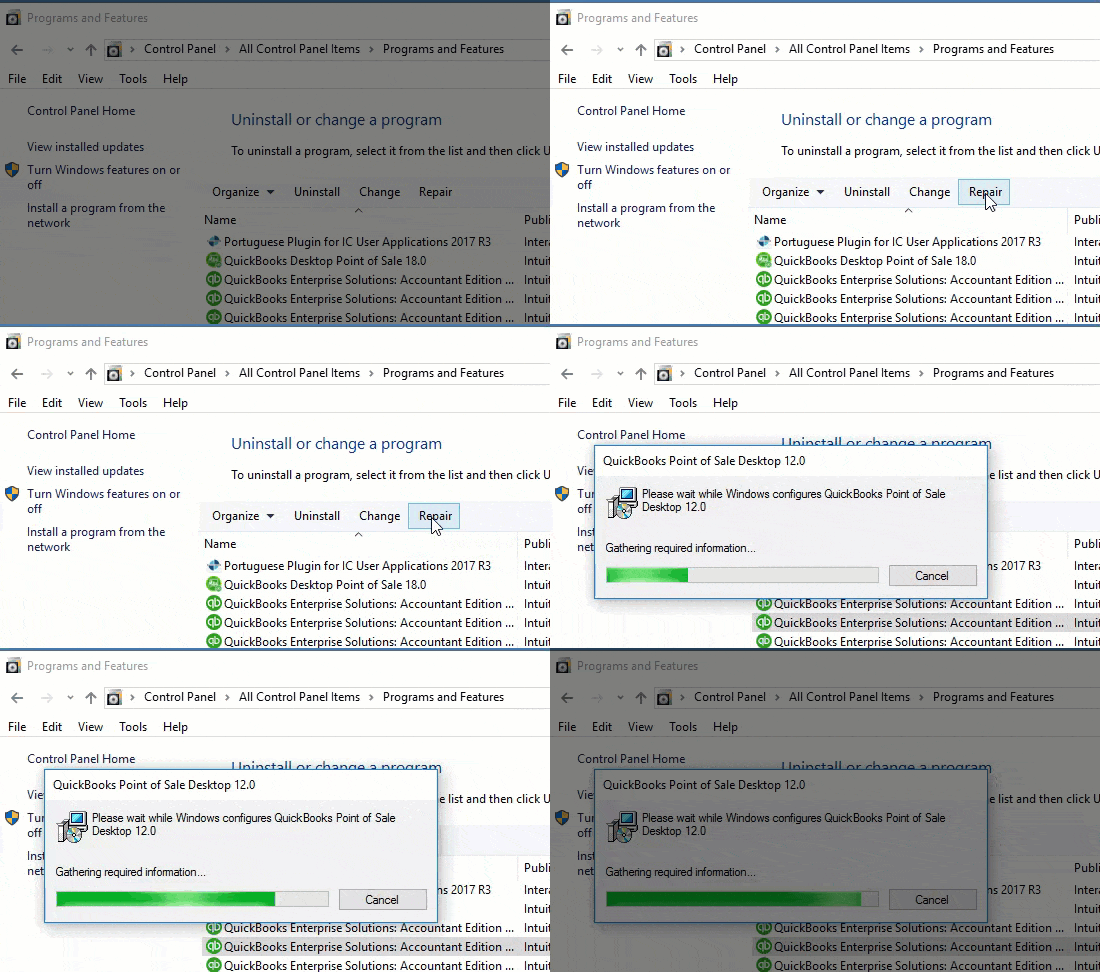
Then open Windows control panel and also choose Programs and features.
Choose QuickBooks and click on Change and repair from the list of installed programs.
Now permit all the positive options throughout QuickBooks software repair
Try opening the company file for checking if the problem fixed successfully.
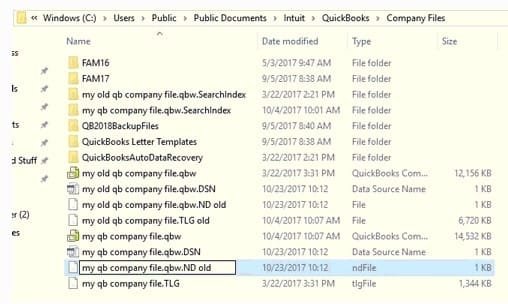
Method 14: Renaming the .TLG and .ND files
You simply have to close your QuickBooks desktop.
Open the company file folder on the server system.
Look for and opt for .tlg file associated with QuickBooks file having error.
Right-click the Tlg file and select Rename option.
For changing the name, prefix ''.old'' before the file name and hit Enter key.
Try similar steps for the Network (.Nd) file and close the folder.
Once you have performed these steps, the .nd and .tlg files will be created automatically.
Open the company file by pressing the Alt key till the file opens.
This would hopefully resolve all the issues.
Conclusion!
If you have any doubts or query or the QuickBooks Error code H202 still persists in your software even after performing all the troubleshooting methods provided in this post, then you can contact XpertBooks Pro professionals team by dialing 1-800-761-1787. We know that such errors may be pesky and hamper your work progress and productivity. That’s why we use advanced tools and evolving technology to save the time and money by providing you with quick and precise accounting solutions without any hassle. We have all your tech needs covered – 24/7, 365 days a year.
Common FAQ's related to this error
Is it safe to move my company file for troubleshooting?
Yes it is, you need to make sure that you have copied both the .QBW and .TLG files together and always back up your data files before making changes.
Does antivirus or third-party security software cause H202 errors?
Yes. Such software can block QuickBooks services or required network ports, causing communication problems. If required, try temporarily disabling the software or adding permissions for QuickBooks executables and ports.
Which services are critical for resolving H202?
QuickBooksDBXX and QBCFMonitorService must be set to Automatic and Running on the server; setting Recovery to “Restart the service” for first/second/subsequent failures helps keep them alive.
Why does H202 happen only on workstations?
QuickBooks error code H202 encounters if the workstation is trying to reach the server’s company file path but unable to reach there. It happens because the hosting is enabled on a workstation or it required services are not running on the server. Another major reason can be if the security/network rules are blocking the traffic.
What are the Signs and Symptoms of QuickBooks Error Code H202?
Following are the common symptoms of the Multi-user switching error code H202 in QuickBooks: 1. You are not able to switch to the multiple-user mode. 2. You can’t open a company file located on another computer. 3. An error message pops up on your computer screen. 4.QuickBooks has gotten slow and freezes or stopped working for a few seconds while using. 5. Your Windows computer is running very slowly.
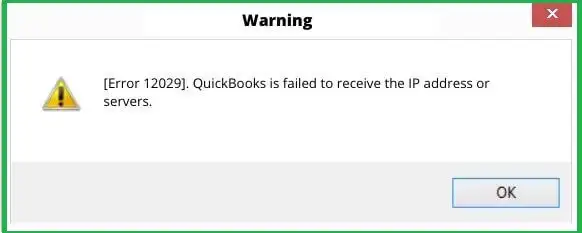
Are you tired of running into technical snags and glitches while using QuickBooks ? QuickBooks error code 12029 is one such update error that often interrupts your workflow. It is basically a network time-out error, which means the accounting software is not able to get an IP address, and the servers are connected through a weak connection. This error occurs when the backend servers are unable to revert to QuickBooks within the allotted time interval.
Another common situation when this error pops-up on the screen is when you try to update QuickBooks desktop or payroll. To get a better grip on this error, it is highly recommended to scroll through the segment carefully. However, fixing errors isn’t a cake walk, and so you can get on a call with our tech personnel using the helpline, i.e., 1(800)761-1787. Our independent accounting professionals will be more than happy to assist you.
Error description: “QuickBooks is failed to receive the IP address or servers”
Software: QuickBooks
Quick Fix: Update QuickBooks Software to latest
What drags you to QuickBooks error code 12029?
Now that we have explored the basic information regarding the QuickBooks error code 12029, it is now time to find out what leads to this error code. It should be noted that there are internal as well as external factors that might lead to such type of error. Let us have a look at both of the causes one by one.
External causes
First external cause of Error code 12029 is downloading the QuickBooks payroll update.
Your firewall or internet security blocking QuickBooks from accessing the server.
If the default browser is not set a Internet explorer.
In case your internet plans have expired, then get ready to face this issue.
Incorrect SSL settings.
Internal causes
QuickBooks software itself fails to connect to the internet.
You can try performing the below set of steps to successfully get rid of the QuickBooks error code 12029.
Method 1: Testing connectivity and settings
It should be noted that the Internet explorer is used by QuickBooks software to access the internet, which makes it important for you to set the internet explorer as the default browser. So, you need to carry out the steps below:
Initially, close the QuickBooks software and then open the Microsoft IE.
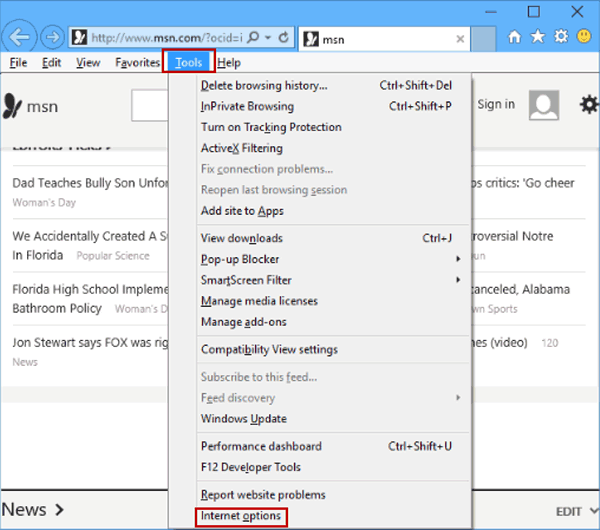
After that, visit the Tools tab or press Alt Key.
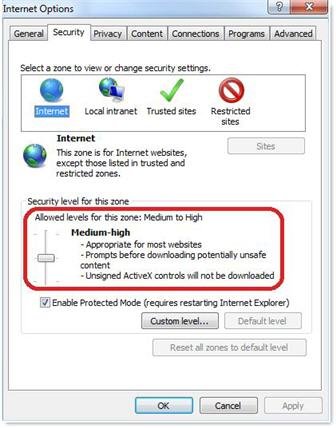
Next, open the Internet options and spot the Security tab.
Look for the Globe symbol and then tap on the same in the Security tab window.
Ascertain that the Security level is set to Medium-high.
Now look for the Connections tab.
If the dial-up node is not used, select the Never dial a connection. Or if you uses the dial up node, then choose Correct internet service provider.
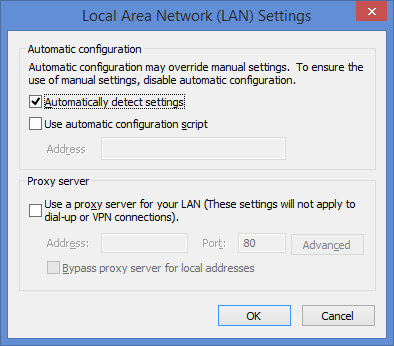
Tap on OK and then move to the LAN settings.
Look for the Automatically detect settings tab.
Now search for the Proxy server checkbox.
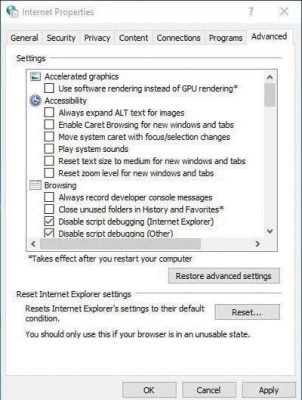
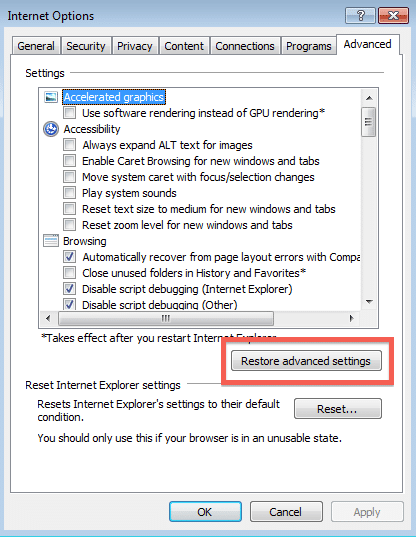
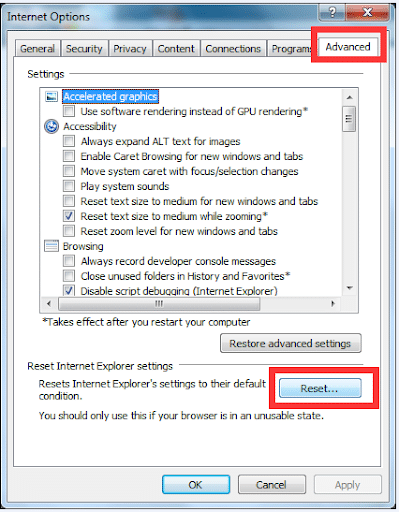
And then, hit on OK and then move to Advanced tab.
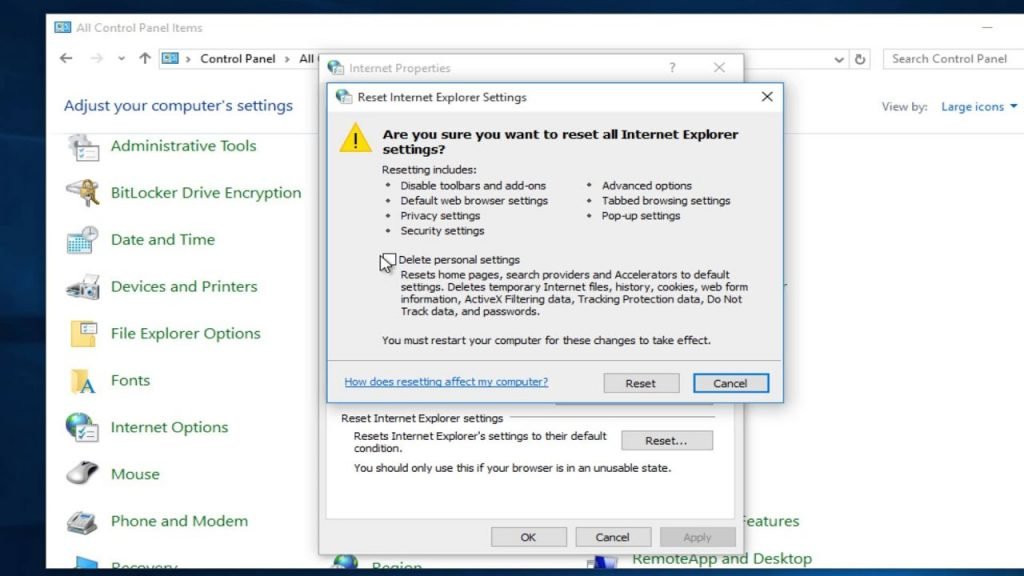
Go for the Restore advanced settings.
Pick TLS 1.2 and hit on OK button.
End the process by closing internet explorer and rebooting the system.
Download and run the TLS 1.2 utility.
Find out whether the is set as the Default browser or not.
The point to be noted here is that, if you are unable to access a secure website outside QuickBooks, then you might be needed to consult a computer or IT expert.
Method 2: Check the security settings of the Antivirus and Firewall
In case the above method fails to work, it is recommended to determine whether some another security software is preventing the download process or not. This issue might occur due to the antivirus or the firewall settings. As sometimes, the security software blocks the software from connecting to the server. In such a case, you are required to check and fix the settings, so that you can favor the payroll update process in QuickBooks. The steps involved in this process are as follows:
Method 5: Open Windows in Safe Mode and the Update
It should be noted that starting Windows in safe mode can help the QuickBooks users in fixing the QuickBooks error 12029. The steps involved in this process are as follows:
Press the Windows + I keys on your keyboard.
Move to the Update and security and then click on the same.
The next step is to hit a click on Recovery option, followed by moving on to the Advanced startup.
Now make sure to carry out the instructions carefully and then select appropriately to reboot the system.
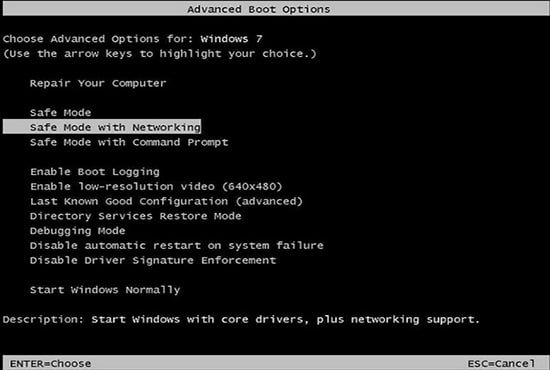
During restarting the system, press the F8 key repeatedly to witness an option to open the system in Safe mode with networking.
Check if the error still persists.
Method 6: Re-configure QuickBooks payroll and Reboot the updates
You can reconfigure QuickBooks payroll and reboot the updates, if none of the other methods worked. The steps involved in here are:
Unplug the Wireless router or the Internet switch and wait for around 10 seconds.
Turn on the Wireless router or internet switch and check the Internet latency now.
Now open the QuickBooks and then the company file.
Once done with that press Ctrl + K keys from the keyboard.
Followed by clicking on Edit option.
Un-check the open Payroll setup.
You will have to wait till the process ends, and the payroll updates will continue on their own.
Method 7: Configure SSL settings for internet explorer in QuickBooks
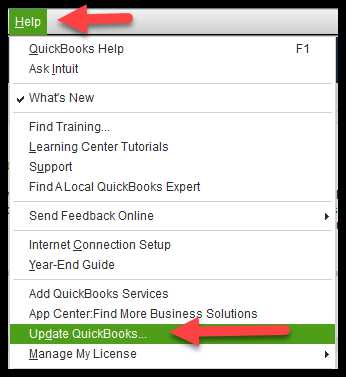
In case you are unable to update payroll, you can start QuickBooks and move to the Help menu and select Internet connection settings. And then, ensure that QuickBooks uses the Internet connection of the system. Also, click onNext and then the Advanced connection setting.
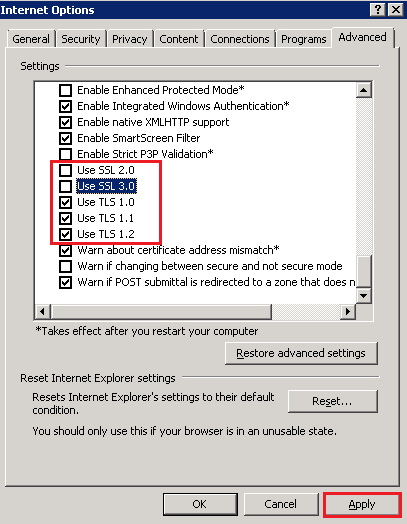
You need to check internet properties and then click on the advanced tab:
Firstly you need to verify that the Use SSL 2.0 and use SSL 3.0 are verified.
Choose the Connect tab and then the OK tab.
Now close the QuickBooks software and restart it.
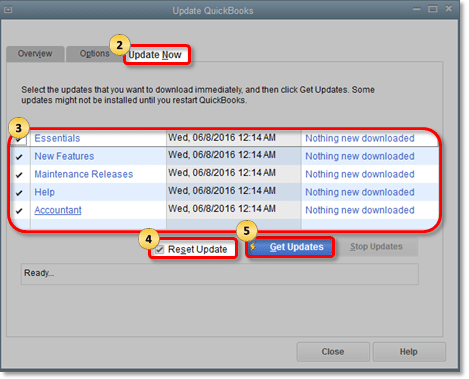
At last, hit a click on Help menu and Update Now tab.
Configure SSL settings internet explorer outside of QuickBooks
Initially, open Microsoft Internet Explorer browser.
Move to the Tools and select Internet options.
Next, tap on the Advanced tab.
After that select the SSL 2.0 and SSL 3.0 checkboxes that can be found in the security.
Click on Apply and OK to close the current window.
Method 8: Rectify system time and date
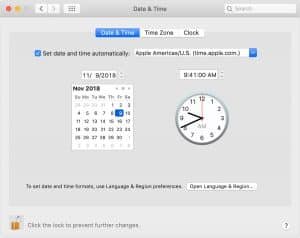
Hit a right-click on the time in the bottom right corner of the taskbar.
After that click on Adjust Date/Time.
Check the Time zone is correct. If not, then click on Change Time zone.
Now choose your time zone and hit Enter key.
Also, check if the Time and date are correct. If they need adjustment, then click on Change date and time option and set the correct time and date and press the Enter key.
Now, re-open QuickBooks and check if the error code 12029 got fixed.
Alternate solutions you can try to resolve QuickBooks error 12029
Reset the QuickBooks updates and attempt to Download and install the QuickBooks update, after restarting the system. Also, ensure to open the company file in single-user mode.
So this brings us to the end of this article. We hope you find it informative and carrying out the troubleshooting steps that we have enlisted here helps you fix the issue. However, if the QuickBooks error message 12029 still exists or reappears by any chance, you can contact our XpertBooks Pro team. We boast a team of accounting consultants, who work round the clock to provide our customers with the best possible solutions through their years of expertise and training.