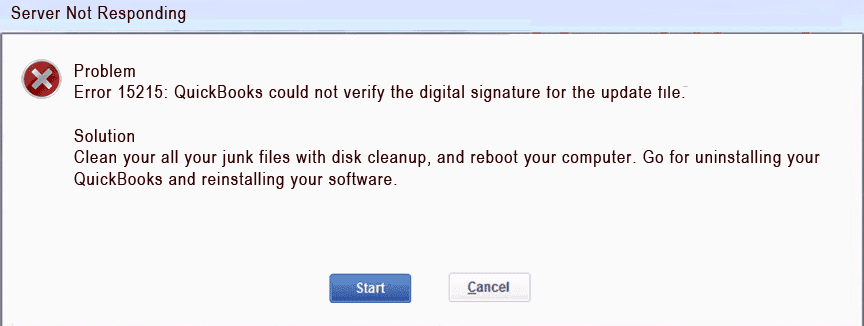
Have you come across QuickBooks error code 15215? Well, it’s a common error code that usually occurs while updating QuickBooks to the latest version or when downloading the payroll tax table updates. This error mainly appears on the screen while performing payroll updates or during maintenance release. According to some users report, they have experienced this error when QuickBooks was unable to verify the digital signature of the update file because of firewall restrictions, internet connectivity issues or incorrect Internet explorer settings. Upon receiving this error, the server error message may stop receiving or you may only have limited access. When this error takes place, you may see the following error message on your desktop screen:
There can be several other aspects related to this error message. Therefore, we have created this informative guide to provide all the necessary information about QuickBooks payroll update error 15215, including its symptoms, possible causes and effective troubleshooting solutions, which will be discussed later in this article. However, if you are not good in technical aspects, then you can also get in touch with our XpertBooks payroll experts team and ask them to resolve this error for you. We own a team comprised U.S based certified accounting professionals who will surely resolve the payroll error codes and various other accounting related issues within least possible time.
What is QuickBooks Error 15215?
QuickBooks error 15215 is a common error code that comes under the payroll 15XXX series of errors. This error can be seen while downloading QuickBooks desktop updates or payroll tax table updates. It occurs due to any kind of conflict with another application running in the system or any damaged QuickBooks components. If the application or software running in the background application might be using excessive bandwidth, ending up in this error. This error can also trigger if the firewall setup blocks the software from connecting with the server. When this error encounters, the following error message and description can be noticed:
Problem
Description
Error number:
Error Code 15215
Description:
Unable to verify digital signature / Incorrect Configuration of Microsoft Internet Explorer
Server Not Responding.
QuickBooks could not verify the digital signature for the update file.
Developer:
Intuit QuickBooks Inc.
Applies to:
Windows XP, Vista 7, 8, 10 & 11
Possible Solution
Clean junk files using disk cleanup, uninstall and re-install QuickBooks.
What are the major causes behind to Payroll Error 15215?
One or more of the following reasons may cause error code 15215 in QuickBooks Payroll:
In case QuickBooks file copy service (FCS) is disabled.
Incorrect configuration of Microsoft IE.
If any file being downloaded during the update process is unable to verify.
In case there is any damaged payroll update components.
Windows is virus or malware-infected.
Also, incorrect setup or damaged download of QuickBooks desktop can also lead to this error.
Now that we have explored the symptoms and causes of the ongoing error, it is time to find out effective solutions. In order to troubleshoot QuickBooks error code 15215, you can follow any of the below given methods:
Method 1: Login as the system administrator
Start off with ensuring that your QuickBooks desktop is closed.
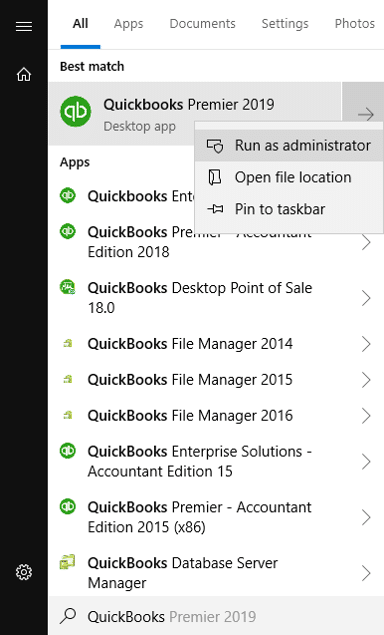
Right-click on the QuickBooks icon and select Run as Administrator.
Now click on Yes upon receiving the message – "Do you want to allow this program to make changes to the computer?"
Retry downloading the payroll or QuickBooks update again
Then install the Tool Hub on your system by following the on-screen instructions carefully.
Next step is to accept the License agreement and complete the installation process.
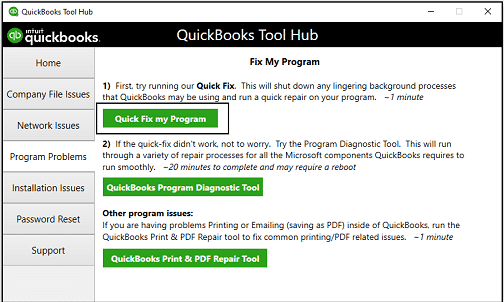
Now launch the QuickBooks tool hub program.
Once done, navigate to the Program Problems from left side menu.
Select the Quick Fix My Program option.
This tool will take sometime (depending on system performance) to diagnose the problem.
Once the repair finishes, open QuickBooks and check the error is solved or not. If the error still remains unsolved then move to next solution.
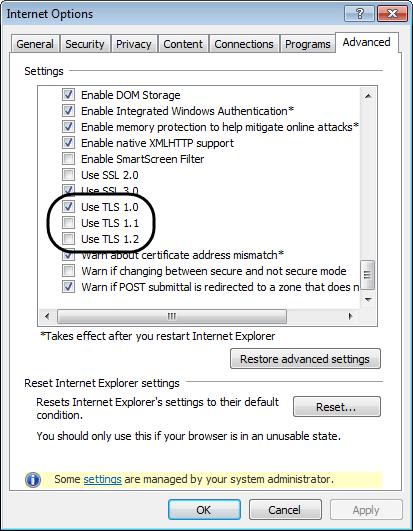
Method 3: Verify Internet Explorer TLS Settings
In this method you need to verify that TLS 1.0 is checked, and TLS 1.1 and TLS 1.2 are unchecked in the Internet Options window of Internet Explorer. Follow the given steps:
You need to reboot your systems in the Selective startup mode to rectify such errors.
Close your QuickBooks Desktop.
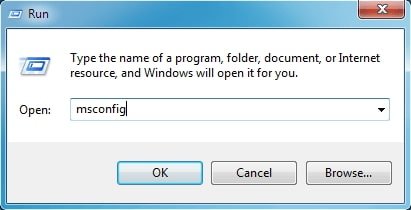
In the system, open Run Window.
For Windows XP: You need to click on Start and then Run icon
For Windows 7 and Vista: You are supposed to click on Start and All program tab. Also, click on Accessories and Run tab.
Further, for Windows 11, press the Windows + R keys together.
Open Run window (Windows + R keys) and type MSConfig. And hit OK button.
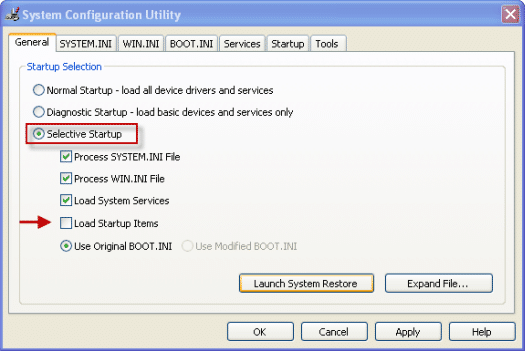
The System Configuration Utility opens. Just Allow the configuration window to open.
Choose Selective Startup and leave the box before Load Startup items unchecked.
Hit a click on Save and then the OK button.
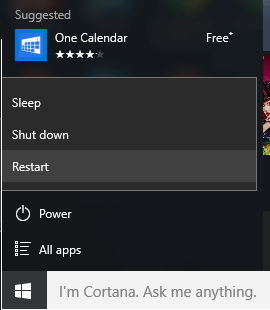
Now restart the computer.
Once the restart is successfully done, hit double-click on the QuickBooks icon to open it and download the current tax table.
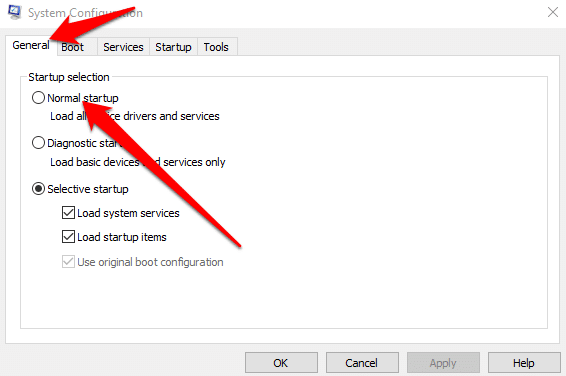
Follow the previous steps (from 1 to 4) and then Open System Configuration Utility (Open Run Window and type MSCONFIG).
Check the Normal Startup box and tap on OK button.
End the process by restarting the computer for changes to take effect.
This action ensures that the system functions in a normal working environment. In case there are items that you want to remove permanently, then you might need to go to the Microsoft website and look for how to clean boot Windows.
In case you were successfully able to download the update by clearing the startup items, then this will indicate that one or more of the program in the startup items are conflicting with downloading the QuickBooks desktop payroll update.
Method 5: Restart the system
Another method that you can implement in order to get rid of error 15215 from QuickBooks can be to reboot the system. At times, restarting the system works in fixing a few of the bugs, especially the errors related to the internet, network, or printing.
However, if the method fails to fix the issue and you are still getting the same issue on a recurring basis, then make sure to stop all the background applications or jump to the next method.
Method 6: Ensure that the firewall isn’t blocking QuickBooks
At times, the system firewall might block the QuickBooks software from accessing the server. So, it requires to be configured, and the steps involved in this process are as follows:
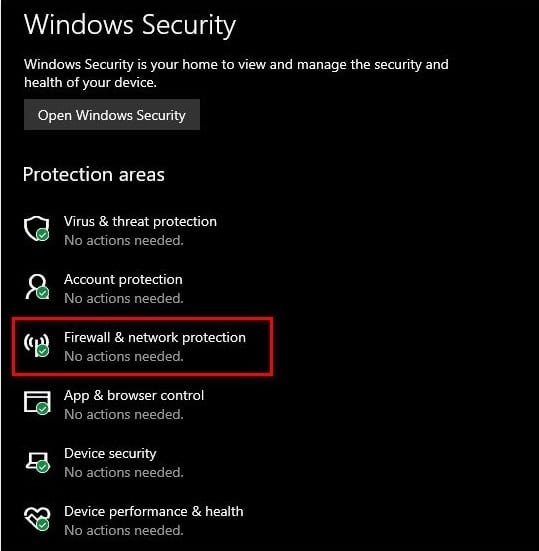
Start with clicking on Control Panel from the Start menu.
Further, click on the system security, followed by opting for Windows Firewall.
Select the view to Large or Small icons and then select Windows firewall instantly.
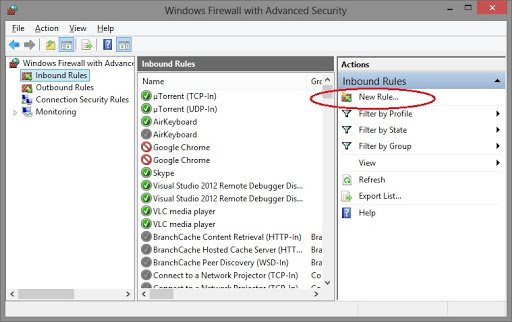
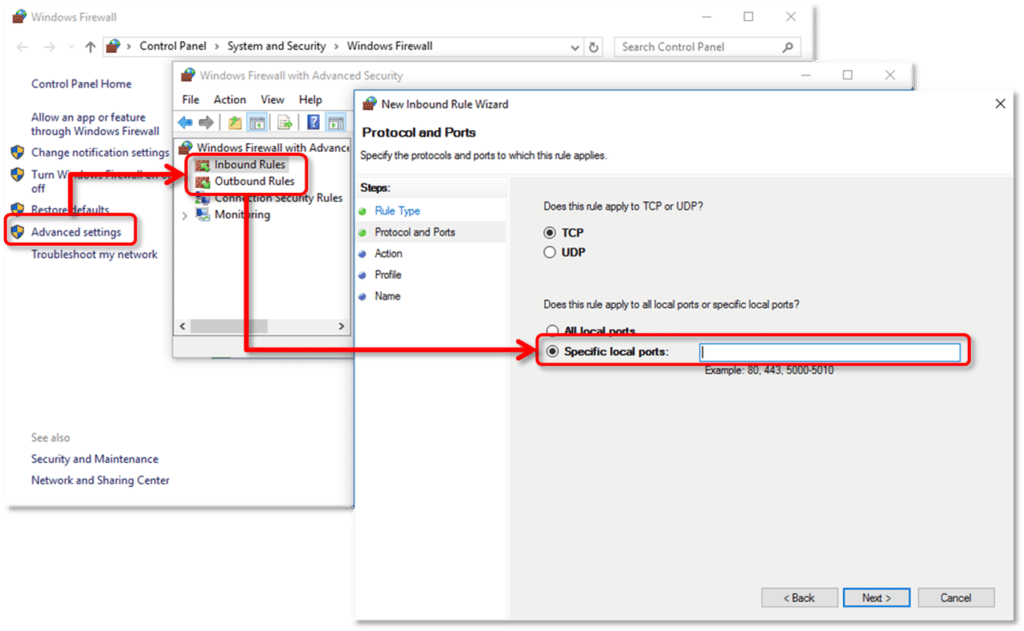
Choose the Advanced settings option, and then in the left section of the screen, highlight the Inbound rules.
Right-click the Inbound rules, and along with that, hit the New rule option.
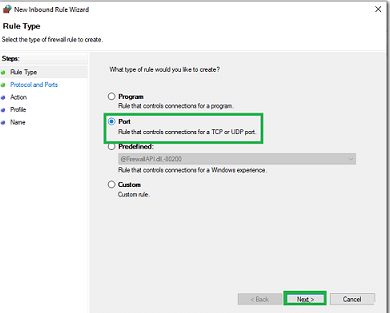
Once done with that, select Port from the Rule type section.
From the first set of radio buttons, click on Specific local ports.
Ensure to separate by a Comma and then click on Next once done.
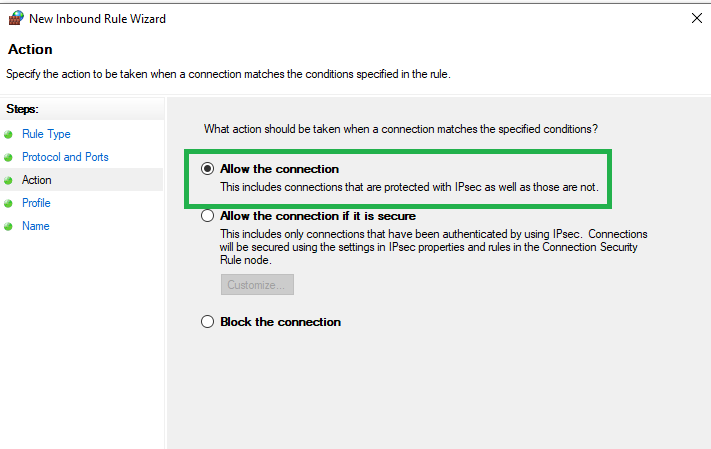
Then hit click on Next and then choose Allow the connection.
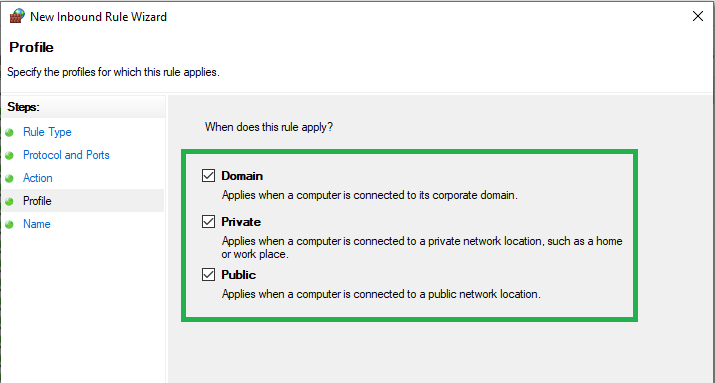
Also, select Network type, if this rule is to applied.
Now, make sure to keep all the options checked before clicking Next, especially when switching from one network connection to another quite often.
Ensure that you need to repeat the same steps for Outbound rules.
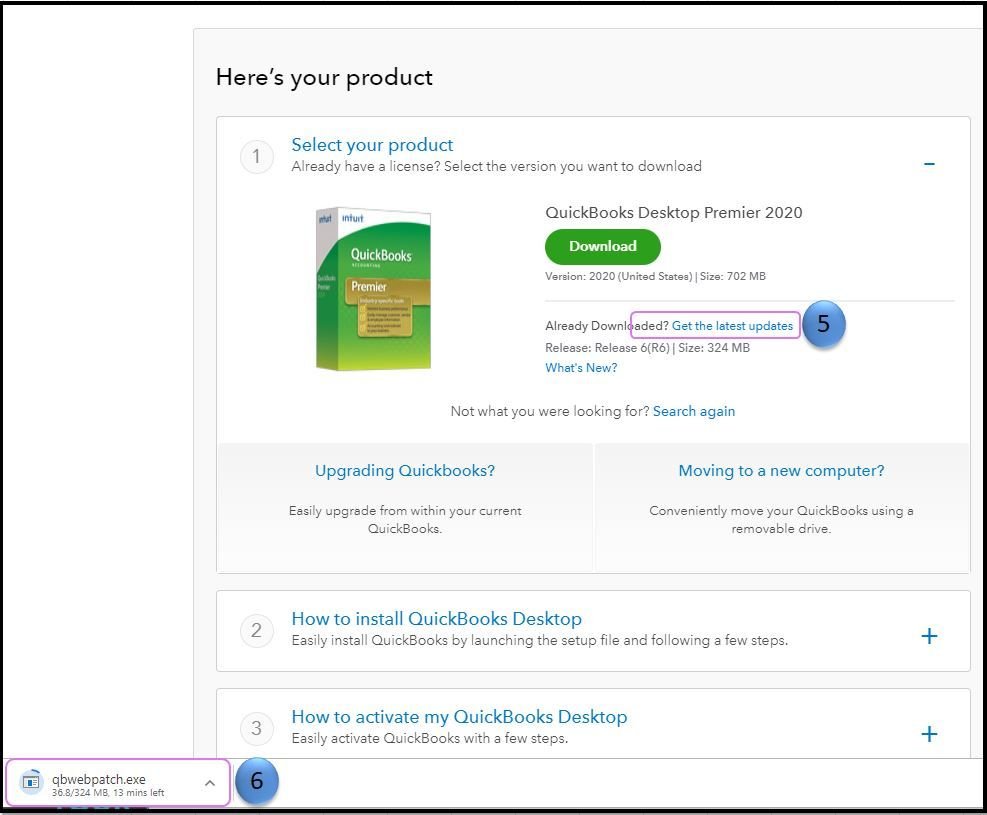
Method 7: Install updates manually
In case none of the above methods worked in your favor, then you can install the updates manually. The steps to be followed here are:
Hit click on the Change tab and then select the QuickBooks product.
Select the Update option and choose the location for the file to be saved.
Make sure to select the Save option.
Locate the file downloaded in the above step.
Double-click the Install the update tab and restart the Windows.
Open QuickBooks to check if the latest update has been downloaded or not.
Points to remember
The above steps are written in context to the system working in a normal mode. In case you are able to spot the items that you wish to remove permanently, then you can check out the process to clean boot Windows from the official Microsoft website.
In case you are successfully able to download the update by removing the startup items, then it indicates that the programs might be conflicting with the downloading of the QuickBooks payroll update.
The above listed solutions are among the most dependable ways to fix QuickBooks payroll error 15215. These methods are recommended by our experts to fix this error. In case the issue persists even after performing these solutions, and you are unable to fix it, you can immediately call our US based error handling team, and we will be glad to offer you quick and precise solutions for this error. Call us now at the dedicated customer support line i.e. 1.800.761.1787, and avail instant support from our executives and certified professionals.
FAQ's
What are the major causes behind to Payroll Error 15215?
One or more of the following reasons may cause error code 15215 in QuickBooks Payroll: 1: You may be receiving this error due to an incorrect configuration of Microsoft IE. 2: QuickBooks desktop verifies the signature on company files. This error may occur if any file being downloaded during the update process is unable to verify. 3: This error may appear if QuickBooks Installation is incomplete or inappropriate. 4: Windows is virus or malware-infected. 5: Incorrect setup or damaged download of QuickBooks desktop.
Can I prevent Error 15215 from recurring?
Yes! you need to keep updated your Windows and QuickBooks. Also, avoid running too many programs simultaneously. Another method for prevent this error is regularly check your network and browser settings.
What are the signs and symptoms that come along with QuickBooks error 15215?
Check out the below given symptoms you may witness when error code 15215 strikes their system. 1: The occurrence of this error may crash the running Windows application. 2: A window will pop up on the screen reporting - 'Error 15215: Unable to verify digital signature'. 3: The computer may start freezing while in use. 4: Windows and its applications, as well as peripherals like mouse and keyboard, may start responding slowly. 5: The desktop gets corrupted with Error 15215when running the same program.
Will Error 15215 affect my company files or data?
No, this error is directly relates to payroll updates and digital signature verification. It doesn’t directly damage or delete your QuickBooks company files.
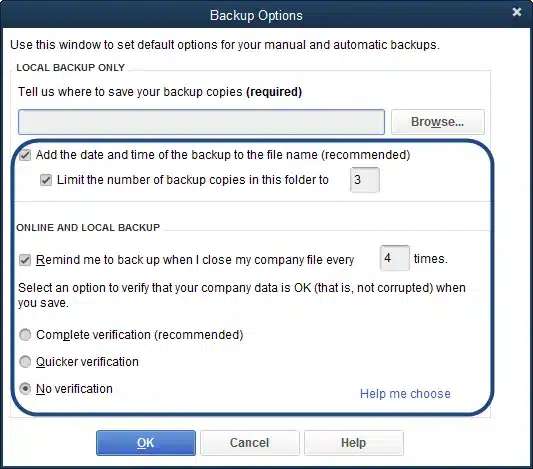
QuickBooks company file carries a lot of important and sensitive data, which needs to be backed up time and again. The user can either backup the data manually of can set up QuickBooks automatic backup. Talking about automatic backup, it is a great feature offered by QuickBooks desktop. One can set up QuickBooks to automatically backup after closing the company file a certain number of times. For example, every 3 times a company file is closed by the user, a backup can be created by the software without any sort input from the user. However, to get a detailed guide about setting up or scheduling QuickBooks automatic backups, make sure to read this post till the end.
Steps to Set up Schedule Backups in QuickBooks Desktop
The below steps can be helpful in setting up scheduled backup in QuickBooks:
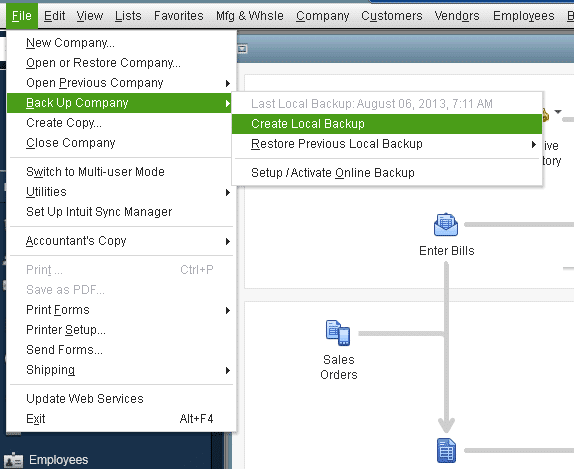
Under this, the user needs to first select the File menu.
And then go for the Save copy or Backup.
After that the user will see that the backup wizard window will open up.
Now, click on Backup copy.
And hit Next.
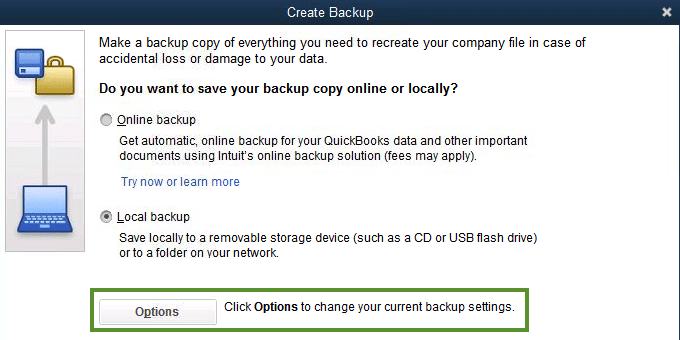
In case you haven’t set backup defaults, select options to do so. The user can select the location where the Local backup will be saved.
After that, select Next.
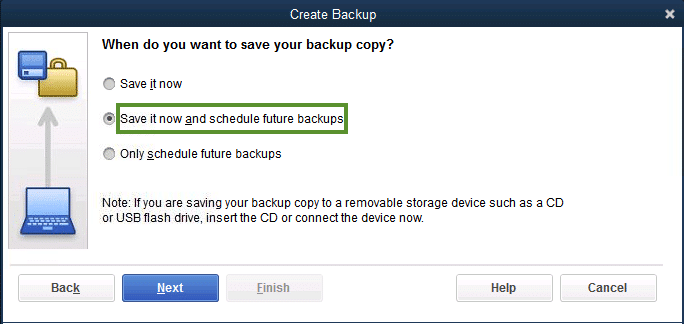
And click on the Options from schedule future backups, and save & schedule future backups.
The user is then required to select Only Schedule future backups and click on Next tab.
Look for the section, backup on a schedule.
Select New.
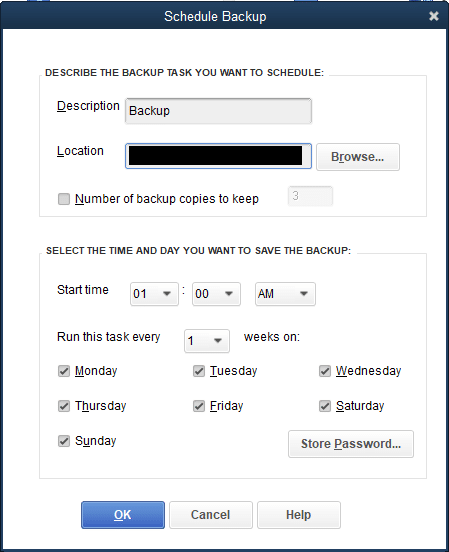
For scheduled backup, type a description. The name of the scheduled backup will help in easily finding it from the list of scheduled backups.
The user will then have to select the Folder where the backup copies will be stored. Click on the Browse tab. And also keep in mind that the software will not allow you to schedule a backup to compact disc.
The user can place a checkmark against the number of backups copies that are to be kept. And then type the number in the number field.
After that open Store Windows password tab. You will be requested to type the windows login information. Ensure that the windows login information that you have typed gives you all the Windows permission required for the location that you have chosen above for the backup.
The user needs to enter the following information for the backup- time, weekly frequency, and days. For instance, if you want that the backups run on a daily basis, you have to select every day of the week and run the backup task every one week.
To return to previous window, select OK tab. The user will see the backup listed in the list in the section, backup on a schedule.
End the process by closing the wizard and clicking on the Finish tab.
Steps to Schedule Automatic Backups in QuickBooks Desktop
In order to set up QuickBooks automatic backup, the below steps can be used:
The very first step is to navigate to the File menu in the QB menu bar.
After that select Save copy or backup.
The next step is to click on the Backup copy after the save copy or backup window opens up.
Now, select Next.
In case you haven’t already set up backup defaults, then select Options to do so. The user can also select the location where the backup would be saved and then hit Next button.
Laster on, hit a click on one of the Two- use this location or change location.
The next step is to select Next button.
And, click on one of the Two options that appear on the screen.
Then, click on Next once again.
And head to the box that asks the number of times you should close QuickBooks company file to save backup copy automatically.
The user can carry out the below steps for setting up backup reminders.
At first, move to the File menu and select Save copy or backup.
After that, select Backup copy and hit Next.
The next step is to click on Options.
Followed by, browse to the directory where you want to save backups.
Moving ahead, select the remind me to backup when closing data every time and enter a number in the field as per the requirement.
Also, select the Add the date and time of backup to the file name box and click on OK tab.
Conclusion
By now, the user might be able to set up QuickBooks desktop automatic backup successfully. Well, if not, then reach out to our professionals team right away using our helpline i.e., 1-800-761-1787. Our team of experts at XpertBooks Pro will ensure to come up with the best possible solution in the least possible time.
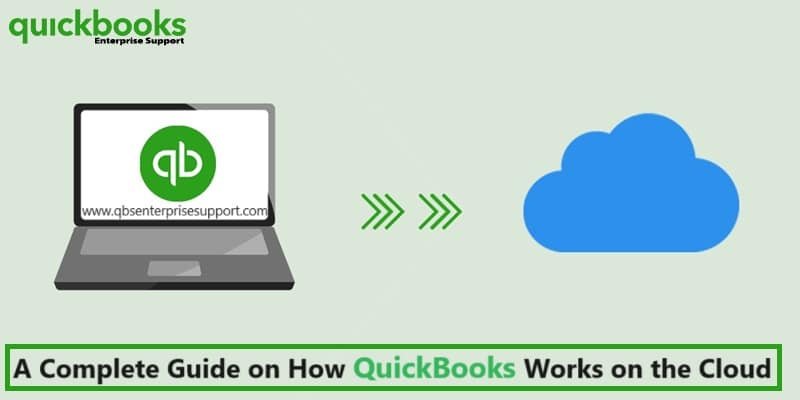
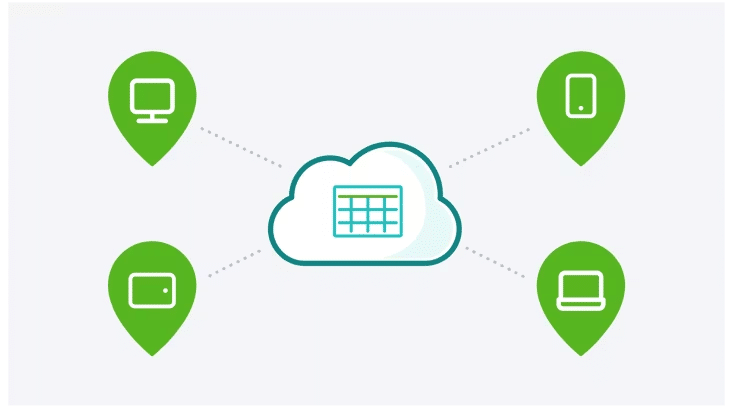
QuickBooks cloud hosting indicates the installation of QuickBooks desktop version on a network server hosted over the internet to enable access via a web browser from any location. In simple words, data and files in a hosted QuickBooks can be easily accessed by the authenticated user from anywhere, and anytime. This doesn’t even require any installation on the system. People switch from QuickBooks desktop version such as enterprise, pro, accountant, premier, etc. to QuickBooks cloud hosting. The reason behind this switch is the challenges, difficulties, failures, and inconsistencies in work.
QuickBooks cloud hosting has completely brought down the need of QuickBooks desktop. With cloud hosting, one gets both robustness of desktop version and accessibility of online version, which makes it one of the most compelling options.
Today, we have come up with this piece of article, where we will be discussing in detail how cloud hosting works with QuickBooks. Thus, if you are interested in knowing, then make sure to stick around till the end.
If you are also curious to know how cloud hosting works, then here are the steps you need to check out:
Well, the authorized images of QuickBooks are installed on the server of the cloud hosting service provider.
Also, the QuickBooks user will be given the access to the server via the internet with various configurations.
Appropriate security steps are installed to guard the application.
In QuickBooks cloud hosting the server is optimized so that it could work on different operating systems/platforms, regardless of the device.
Connectivity between the end user device and the server is performed using the remote desktop protocol, which can be installed to log in as the authorized user.
Moreover, the changes made on the hosted QuickBooks will be saved automatically and will be visible to all authorized users.
Also, the user can access and work on QuickBooks with the help of a web browser or RDP shortcuts. Whereas, the rest of UI, features and other functions are similar to that of QuickBooks desktop.
The admin of the account will have the right to create/remove users and edit the access permissions allowed to them. Along with that, the access to the hosted QuickBooks is secured using the login credential authentications.
The accounting processes will be executed and saved on the hosting server, the accounting data will remain safe and secured, even in the case of local machine failures.
The features and functionalities of hosted QuickBooks are similar to that of desktop version, as a result of this, switching to it doesn’t disturb the user experience. It even enhances the accessibility and productivity.
QuickBooks cloud hosting requires a stable internet connection that allows real-time access to QuickBooks for multiple users and that too on different devices and OS.
How Does QuickBooks Hosting Work?
QuickBooks desktop hosting makes simpler your accounting tasks by using cloud technology.
Server Setup: By using hosting services, the hosting provider will install your QuickBooks desktop on a cloud server.
Real-Time Access: You can access your QuickBooks desktop flawlessly from anywhere with an internet connection. It can help you to provide real-time updates and collaboration.
Data Migration: Also, your data will be securely migrate to the remote cloud server.
User Management: You hosting providers will set up user accounts and permissions by ensuring data security and access control.
Secure Access: You can now easily connect to the server through Remote Desktop Protocol using your any devices and web-browsers.
Process to get QuickBooks cloud hosting
Now that you know, how QuickBooks cloud hosting works, you should also find out the process in which cloud hosting can be attained for your business. Well, it is not a huge process and doesn’t involve a lot of formalities.
Initially, the user would require to purchase the QuickBooks cloud hosting solution from a renowned cloud hosting service provider. And then, after this is done, all the essential licensed copies of QuickBooks enterprise are installed and configured on the server of the service provider Once this is complete, you being the user will be able to access those files with a strong and protected environment.
Later on, the client or the buyer will be provided with the access to the server over the internet with certain configurations.
Security is also taken into consideration and proper security steps are deployed to the secure application using remote desktop protocol
Other important steps are followed after this and the user will successfully will be able to use QuickBooks cloud hosting.
What are the versions that work with QuickBooks hosting?
As we already know that there are different versions of QuickBooks desktop available, but not all work well with QuickBooks hosting. The ones that are supported in QuickBooks cloud hosting are as follows:
QuickBooks Desktop Pro hosting
QuickBooks Desktop Premier hosting
QuickBooks Desktop Enterprise hosting
QuickBooks Desktop Accountant hosting
QuickBooks Desktop for Contractors hosting
QuickBooks POS hosting
Majority of the hosting providers are able to host all the version of QuickBooks desktop, which includes QuickBooks pro, premier, enterprise, and accountant. Moreover, majority of the country specific versions released from QuickBooks 2005 through QuickBooks 2020 are kind of compatible with the server setup of QuickBooks cloud hosting providers.
What makes QuickBooks cloud hosting better?
QuickBooks desktop is regarding to be the best of QuickBooks software, but there are certain limitations that roll in with QuickBooks desktop. These limitations include the following:
Limited user access
No remote access
The data remains only on the local device
Lack of automation, when it comes to data entry and updates
Inconvenience in sharing and exchanging files
No real time team collaboration
Well, these limitations can be easily overcome with the help of QuickBooks cloud hosting. This can be done with the features that cloud hosting offers. These features are stated below:
Unified integration with add-ons
Abridged local IT expenses
Multiple user access
Real-time change tracking
Simple file sharing with unlimited users
Backed up against accidental data loss
Data integrity
Device independence
Anytime and anywhere access
Backed up and restored the mistakenly deleted and removed important data and files
The user along with the clients, and team members can connect, as well as communicate with each other and access the same QuickBooks data file in real-time as QuickBooks hosted allows multi access to make accounting procedures interesting and attractive
The features of QuickBooks cloud hosting cover all the drawbacks of QuickBooks desktop, which makes it better than that of QuickBooks desktop.
Modes of QuickBooks hosting
By now, you know how beneficial cloud hosting can be for you. It is time to find out the modes of QuickBooks hosting. Well, hosting of QuickBooks can be implemented in 3 different modes, which include the following:
Dedicated Hosting: It should be noted that different users are connected directly to the server on which QuickBooks is installed.
Peer to peer hosting: This particular mode is opted for on-premise hosting. In this one user hosts the application and data to provide access to other users on the network.
Alternate hosting: In this particular mode, one user is connected to the hosting server over the internet. The rest of the users get connected to the main user to access the application on the local network.
QuickBooks cloud hosting offers flexibility, mobility, and scalability benefits. It is ideal for small to mid-sized businesses, as they avail of various things to manage and grow the business. In a nutshell, cloud hosting is recommended to the user for betterment of the business productivity. One can easily connect with some of the cloud hosting providers and get QuickBooks cloud hosting instantly.
However, if you have any query or if you need our assistance to get QuickBooks desktop cloud hosting, then you can simply consult with our accounting consultants at XpertBooks Pro. Our professionals will ensure to come up some best services for you.
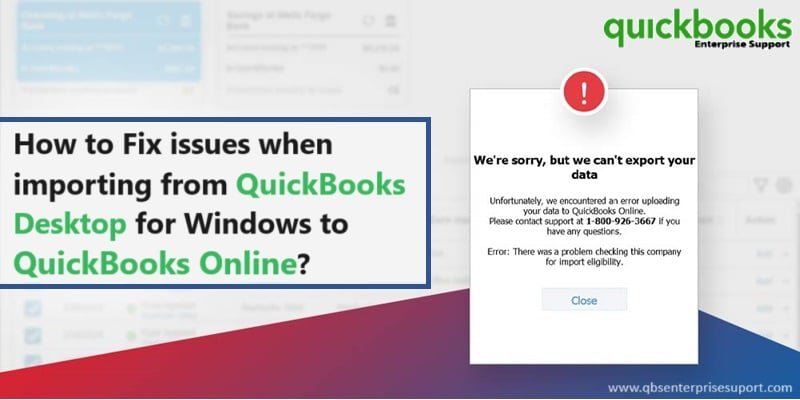
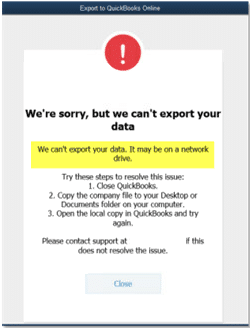
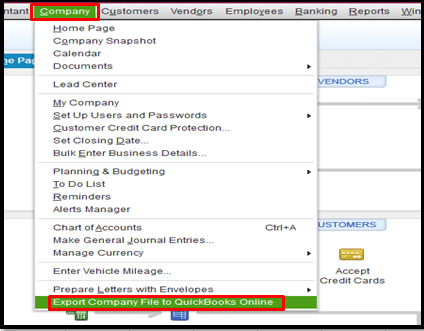
Found QuickBooks online more appropriate for your business, as compared to QuickBooks desktop and started with the process to import from QuickBooks desktop for windows to QuickBooks online, but suddenly bumped into a warning message and the process stopped? Found this relatable? If that is the scenario, then we have got you covered. This technical snag is reported largely in the recent times. The best part is that it can be rectified easily by simply rebuilding the data file and restarting the process of export.
You can explore this segment to find out the right processes to rectify issues when importing from QuickBooks Desktop to QBO. However, if you aren’t interested in manually performing the fixation steps, then in that case get on a call with our tech geeks at XpertBooks Pro, and our accounting professionals will ensure to perform the set of steps required to rectify the issue from its root cause.
Easily resolve common issues while importing from QuickBooks desktop for Windows to QuickBooks Online
You can perform the below stated steps and try fixing the issue when importing from QuickBooks desktop for windows to QuickBooks online. Rebuilding the data file can and restarting the export process can easily troubleshoot all the import issues.
Steps for rebuilding the data file and rebooting the export process
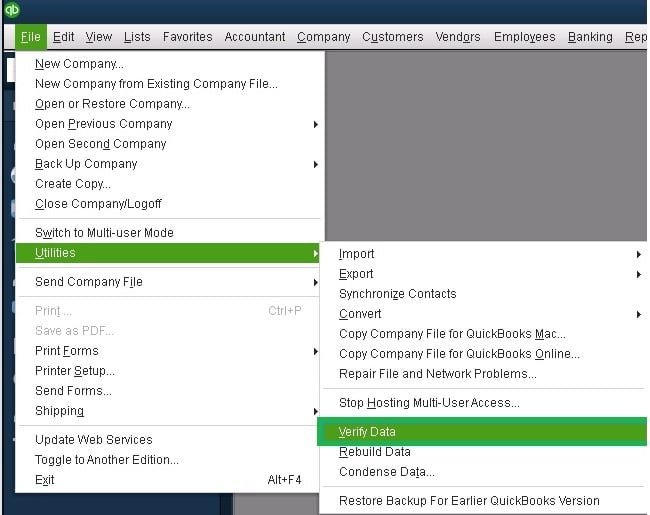
Step 1: Verifying the company data
You need to choose window and also close all to close all open QuickBooks Windows.
Furthermore, choose File option and also the Utilities option.
Later on, go for Verify data.
And also, if QuickBooks reports a problem, and head to the next step.
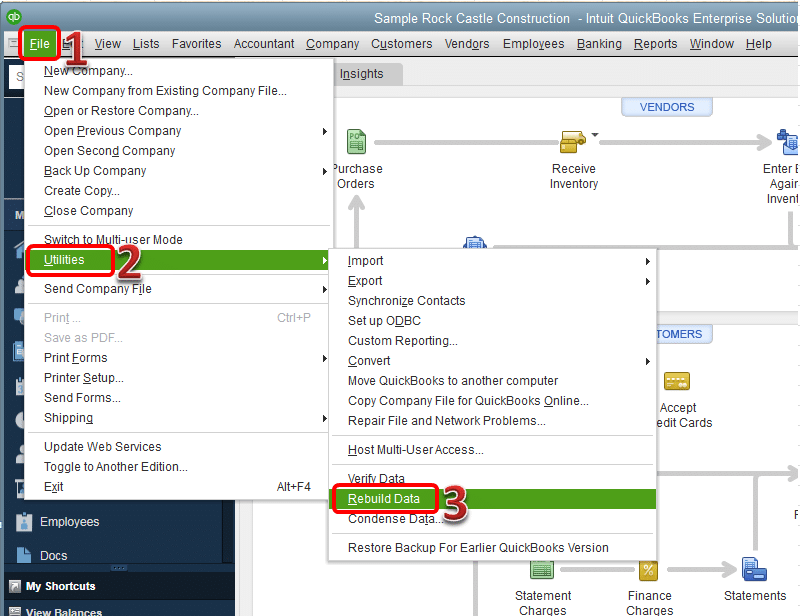
Step 2: Rebuild the company data to repair problems
You are supposed to choose window and then close all to close all open QuickBooks Windows.
Heading forward, choose File and also Utilities tab and also Rebuild data.
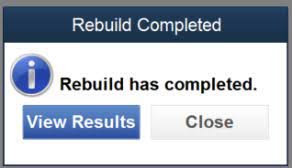
Moving ahead, if you see the message that says rebuild is completed, then head to the steps ahead.
Step 3: Verify rebuilt company data
Under this step, go for Windows option and then close all option respectively.
Furthermore, choose File menu and tap on Utilities tab.
Along with that go for Verify data.
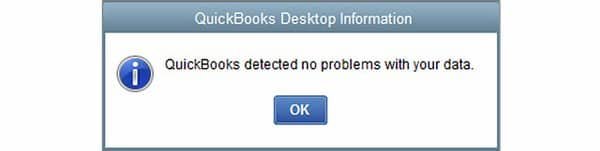
In case you see the message that says QuickBooks detected no problems with your data, then head forward to the next step.
Step 4: Process to start the export process once again
Solutions that can be followed to fix issues when importing from QuickBooks Desktop to Online
If you are experiencing any of the errors discussing in above, then the below measures can be taken to rectify the issues easily.
Check if the product payment didn’t go through
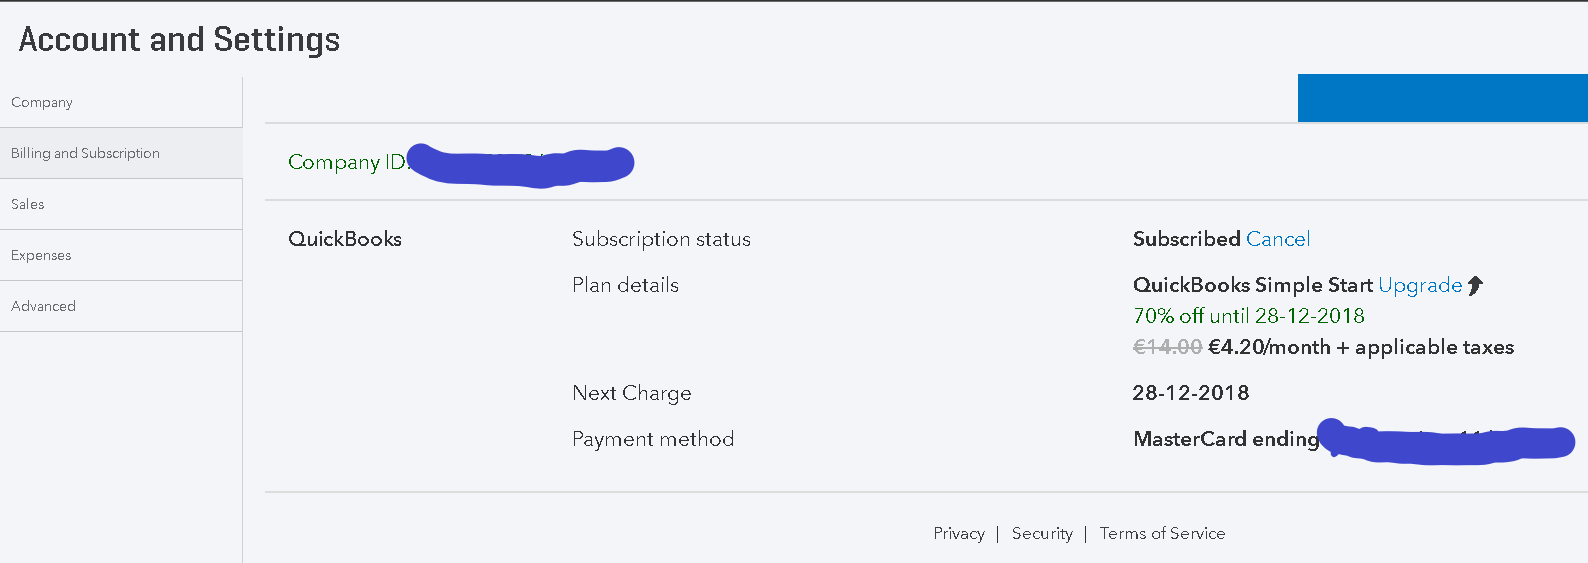
To check this, you need to choose Gear icon on the toolbar.
And later on, go for Accounts and settings tab and also the Billing and subscription options respectively.
QuickBooks online would show a green subscribed status for the migration to work in a proper manner. In case you bought payroll before the migration, then also you would see the same thing.
Update the QuickBooks for Mac to the latest release
You can fix the issue by opting for the Check for QuickBooks updates option in QuickBooks menu.
Heading forward, go for install updates tab.
Moreover, reboot QuickBooks.
You can also try out running the Rebuild and Verify utilities to try fixing the issues mentioned earlier.
Another method that you can opt for is to add Intuit as a trusted site in the internet explorer.
Scrolling through this segment can be of great assistance in chucking off the issue experienced when importing from QuickBooks desktop to QuickBooks online. In the event of facing the same issue repeatedly even after performing the steps jotted in this segment, it is highly recommended to speak to XpertBooks Pro technocrats.
Accessing folders in multi-user mode, right Windows permissions are a must. Each QuickBooks version has corresponding components that require an update to work when in multi-user mode. The user might face multi-user errors, which might be pretty much time consuming to fix. One can fix the company file and network issues with QuickBooks file doctor. It will analyze the basic issues with multi user mode. If you are looking for the process to set up folder and windows access permissions to share company files, then reading this post carefully will help in the process.
Important points
There are certain important pointers that one can’t afford to miss. These pointers include:
The user needs to ensure the installation directories have the correct permissions.
Also, in case the user is running Microsoft Windows edition, then the Security tab might not be available in Normal mode. The user will have to restart the system in safe mode to complete the steps.
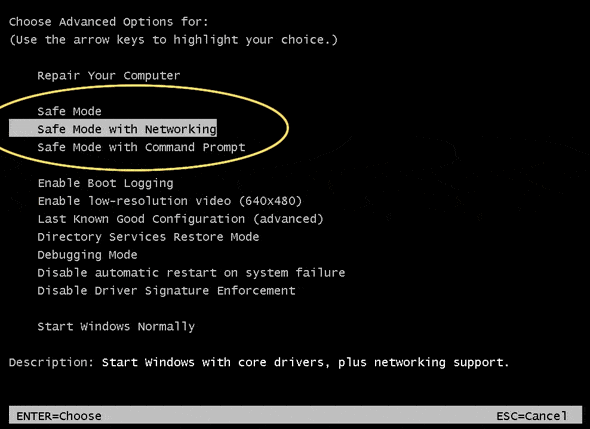
The user will have to restart the system and press F8 key until the Advanced boot window opens.
Also, on the Advanced boot window, the user needs to select Safe mode and then hit Enter tab.
Moreover, workstations multi-user access enabled can inadvertently go into Alternate hosting mode and also take the ownership of a company file. As a result of this, other users won’t be able to open the file.
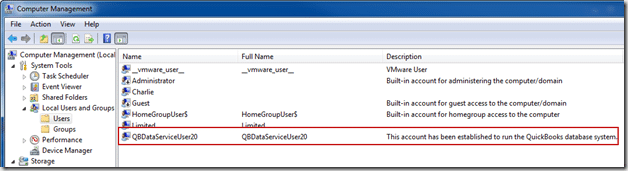
The QBDataServiceUserXX depends on the version of QuickBooks desktop being used.
C:\Users\Public\Public Documents\Intuit\QuickBooks\Sample Company Files\QuickBooks Enterprise Solutions X.0 (X = version) or C:\Users\Public\Public Documents\Intuit\QuickBooks\Sample Company Files\QuickBooks 20XX (XX = year)
The users are supposed to carry out the steps for the folders listed. Considering that they might not have all the folders.
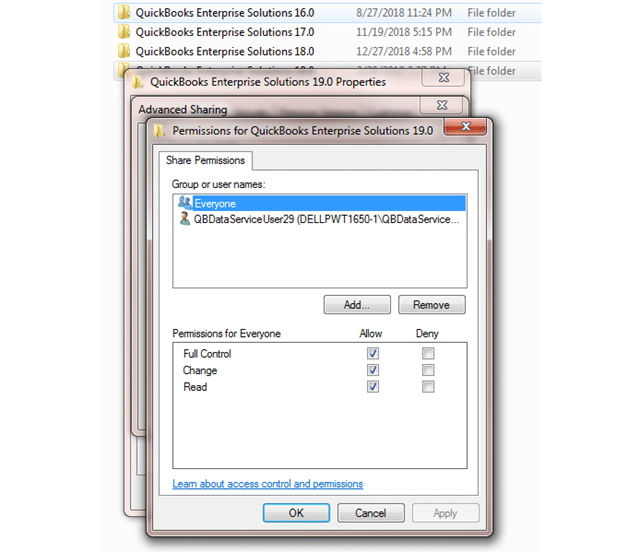
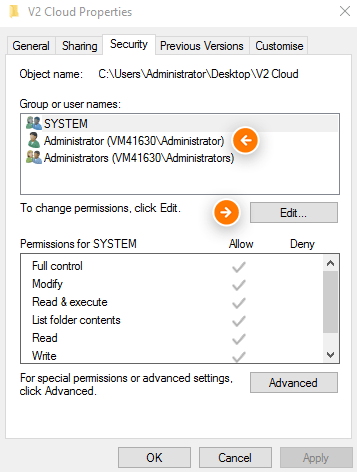
The user is supposed to right click the folder and select the Properties tab.
Followed by selecting Everyone.
It should be noted that, if everyone is not listed in the group or user name checkbox, then the user will have to select Add and type in everyone. Followed by hitting OK tab.
The last step is to select full control and select Apply and OK tabs respectively.
Setting Windows Access Permissions to Share the Company Files
The user needs to ensure that QuickBooks has the right level of access that can assist in preventing future issues that might come across while working with the company files over the network.
For Windows 10 and 8
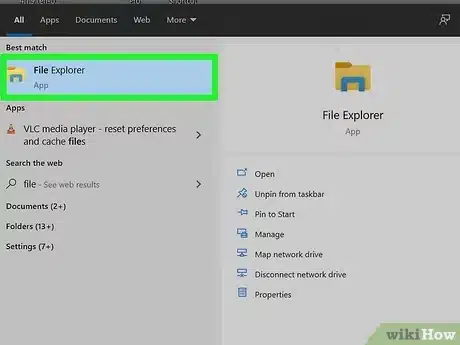
The Windows 11, 10 and 8 users are required to open the Windows start menu and then open the File explorer.
After that, spot and right click the folder having the company files.
The next step is to select the Properties tab and then sharing and then share Add.
Now, the user needs to select the corresponding QBDataServiceUserXX for the version being used.
The last step is to Set the permissions of both users to Full control and hit on Share tab.
Windows 8.1
Taking the ownership of the file:
To take the ownership, the user is supposed to open the Windows start menu and then open up the File explorer.
Followed by, selecting the folder that is to be opted for ownership of, and click on Share.
The next step is to select Advanced security and then Change. After that select advanced and then Find now tab.
The last step is to select the User and hit OK tab.
Granting full control
To grant full control, the user needs to open the Windows start menu and then open File explorer.
Followed by selecting the folder and selecting Share.
Now, choose Advanced security and then add and select a Principal.
The next step is to select Advanced tab and then click on Find now.
Once done with that, select the User and select OK tab.
Also, select Full control and hit OK button.
Windows server 2012
The steps for Windows server 2012 are as follows. But before that, the user should ensure that the file and storage services are installed:
At first, the user is supposed to open the Windows start menu. After that type Run into the search and also open the run command.
Then, type in Server Manager and choose OK tab.
Also, choose the File and storage services, and then Share.
Now, on the task drop down, select New share.
The next step is to select SMB share- Quick.
It should be noted that SMB share- Quick is the default profile. This selection might vary accordingly:
Once done with that, the user needs to select type a custom path from the share location section and then browse to locate the folder you wish to share.
The last step is to select the appropriate folder and choose select a folder and then hit Next tab.
It should be noted that you might leave the default selections under the configure share settings window and hit next again.
Towards the end of this article, it is expected that the information shared in above might help in setting up folder and windows access permissions to share QuickBooks company files.