If you are planning to install and use the latest QuickBooks and Enterprise solutions, then it is very important for you to make sure that your system is compatible with the new update. In order to run QuickBooks desktop and Enterprise solutions, you need to know what your system requires in terms of the operating system, RAM, etc. Before purchasing any product for your system, it is important to understand whether your system will be able to handle the software without any issue or not. System requirements basically means that the system configuration is set according to the new product being incorporated.
This article is completely based on what all your system will require, in order to work with new products such as QuickBooks and Enterprise solution without any kind of error. So, make sure to read the article carefully and stay tuned till the end. However, if you are confused or looking for expert assistance, then in that case you can consult our U.S. based accounting professionals team. We are a group of certified experts dealing in all sorts of QB related queries. So, do not hesitate in calling us anytime, as we will be more happy to help you.
Features of QuickBooks Enterprise Solutions
The QuickBooks desktop enterprise rolled in with some great features and functionalities:
Easy time tracking
Invoice history tracker
Scaling up to 40 users
Generating bill pay as you use write checks feature
Payroll status for direct deposit
Tracking inventory and managing profits
Getting paid faster and easier
Employee payment adjustment history
Transferring of credit between jobs of the same customer
Paying employees in a snap
Alternate vendors
Searching company files easily
Quick upgrade
Making between business decisions with advanced inventory
Minimum System Requirements for QuickBooks Pro/ Premier and Enterprise
Let's know the system requirements for QuickBooks desktop, premier and enterprise solutions:
Operating Systems
Windows 7 or Windows Server 2008
If you are using a Windows 7 or Windows Server 2008, then you need to know that Microsoft no longer provides security update or support for systems having Windows 7 and Windows Server 2008. Thus, highly recommended that you should upgrade your operating system to a supported version before you get started with installation of QuickBooks, as this might hamper the data security.
Windows 10, all editions including 64-bit, natively installed.
Windows 8.1 (Update 1), all editions including 64-bit, natively installed.
Windows Server 2019, and Essentials
Windows Server 2016, and Essentials
Windows Server 2012 R2, and Essentials
Windows Server 2012, and Essentials
Windows Small Business Server 2011, Standard and Essentials
The point to be noted here is that the QuickBooks accounting software demands using Windows natively and not via an emulator or virtual environment.
Database servers
Windows (Natively Installed)
* Windows Server 2019, and Essentials
* Windows Server 2016, and Essentials
* Windows Server 2012 R2, and Essentials
* Windows Server 2012, and Essentials
* Windows Server 2011
* Windows Small Business Server 2011, Standard and Essentials
* Windows 10
* Windows 8.1 (update 1)
Linux (when using QuickBooks Enterprise Solutions Database Server-only installation)
* 2.5GB of disk space (additional required for data files).
* Additional software: 60MB for Microsoft .NET 4.6 Runtime, provided on the QuickBooks CD.
* Additional requirements for Intuit Data Protect in QuickBooks Connected Services offerings (applies to the US only). 1. Needed at least 4.0GB RAM. 2. Twice the size of the largest file set to back up + 100MB or twice the size to restore. The space is only needed from the work folder LocalApplicationData+"Intuit\Intuit Data Protect".
Note: In order to experience the best performance, you need to store the QuickBooks data file on a solid-state drive.
Windows
* US version of Windows.
* Regional settings are supported when set to English.
* Administrator rights needed for the server computer while hosting Multi-User access.
*Natively installed – This means that QuickBooks was installed on a particular system or environment that it was designed for. Along with that it also means it doesn't require to run in a virtual environment or emulation software.
Optical Drive
4X DVD-ROM drive needed for CD installations (unless QuickBooks is downloaded from Intuit server).
Screen Resolution
* Display optimized for 1280 x 1024 screen resolution or higher with up to 2 extended monitors.
* Optimized for Default DPI setting for a given computer.
QuickBooks software is compatible with any hardware and also it is very easy to interact with third party applications. You can check out the integrations below:
Microsoft Office:
QuickBooks for Mac 2016 (the US only), 2021, 2020, and 2019.
Adobe Acrobat Reader: This is needed for viewing forms, adobe acrobat reader 9.0 or later due to certain form is difficult to open, which makes it suitable for the version is needed for forms.
Office 2016 including Outlook 2016 on 32 and 64 bit.
Office 2010 and Office 2013 and 365 both on 32 and also 64 bit (including Outlook 2010 and Outlook 2013).
Gmail Estimates, Invoices and other forms with Microsoft outlook 2010-2016, Microsoft Outlook with office 365 and other support to Gmail, Yahoo! Mail and Outlook.com.
Requires Microsoft word 2016, 2013, or 2010 or Office 365 (includes 64-bit) for preparing letters because all version has different features.
The system should have Microsoft Excel 2016, 2013, or 2010 or Office 365 (Includes 64-bit) for exporting reports, as reports are different to others and it demands different Microsoft versions.
Also, it needs Outlook 2010 (32-bit) for contact Synchronization with Microsoft Outlook.
QuickBooks contact Sync is needed for Outlook synchronization Outlook.
QuickBooks Point of Sale Version 18.0 and Version 12.0 (applies to the US only).
TurboTax 2018 (Personal and Business)
Lacerte 2018 and 2017 (applies to the US)
Pro-Series tax years 2017 and 2016 (the US only)
Quicken 2019, 2018, 2017, and 2016
This needs internet access with at least a 56 Kbps connection speed for payroll and other online features.
Yahoo email, Gmail, windows mail, Hotmail, and AOL.
Payroll and other online features and services require internet access with at least a 56 Kbps connection speed. DSL or cable modem is recommended.
Firewall and antivirus software compatibility
After testing QuickBooks Pro, Premier and Enterprise with the firewall and antivirus programs, we have jotted the firewall and antivirus software compatibility requirements. The most important point to be noted that you will have to adjust some settings in the programs to get seamless QuickBooks experience.
Windows server firewall all editions
Windows 8.1 firewall all editions
Microsoft security essentials
Avast
AVG
Norton LifeLock
ESET
Avira
Kaspersky
MacAfee
Bitdefender
Malwarebytes
Note: It should be kept in mind that QuickBooks software will work with the systems running RAID. However, it is not recommended as it may cause QuickBooks to operate slowly.
QuickBooks desktop needs internet security protocol TLS 1.2 for the connected services to work properly.
To know the minimum system requirements for QuickBooks desktop for MAC users are given below:
Minimum System Requirements
You should at least have Mac OS 10.14 (Mohave), and supported by Mac OS 10.14 (Mojave).
Make sure that the product is registered.
The disk space should be at least 250 MB.
2GB RAM is the minimum requirement. However, 4GB RAM is recommended.
Intel Core 2 duo is the least one should have. However, it can go higher in order to run a server.
CD or DVD drive or an Internet connection in order to install.
For printing purposes: 100% Macintosh compatible printer is a must, in case you are planning to print invoices, cheque deposit slip, purchase orders, mailing labels, reports, etc.
Recommended to use intuit checks for printing checks. As the Canadian image ready checks are not supported.
Software Compatibility
For emailing purposes: You should have Apple mail, Microsoft Outlook 2016 or later, along with the Mac Office 365.
For payment purposes: Intuit merchant service is required, in case you accept credit card and debit card payments. Merchant service for QuickBooks for Mac is sold separately and subject for application approval. However, the debit card transactions are processed our signature debit due to which they do not required entering a pin code.
For exporting report data: Apple numbers V 3.5, Microsoft Excel 2016 or later, and also Mac Office 365 are required.
Talking about the payroll: There are a few payroll services that would work with QuickBooks for Mac namely Intuit QuickBooks payroll for Mac, Intuit full service payroll, and top pay from Aatrix. It should be noted that the payroll for Mac requires EIN and an Internet connection to work properly. Also printing checks and forms require Adobe Reader, for which additional fees might be applicable.
Mac apps: You can sync QuickBooks desktop for Mac with apple's calendar, contact and, messages.
However, talking about the file conversion:
QuickBooks for Mac 2021 supports the following:
Two-way conversion from and to QuickBooks desktop.
One-way conversion to QuickBooks online.
And one-way conversion from QuickBooks desktop for windows 2016 to 2019.
Important Points to Consider
In case the product requirements above do not specifically state any operating system, hardware, software, or Anti-Virus is supported, then in that case it might not have been tested. It is not guaranteed that the experience will be trouble-free.
Increase the experience problems outside of the supported environment, technical support will be limited to standard troubleshooting. In case of a non-favorable situation, the program should be returned to a supported environment for additional support.
However, increase the Microsoft is no longer supporting the before-mentioned products, then neither shall intuit.
The system requirements for QuickBooks desktop we have mentioned in above might be of some help in making your system compatible for QuickBooks desktop and Enterprise solutions. However, in case you face any sort of error, or if you are looking for technical assistance, make sure to call us any time using our dedicated helpline i.e. 1.800.761.1787. We are a group of accounting professionals, who work round-the-clock to provide the best possible assistance to all sort of QB needs. Thus, do not hesitate in calling us anytime, as our experts will be there to assist you.
Want to unleash the procedure to tackle out QuickBooks H202, especially in case of windows server 2012 Essentials R2? If that is the case, stay hooked to this segment. In QuickBooks accounting software you might stumble upon various typical errors. The fun fact about these errors is that it can be easily resolved by carrying out a few simple steps. QuickBooks error H202, in case of Windows server 2012 Essentials R2 is a pretty common issues that might be seen due to different factors.
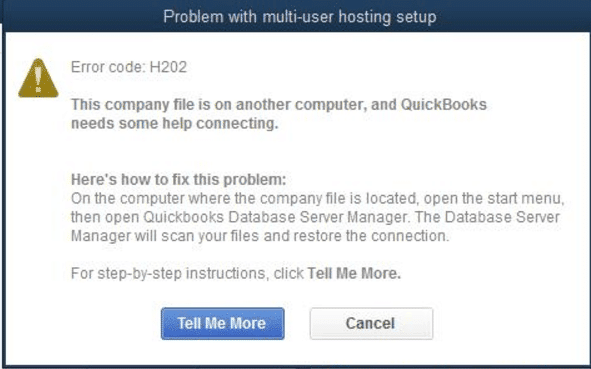
In this segment, we are going to discuss about the causes and fixes to this error. You should follow these steps only if you see Error H202 and you are using Windows Server 2012 Essentials R2. In case you find the solutions a bit complicated, then in that situation you can contact your network admin before you begin. Moreover, reading the article till the end will help you in getting rid of the error without much hassle. You might encounter QuickBooks error H202 with a warning sign:
This company file is on another computer and QuickBooks needs some help connecting.
Steps to Fix Error H202 if you use Windows Server 2012 Essentials R2
You might thinking about the factors causing this error. Even though there are always reasons behind the occurrence of QuickBooks errors, but there aren't much defined reasons in this case. Therefore, here are the solutions that you can implement straight away.
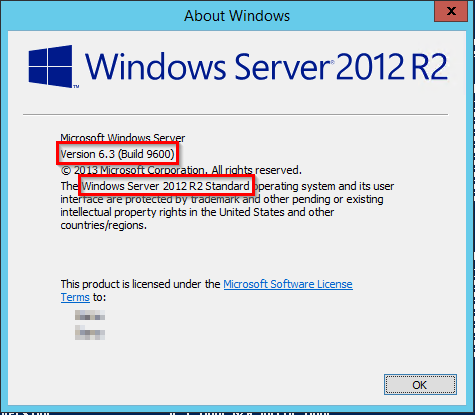
Step 1: Check the server version you're using
In this step you need to verify the server version you are having, for ensuring that the steps are appropriate accordingly. You are required to carry out the steps below:
Start off with opening the Windows start menu on the server system.
Type in Settings into the search bar. Followed by opening the same.
Select Systems and then About option.
Here, you will see the server version listed in the About section. For the ones who are using windows server 2012 Essentials R2, the below steps are a must. However, in case using any other server operating system, the basic H202 troubleshooting steps can be carried out.
Step 2: Installing QuickBooks database server manager
For the ones who have not already installed QuickBooks database server manager on the server system for each of the versions of QuickBooks, it is very much important to download and install it. The QuickBooks database server manager tool maintains the stability of the multi-user network. Now the steps below can be continued:
The setup process can be done in two ways:
Opting full program option: This involves the full version of QuickBooks desktop and database server manager installed on the server computer.
Or else opt for the server-only option: This involves only the QBDBSM installed on the server system.
This step is to be carried out every time the server system is restarted. You should always sign in to the server system as a user with admin rights while troubleshooting.
Stopping the base filtering engine service
Firstly, open the Windows start menu on the server system.
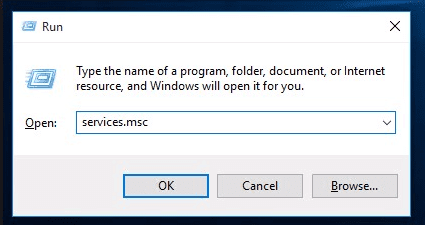
Type run into the search bar and open run.
Followed by typing in services.msc into the run window and hit Enter key.
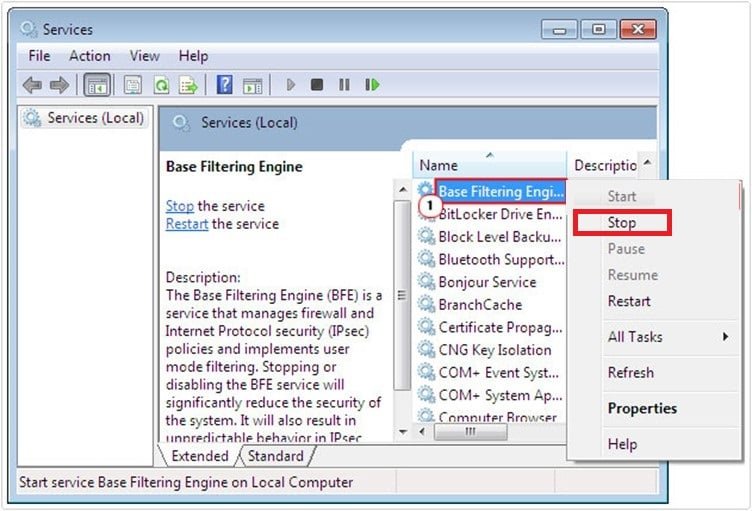
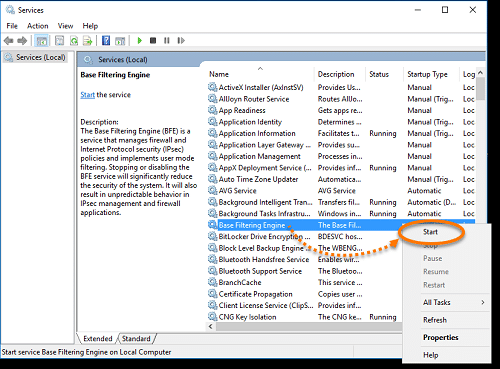
Next step is to spot the base filtering engine on the service list.
Hit a right-click on the base filtering engine and select the stop option.
Make sure to dismiss or stop again the error message in case it displays on the screen.
The above-listed steps will end the connection to the workstations, which will be restarted later on.
Scanning the QuickBooks files
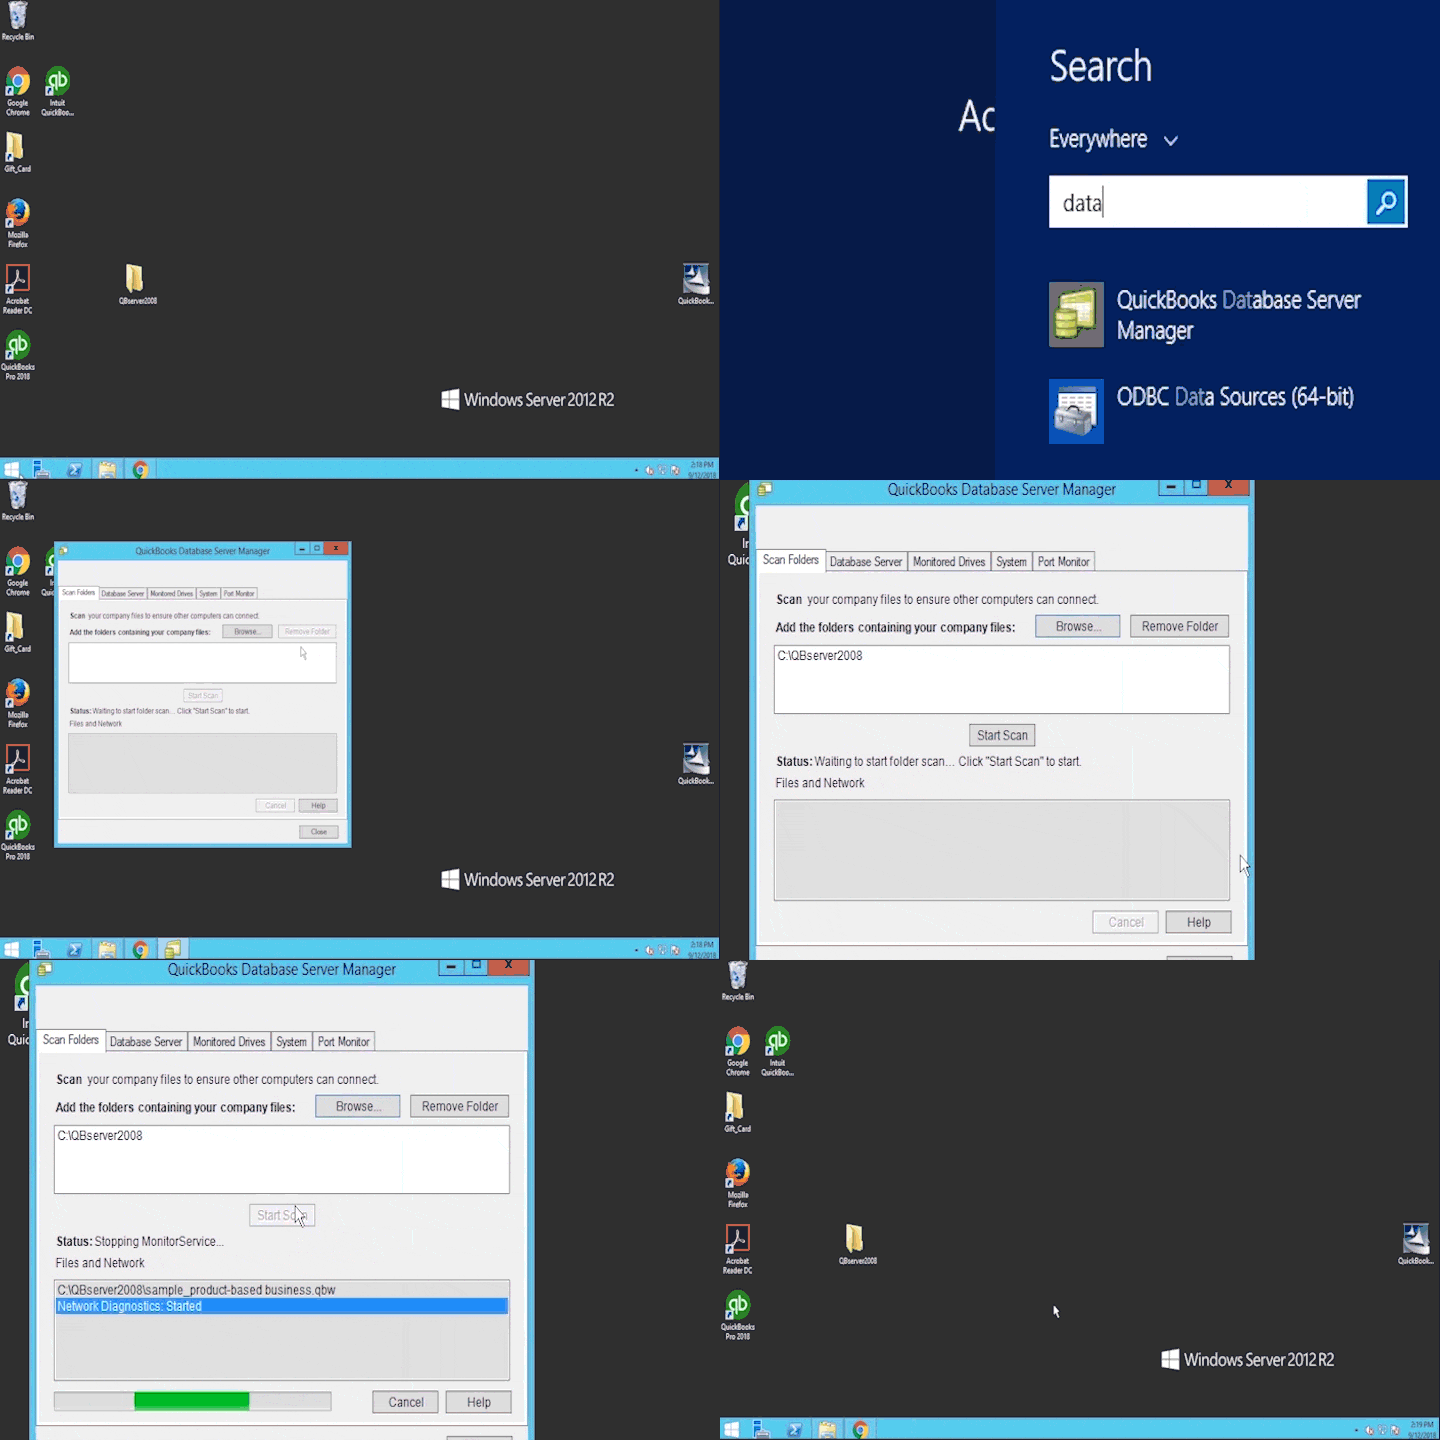
In this process, open Windows Start menu.
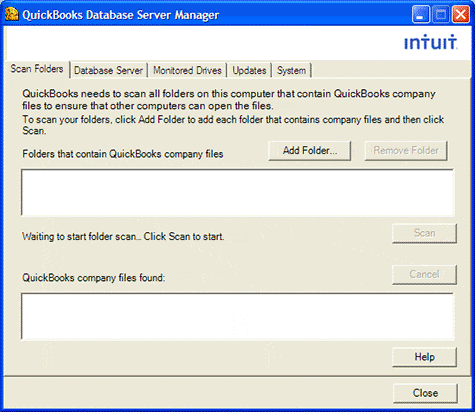
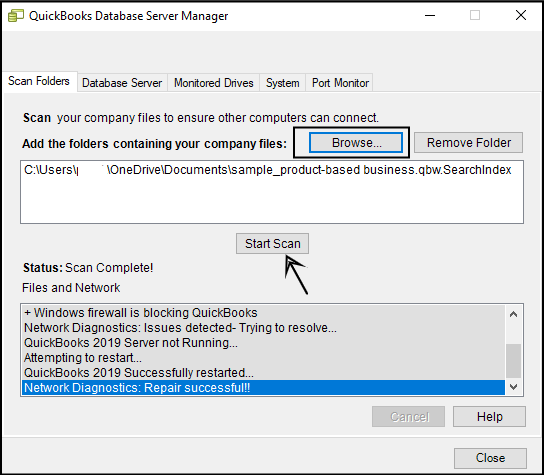
Now type QuickBooks database server manager into the search bar and open the same.
Once done with that, choose the folder with the company files or you can also browse to spot the folder on the computer.
You need to further click on start scan option.
Choose the close option as soon as the scan finishes.
Restart the base filtering engine service
Now that you have completed the scanning process, it is time for you to start the base filtering engine service that we turned off earlier. The steps involved in this process are:
Open the Windows Start menu.
Type in RUN in the dialogue box.
Also, type services.msc into the run window and press Enter key.
Now look for the base filtering engine on the service list.
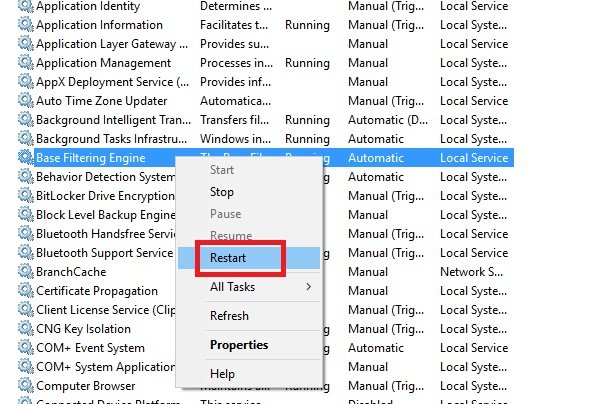
Followed by right-clicking the base filtering engine and selecting Restart.
In case you encounter an error message, you are required to dismiss it and select Start again.
Before you close the window, make sure to spot the Windows firewall on the service list. And also, check out the status, if it's running, then the process is complete.
In case the Windows firewall is not running, you can carry out the steps below:
First of all, hit a right-click on Windows Firewall and select properties option.
In the properties window, select Start and restart the firewall.
These were a few steps that can be followed in order to get rid of QuickBooks error H202 especially when using windows server 2012 essentials R2. If you are still having any query or in case the error still persists then feel free to reach us to our accounting experts. We work round the clock to provide the best possible assistance for all queries.
FAQs - QuickBooks Error H202
Can Error H202 occur in a single-user environment?
This error can occur in the single-user mode in case of some network configuration. The error may occur in such cases when the program is unable to communicate with the company file.
Can QuickBooks Error H202 occur in QuickBooks Online?
No! This error is only encountered in QuickBooks desktop, especially in the multi-user mode.
Is QuickBooks Error H202 caused by a problem with the company file?
This error, besides the network and hosting misconfiguration, can also be caused due to damaged company files.
Does QuickBooks Error H202 affect all users in a multi-user environment?
No! it only affects specific users or workstations in the multi-user mode.
Stumbled upon QuickBooks error 6094, 0 (6010, 2) and don’t know the ways to get rid of it? If yes, then you need not worry about it. As, today’s segment will be dedicated towards fixing to such type of errors. This error is usually seen when the third-party antivirus/internet security program blocks the QuickBooks desktop. The third-party security program includes PC tools, including internet security, AVG Antivirus, and SpyHunter Malware blocking QuickBooks software. To know more about QuickBooks error code 6094, read carefully to this segment till the end.
What is QuickBooks Error Message 6094, 0?
As mentioned before, you can encounter this error when QuickBooks fails to launch the web database. Also, the same error can be seen, due to the security program updates. It comes with an error message stating:
Error
Description
Warning
"An error occurred when QuickBooks tried to start the database server that manages access to the QuickBooks company file. Error (-6094,0)".
The causes and fixes will be discussed later in this post.
What causes the QuickBooks error code 6094?
This error can be caused due to a few factors enlisted below:
Anti-virus causing the error.
PC tools internet security might also cause the error.
SpyHunter/malware blocking the same.
Important Points
Before moving to the troubleshooting, you need to consider certain points, such as:
Update anti-virus software to the latest release.
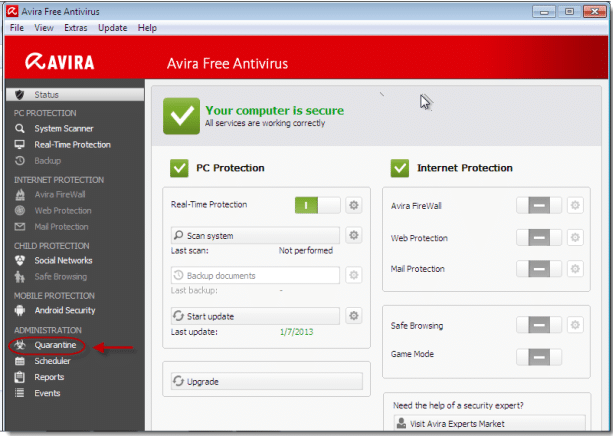
And also, navigate to the quarantine folder or antivirus vault to restore the qbdmgr.exe and qbdmgrN.exe files.
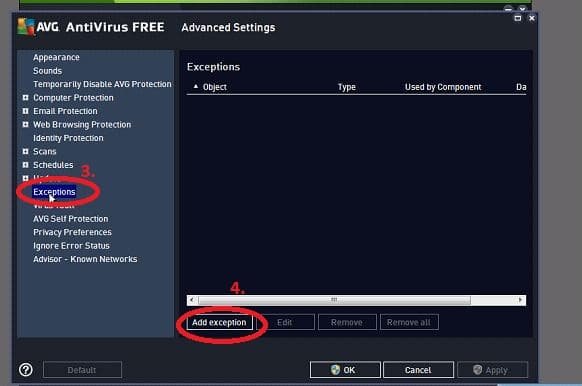
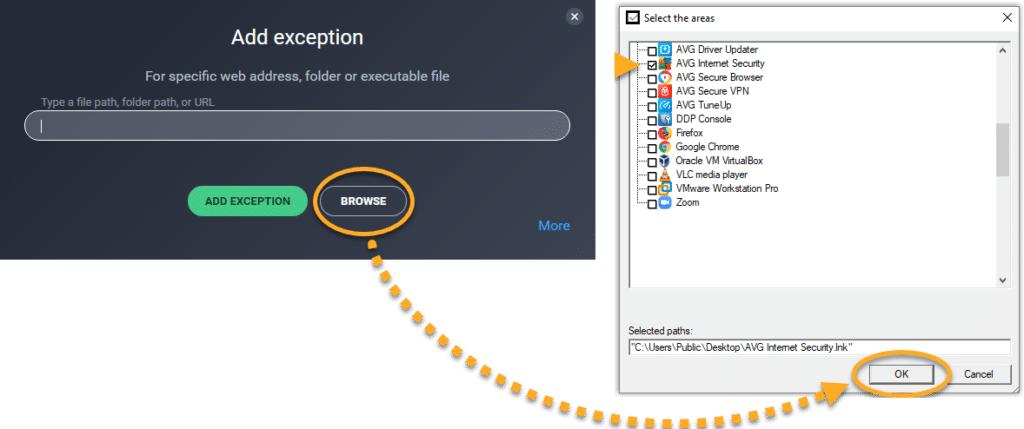
Prevent QuickBooks desktop directory from getting scanned by adding exceptions on antivirus software.
Methods to Troubleshoot QuickBooks Error 6094, 0 (6010, 2)
Now that you know, why this QuickBooks error code 6094, 0 is encountered, you need to fix the error. Make sure to perform the required steps we have listed below, in order to get rid of the error. Let us check out each of the methods one by one:
Method 1: Repairing QuickBooks desktop software
The first method requires you to repair your QuickBooks desktop, this can be easily done by carrying out the steps below:
Close all the unnecessary programs interfering with the QuickBooks software and then restart the same.
Ensure to have the Backup of the QuickBooks company file.
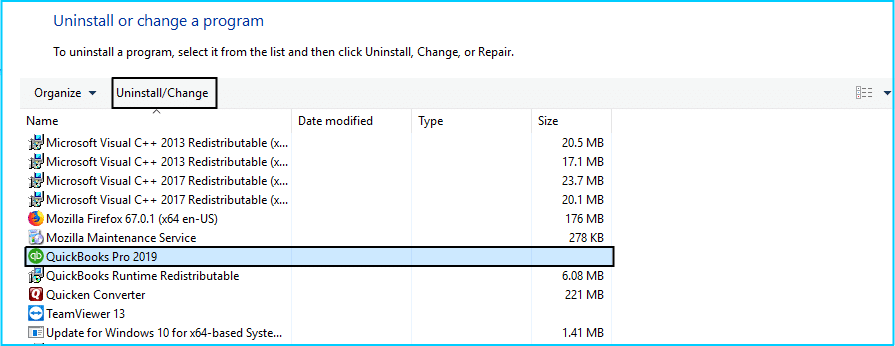
Move to the Start menu and open the Control panel.
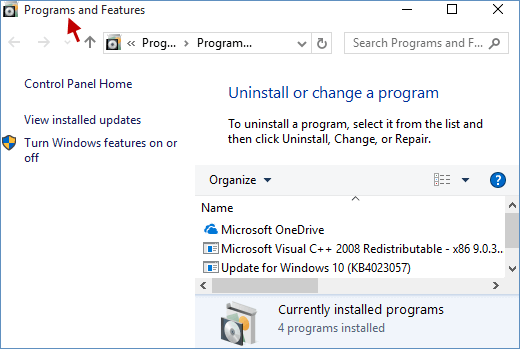
Select Programs and features in the control panel. Also, Uninstall any program which is not needed.
Choose the QuickBooks program from the list and hit on the Uninstall and Change option.
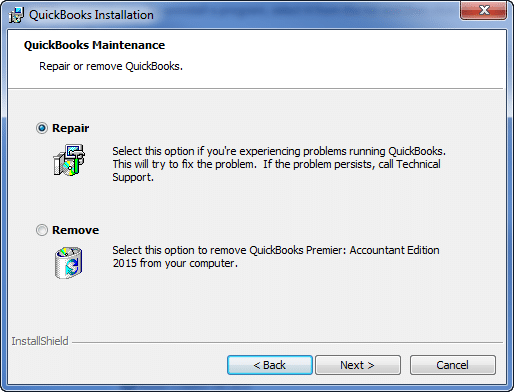
Moving ahead, hit a click on Continue tab and then choose Next.
Go for the Repair option and click on next and wait until the repair process completes.
Method 2: Remove QuickBooks files from the list of blocked files
The easy steps to get QuickBooks removed from the blocked files list are given as follows:
Launch the SpyHunter software.
Click on the System guard.
Select the User added tab and then search for the QuickBooks files.
Set the QuickBooks files status as Allowed.
If you are unable to find the QuickBooks files,and then go back under the Added tab.
Also, verify PUP.
If you find any QuickBooks file in the list, then Set its status to allowed.
Also, set the status as allowed if you found the QuickBooks files blocked under PUP.
Method 3: Setup AVG antivirus
The steps to follow for preventing QuickBooks directory from being scanned:
Close QuickBooks Desktop and then open AVG Antivirus user interface.
Double-click the Resident shield and select to Manage exceptions is recommended.
After that, you need to select the Add path option, followed by entering C:\Program Files\Intuit. (Note: It should be noted that if QuickBooks is installed in a different folder, then adding that folder path is recommended.)
Lastly, hit a click on OK and then Save changes. Moreover, note that it is necessary to Restore all QuickBooks file that AVG Anti-virus quarantined.
Check if the files are quarantined
Open the AVG Antivirus user interface and select History.
Select Virus vault and locate any QuickBooks file that has been quarantined. Example: qb.exe, qbw32.exe, qbdbmgrn.exe, qbdbmgr.exe.
Go for the required files, and along with that, select Restore and Close.
To end the process, open QuickBooks.
Check for any renamed files in the installation directory
Initially, close QuickBooks.
Check for the path C:\ program files\Intuit\ QuickBooks for the rename files in the install directory that were renamed. Example: QBDBMGRN_AVG_RESTORED.
Rename the file to the Original name.
Lastly, open QuickBooks desktop.
Method 4: Check PC Tools Internet Security
The steps below are to restore infections that have been Quarantined:
From the Settings menu, select Quarantine.
Also, choose Necessary items to restore, followed by selecting Restore.
Select Yes and hit OK button.
Setting up exceptions to prevent the QuickBooks directory from being scanned.
In this, you need to select the Settings option from PC Tools Internet Security menu.
Choose Global action list. Follow it up by selecting the add to select the Files to be excluded from scanning.
Select OK tab.
Hopefully, the methods should aid in the rectification of error code 6094, 0 and 6010, 2 from your copy of QuickBooks. If it is still appearing on your screen, then perform the next method.
Method 5: Restore QuickBooks files from quarantine (if any)
There may be a possibility that somehow your antivirus recognized QuickBooks as a threat and thus transferred critical QuickBooks executable files into the Quarantine folder. The steps below should give you an idea about how you can recover the file back to its original state.
Select the History from the program’s dashboard.
Hit a click on the Virus vault.
Followed by look for the file starts with qb and then click on the same.
The final step requires you to select the Restore option.
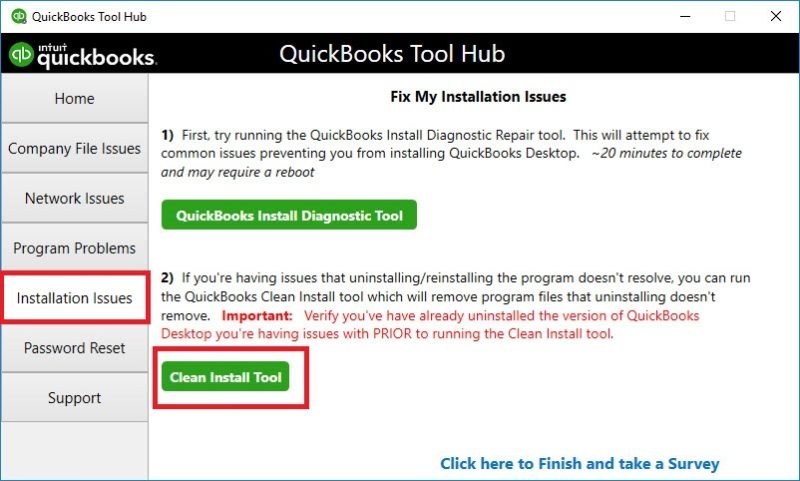
After that you need to install the QuickBooks Tools Hub program by hitting click on quickbookstoolhub.exe file.
Once done, open the tool hub from the desktop icon, then navigate to Installation Issues tab.
Here, you need to select Clean Install Tool to run the tool.
In the next step, follow the on-screen given commands. The clean install tool will uninstall and the re-install the QuickBooks.
Final Words..!
With this, we come to the end of this article, and we also hope that the information shared in above might be of some help in getting rid of QuickBooks error code 6904, 0. However, if the error still persists, you can get in touch with our team of QB specialists. Our U.S based accounting professionals will be there to assist you in getting rid of the error with much ease.
FAQs
What is QuickBooks Error 6094 related to?
This error is associated with certain issues in the database service that prevent the service from starting.
What causes Error 6094?
This issue can be attributed to a conflicting program running in the background or the Firewall or antivirus program blocking QuickBooks functionalities.
How to disable the antivirus to bypass Error 6094 in QuickBooks?
To disable the antivirus, follow the given steps: 1. Hit a right-click on the antivirus icon on the Taskbar. 2. After than hit on Temporarily disable the program option. 3. Once that is done, try restarting the Database Service once again.
QuickBooks is regarded as one of the finest accounting software, but at the same time, the fact that this software is prone to certain errors can’t be denied. There are certain errors that can hinder the smooth working process and through this article, we are going to discuss one of a common error i.e. QuickBooks QBWin.log errors that are faced by many users. In case you are getting an error message regarding rebuilding the company file, then you can tackle the issue by carrying out the steps which we will be discussing in this article.
To get rid of the QBWin.log errors, read this article carefully or you can get in touch with our XpertBooks Pro team of professionals at 1.800.761.1787. Our experts and industry best accounting professionals will be happy to help you.
Brief into QBWin.log errors in QuickBooks
Encountering these errors might be a bit annoying for you, but it can be done by rebuilding the file following the on-screen steps. After completing it, you might see additional error messages about the log files:
QBwin.log file: LVL_ERROR--QuickBooks has experienced a problem and must be shut down, ErrorCode:1256530728
You may often see these error messages if QuickBooks closes unexpectedly after an error, power outrage, or surge, or even due to server failure. Backing up the data on regular basis can be a savior in tackling this error, as it makes the process even straightforward.
Find out where to find QBWin.log and QuickBooks.log files that can assist you in determining the cause of specific issues found in the QuickBooks Desktop company file. QuickBooks Desktop logs program messages and errors, along with the information generated through the Verify, Rebuild, and Condense Data utilities, in an individual file. In Windows the file is named QBWin.log, and for Mac, the file is named QuickBooks.log.
Find QBWin.log or QuickBooks.log files on QuickBooks for Windows
Every QuickBooks version comes with their own QBWin.log. Each time you open your QuickBooks it renames the previous QBWin.log file and makes an entirely new one.
If you're only running just one edition of QuickBooks Desktop installed, follow the steps in Option A.
If you're unable to find the folder or folders within the way suggested by this guideline, then you may have to show hidden folders and files.
How to Access QBWin.log on the local computer?
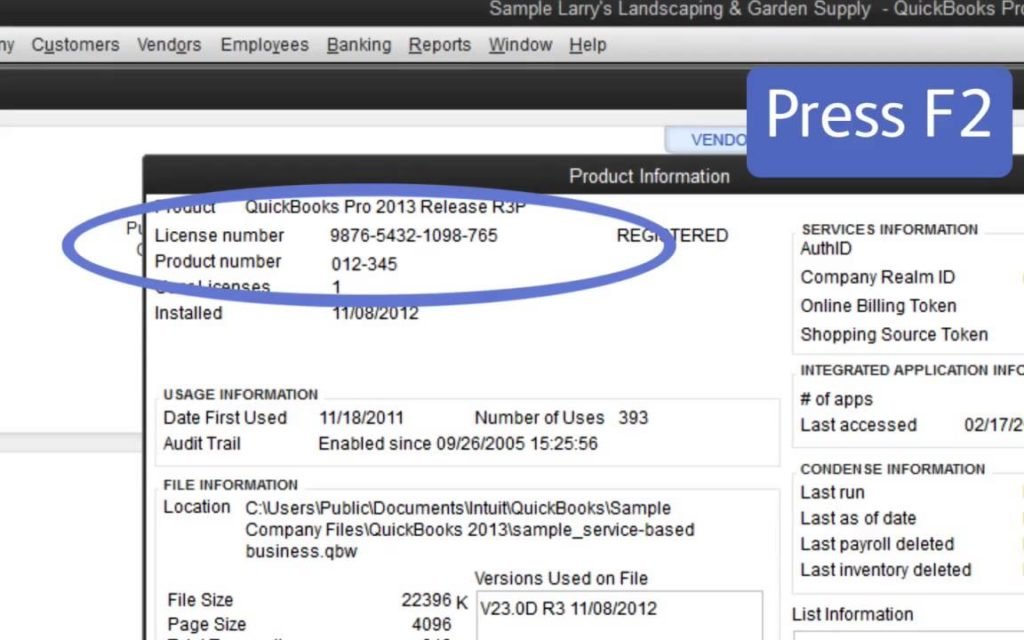
Option A. Access QBWin.log from the QuickBooks product Information screen
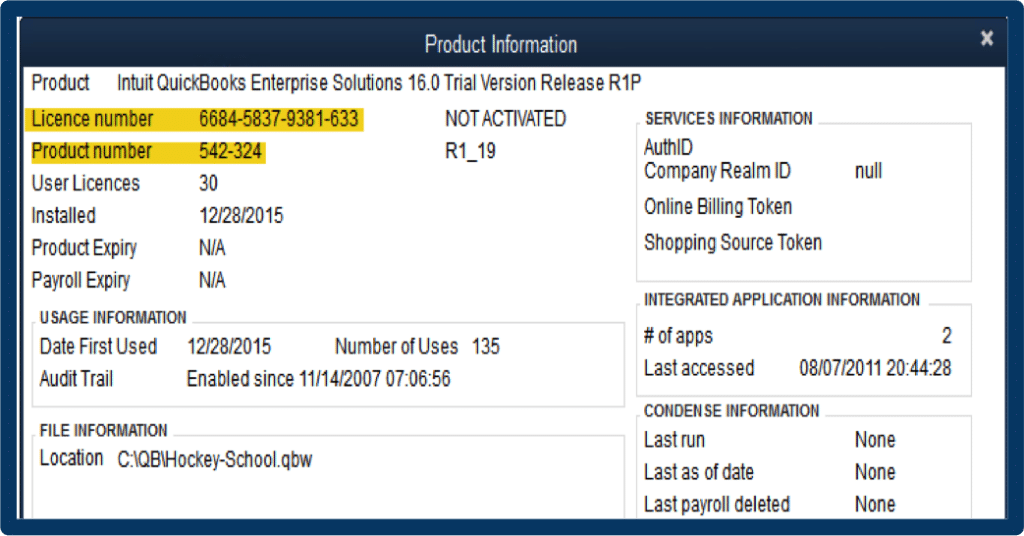
From the homepage, you need to press the F2 key or Ctrl+1 keys to launch the information window for the product.
Press the Ctrl+2 keys or F3 key to start your Tech Help window, then choose to open the Open File tab.
Now choose QBWin.log and then click Open File.
A quick tip is to press the Ctrl+F keys and then type "Start Verify" to locate the final entry of Begin Verify within the log files.
Option B: Access QBWin.log within Windows
Find the location of QBWin.log using File Explorer.
Location: C:\Users\YOUR USER NAME\AppData\Local\Intuit\QuickBooks\log\XX.X\QBWin.log
In this instance, XX.X represents your version of QuickBooks Desktop. For instance, 18.0 is Enterprise 18.0 and 28.0 is QuickBooks 2018.
Tip: A faster way of doing this is by typing %localappdata%\Intuit\QuickBooks\log\XX.X\QBWin.log to your address bar.
Log in to QBWin.log to Rights Networks or other Hosted Environment
For QuickBooks Desktop Pro/Premier users:
On the start menu in your Terminal or Hosted environment, choose Computer.
On the search menu, enter QBWin.log. Don't hit Enter or click on the magnifying glass symbol.
The list of QBWin.logs will appear. Check for QBWin.log with the most recent date and time.
For QuickBooks Enterprise Solution users:
On the QuickBooks Home page, press Ctrl+1 keys or F2 key for the Product Information window.
Press F3 key or Ctrl+2 keys to open the Tech Help window.
Select the Open File tab.
Choose QBWin.log. Then open the File.
Find QBWin.log or QuickBooks.log files on QuickBooks for Mac
At first. Select File menu and then Close Company.
Select OPTION with your keyboard and choose Help and then Product Information.
Click on the Collect Logs. This will automatically create a zip archive on your desktop, along with the log files.
Find it on the desktop, and double-click to extract the files. Within the folder, you'll find those log files.
Steps to fix the QBWin.log errors in QuickBooks desktop
These QBWin.log errors in QuickBooks can be easily tackled by carrying out the following steps:
Step 1: Rebuilding the company file
In this step, you are needed to carry out the onscreen instructions, when the message about rebuilding the company file appears on the screen and rebuild the data utility. This would fix the minor damage to the company files. The steps to be followed for manually repairing the company file by rebuilding the data are:
Ensure to have the backup of the company file.
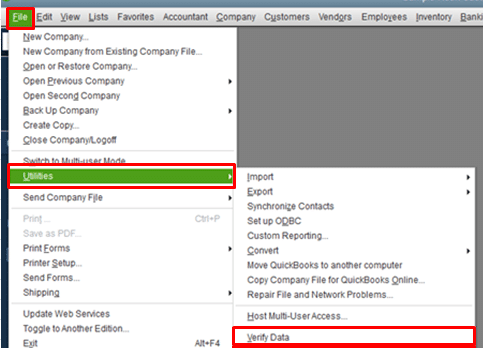
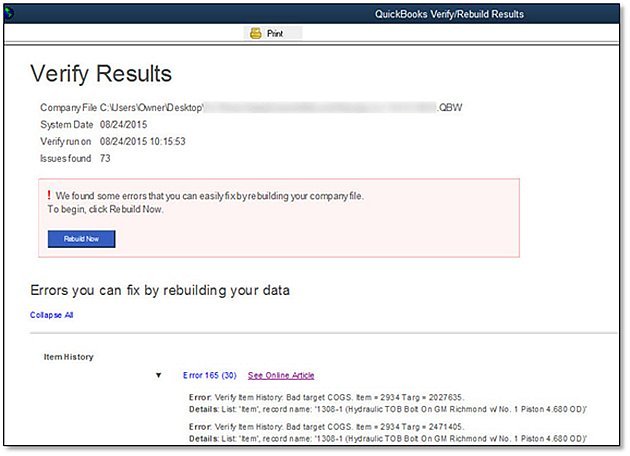
Move to the File menu and hover over Utilities and then choose Verify data.
Let the tool check the file for data issues.
Choose the expand all option from the verify results screen.
Go for see online article, for the steps to fix the issue.
Repairing the company file using Rebuild data tool
The rebuild data tool is built-in to QuickBooks desktop, and then it fixes the minor company file data issues automatically. The steps to be followed are:
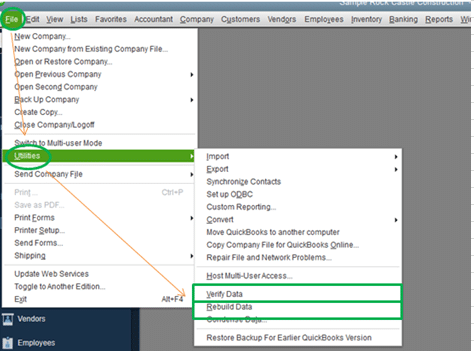
Move to the file menu, and then hover over the Utilities tab and also choose the rebuild data.
Next step is to select OK on the QuickBooks information window. And carry out the on-screen instructions to save a backup.
Next, let the tool repair the file. This might take some time. You might feel that the QuickBooks program might seem stuck, but as long as you are able to move the mouse, the tool is working.
Once the tool finishes its task, it is recommended to select the OK tab.
Now move to the file menu. And then, hover over the utilities and also choose verify data.
And lastly, let the tool check the file for data issues.
In case the QuickBooks doesn't find any issue, then we would recommend you to select OK tab. You can continue to use the company file, as this will not damage the data. However, if QuickBooks detects any issue with the company file, then we suggest you to select Rebuild Now.
Step 2: Restoring a backup
In case you are having a recent backup of the company file, then it can be easily used to restore the accounts. Now open QuickBooks and the company file. In case the QBWin.log error message appears on the screen, or the backup is not available, the next step should be implemented.
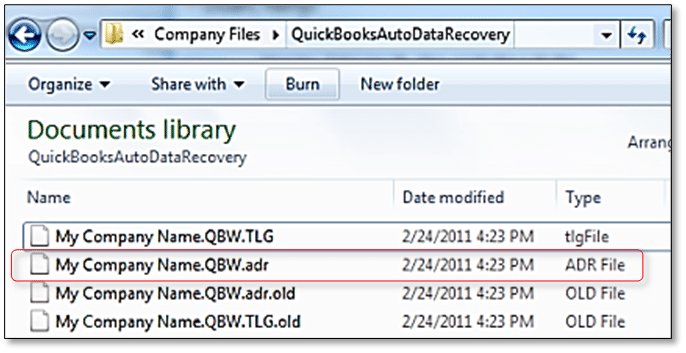
Using the QuickBooks auto data recovery tool can also work in order to fix this error code. This tool is capable enough to fix the errors that are not fixed with the help of the rebuild data utility tool.
Step 4: Checking the rebuild report
Once the rebuilding the file process completes, it is time to rebuild the report:
Open the QuickBooks and then open company file.
Press F2 to open the product info window.
Moving ahead, select review last verify/ rebuild.
Now review the verify/rebuild results. And then, choose expand all option to see if the QuickBooks software found any errors.
If you encounter any of the below error message, then you can carry out the steps below:
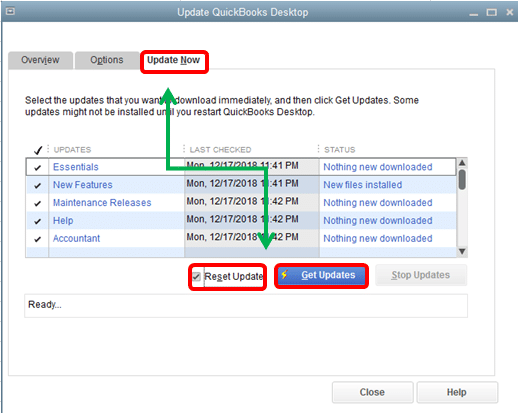
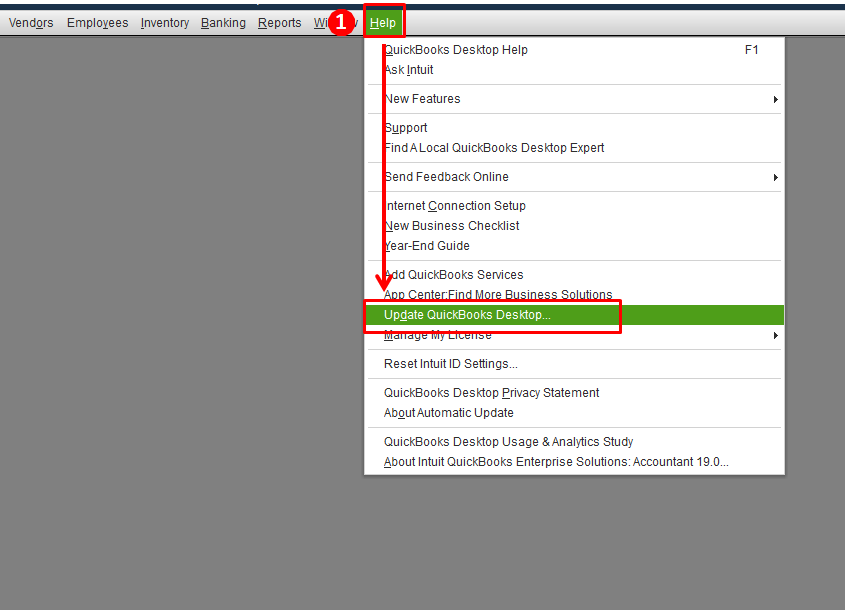
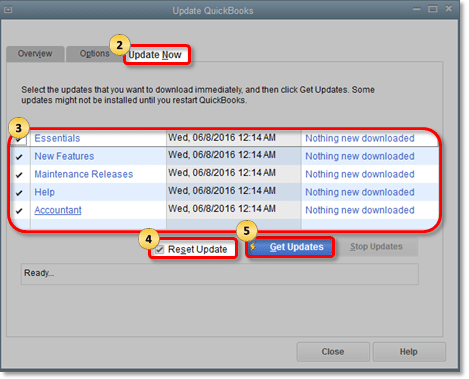
Moving to Help menu and then selecting the update QuickBooks desktop option.
Move to the update now tab and then select the reset update checkbox to clear all previous updates.
Next step is to choose get updates option to begin with the download.
Followed by restarting QuickBooks, when the download completes.
Moving ahead, you need to accept the option to install the new release, when asked.
Conslusion
Tackling with QuickBooks desktop QBWin.log errors might seem to be a tedious task to many users, but at the same time, it can be easily fixed by performing steps we have mentioned above. However, in case the error persists even after implementing all the above given steps, or in case any of the queries remain unanswered, you can simply get in touch with our error handling experts at XpertBooks Pro. Help is available round the clock!
FAQ's
What is QBWin.log in QuickBooks Desktop?
QBWin.log is a log file in QuickBooks desktop that records detailed information about the program's activities and any errors encountered.
What are common errors found in the QBWin.log file?
The QBWin.log file may contain various types of errors, including: 1. Data damage errors 2. Network connectivity errors 3. Installation errors 4. QuickBooks application errors 5. Errors related to third-party applications or services integrated with QuickBooks
Is it necessary to fix every error found in the QBWin.log file?
Not every error found in the QBWin.log file requires immediate action or fixing. Some errors may be informational or related to non-critical issues.
Can I delete the QBWin.log file?
Yes! You can delete the QBWin.log file if you no longer need it or want to clear the log history. QuickBooks will create a new QBWin.log file when it runs again.
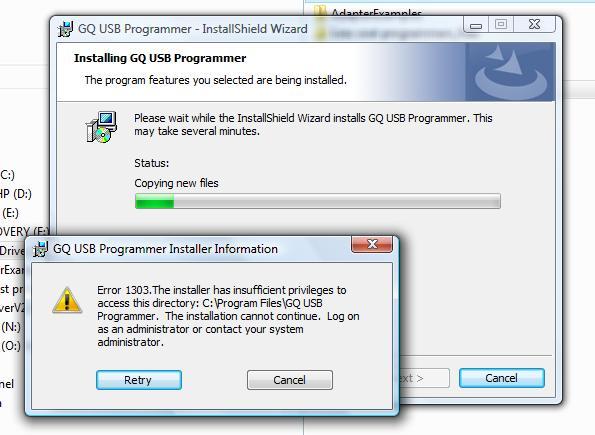
Are you experiencing QuickBooks error code 1303 and unable to tackle it? Well, need not worry anymore, as we are here with this comprehensive guide to fix this error effectively. This error is often encountered at the time of installing QuickBooks desktop. It basically means that the installer does not have sufficient privileges to access the path to the directory. Such an error also comes up with an error message stating:
Error
Description
Warning:
“Error 1303: Installer has insufficient privileges to access this directory. C:\...\Intuit”.
This error can be very much frustrating for QuickBooks users to handle. Keeping that in mind, we have come up with this article to address the causes as well as the quick fixes to the installer error 1303 in QuickBooks. Thus, make sure to read this guide carefully and follow the instructions to resolve the error as quickly as possible.
What leads to QuickBooks error 1303?
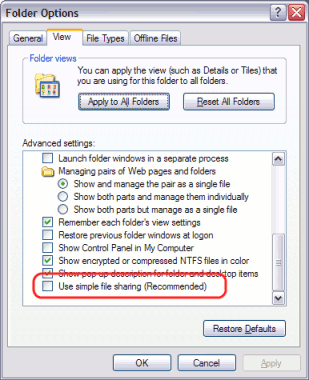
There are not plenty of reasons behind the occurrence of this error code, but there can be a few common ones. This error is usually seen when the system group is unable to access the directory due to a lack of full control. Or if there is any issue with the QuickBooks installation. The same error can also be encountered, if the settings for Windows file sharing are misconfigured.
In case the system doesn't have enough space in its driver to save the installer files.
If the system group or the noted directory doesn't have full control privileges.
Another reason can be if the settings for Windows file sharing are misconfigured.
In case there is any technical error in QuickBooks installation.
The error can also be identified, if the error itself displays on the system screen.
Another symptom of the error 1303 can be if the Windows slowly interact.
If the Windows runs sluggishly or do not respond to user inputs.
Methods to Root Out QuickBooks Error Code 1303
You can resolve this error, by either downloading and installing the QuickBooks tool hub or by carrying out the manual steps. You can also run the rebuild utility to get rid of this error.
Note: It should also be noted that for Windows Vista, the utility might not work due to the differences in file structures and permission.
You can create a utility that resets system groups and all group permissions settings to Windows default settings. Another possible option is to manually change the permissions for the system in full control and folder C:\Document and Settings\ All Groups for all users. Let us check out each of the methods one by one:
Method 1: Downloading and installing QuickBooks Tool Hub
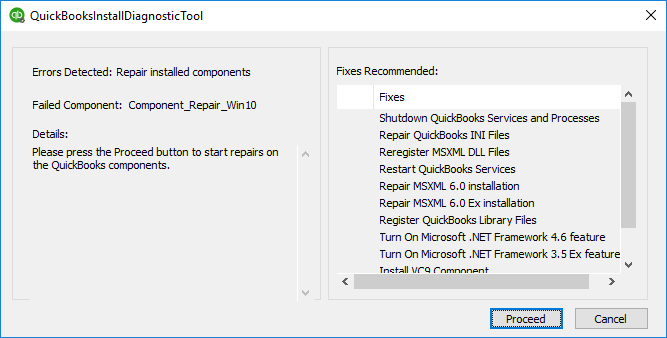
The QuickBooks tools hub is a great invention that helps in tackling a lot of errors. Downloading and installing tools hub can help you in getting rid of QuickBooks error 1303. It should be noted that you will have to close the software, in order to use this tool. After installing the tool, you can move to the fix QB desktop install errors in the tool, and then use the QuickBooks install diagnostic tool. The steps involved here are:
The utility resets system groups and all group permissions settings to Window settings. Running the utility might work up to a certain extent to fix this error. Let us check the steps out:
Initially, click on the link: permissionsfix.bat.
Select the Save option and then save the file on the desktop of the affected system.
Double click the File, that will open the DOS window in desktop screen and then you can type “Y” at prompt. Running the script will reset the permissions of the affected folders to the default settings. And you will be prompted “are you sure you want to continue? (Y/N)”.
Note: It should be noted that you can type in “y” only in lowercase to initiate the script. In case Y is typed in Block letters, you will return to the error.
After that, press any of the keys and exit the DOS window.
Insert QuickBooks CD and try to install it again.
Method 3: Resolving the error manually
The last method that one can opt for is manually changing the permission to full control for system and everyone groups for the folder C:\Documents and settings\All users. The steps involved in this process are as follows:
Step 1: Editing the permissions for the appropriate folders
Press Windows + R keys to open the run window.
Enter the path C:\ProgramData\COMMON FILES in the open field and then hit OK tab. This will open up the folder contents window.
Click on the organize option in the folder window and then choose Properties Windows 10. Followed by selecting properties on the top ribbon of the folder window.
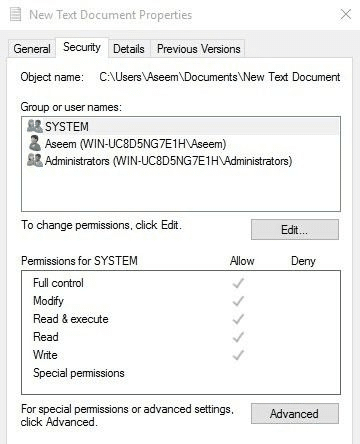
Choose the Security tab in the properties window.
Hit a click on the advanced tab and tap on Edit tab.
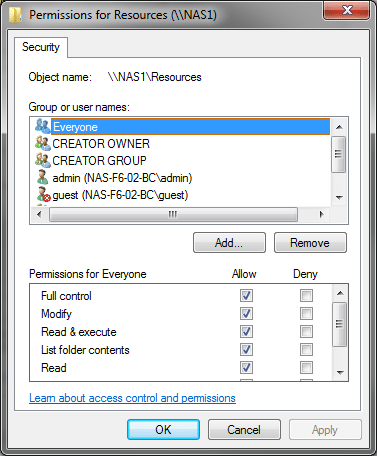
Scroll down the list of permission entries and double-click the system user.
Select the checkbox for the Full control row in the Allowcolumn. Followed by clicking on OK button.
Repeat the steps with everyone group, if exists.
Check the checkbox saying Replace all existing inheritable permissions on all descendants with inheritable permissions from this object.
Performing the above-mentioned solutions and steps can be pretty helpful in getting rid of QuickBooks error 1303. However, if the error persists for some reason, or the error continues to trouble you, then make sure to contact our professional for technical assistance. We are a hub of certified accounting professionals, who work round the clock to provide the best possible assistance for all aspects of QuickBooks needs. Feel free to contact us anytime our cordial team will be happy to assist you.
Frequently Asked Questions (FAQ's)
What is QuickBooks Error 1303?
Quickbooks Error 1303 is related to QuickBooks updates.
How QuickBooks Error 1303 can be be resolved?
Perform the following processes <Run QuickBooks Tool Hub>, <Reset system groups> and <Use manual steps>.
What is QuickBooks Tool Hub?
QuickBooks Tool Hub is an "error-resolution tool" offered by Intuit. The tool: 1. QuickBooks Install Diagnostic Tool 2. File Doctor Tool, and 3. Quick Fix My Program.