QuickBooks accounting software is one of the finest accounting software that is used by many business owners around the globe. It lets them to manage their business without much knowledge of bookkeeping and accounting. But sometimes, it can't be denied that there are specific bugs and errors that may show up suddenly and trouble you. One of the errors in the list that users often complain about is overflow in QuickBooks desktop. This is not a commonly seen error, but at times it can be very annoying while opening the chart of accounts or when your company balance sheet displays the overflow error instead of the amount. This error takes place when the value of one of the accounts exceeds.
Overflow error often causes unwanted laps and hinders the smooth working process. In order to get rid of this technical snag, you will have to analyze the error properly and carry out the required solutions. In order to simplify the process for you, we have come up with this article where we will tell you the right solution that you can carry out in order to get rid of the overflow error in QuickBooks. Moreover, if you have any sort of query, you can simply get in touch with our accounting professionals.
Below are some of the cases when our customers have reported the QuickBooks Overflow Error:
When you run Verify Data utility in QuickBooks and gets this error message popped up on the desktop. The error may read “A QuickBooks overflow error has taken place.” This describes that your account has exceeded the maximum value allowed.
While opening Chart of Accounts, if a user receives overflow error rather than the account in one or more of the account balance sheets.
When a user runs a report and overflow error shows in one or more amount columns up in place of a particular amount.
This is a specific type of data, where all the measurement units are combined with each other in order to exceed the limits of a specific field. You can encounter this error while opening any report and field of any column display overflow text. Also, this error gets displayed on the screen while running the verify data utility.
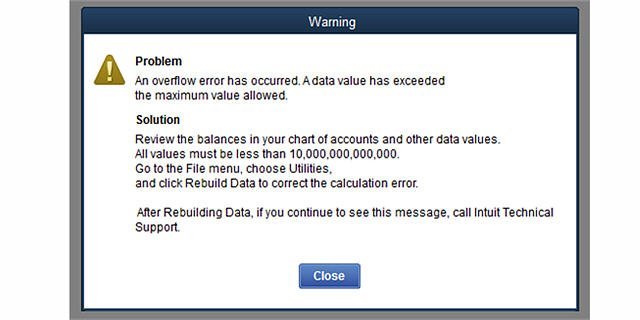
A error message might appear on the screen stating as:
Error
Description
Problem:
An overflow error has occurred, one of your account has exceeded the maximum value allowed.
The same can also be seen with the chart of accounts, especially when one or more of balance sheet display overflow in the place of an amount. Also, one or more amount columns will show OVERFLOW when you run a report instead of an amount.
When does overflow error appears in QuickBooks desktop?
There can be certain situations, when the QuickBooks user might end up in QuickBooks overflow error. These situations include the following:
In case you runs the QuickBooks verify data utility, you might stumble upon such error message stating “A QuickBooks overflow error has taken place” This indicates that one of the accounts has gone beyond the permitted maximum value.
If the report is running by you, instead of an amount, then overflow is shown in one or more of the amount columns.
At times when you open chart of accounts, instead of an amount, then overflow error is seen in one or more of the sheet accounts.
What Leads to QuickBooks Desktop Overflow Error?
There can be a few causes due to which you might encounter this annoying error. A few of which we have listed below:
At times the format matter for overflow errors. To understand better, let us seek an example: the format you are copying from an Excel spreadsheet somehow mismatches the format that is accepted by the QuickBooks, in that case you might encounter this technical snag.
If you converted one large quantity on a Group item to another large quantity, then it is most probable to encounter this error. It will appear next to the group’s component items.
Damaged transactions are also one of the most common reasons of this error in your company data file.
In case an inventory item with a value is larger than the number of the items, then in that case you can stumble upon QuickBooks desktop overflow error.
Data corrupted transaction data in the company file can also be one of the common reasons.
Another factor causing the error can be the company account balance and other fields greater than $9,999,999,999,999.99.
If there is an Inventory item with a too large value for the number of items, for example, a quantity of 1 and a value of $20,00,000 can be another factor causing the error.
Solutions to Resolve Overflow Error in QuickBooks Desktop
In order to get rid of from QuickBooks overflow error, you can carry out the methods listed below. All you have to ensure is that the sequence of the solution remains the same in order to avoid any kind of mess.
Important: You should also ensure that the system requirements of QuickBooks are fulfilled and check the system's regional settings, the disk space of the system, and also the RAM available. Now moving onto the solutions, let us check out the methods that can be followed one by one:
Solution 1: Rebuild your company’s data file
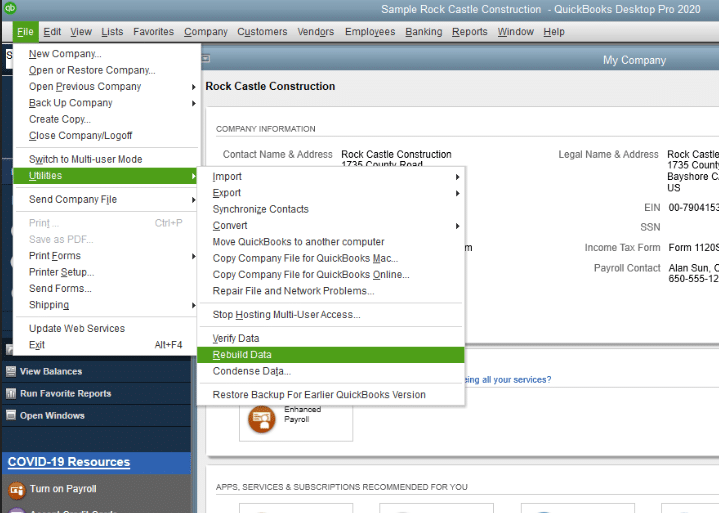
To fix this problem first you can try to rebuild your data file using the following steps:
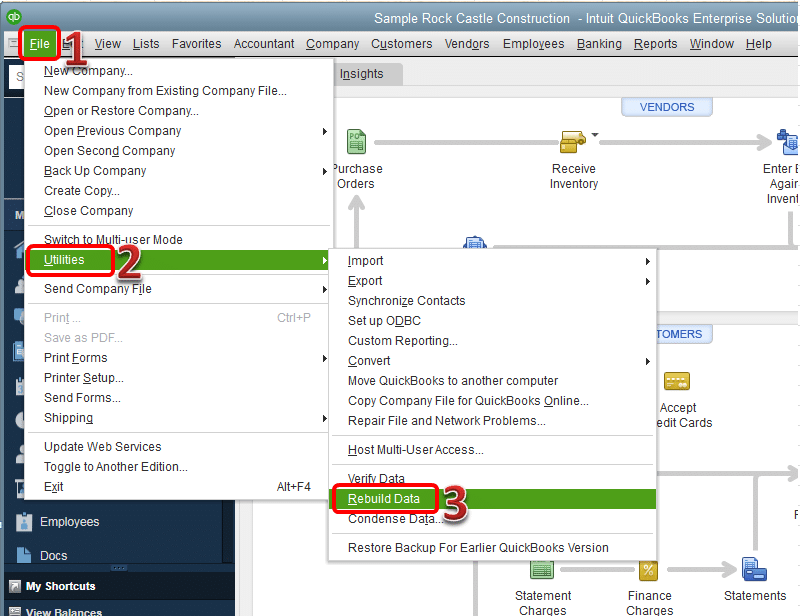
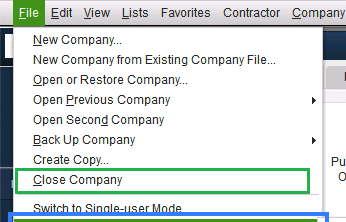
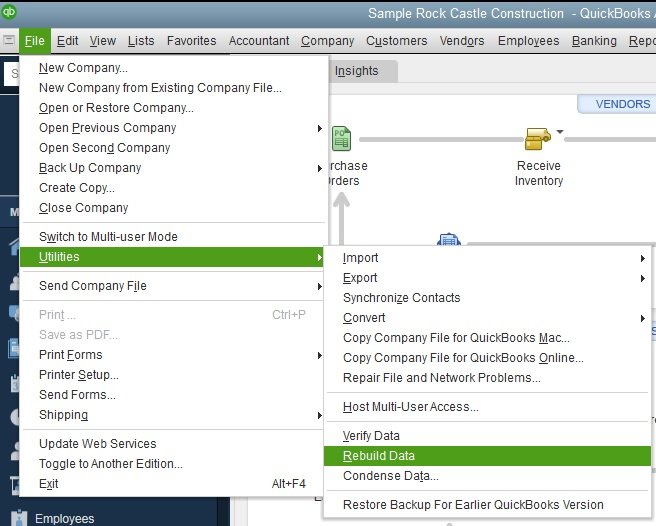
The initial step is to go to the File menuin QuickBooks.
Moving ahead, select the Rebuild Data option.
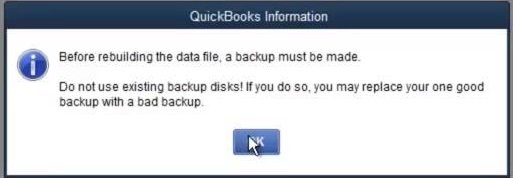
In case the Warning message appears on the screen and ask to Backup a company file. You will have to click on OK tab. This will display the QuickBooks not responding error message, but if you are able to move the cursor, the method can be ignored and you can wait for the process to complete.
Now wait for the backup process to complete.
Lastly hit a click on OK when you receive the message - Rebuild is complete. And you are good to go then.
Solution 2: Export your QuickBooks file to Microsoft Excel to discover the overflow
Step 1: The first step is to Export lists to desktop
Sign in to your company file as System admin.
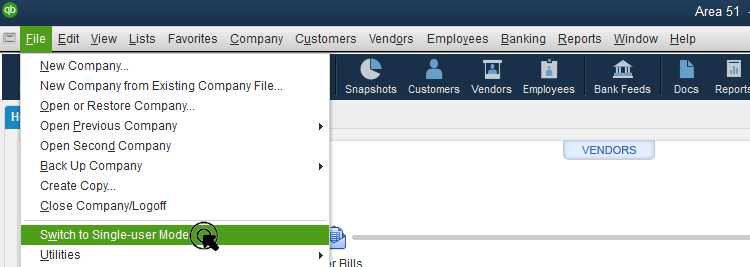
Head to the File menu and select Switch to Single-user Mode.
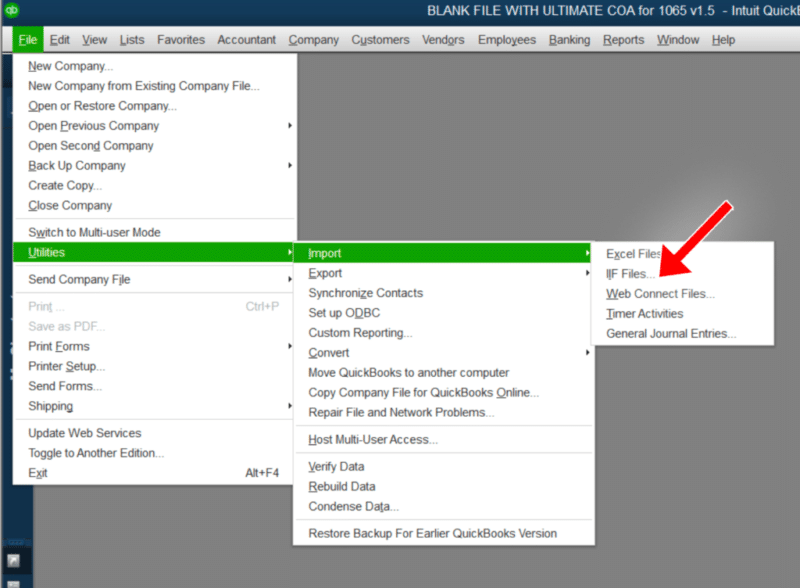
Navigate to the File menu and choose Utilities and then click on Export.
Now choose Export IIF Files option.
From the Save in drop-down menu, now choose the location you want to save the IIF. (Ex: your Windows desktop.)
Enter a name in the File name field and then click on Save.
Finally, click on the OK button.
Step 2: Minimize the QuickBooks software.
Step 3: After that right-click on the Export file.
Step 4: Moving ahead, select Open with Excel from the list that appears.
Step 5: Spot the transaction having overflow value.
Press Control and F keys simultaneously.
Followed by, typing the word *overflow*.
Hit the Find next option.
Step 6: Now minimize QuickBooks again.
Step 7: Lastly, go back to QuickBooks and rectify the field data in Account, Name, Item having overflow.
Step 8: In the last step you need to check if the error persists.
The first two processes may take some time. Keep patience and let the tools do their work. If the repair tool find no error, go on and use your file. If not, perform the troubleshooting manually. However you may require to have good compute knowledge. In case you are not aware of the process of repairing QuickBooks manually, we suggest you contact a professional.
Step 2: Create a portable file and restore the created file to a new working file
Login to QuickBooks as an Admin > go to File menu > select Create Copy > Portable company file > Next > Enter a name > Save it to desktop or any location you want > select Save and OK button.
Step 3: Check your Chart of Accounts
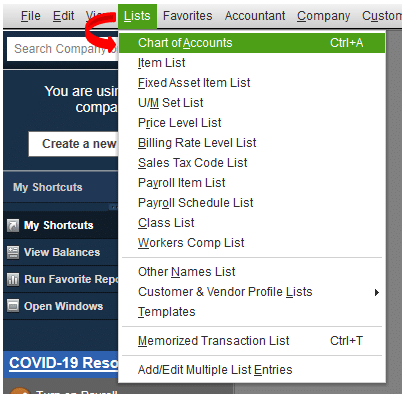
Under this process, you need to go to the Lists menu and tap on Chart of Accounts.
And then, Locate the account with a balance of 10, 000, 000, 000, 000 or more.
Reduce the account balance so that it doesn’t reach 10,000,000,000,000.
After that, move to the next step.
Step 4: Look into your Memorized Reports
Just in case the overflow seems to appear on a memorized report, you should run the report from the Reports Menu.
If you don’t find overflow in the new report, remove and recreate the Memorized Report.
If the new report consists of overflow, proceed to the next steps.
Step 5: Search all fields of all lists that display an amount or total. You may also have to include the inactive items as you go through your lists
Initially, go to the Lists and click Add/Edit multiple List Entries.
After that hit a click on Customize Columns and select any field that has an amount (for Credit Limit, expenses, bills, etc.).
Look for Overflow then if required edit, change, or delete that amount.
Followed by, check All the list.
In updated versions of QuickBooks under Edit, search for “overflow” and for list elements first followed by transactions.
Continue running verify after completing the editing part of the amounts in the company file until the message stops appearing on the screen.
At times in QuickBooks account showing only one item is overflowing, mostly the overflowing item is newly added. The exception to that is the already existing item in the list also showing such error.
If the overflow is with a new item, delete it from the list of items and recreate it.
Now, ordered the item in case it is not a new item and correct the overflow causing transaction.
Audit the item in the list and make amendments in the transaction causing an overflow, for example: A Bill with an amount of one million dollars and an amount of 1 in place of 1 million will change the average cost from one USD to 1 million USD.
If you are unable to find such a transaction, put in an Adjust Quantity/Value on Hand document for adjusting the average cost.
Solution 6: The damage transactions are leading to QuickBooks
If the overflow issue is triggered by transactions, you would easily be able to find it.
Run various QuickBooks reports until overflow is seen, including Financial Statements, Custom Transaction Detail, Sales by Customer, Sales by Item, etc. until you see overflow.
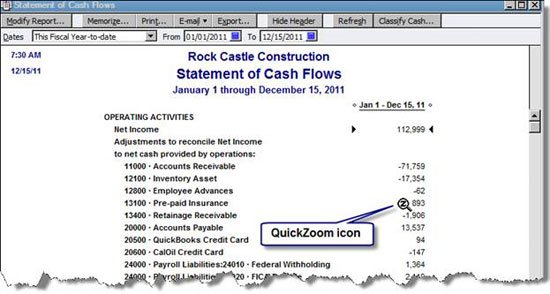
Move to the Transaction level by the way of QuickZoom on overflow.
The last step is to Fix the transactions.
Firstly Run the Rebuild and Verify Data utilities on your system.
You can perform the troubleshooting steps that are mentioned above to resolve the Overflow error in QuickBooks desktop and resume your work. However, in case the error still persists or you are not comfortable performing any of the steps mentioned in the post, please call our accounting experts team via our helpline i.e., 1.800.761.1787. Our experts will handle this issue for you.
FAQ's
What is QuickBooks desktop overflow error?
Overflow error generally occurs when the items in the list, like the chart of accounts, vendor list, or customer list, surpass the maximum allowable limit in QuickBooks.
How do I know if I have QB Desktop overflow error?
You may encounter the following error message on your screen: "Overflow Error: More than 100,000 accounts, customers and other names, or items".
How do I merge items in QuickBooks Desktop?
The steps to merge items are: 1. Access the list containing the items. 2. Select the items to merge and right-click on them. 3. And then hit a click on Edit tab and follow up by clicking on Change Account. 4. Now opt for the account to merge the items and hit on Ok. 5. Later head towards, tap on Yes on the prompt.
How do I archive items in QuickBooks Desktop?
Perform the following procedure: 1: Access the list of items. 2: Pick the items to archive and right-click on them. 3: Hit on Make Inactive.
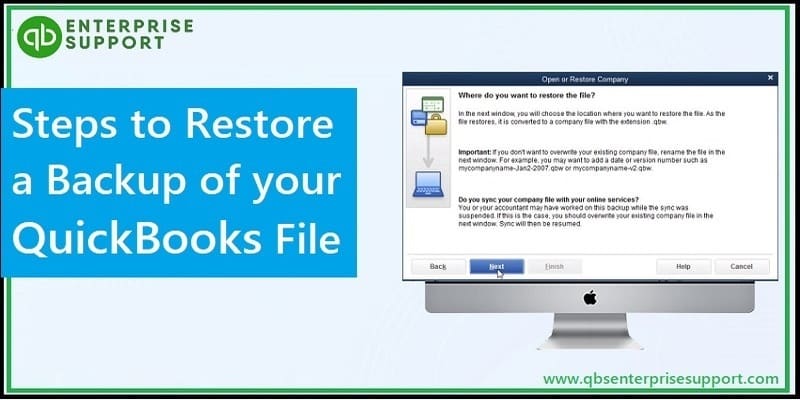
QuickBooks accounting software has marked its presence in the accounting industry in the recent couple of years. It has created a lot of buzz in the accounting world. However, there are certain things where you get stuck and seek for professional assistance. Majority of the users face difficulty in restoring company files in QuickBooks desktop. Thus, keeping that in mind, we have come up with this post, where we will be discussing the process to restore the backup files in QuickBooks desktop. Make sure to read this post till the end. Moreover, you can also get in touch with our accounting professionals team for further assistance.
Many times, users find this procedure quite challenging to deal with. In those cases, allow our professionals to perform the task of troubleshooting on your behalf. Start off a conversation with our U.S based accountancy experts straight away, and our assistance team will certainly happy to help you.
What do you mean by restoring backup for QuickBooks?
Basically, when any kind of corruption occurs to the QBW file, the stored data becomes inaccessible, which might stake the accounting information of the organization. In such a situation, you can employ a manual method of restoring the QuickBooks company file from the local backup. This is only possible if the backup is created earlier. Also, in order to restore the backup of the company file from the local backup, you will have to have the password for the admin account as a part of the restore process. Read on the post to learn the process to restore backup.
Steps to Restore Backup Files in QuickBooks Desktop
At the time when you make an attempt to restore the backup file, QuickBooks makes use of the backup file with the .qbb extension, in order to create a new company file with the same extension. In case the backup file is present on the external drive, then in such a situation, you will have to transfer it to the local drive and then continue with the process. Also, while downloading the file, an option will show up regarding where to save or map the file. So, make sure that you opt for a location where you can access it easily. Now that you know all the facts, it is time, to initiate the procedure.
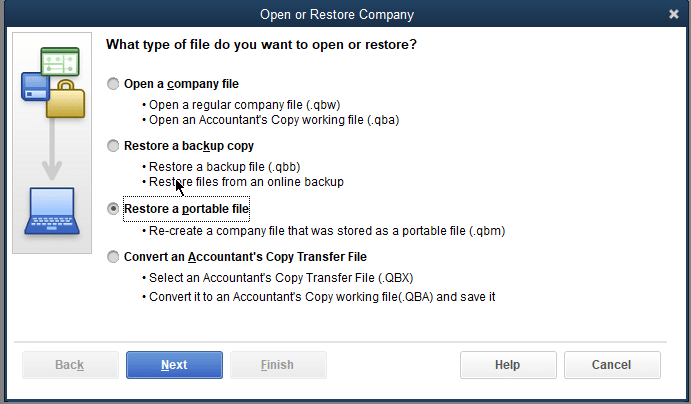
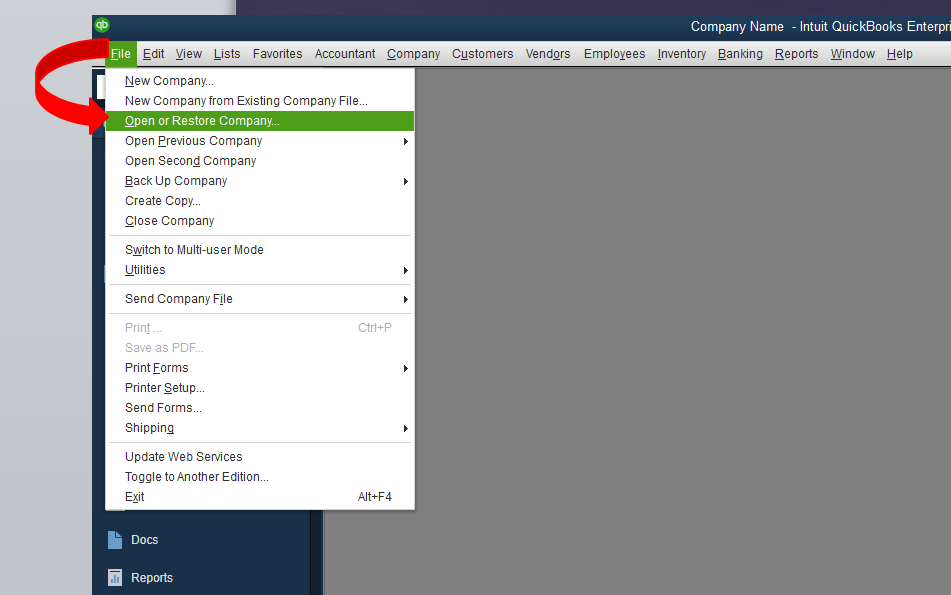
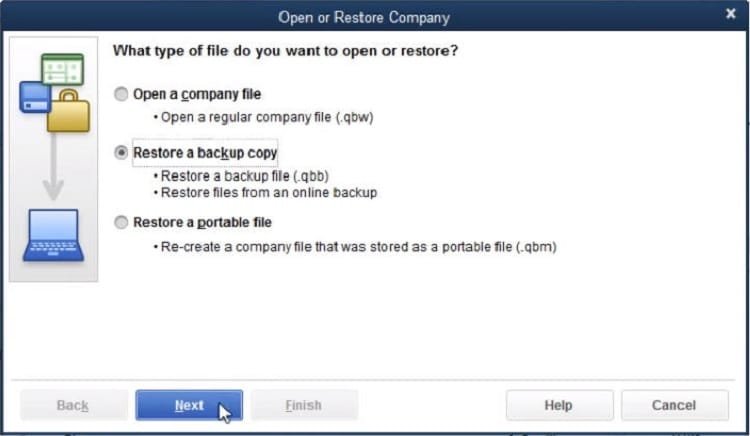
Step 1: In this process, navigate to the File menu and then choose Open or restore company option. This step will open up the restore wizard.
Step 2: Moving ahead, you need to click the Restore a backup copy having the .qbb extension. Once done with that, make sure to click on Next.
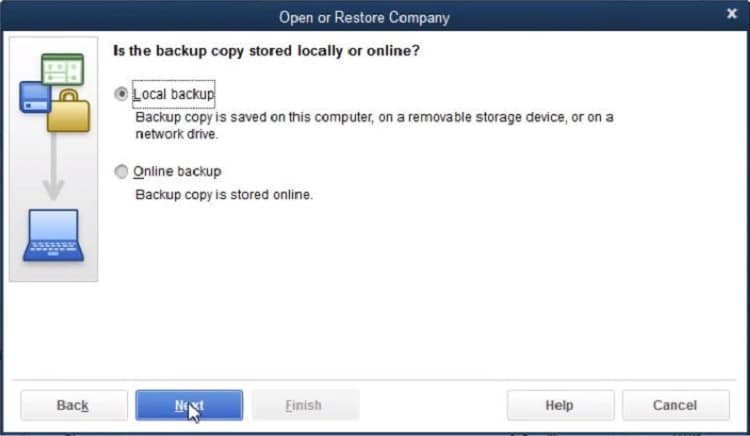
Step 3: Once done with that, choose Local backup, and hit the Next option once again. This will now open up the backup copy window.
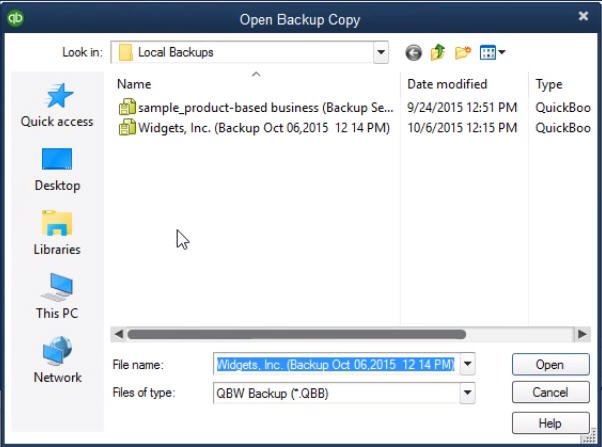
Step 4: Browse the location having the backup file. This step is not mandatory and should be performed only if needed.
Step 5: Choose Backup file, and then tap on Open and then Next tabs respectively.
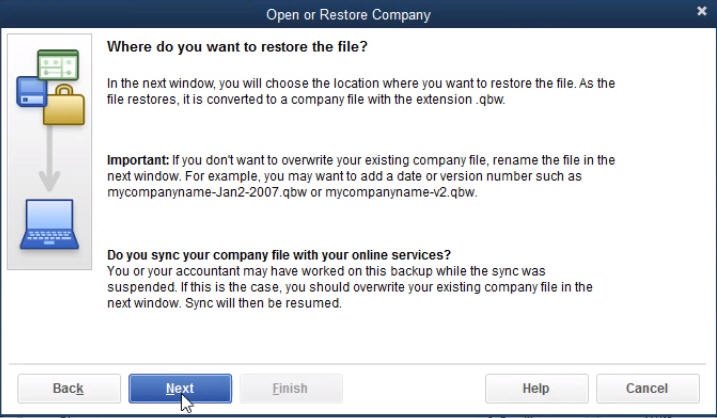
Step 6: It should be noted that if you open the backup in the same folder as the existing company file, you might end up overwriting the data. Simply to avoid this, you can rename the existing company file or the backup so that the names differ from each other. Moreover, you can also save the backup in a completely different folder. This will also help.
Step 7: This would not require you to hit on Save option from the drop-down arrow. Then, move to the location, where the backup file is to be restored.
Step 8: This drives you towards the end of the process, where it is important to choose the Backup file and hit on Save.
Note: In case any of the messages get displayed on the screen, then you'll have to respond to each of them.
Steps to Restore a Backup of QuickBooks Company File from the Local Backup
The process to restore backup company file involves the steps below, but before that you need to move the file to the local drive, if the backup company file is on external device like USB or hosting service like Box. Follow the steps:
Click the File from the menu bar and then select the Open or restore company.
Select the Restore a backup copy opt to restore the data from the backup copy and then tap on Next.
After that, the window will ask for the location of the saved backup copy and then you will have to select the Local backup to restore the company file from the backup stored on to the network or any removable media.
Note: In case you have saved the backup copy online, then you need to select the online backup option rather then opting for local backup.
Next, hit a click on Next and then Continue after making a choice between Online backup and local backup.
Use the Open backup copy dialog box that appears to navigate to and select the Local backup copy for the restoration process.
Moving ahead, opt for the Open tab in the Open backup copy dialog box and then return to the Open or restore company window.
Note: The point to be noted here is that, rather than executing the steps above, you can select the file from the menu bar and can select the name of the local backup file to use.
A window open or restore company will display Where do you want to restore the file? Screen. After which you need to hit the Next tab.
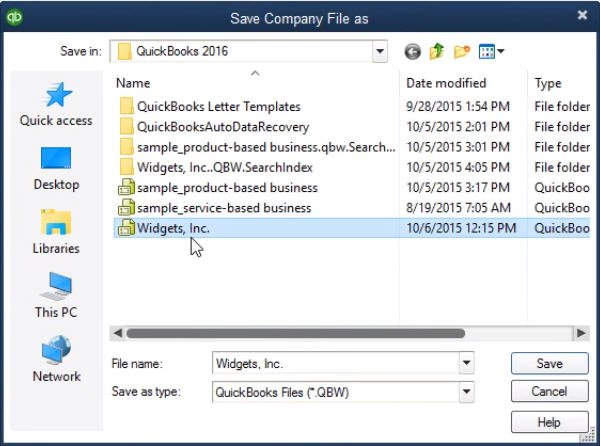
Now, select Save company file dialog box and then select the Damaged company file to overwrite the data with the data from the backup copy.
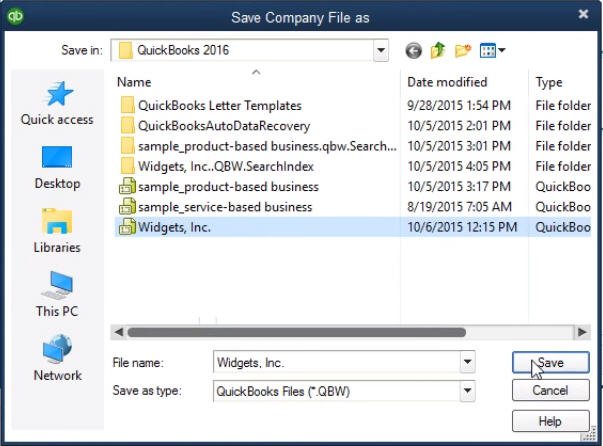
Next step is too select the company file and then click on the Save tab.
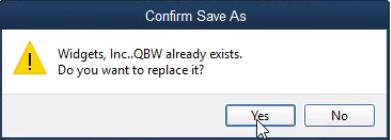
Followed by clicking on Yes and then replace the selected company file.
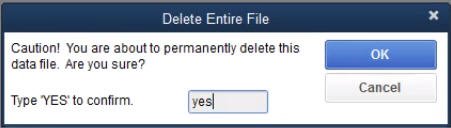
Now, type Yes in the text box in the delete entire file window and then hit on OK tab.
Enter the password into the password field in the QuickBooks login dialog box and then click on the OK tab.
Important Note: You can continue with the steps below to finish restoring the company file, in case the password is not created for the admin account.
Enter a different name for the admin account into the username field.
And then, Enter the password for the user account into both the new password and Confirm password.
Followed by selecting a challenge question and enter the answer.
Hit on OK button to finish restoring.
Lastly, re-enter the transactions into the company file and the process is over.
Concluding Words...!
Well, these were the quick and easy steps to restore your backup company file for QuickBooks desktop. However, if you're facing any kind of issues while performing these steps, then in that case, you can get in touch with our certified accounting professionals. Connect with our US based accounting experts by way of our helpline number: 1-800-761-1787. Our experts will be happy to help you. Do not hesitate in calling us anytime, we will be there to assist you round the clock.
FAQs
Can I restore a backup created in a different version of QuickBooks Desktop?
It is better to restore the backup in the same or compatible QuickBooks version used for the creation of the backup.
What types of backups can I restore in QuickBooks Desktop?
The backup types that you can restore in QuickBooks encompass Local backups, Network backups, Online backups, Portable backups, etc.
Can I restore a backup on a different computer or location?
Yes, you can restore a backup on a different computer or location.
How long does it take to restore a QuickBooks backup file?
Although the speed of the restoration depends on several factors, it generally takes 5 to 10 minutes to culminate with the backup.
QuickBooks accounting tool assists business owners and accountants with a wide range of cutting-edge features. The software has changed the way how businesses used to handle bookkeeping and accounting tasks. But, like any other software – QuickBooks too experiences issues at times. While many of the issues can be fixed by simply following the prompts on the screen, some need technical knowledge to continue the uses of the software. This blog post is created to inform you about how you can verify and rebuild data utility in QuickBooks desktop. So, keep reading on!
QuickBooks being a multi-faceted tool that can be plagued by a number of issues. Presence of any kind of virus or malware can lead to such an error. These malicious files can also affect the software. It might result in an inadvertent selection of setup file that are important for you. Further, this might end up in an inadvertent selection of setup files that are important. You might also face certain other issues:
The system freezes all of a sudden while you are operating the software.
The response time of the system is very slow when the commands of the mouse or keywords are stimulated.
If the Windows OS is unable to start up in a proper manner.
It’s important to know that you should use QuickBooks Verify and Rebuild Data Utility on a regular basis to avoid errors and to keep you company file free of errors.
Points to Remember before Verifying and Rebuilding Data
Before you instigate fixing errors, make sure that you verify the following points:
In order to rebuild data in QuickBooks, you can carry out the steps below:
To begin with, move to the windows option and then select close all.
Select the File option and then click on the Utilities option, followed by clicking on the Rebuild data option.
Moving ahead, you will get a warning message for backing up the company file and then hit the OK button.
The next step is to avoid replacing the current backup. Or else you should use an external device for this backup.
Enter the new name in the filename field to avoid the current file to overwrite.
Next, rebuild the data process, which will start when the backup process completes.
After the application shows rebuild has been done, hit a click on OK button.
Moving ahead, close the rebuild company and then reopen the lists in the file.
Choose the File menu and also closing the company.
Now choose the File and then open the company. You are now required to select the company file which is supposed to be open, and then hit a click on open option.
Then, analyze the check register and the balance sheet, along with the profit and loss reports.
Further analyze the information about the rebuild data utility by reviewing the QBwin.log file. This would have all the information from starting to end about the whole process.
How to Verify and Rebuild data in QuickBooks Desktop for Mac?
Well, if you are a QuickBooks Mac user, then the above steps are of no use to you, as the process to verify and rebuild data generally differ in QuickBooks for Mac. So, check out the steps listed below:
Step 1: Verify Company file data
The steps to verify company file data for errors or data damage are as follows:
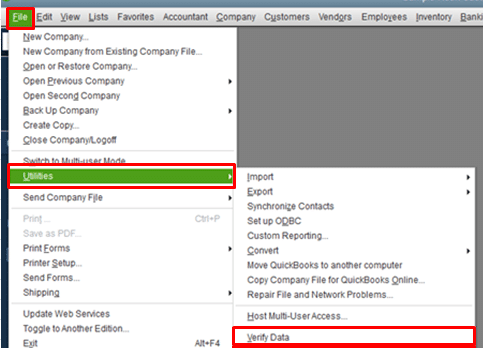
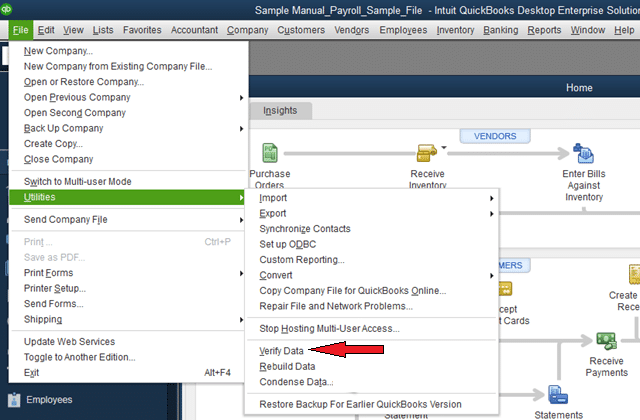
Select the File option and then select the Utilities option.
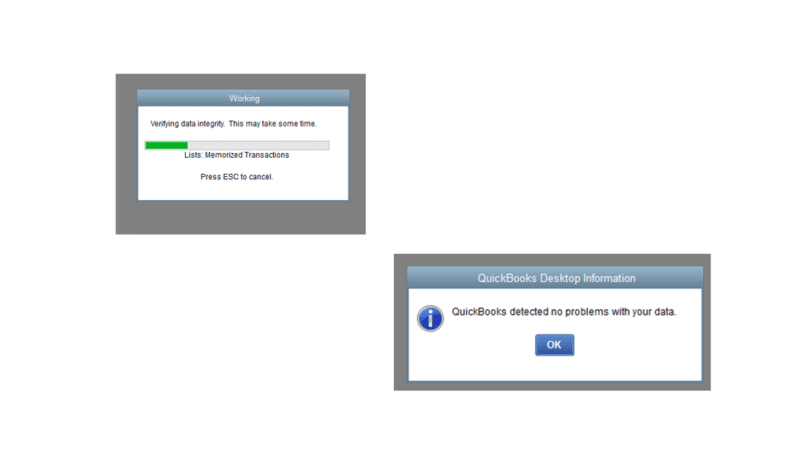
Moving ahead, select the Verify data and hit OK to close all open tabs.
In case you find a message stating "Your data has failed the integrity check", it is supposed to rebuild the file. In case no problem is detected, you are good to go.
Step 2: Rebuild company file data
Once you have verified the data, you need to rebuild the company file to fix the errors or any damage detected:
Go for the File and Utilities option.
Choose the Rebuild data option. After that, select OK tab to close all windows.
The next step is that the QuickBooks software will ask for taking a backup before rebuilding the company file and clicking on OK. In case, you want to skip backup, you need to choose the Cancel option to continue rebuilding the company file.
In case you haven't set up any backup preferences, then QuickBooks will ask you to update them.
And then, select backup preferences and edit as per the requirements. Followed by selecting OK button.
After the backup finishes, select Show in Finder to locate the backup or select OK if done.
Hit a click on OK tab.
Important: You can verify your company file again to make sure your file is free from errors or data damage. In any case you are still having the errors or data damage then you have to rebuild the file again.
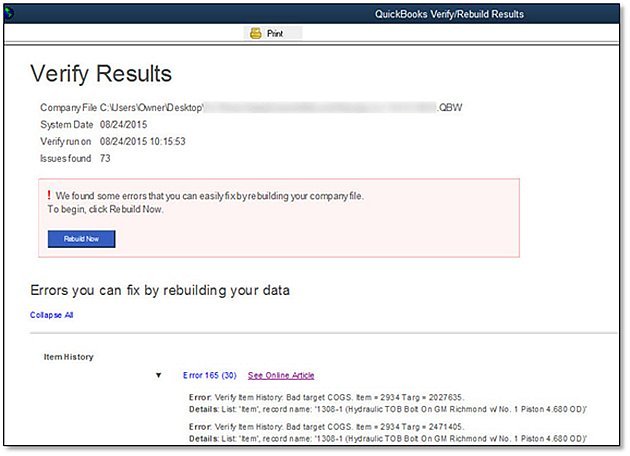
To manually resolve the data errors you can view each error message that is listed in the Verify Results window along with it’s fixation steps.
How to monitor and reduce database pieces?
Verify that the database doesn't have 10 or more fragments. In case there are more than that, you will have to decrease it by following the steps listed below:
Arrange list: Move to the list menu and also choose the option to resort list.
Rebuild file: After you resort the list, you are required to follow the steps to rebuild the data file.
How to fix errors using transaction record numbers?
It should be noted that the record number often helps in finding errors that QuickBooks finds when you verify the company file. Just in case the file has any issues, then you would have a link for opening the QuickBooks.log file. This file has the list of errors in the company file.
For finding the QuickBooks.log file at any time:
You need to hold the command key and further choose go and library options respectively.
Double-click on the logs folder.
Now, double-click the QuickBooks.log file.
From the QuickBooks.log file:
You will see record numbers referenced as RecNum and RefNum. These are basically internal record numbers that are used by the QuickBooks software.
You need to choose the edit tab and also choose the find option.
Further, search for recnum and enter the record number.
QuickBooks will look for all records containing the transaction number.
You need to go through the results and then modify and re-enter the data to fix the issues.
Conclusion!
To ensure that your QuickBooks Data is repaired and consists of no more errors, verify and rebuild data utility in QuickBooks Desktop once again. If the verify data utility again detects new errors in the data and rebuild data tool is unable to fix the errors then you may have to check the error by reviewing the qbwin.log file stored in the QB folder. If you have any questions or you require any assistance, then call our XpertBooks Pro team.
FAQs
What does verify and rebuild do in QuickBooks?
Verify and Rebuild tool is an error-detecting and company file-rebuilding tool that comes as an integrated feature in QuickBooks. While the Verify tool checks for any issues, the Rebuild data tool fixes any diagnosed errors within the company file.
Should I run rebuild in QuickBooks?
The Rebuild tool should be used only if any issue is diagnosed in the company file. In such cases, an error message pops up on the screen stating, "Your data has lost integrity". However, if this message doesn't appear, there is no need to run the Rebuild tool.
How often should I rebuild data in QuickBooks?
The Rebuild tool should be resorted to after a week or two weeks.
How to do a rebuild in QuickBooks?
The Rebuild tool can be used by conforming to the below-given steps: 1. Run QuickBooks and click on the File menu. 2. Within the File menu, click on Utilities. 3. Herein, opt for the Rebuild Data option. 4. In case you want to use the verify tool, click on Utilities and then opt for the Verify data option.
Well, do you remember the password of your QuickBooks desktop? Due to the increase in security concerns and also increase in social media platforms, it has become very difficult to remember each and every password, and this is when an automated password reset tool comes into picture. Many times, users might fail to remember the QuickBooks admin password too, which can be a trouble. But need not worry, keeping our data safe while using the internet is our responsibility. One way of doing this is only using reliable software and tools.
QuickBooks desktop is one such powerful software that gives users protection from data theft and misuse. Thus, retrieving the admin password of QuickBooks isn’t a simple task. The software recommends its users to keep a strong password, and authorized users can reset the password in case it’s forgotten. You can follow certainsteps to crack the QuickBooks admin password using an automated password reset tool. This article is entirely focused on the process to use QuickBooks automated password reset tool to crack admin passwords and related facts. Many of you might have heard about this tool for the very first time, well don’t worry reading this post can get you the hold of this tool. So, make sure to stay tuned till the end.
Well, the fact that password is a sensitive case can't be denied, so if you are sceptical about experimenting and trying the process on your own, then you can contact our team of professionals for your accounting assistance.
Why is the QuickBooks automated password reset tool needed?
Well, one of the major reasons why password reset tool is required is to address the security concerns. The cybersecurity concerns have given rise to the QuickBooks password retrieval process. Earlier, it was notices that many people could obtain the QuickBooks company file, authorizing them to retrieve and steal the important data and information.
However, if you facing any kind of issue in resetting the password for your QuickBooks software, then the automated password rest tool can be a solution for that. This tool can help you in resetting the password with much ease. It can be helpful for you, if you have lost or forgotten:
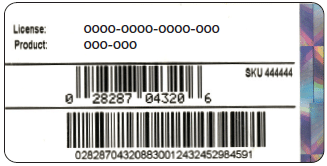
15- Digit license number
Contact name
Phone number
Email address
Postcode
Things to know about changing/resetting QuickBooks Admin Password
QuickBooks requires you to manually enter your password every time you have to access the QuickBooks company file to keep your data secured. Also, you would have to change every QB password every 90 days. QuickBooks offers the users multiple prompts to change the password when the expiry date of the password approaches.
It is not rare for anyone to forget a password. And when a situation like this occurs, you can easily retrieve the QuickBooks Admin Password. To crack the QuickBooks password, you would have to follow the below-mentioned steps:
Basic Requirements
It is advised to you to follow the specific criteria before composing the password:
The password must be of a minimum of 7 characters.
There is at least one numeric character and one uppercase letter should be used.
Another important thing is that there should be no spaces in the password.
You need to ensure that the passwords are case-sensitive.
A password should be simple to remember and tough to crack.
You should not log in to the account on any one network or device.
Avoid adding social information when arranging the QuickBooks admin password.
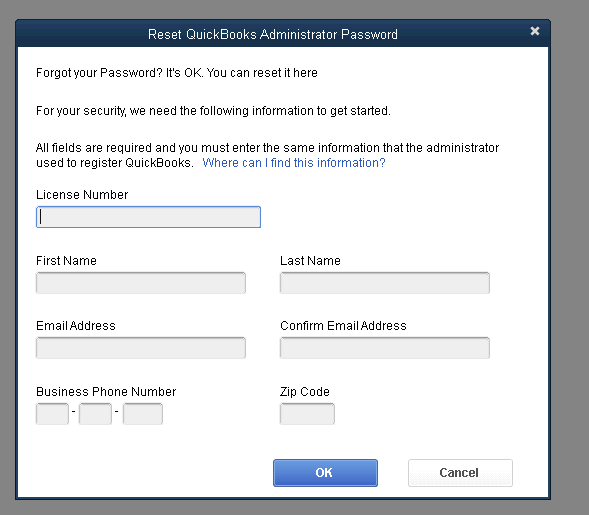
You are needed to remember these all points for QuickBooks admin password crack. When you are on the login page, hit a click on forgot password and try to retrieve the password. You can also utilize the QuickBooks automated password reset tool.
Steps to Use the QuickBooks Automated Password Reset Tool
You can opt for any of the two available options to crack the admin password namely:
QuickBooks Automated Password Reset Tool.
Reset QuickBooks password using the security question.
We will be exploring each of the methods later in this post.
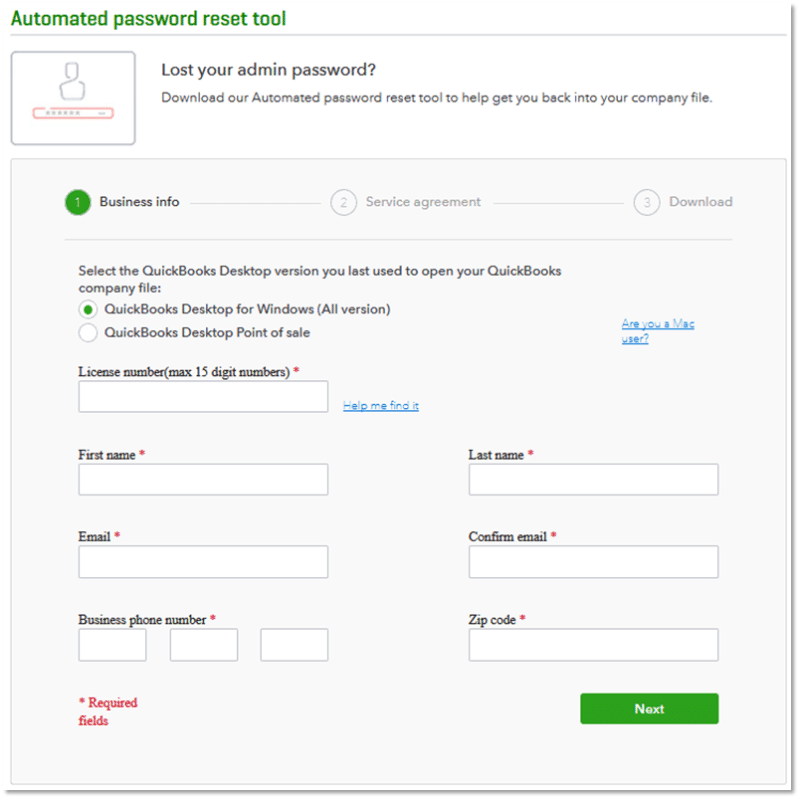
Method 1: Resetting password using QuickBooks Automated password reset tool
Select your QuickBooks Version. The version of QuickBooks last opened the company file with should be installed on the system. If not, then you might not be able to reset the password.
Fill out the required segments, such as the QuickBooks license number and the business information you used while registering for QuickBooks.
The phone number must be 10 digits with no extension at the end. You should change the country to select the Country and then manually edit the Phone number and save it.
Next, Agree and accept the license agreement and wait until the download process is complete.
Now authorize your Username, email id, primary mailing address, and Zip code when prompted.
Put in your License number as well as your telephone number.
Once downloaded, run the ‘Automated Password Reset tool’.
Next, choose the QuickBooks version that you are using from the QuickBooks Desktop Products drop-down.
Now browse for the Company file you wish to set a password for.
Enter the ‘New Password’ And confirm it. Use capital and small letters, numbers, and special characters.
Now tap on the ‘Reset Password’ option to complete the password resetting process.
Important: Once you are done with the above steps, You are supposed to have access to QuickBooks and will now be able to log in to the company file successfully with the help of the new password created above. You are not permitted to use the QBPasswordReset.exe before completing the verification form again, especially after this instance. In order to reset the password on a different QuickBooks company file, you should go back to the QuickBooks Automated Password Reset tool and then carry out the same process for downloading a new QBPasswordReset.exe file.
Method 2: Resetting QuickBooks password using the security question
In case the password just slips through the mind, then you can opt for the "I forgot my password" option. The steps to be followed in this process are as follows:
Initially, hit on the "I forgot my password" in the QuickBooks desktop login window.
Choose the Answer the security question option.
Provide the correct answer.
Moving ahead, you will see a window stating "Your password and challenge answer has been removed and your company files are no more password protected"
When this window will close, you will have to generate a New password and choose a New answer to a challenge question.
This would Set the new password and challenge question.
For security purposes, QuickBooks software asks you to change the admin login password after every 90 days and even sends the reminders for the same. You can opt for the below technique for a strong password:
The length of the password should be greater than 7 characters.
One upper case letter is a must, and also one special character.
Steps to Crack the Admin Password using QuickBooks automated password reset tool
When one logs into QuickBooks desktop, a password for security purpose is required. After opening QuickBooks, one can easily access the company file. Considering the security measures, it is important to change QuickBooks passwords in every 90 days to avoid security threats. This is where QuickBooks password reset tool comes into play. The processes to reset passwords with the password reset tool vary according to the version of the QuickBooks software. Check out the steps below to reset the password:
Spot the version of QuickBooks you are using currently.
QuickBooks statement writer
The very first step is to open QuickBooks software and move to the Reports.
And then, open QuickBooks report writer and then move to Help option.
Next step is to select the About QuickBooks report writer.
In this, select the Help menu and then select the Product information.
And then, look for the QuickBooks version and release.
QuickBooks Basic or enhanced payroll
Select Employees and then select Payroll Centers.
And then click on the Payroll tab,
QuickBooks for Mac
Move to the Help option.
And then select Product information and then note down the version.
QuickBooks Desktop
You need to click on the F keyboard, and then Product information will open up.
And then note down the QuickBooks version.
Choose the last updated QuickBooks desktop version to open the QuickBooks company file.
Note: Ensure that, it is a must to have .Net Framework 4.5, in order to run and use QuickBooks automated password reset tool. In case, you are not having this framework, then make sure to download it.
Download the Automated password tool for the QuickBooks desktop on the system.
And then, use the tool to Reset the QuickBooks admin password in any version of QuickBooks Desktop for Windows.
It is required to choose from the Version of QuickBooks desktop.
Moving ahead, register QuickBooks using the License number and information. After that, click on Submit.
After that, read the Agreement of license and click on Accept.
Followed by clicking the Download tab and then also clicking the Download link.
Once done with that, you need to put in the Token number when needed.
And then select the QuickBooks version, you are using from the drop-down menu.
Next step in the process is to click on Browse and find & select the QuickBooks company file that requires a password reset.
Moving ahead, type in the New password and then hit Confirm.
After that, if the password reset is for an Accountant copy working file such as .QBA. You will have to type in the file name, in the file name box and then hit the Enter key. And then select the .QBA file
And then click on the Reset password.
The point to be noted here is that you should be able to log in to the company file using the new password, which was created using the above steps. It is also recommended to use the password reset tool for one time. In case you tries to do it again, the verification form will have to be file out again to generate a new token access.
The above-mentioned steps shall help you crack your QuickBooks desktop admin password using the QuickBooks automated password reset tool. In case you are unable to retrieve the password, you can contact the XpertBooks Pro Experts. For immediate assistance and precise solutions, you can simply ring up at our toll-free number i.e., 1.800.761.1787, and let our accounting software specialists assist you in the process. Getting in touch with a professional make things easy up to a great extent. Our accounting professionals team will be happy to assist you.
FAQs
Can I reset the QuickBooks admin password without using an automated tool?
Yes! You can easily acquire your password without using automated tools. For this, you can use the built-in password recovery feature. I
How can I ensure the security of my QuickBooks admin password?
You can make sure that your QuickBooks password is secure by resorting to the following guidelines: 1. Opt for a strong and unique password which comprises numbers, letters, and special characters. 2. Avoid using names or birthdates as passwords. 3. Keep updating the password frequently. 4. Enabling two-factor authentication..
Can I reset a QuickBooks admin password by reinstalling the software?
No! Reinstalling QuickBooks will not reset the admin password.
Intuit QuickBooks has successfully transformed the way businesses carried out their accounting and bookkeeping activities. But at the same time, there are certain errors and technical bugs that hinder the smooth performance of this software. A most common error code has been reported in many times is QuickBooks error 6000, 301. As is clearly visible, this error code belongs to the 6000 series error and is often encountered while attempting to use a desktop company file. The majority of QuickBooks users find it quite tedious to tackle this error. Damaged or corrupted company files, improper network configurations, and outdated software versions are all common contributors to this problem. Thus, keeping that in mind, we have come up with this post, where we will be discussing the causes and quick fixes to the error code 6000, 301. Make sure to read this post till the end.
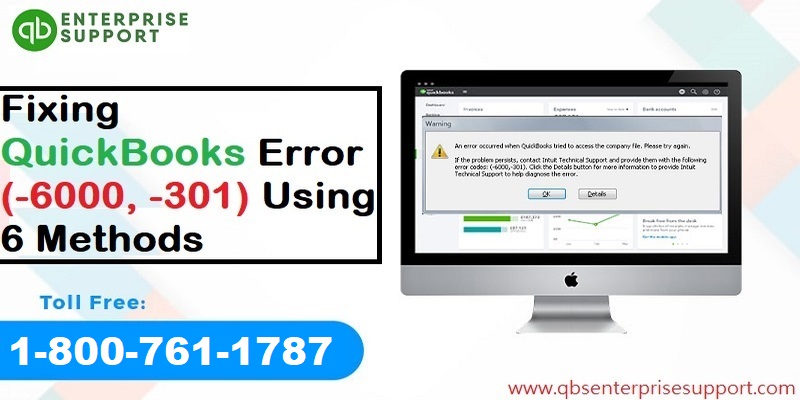
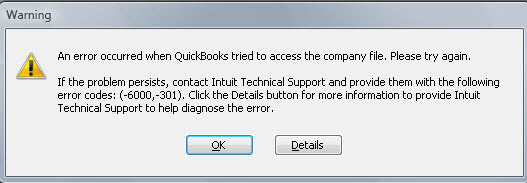
As mentioned above,Error 6000, 301 belongs to the series of error 6000. This error code comes up with an error message stating:
Warning
An error occurred when QuickBooks Desktop tried to access the company file. Please try again. If the problem persists, contact Intuit Technical Support and provide them with the following error codes: (-6000, -301).
We often encounters this error, while opening the company file in different QuickBooks versions. This sort of issue is usually seen when we try to open a QuickBooks company file with .qbw file and the disk space is not enough. This error occurs over the screen and leads to difficulty in managing and handling activities. There can be multiple factors causing this error code, a few of which will be discussed later in this post.
Factors leading to QuickBooks error 6000, 301
Company file error code 6000, 301 in QuickBooks can be caused due to multiple factors, a few of which will be discussed later in this post. Let us have a look at each of the causes one by one:
Corrupted QuickBooks desktop supported files which include:
The Transaction log (TLG) file
The Network descriptor (ND) file
Data source name (DSN) file
We attempt to open a QuickBooks desktop company file located in the hard disk of a server accessing the QuickBooks server manager.
The .qbw company file corrupted
Also, if we try to install Encrypted software, which might hamper the work process
Damaged Database name file.
Effects of QuickBooks error code 6000, 301
The effects of QB error code 6000, 301 are as follows:
Users unable to access the damaged company file
Need to rebuild the same company file
Massive time crunch
The downloading QuickBooks desktop support files to cope with the error.
Issues related to excess data usage and time management
Easy Methods to Resolve QuickBooks Error 6000, 301
Now that we have explored the various facts related to QuickBooks company error code 6000, 301, it is high time to learn the various methods to get rid of this error. Let us check out each of the error resolutions one by one:
Method 1: Disable the encryption software
Note: If we find any encryption software on your system then it is advised you to disable it. We do not recommend you to use any 3rd party encryption software to encrypt QuickBooks company file.
We will have to communicate with the software merchant for the encryption software for proper guidance.
Avoid using any third-party encryption software.
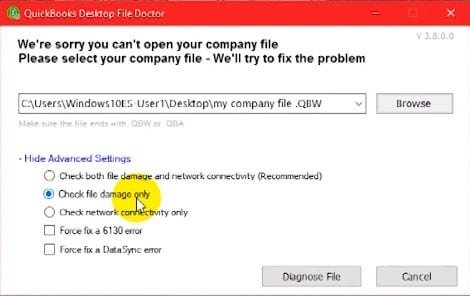
Method 2: Download and run the QuickBooks File Doctor
Look for the icon on the Windows taskbar for opening, in case it doesn’t open up on its own.
Use the drop-down list and then Look for the company file. We can also click on the Browse tab and then locate to Continue.
Hit on the options File damage and Network connectivity respectively.
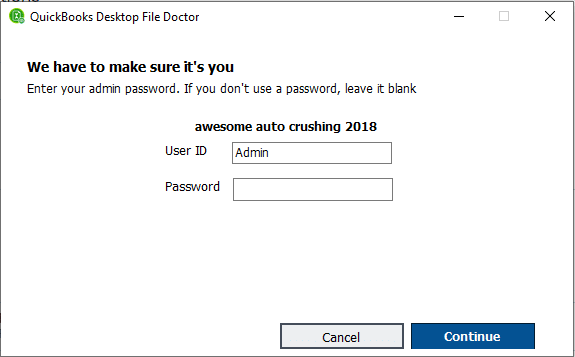
Enter the Admin password on the company files and then hit the Next tab.
Select the Host/server or workstation carefully. If you are running the file doctor tool on the workstation, then we will have to opt for the Workstation. Or else pick the Server accordingly.
Hit a click on Yes if running the file doctor on the System hosting the company files. We will have to select NO.
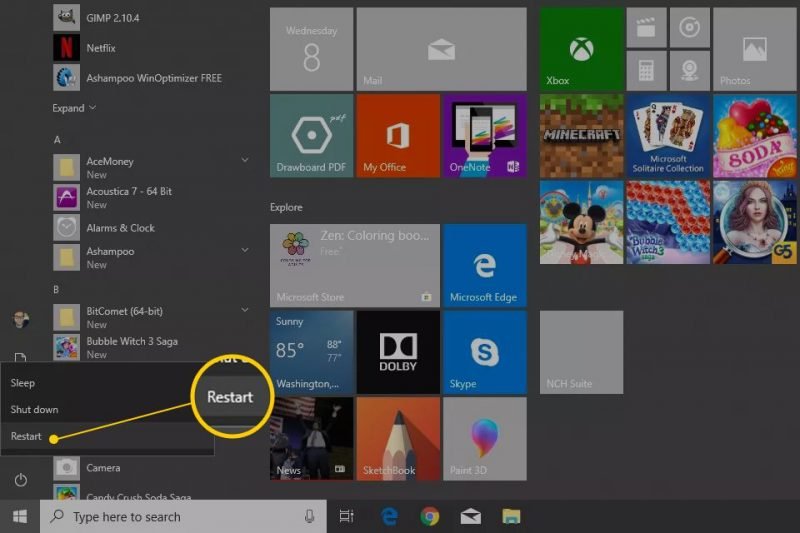
Another way in which we can get rid of the Error code 6000, 301 is to restart the system. Restarting the system can help us in getting rid of the error up to certain extent. So, we can simply restart the system and check if the error persists.
Method 5: Change the filenames of QuickBooks '.ND' files
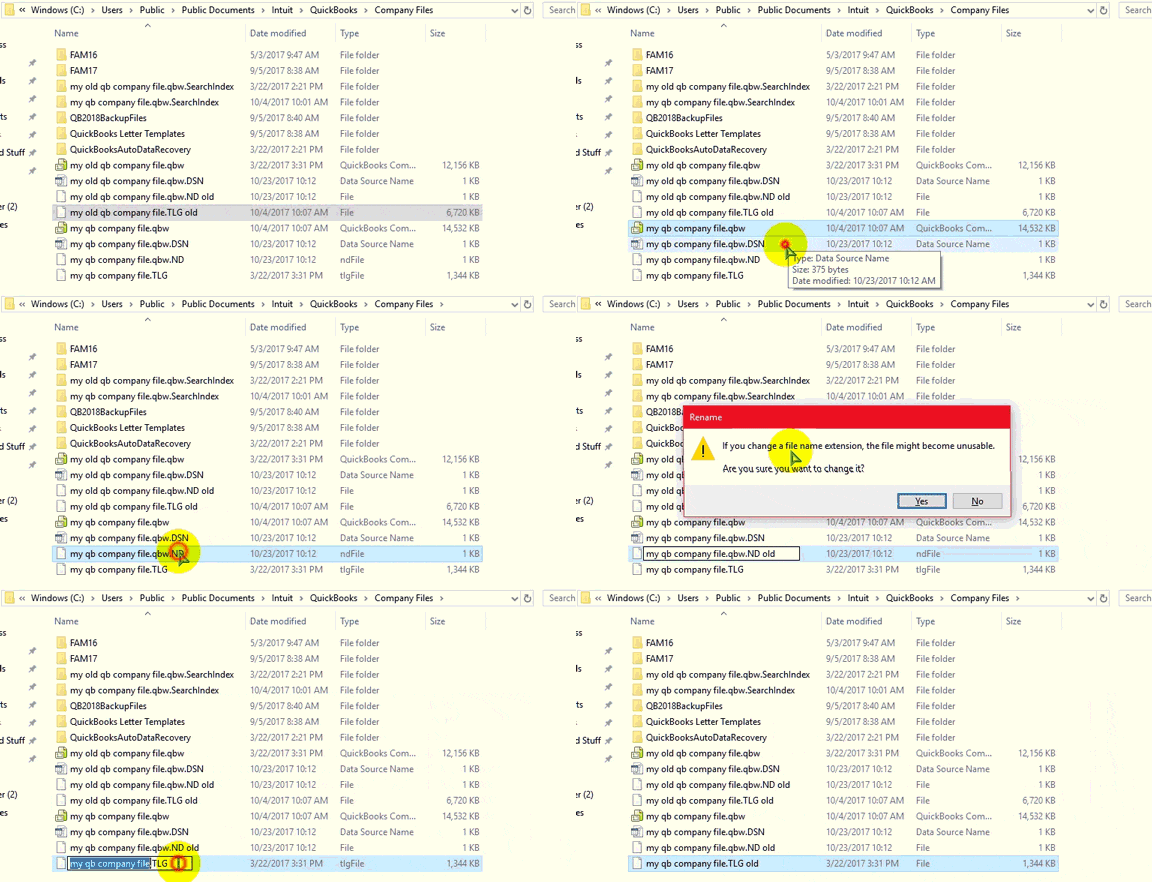
Coming to the this method, we can simply rename the QuickBooks .ND files as it might fix the error. The steps involved in this process are as follows:
Open the folder having the company file.
You will see the file having the same name as the QuickBooks file, but with a different extension .tlg along with .nd and .dsu.
Right click on each file along with clicking on the Rename option. We will then have to add the word .OLD to each of them.
This will help in Rebuilding the company data files and keeps away from a default database.
Method 6: Repair the QuickBooks desktop software
We should always remove the files that are of no use or are corrupted. Therefore, repairing the QuickBooks desktop software can help in getting rid of QuickBooks error 6000, 301 with much ease. The steps involved in this process are:
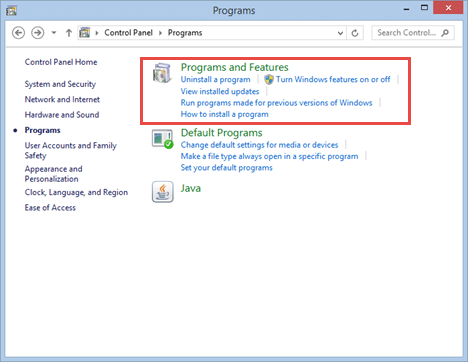
Move to the Start tab and then open the Control panel.
After that hit a click on the Programs tab.
Followed by clicking on the Programs and features tab.
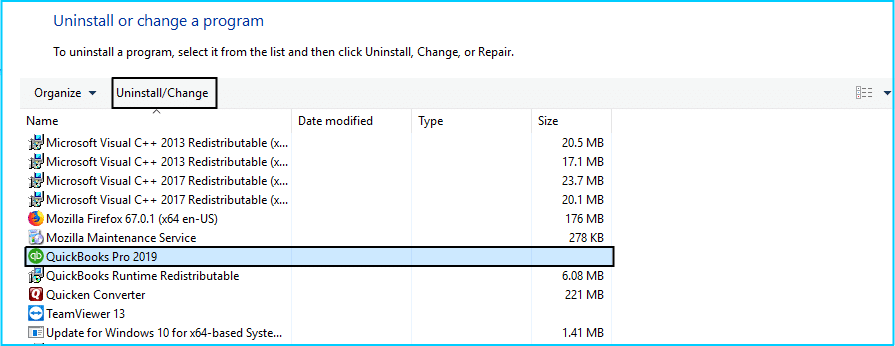
Now select the QuickBooks software and then click on Uninstall option.
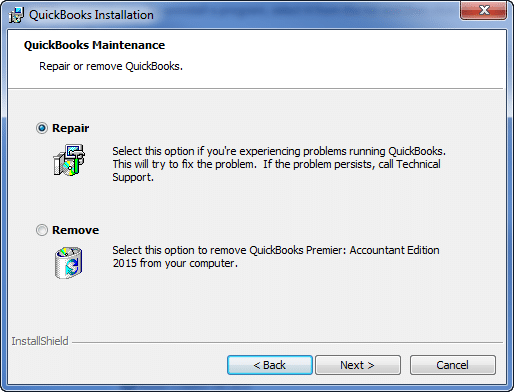
After that click on the Next tab once the QuickBooks installation window appears.
Select the Radio tab and then hit on the Repair icon.
Also hit a click on Next tab and then also select Repair tab.
This drives us to the end of this post, where we hope that the information, we have shared in above might be of some help in fixing. Implementing the methods illustrated above might help us to do away with the QuickBooks error code 6000, 301 with much ease. However, there can be a situation wherein we might not be able to fix the bug even after carrying out the steps discussed above, in such a situation, it would be better to consult an accounting professional or expert to fix the error on your behalf. You can get in touch with our QB specialists team using our helpline number i.e., 1-800-761-1787, and ask our team to fix the error for you. Our experts will be happy to fix the error for you. Our diligent and industries best accounting professionals will be more than happy to assist you.
FAQs
What is QuickBooks Error 6000, 301 ?
This error comes in 6xxx series of error codes that are associated with company file. It may appear on your desktop screen at the time you try to open or modify the company file.
What is .ND file in QuickBooks?
.ND is a QuickBooks file extension that denotes the Network files.
How to rectify the Error 6000 XXX?
The various methods to resolve this error are: 1: Disable the encryption software. 2: Run QuickBooks File Doctor. 3: Reboot the system. 4: Update QuickBooks