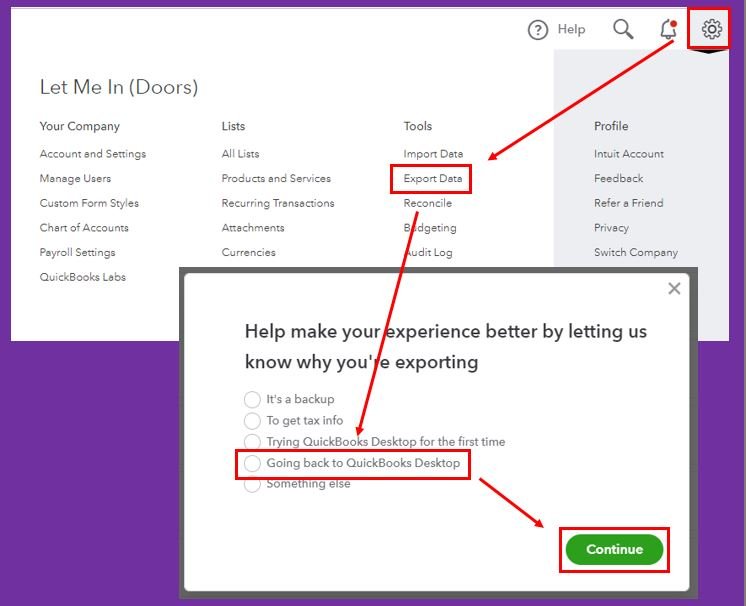
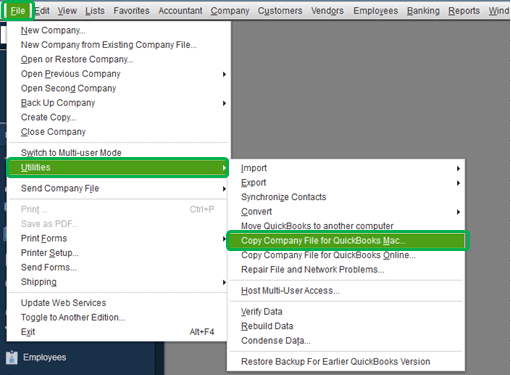
Are you in pursuit of exporting your data files from QuickBooks Online to QuickBooks for Mac? This article will provide a step-by-step and easy-to-follow crosswalk to help you reach your destination. QuickBooks users, majority of the times switch from QuickBooks Online to QuickBooks for Mac, which also requires exporting the data file. In simple words, in order to convert from QuickBooks online to Mac, users are supposed to export the file to QuickBooks desktop Windows and then convert the Windows file to Mac. This situation might seem to be a bit daunting to many users. Considering this, we have come up with this article, where we will be talking in detail about the entire process to export the file.
So, we recommend you to read this article carefully till the end. However, if you feel the process of exporting data file from QuickBooks online to QuickBooks for Mac to be too technical for you to handle, then in that case, feel free to connect with accounting experts directly.
You need to use a Windows system with internet explorer 11 or higher when exporting the data file.
QuickBooks Desktop for Windows should be of the same version or earlier than QuickBooks Desktop for Mac. To understand it better, we will take an example that if you are exporting to QuickBooks for Mac 2016, then you need to make use of QuickBooks for Windows 2016 or earlier versions.
For this, select Browse in the No company open window, and after that locate the file you wishes to restore. It should be noted that if the QuickBooks windows file is on an external drive, then it is important to save it locally by dragging it to the desired location before restoring it to avoid data corruption.
You will then have to select OK button when a prompt appears asking if you want to Restore a QuickBooks desktop for windows file.
Now enter a name for the restored file and hit Save.
Well, now that you have arrived to the bottom of this article, we believe that you might be well versed with the process to export data file from QuickBooks online to QuickBooks for Mac. However, in case you have any doubt remaining or for any further information, you can simply contact our XpertBooks Pro consulting team directly. Our professionals will handle the situation for you.
FAQ's
Can I export my data file directly from QuickBooks online to QuickBooks for Mac?
No! There is no direct method to export your data file from QuickBooks Online to Mac.
What data can be transferred from QuickBooks Online to MAC?
Users can transfer data such as customer information, vendor information, chart of accounts, transactions (invoices, bills, payments, etc.), and some reports from QuickBooks Online to QuickBooks for Mac.
Can I import my QuickBooks Online backup file (.QBO) into QuickBooks for Mac?
No! The .QBO file format used for QuickBooks Online backup files is incompatible with QuickBooks for Mac.
Will all my customizations and settings in QuickBooks Online be preserved after exporting to QuickBooks for Mac?
Not all customizations and settings may be preserved during the export process. Some features and settings in QuickBooks Online may not have direct equivalents in QuickBooks for Mac.
Have you bumped into File in Use Error or any other errors that are blocking you from using the company file in QuickBooks desktop for Windows? Well, don't panic in that case, as this segment is going to brief you with the information related to rectifying the locked file errors in QuickBooks desktop. Go through this article to find out the quick fixes to the issues that block you from using the company file in QuickBooks desktop for Windows. You can see the below errors while trying to open or edit the company file:
Error
Description
Warning
Company file in use. Please wait Only one user at a time is allowed to do (a task)
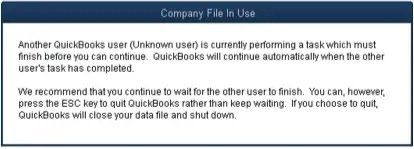
Company File in Use
Another QuickBooks user is currently performing a task which must finish before you can continue.
Warning
Sorry, you cannot change this (transaction) now. (Another user) is currently doing a task that uses that in this transaction.
Warning
The automatic entry of (transactions) is being skipped because (another user) is accessing them.
Are you a victim of this error?, If yes, then need not worry the company file is still safe. You can carry out the below-mentioned steps in such situations. If you are also facing such an error, then reading this article ahead will be a great help for you.
Why Locked File Errors Occurs in QuickBooks Desktop?
Locked file errors in QuickBooks desktop usually appear when the software is unable to access or modify a company file because it is already being used by another user. These QuickBooks errors mainly occurs in multi-user environments where multiple systems try to open the same company file simultaneously. When this error encounters, QuickBooks may fail to create backups, open a company file or switch to multi-user mode. In this segment, ahead you will will get the best methods to resolve the locked file errors in QuickBooks desktop. Thus, keep read on!
Steps to Fix QuickBooks Locked File Errors (Company File In Use)
Checkout the following conditions and solution methods in order to resolve the locked file errors in QuickBooks desktop or company file in use or locked file error:
Case 1: In case the error says another user is doing something
These errors usually happen when another user is doing a QuickBooks task that’s limited to one user at a time, even in multi-user mode. In such a case, you can start the task as soon as the other user completes. Also, if you are aware to know who is the another user, then you can reach out to him and ask for a heads up when they are done. However, if you are sure the error isn’t caused because of another user, then try out the other solutions.
Case 2: If the error consistently refers to a specific user
Another situation can be if the error refers to a particular user, and that particular user is not carrying out any task in QuickBooks. In such a scenario, the below steps should be followed:
You have the another user that’s referred to in the error close and reopen QuickBooks on their workstation.
Now open QuickBooks on another workstation.
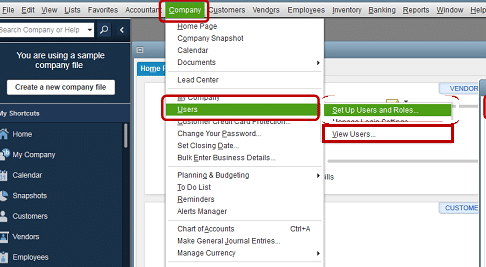
Move to the Company menu and then select Users and also View users.
You have that referred to in the Error sign out of QuickBooks on the workstation.
Go back to the list of users. If the specific user no longer appears as signed in, you should be able to do the task without the issue. In case error still appears, then carry out the solutions for both “Waiting for company file” and “error on multiple workstations”.
Case 3: If the error says “Waiting for company file” or company file in use. Please wait
These kinds of messages usually indicate performance issues. The examples include network issues, database issues, conflicting programs, and a server or workstations that doesn’t keep up with the system requirements for QuickBooks.
Case 4: In case the error appears on multiple workstations
In this scenario, the below solutions could be used:
Method 1: Look for multiple host systems and stop hosting on all workstations
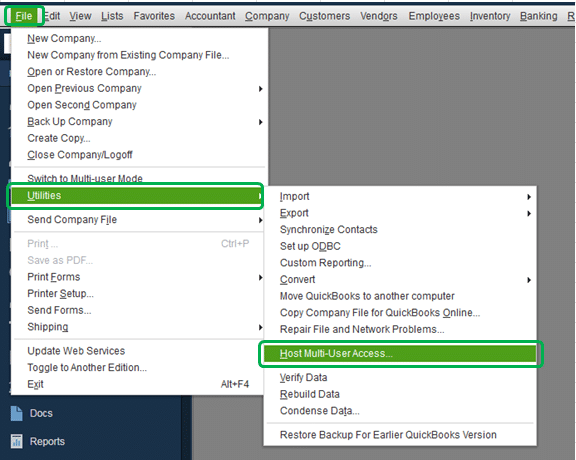
Open QuickBooks desktop move to File menu.
From the File menu select Utilities and opt from the two of the options Stop hosting multi user access or Host multi user access.
Close QuickBooks desktop and repeat the steps sequentially.
Conclude the process by opening QuickBooks and try doing the task that causes the error.
Method 2: Stop and reboot QuickBooks services on the server
Go to the Server and ensure All workstations have QuickBooks closed.
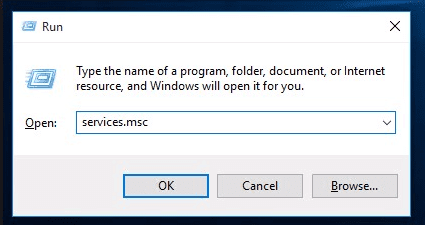
Next step is to choose the Start menu and select Run.
Now enter services.msc hit OK button.
Followed by selecting QuickBooksDBXX from the name column.
Next step is to select Stop link.
Also go for Start tab. This will allow access to the company file.
Now open QuickBooks and try doing the task.
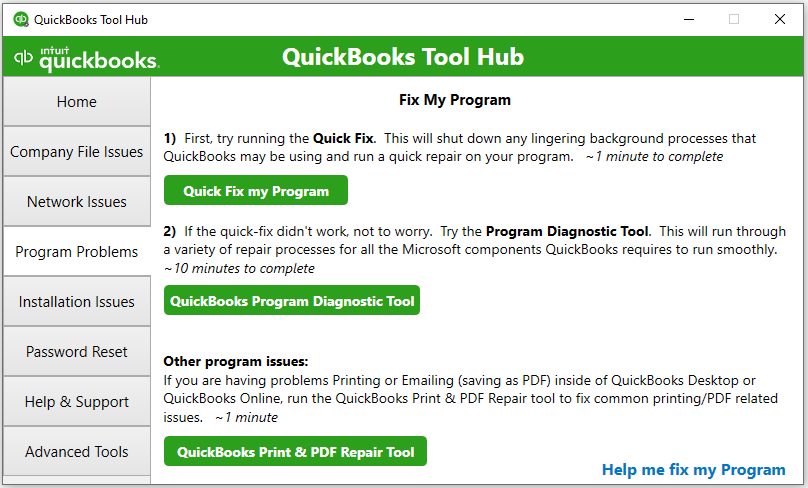
Method 3: Using the QuickBooks tool hub on the server
The QuickBooks tools hub brings together various tools to help the common issues. The steps below should be opted:
Follow all the steps to download and install the QuickBooks tool hub on the server.
Open the tool hub and go for the Program problems tab.
Run each of the tools on the program problems tab. After you run each tool, try doing the task again in QuickBooks.
Case 5: In case the error persists on only one workstation
There can be a situation when the error keeps happening on only one user’s workstation, there might be an issue with the QuickBooks or Windows permissions. In such a situation, the below methods should be opted.
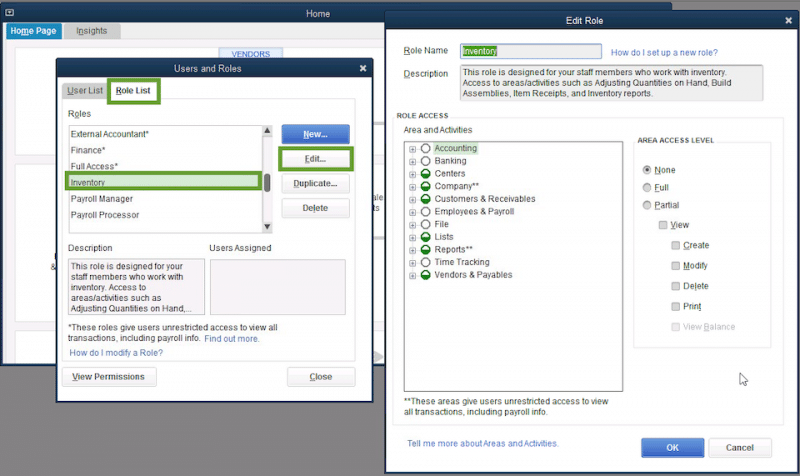
Method 1: Creating a new user in QuickBooks
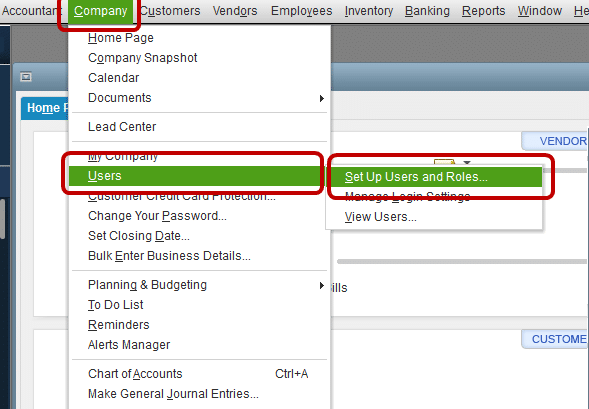
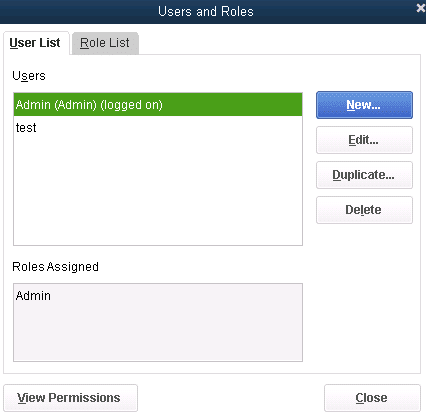
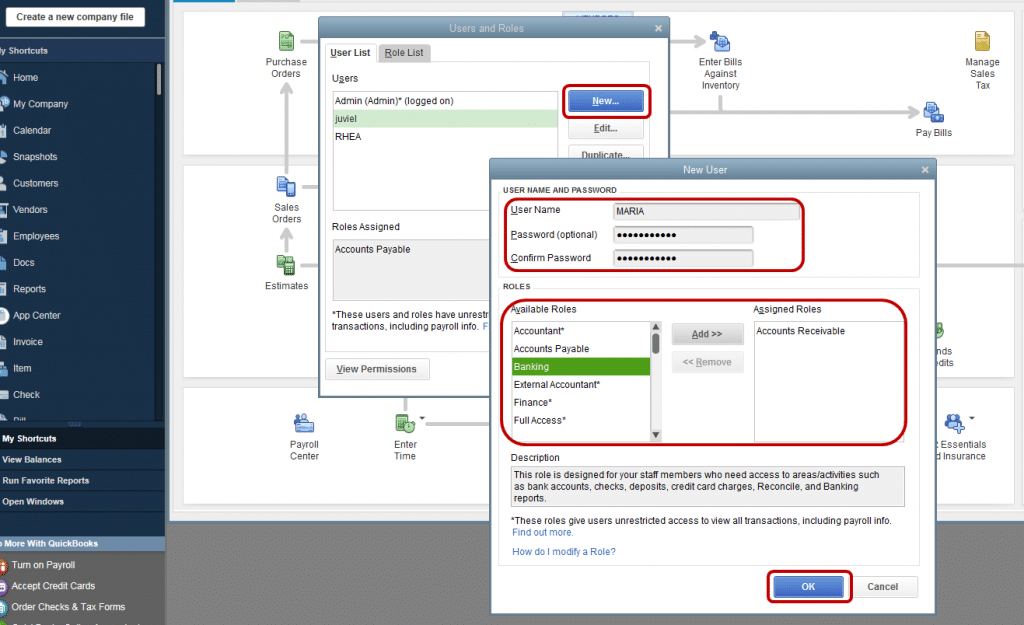
Move to the Company menu and select Users.
From users tab click on Setup users and roles.
Select New in the users and roles window. And in the user name filed, add a Name. In case you want, you can Add an confirm a password.
Next step is to select a Role from the window and then choose Add and hit OK button.
To make changes to the role, choose Role list and edit tabs. Add or reassign permissions as needed and hit OK button.
Once done, choose close in the Users and roles window.
After that sign out of QuickBooks and then sign in as the newly created user.
Try doing the task as the New user.
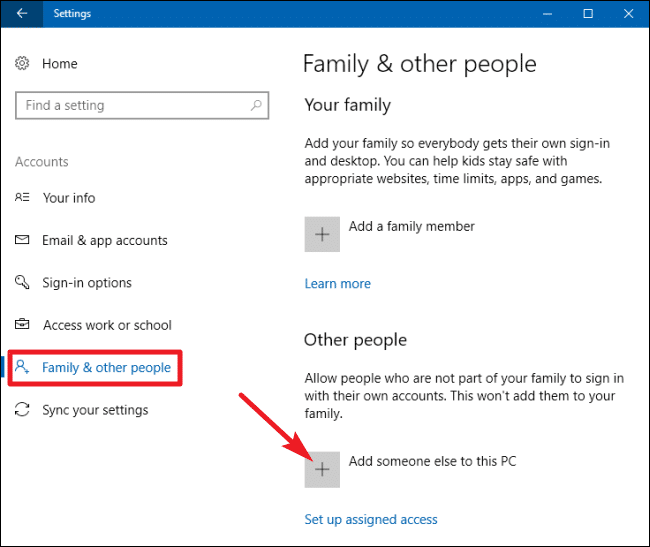
Method 2: Creating a new Windows user with admin rights
Follow the steps to create a new Windows user with admin rights.
And then sign in to Windows as this user on the workstation.
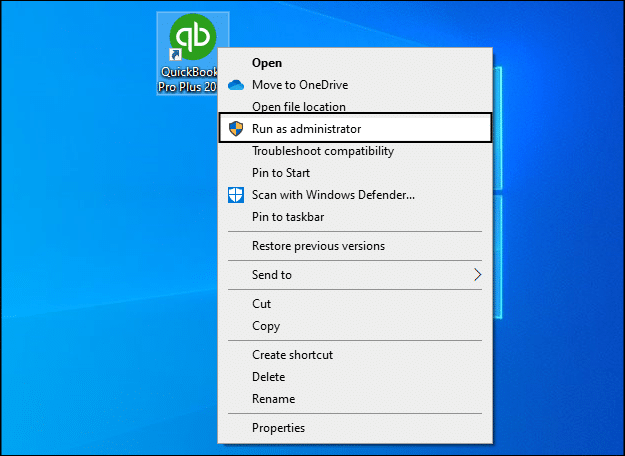
Hit a right click on QuickBooks icon on the desktop and select run as admin. This should let you do the task on the workstation without getting the error.
This brings us towards the end of the processes as well the article. Knocking off the QuickBooks locked file errors becomes a little easy, once you perform the set of steps mentioned in this segment. However, in case you are facing any difficulty, then feel free to contact us at any point of time. Get on a call with our tech geeks using our dedicated helpline number i.e. 1.800.761.1787, and our team of QB experts will ensure to provide the best possible accounting services round the clock.
QuickBooks accounting software is loaded with many impeccable features, which makes it highly customer friendly and easy to use. In spite of such amazing features, a few users might face some unwanted delays due to various technical and non-technical glitches. One such annoying error that annoys the users is QuickBooks display errors. The display issues might be seen in QuickBooks, and especially in case of the highly resolution graphics displays. Various issues might come up with the display, which includes some fields in QuickBooks desktop display “Black” in place of the expected “White”. Overusing the product might lead to such an issue in the majority of cases.
If you have a newer high-resolution monitor, then it is needed to change the default settings in QuickBooks. If the icons or fonts look fuzzy, or if the Windows are blank or strangely sized, then you need not to worry. This article will deal with all sorts of QuickBooks desktop screen issues. Here we will let you know an insight into the signs, symptoms, reasons, and other fixation steps to fix the QuickBooks display errors.
What are Screen Issues in QuickBooks Desktop?
Screen issues in QuickBooks desktop generally occurs when the software fails to load Windows, menus, fonts, icons or other screen elements properly. These issues mainly appears due to incorrect display settings, damaged QuickBooks components or Windows scaling issues. When these display issues occurs, you may experience different different type of issues such as blank screens, missing buttons, overlapping text or unreadable fonts while working in QuickBooks desktop.
What are the reason behind to screen issues in QuickBooks?
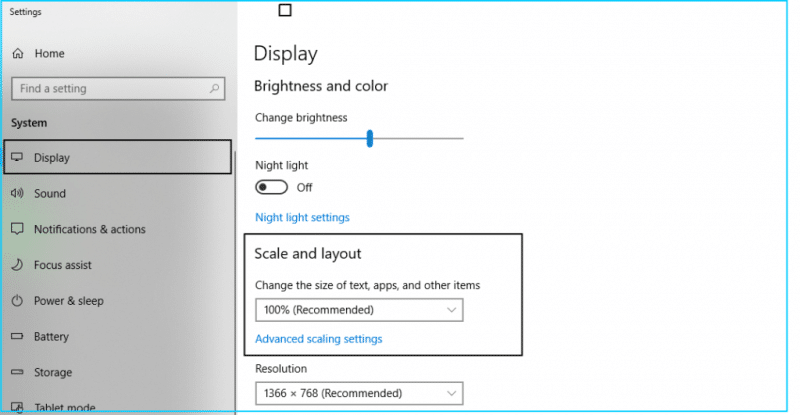
Talking about DPI, QuickBooks is coded and designed for the default windows “Dot per inch” setting of smaller- 100%. Many systems with higher resolution might have DPI settings of 125-150% that can lead to display issues. There can be several other reasons behind display related problems in QuickBooks, including:
If there is incorrect Windows display scaling settings.
In case of high DPI settings conflicts.
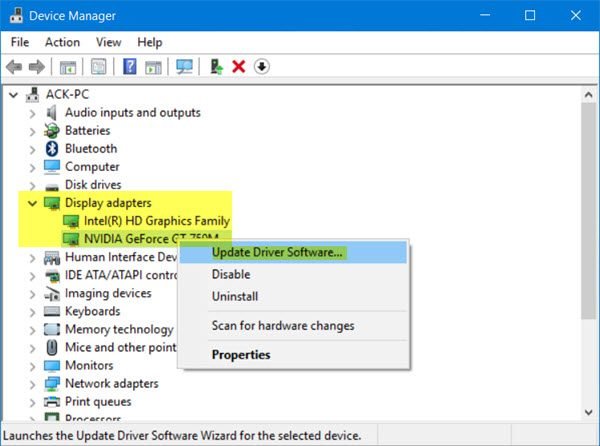
Outdated graphics or display drivers.
Multi-monitor display conflicts, could be another possible reason.
What are the signs of display issues in QuickBooks desktop?
There can be certain signs and symptoms of display issues in QuickBooks desktop. Let us have a look:
A field overwrites and hides its label, then it can be a symptom of display issues.
Missing buttons and huge fonts can be another symptom of display issue.
A blank home page can be another symptom.
Unclear screen, especially when you maximizes or minimizes it.
Another symptom can be if the transaction form doesn’t fit the system screen.
If the sizing of the icon at the top right corner of the screen doesn’t reflect.
Methods to Resolve the Screen Issues in QuickBooks Desktop for Windows
Resolving screen issues in QuickBooks desktop becomes easy, if you carrying out to the methods below. Check out the below methods very carefully to correct the issue.
Method 1: Change the display settings
The very first method is to change the display settings, but before that you need to change the display and view preferences in QuickBooks. The steps to be followed are:
At first, close the QuickBooks desktop.
And then open Windows Start menu.
Type QuickBooks into the search. After that, hit a right click on the QuickBooks icon and also select the Open file location.
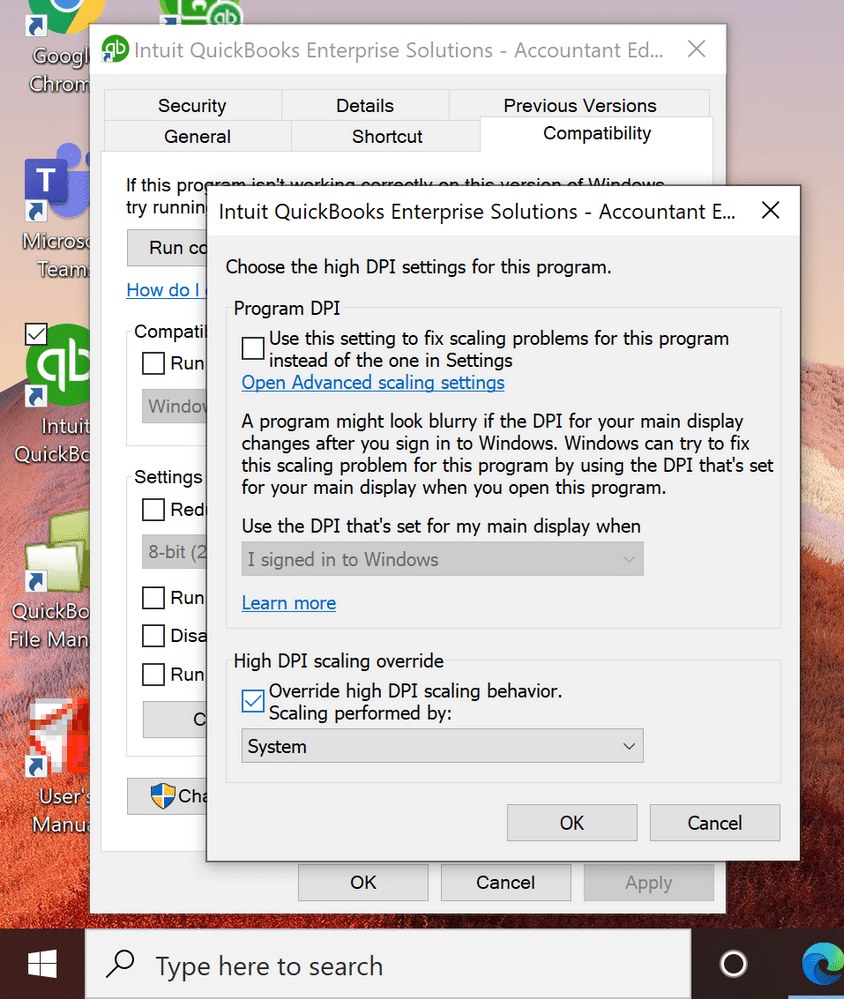
Hit a right click on QuickBooks.exe file and also choose the Properties option.
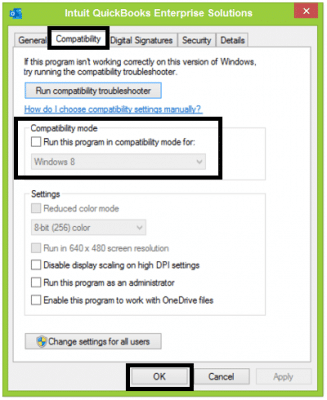
Next step is to move to the Compatibility tab.
Choose the Disable display scaling on the high DPI settings checkbox. Also, select the Change high DPI settings and then Override high DPI scaling behavior.
The final step is to choose Apply and then hit a click on OK button.
You need to open QuickBooks and look for display issues.
Method 2: Adjust the view preferences in QuickBooks
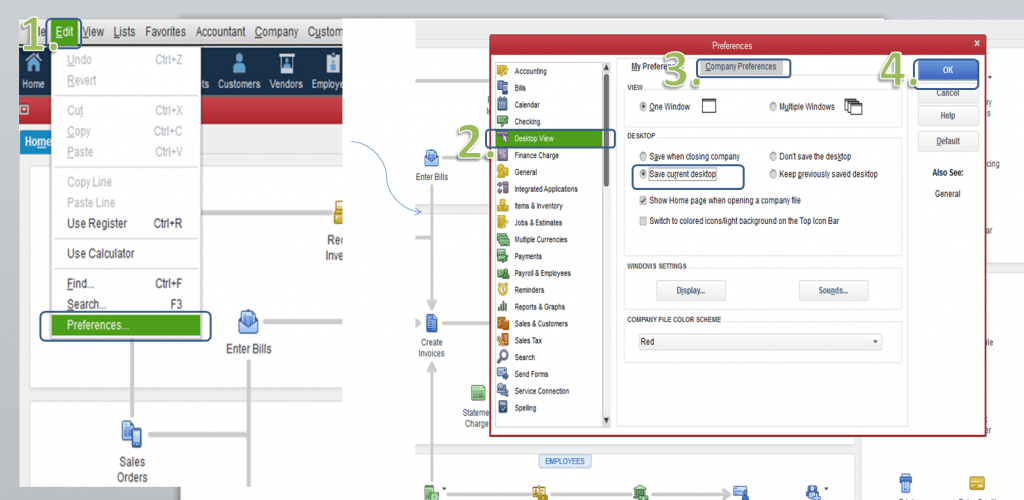
In this particular method, navigate to Edit menu and select Preferences in the QuickBooks.
After that choose the Desktop view from the list and then opt for My preferences tab.
Select the One window option in the view section and then choose OK tab
You will have to close and reopen QuickBooks and the company file. Also, check around for display issues.
QuickBooks works greatly with windows DPI settings. Changes in these setting might lead to display issues. It is very much important for you to keep in mind, that changing the windows settings will affect all the programs on the system, and not just QuickBooks. The steps to be followed here are:
For Windows 11
Being a Windows 11 user, hit a click on Start tab and move to Control panel.
Press Win + X keys and choose Appearance and personalization.
Head to the Change item size section and hit Set custom scaling.
From the drop-down list, select 100% and press OK tab.
Hit Apply tab and also sign out for changes to take effect.
On Windows 7
Hit a right-click on the Desktop and choose Screen option.
Go for Display settings and click on make text and items larger.
Now select the option next to Smaller-100%
Save changes and reboot the system for the change to reflect.
On Windows 8/8.1
Right-click on the Desktop and choose the Screen tab.
Then choose Make text and other items bigger or smaller at the bottom of the display settings.
Unmark in Allow me to select for one Scaling level for my displays.
Now drag the Slider to smaller than 100% to ascertain that the text and other items are of normal size.
To conclude, Save changes and reboot the system.
Method 4: Restart Windows
It is supposed to reboot Windows 10 or Windows 8 systems.
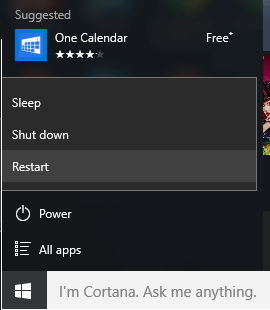
And also, Open Start menu.
The next step is to press on Power option and opt for Restart.
And for Windows 7, Vista, or XP systems, press Start tab on the taskbar.
For Windows 7 or vista, hit a click on Small arrow and then choose Shutdown option.
If you are a Windows XP user, then hit on Shutdown or turn off system.
QuickBooks goes black screen issue and various other display issues can be resolved by carrying out the above methods. We have tried to sum up the solutions that can help you to resolve the QuickBooks desktop display issues. However, in case the error continues to trouble you, or if you having any queries, then we can help you out with some relevant answers to all your queries. You can contact our XpertBooks Pro team and our US based accounting experts will be there to assist you in a single call.
QuickBooks unexpected error 5 is seen when the QuickBooks database service user is restricted to access the file location. This error comes up with an error message stating “Got unexpected error 5 is a call to NetShareGetInfo for Path”. This sort of error is seen due to invalid entries in the Windows registry or the system is not configured accordingly. QuickBooks unexpected error 5 is basically an issue that generally occurs with a warning message that is:
Message
Description
Error:
Encountered Unexpected Error 5 in call to NetShareGetInfo for path\\server\file.QBW
What is QuickBooks Unexpected Error 5 and why it occurs?
Unexpected error 5 in QuickBooks mostly seen when a user try to access the company file or perform a certain administrative tasks within the software. When this error takes place, QuickBooks becomes un responsive and fail to open during the tasks. To know more about QuickBooks unexpected error 5, read this post carefully till the end.
Factors causing the QuickBooks Error Code 5
The unexpected error 5 can be seen due to following factors, which include the following:
Method 3: Turning off user account control in Windows
In order to turn off user account control in Windows, you can simply carry out the below steps:
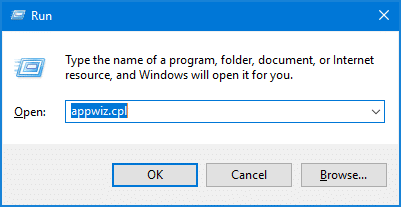
Press Windows + R keys to open the Run Window.
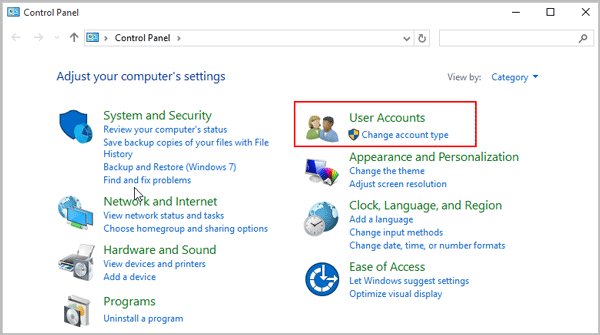
And then, type Control panel and hit on OK button.
Next step is to select User accounts and also select User accounts (classic view).
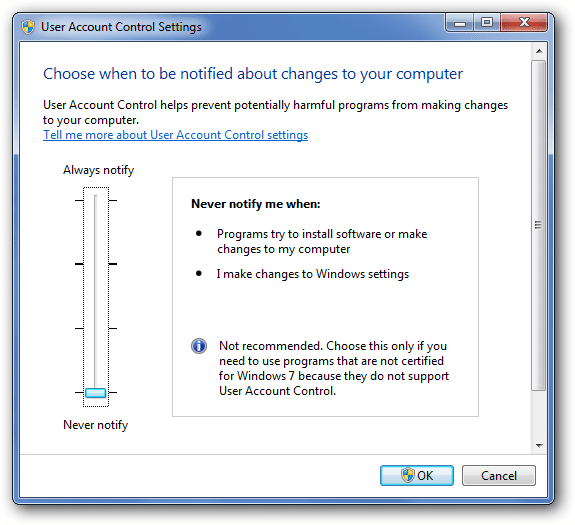
Select Change user account control settings. It should be noted that if you are prompted by UAC, you need to select Yes to Continue.
Now move the slider:
And set it to Never notify and choose OK to turn UAC OFF.
Or set to Always notify and opt for OK to turn UAC ON (If prompted, select Yes to continue).
Last step is to reboot the system.
You can continue to the action that caused the error. Moreover once the error is resolved, you should ensure turning on UAC. As it needs to be turned on for financial exchange to function with QuickBooks desktop point of sale.
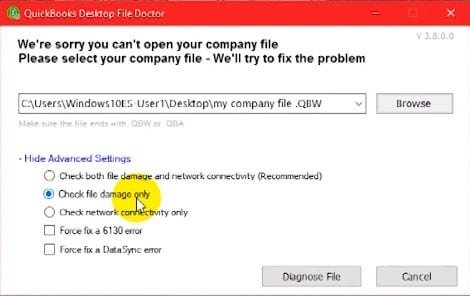
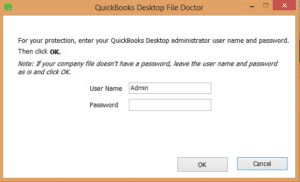
Method 4: Downloading and installing QuickBooks file doctor
If the above methods failed to work for you, then make sure to follow the below solutions and try fixing the error. You can download and install QuickBooks file doctor tool to resolve the error. The steps to be followed for this are:
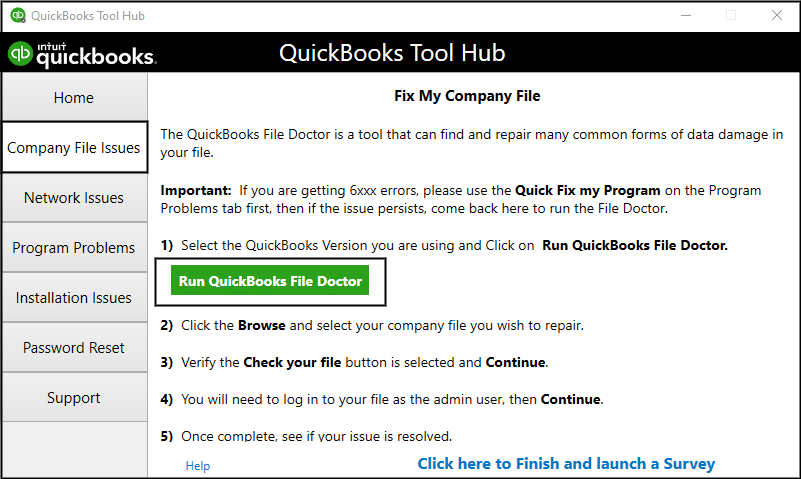
Run QuickBooks file doctor from Tool hub program
You can use QuickBooks tools hub program to directly launch the QuickBooks file doctor from it. All you need to follow these steps:
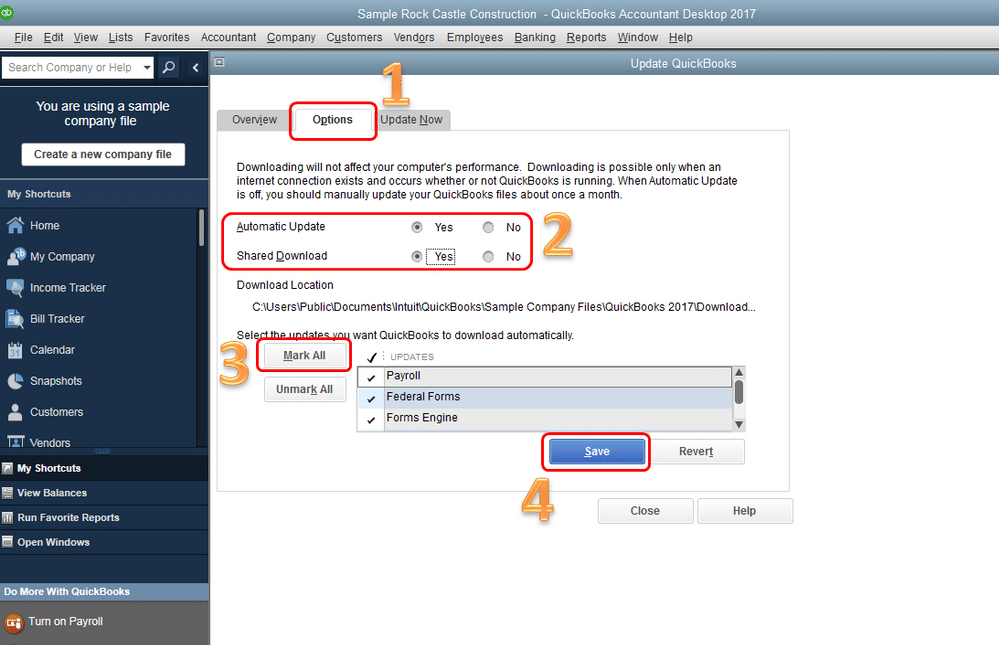
You can update the QuickBooks point of sale in order to fix the issue. This can be done by setting up automatic updates.
Sign in to the point of sale system as an admin.
Move to the Help menu and then hover over software update and also select Updater preference.
Also select the General tab.
Now select Automatically download updates.
Also choose Notify me to get the notification related to new updates when they are available.
The last step is to select OK when done.
The software will automatically download and install the latest updates when they’re available.
Method 6: Giving file share access
This annoying error in QuickBooks may also occur in case the file sharing is not enabled for the company files. In such a situation, the user should follow the steps below to enable shared access.
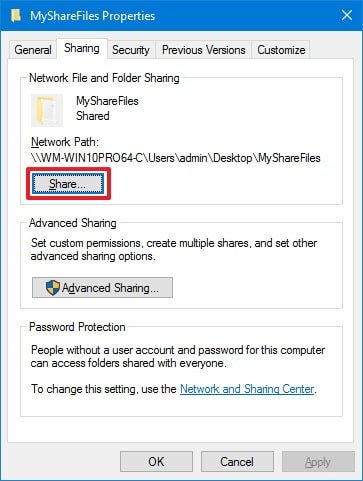
For this, launch the File explorer and right-click on the folder where it has been saved.
After that, select Properties and Sharing tab.
And then select partial or full sharing according to the business requirements.
The final step is to select Apply and hit the OKbutton.
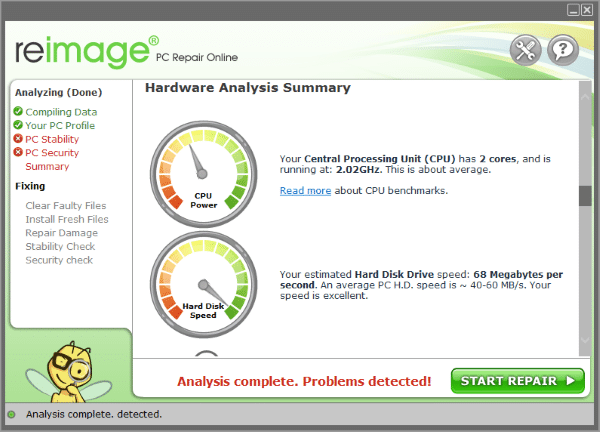
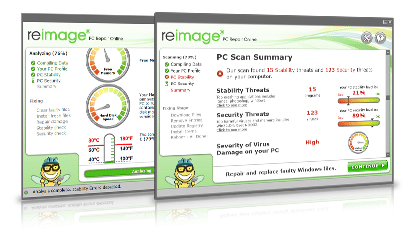
In case the above methods failed to resolve the unexpected error 5, then, in that case, you can install the reimage repair tool. The steps to resolve the issue are:
With this, we conclude the article over here, and hope that the information stated above might be enough to fix the QuickBooks unexpected error 5. However, in case of any query or if you need any sort of technical assistance, give us a call using our dedicated helpline i.e., 1.800.761.1787. Our team of QB experts will ensure to provide you with immediate technical assistance.
FAQs
What is Error code 5 in QuickBooks?
Error 5 is due to QuickBooks database service issues.
Can recreation of a new user resolve QuickBooks error 5?
Yes, creating new user can fix this issue.
What is the major source of error 5?
Error code 5 is due to invalid Registry entries.
What is error 5 due to?
QuickBooks Error code 5 is most of the times due to corrupted QuickBooks files.
If you are in search of a process to import and export data in QuickBooks desktop, then you have landed on the right place. In order to access information, you might think the only option is starting from scratch, but the fun fact is that you can also transfer information to and from QuickBooks. This process not only makes it simpler for you to convert, upgrade, or create new company file, but also saves a lot of time that you can invest in more important tasks. The process to import and export data in QuickBooks involves a few basic steps, which we will be discussing later on in this segment. So, make sure that you stay connected to the article till the end, and do not miss out on any of the steps.
Moreover, you can also get in touch with our team of accounting professionals for any further assistance. Our experts can aid in your endeavor and help you in importing and exporting data in QuickBooks desktop.
A brief into the process to import and export data
Talking about the importing data, you can easily import things like the bank transactions, accountant’s changes, general journal entries, and batch transactions. You can also import the customers and vendors. Moreover, the same can be exported, like the available journal entries, customer and vendor lists, etc. We will look at some lists and transaction types that you can import into QuickBooks.
Lists you can import
The list of information you can import is huge. Let us have a look at the elements that you can import without any issue.
Now talking about the transactions that can be imported, we have listed them below, have a look:
Account beginning balances
Cash sales to customers
Checks
Deposits
Invoices
Account transfers of funds
Vendor bills
Estimates
Payments from customers
Vendor bills refunds
Purchase orders
General journal entries
Credit memos to customers
Credit card refunds to customers
Points to remember
There are certain points that you should remember, at the time of exporting and importing data in QuickBooks. Let us check out some of the most important ones:
Process to Import and Export Data with QuickBooks Desktop
The process might differ for the item to import and export, so we will be exploring the steps for different items one by one:
MS EXCEL
The standard import process for MS excel involves a few basic steps. QuickBooks opens up a formatted excel spreadsheet, where you can enter the information. At the time when you save and close the file, you can review results and view data in QuickBooks. To import customers, vendors, and products, the steps below can be incorporated:
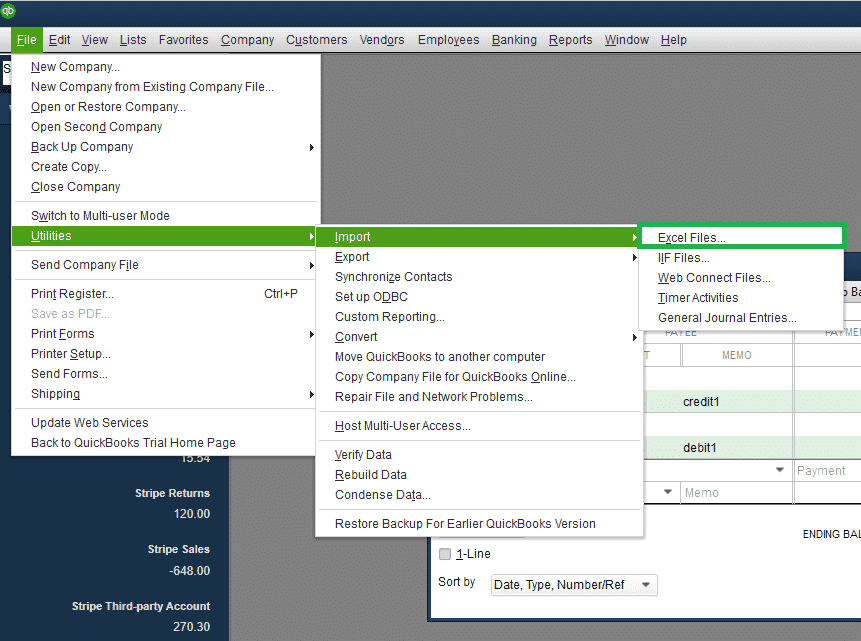
Visit the File menu, and then select the Utilities option and then hit Import.
Also, hit a click on the Excel files.
If you get Add or edit multiple list entries window, then you are supposed to hit a click on No.
Follow the wizard for importing the files:
For this choose the Type of data.
QuickBooks opens a formatted excel Spreadsheet. After you have entered the information, saved the file and closed it, you will be given the option to Add My Data Now.
And then review results and View data in QuickBooks.
End it by selecting the Close option when done.
The point to be noted here is that if you need to import additional customer, vendor or item data from excel using this option, getting back to this window option is always available.
Using CSV files
In order to import a list in the CSV format, you need to install the QuickBooks import excel and CSV toolkit. The tool kit will have the following components:
Import from Excel and CSV Manual - A pdf document with instructions, best practices and notes.
XLS example folder - A sample excel file containing 4 worksheets, one for each type of list.
Allowed fields - a reference guide explain what fields are available for the excel and CSV import.
CSV examples folder - sample CSV files, one for each type of list.
For exporting the CSV files, if you are not having MS excel installed on the system or if MS excel is not installed on the system or if yo wishes to view and edit the data using a different format.
Customer and vendors
The first step is to open the Customer/vendor center.
After that select Excel drop down, then you can choose the following:
Export customer/vendor list: if you wish to export the customer data such as name, balance, or the contact information
And Export transactions: If you wish to export transactions.
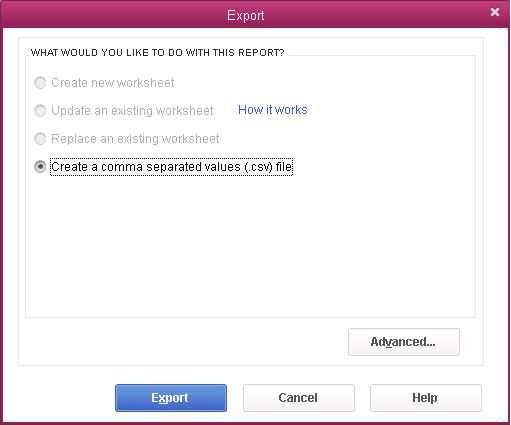
Now, in the export window, you are required to select the Create a comma separated values file.
And then click on the Export option.
Now assign a File name, and then select the Location where you wish to save the file.
Also, locate, open, and Edit the file if needed.
Reports
For this, you need to open the Report option.
Go for the Excel drop-down at the top of the report.
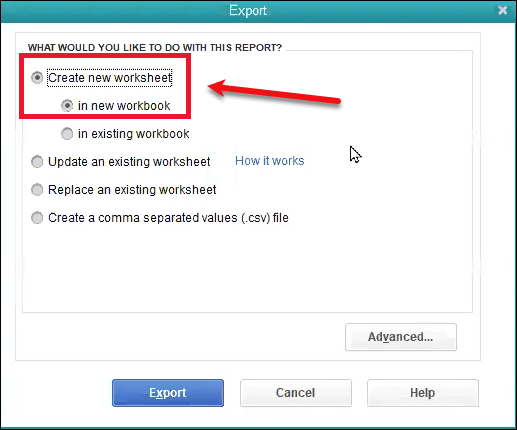
Choose the Create new worksheet.
Also, opt for Create a comma separated values file on the send report to Excel window.
Next step is to select Export.
Then, assign the file name, and also select the Location to save the file.
And also locate, open, edit the file as per the requirements.
The initial step is to Sign in the company file as an admin.
And then move to the File menu.
After that opt for the Switch to single user mode option.
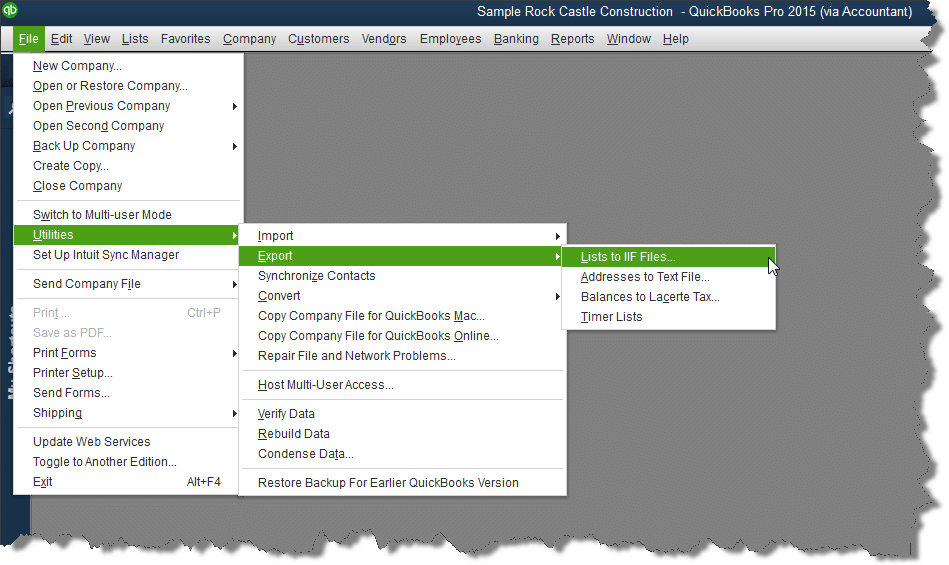
Next step is to visit the File menu and select the Utilities tab.
Also select the Export IIF files.
You need to opt for the Location to save the IIF from the save in drop down.
After that Enter a name in the file menu and also select Save.
The final step is to select OK button.
The steps to import IIFs
The initial step is to Sign in the company file as an admin.
After that move to File and opt for the Switch to single user mode.
Make a backup of the company file. You can restore it if the data doesn’t import the way it was expected to.
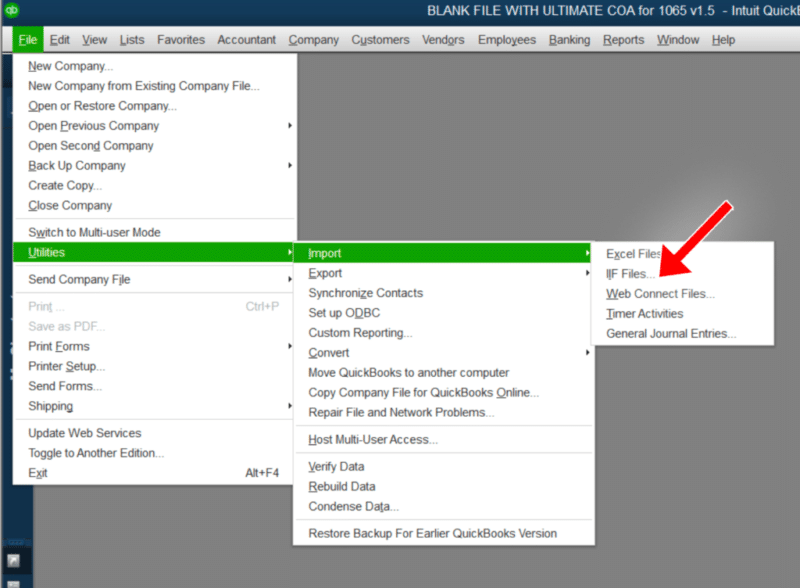
Move to File menu and opt for the Utilities and Import option. Also, select the Import IIF files.
You then need to browse the IIF file, select it and then Open it.
The last step is to select Ok to confirm the data imported.
Importing batch transactions from the accountant
The process to import batch transactions from the accountant involves the following steps:
Firstly, select the Batch enter transactions from the Accountant menu.
And then, from the transaction type drop down, select the transactions, you need to enter. You will have the option to enter multiple checks, deposits, credit card charges or credits, invoices, credit memos, bills and bill credits, but only in the supported versions of QuickBooks.
Next step is to opt for the appropriate bank / credit card or AR/AP account from the down arrow. You can also select the Add new to set up the account.
Moving ahead, open the Spreadsheet containing the transactions to paste it to QuickBooks.
Then, Arrange the columns in the spreadsheet to match the column order in the QuickBooks batch enter transactions screen.
After that, highlight the Transactional information, then right-click it and also select the Copy option.
Followed by right clicking the First date field in the list and select Paste in the Batch enter transactions screen.
Now the information from the spreadsheet will display the Batch enter transactions screen.
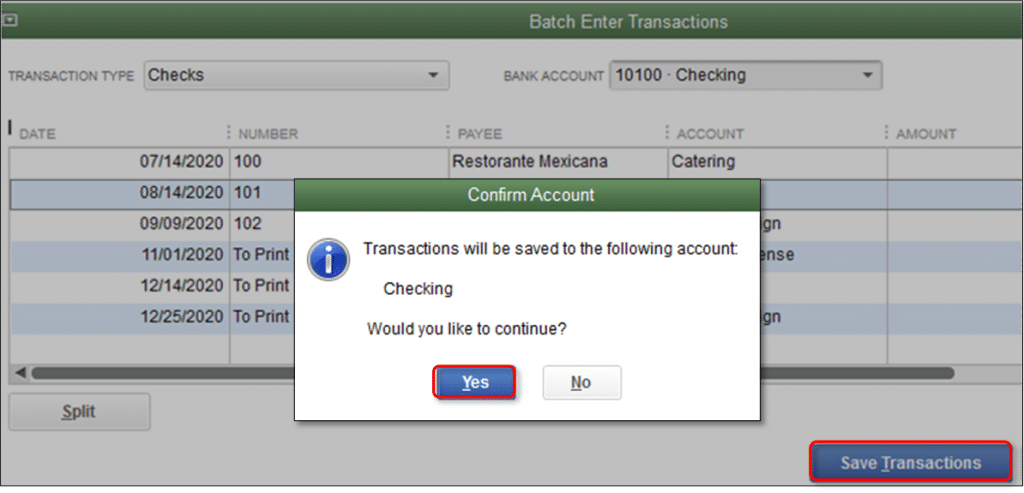
And then continue with the steps to Add all transactions.
Next step is to select Save transactions option and also hit Yes to save.
Finally, select OK to finish the importing process.
It should be noted that the batch transactions cannot be exported, but you can copy multiple transactions from the company file to another in a form that can be imported using the enter batch transactions feature.
The list of steps for importing and exporting different data in QuickBooks desktop doesn’t end over here. You can give a call to our XpertBooks Pro consulting team at 1.800.761.1787, if any of your queries remain unanswered. Our accounting professionals carry out the export and import process in QuickBooks desktop on your behalf.
FAQ's
What types of data can I import and export in QuickBooks desktop?
Different data types that can be imported and exported in QuickBooks desktop include customer, vendor, and employee lists, invoices, bank and credit card transactions, purchases, and ancillary data types.
Can I import and export data between different versions of QuickBooks Desktop?
Yes! You can import and export data across different QuickBooks versions. However, the data should be compatible with both versions.
Is it possible to import data from other accounting software into QuickBooks Desktop?
Yes! Users can import data from other accounting programs into QuickBooks desktop. This is possible by using the import tool offered by Intuit or some third-party tools.
Can I export and import data between QuickBooks Desktop and QuickBooks Online?
Yes! You can easily export and import data between QuickBooks desktop and QuickBooks Online. For this, you may use the built-in export and import tools or third-party tools that facilitate the data conversion process.