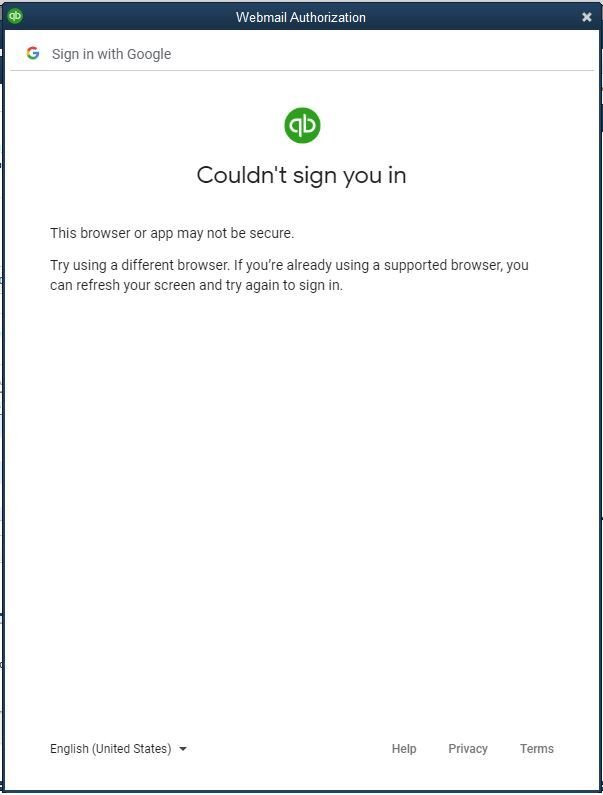
Is QuickBooks not accepting the password while you try to sign in to your email? Well, there is no need to worry as you are not the only one facing the webmail password issues in QuickBooks desktop. In the recent few days, this error has been reported by many QuickBooks users. It is basically that the QuickBooks desktop doesn’t accept the password when using email services like the Gmail, Outlook, or Yahoo Mail. You might be unable to connect to the online email services and send transactions directly from the QuickBooks desktop. Many times, this error might appear on the screen saying, “Incorrect email or password.” Well, there is no need to worry, as there can be certain things that can block the messages going out to the customers and vendors. This article is crafted to resolve all those email related issues.
In order to fix the issue, you will have to spot and configure those programs blocking the messages. So, to make the process easy for you, we have come up with this article, where we will be discussing the steps which can fix the webmail password issues in QuickBooks desktop.
What leads to webmail password issues in QuickBooks desktop?
The below mentioned factors are some of the most common factors causing webmail password issues in QuickBooks. Let us have a look:
If you are typing the wrong or invalid email ID and password.
Also, in case of inappropriate accessibility settings
Weak internet connections.
Another reason can be if the keyboard isn’t typing properly or maybe some of the keys aren’t working.
You can face similar issue if you are adding the space or missing the space required to complete the correct password strength.
Steps to Fix the Webmail Password Issues in QuickBooks Desktop
In order to troubleshoot the webmail password issues in QuickBooks desktop, you can carry out a few simple steps. Let us explore the steps in detail:
Step 1: Update QuickBooks Desktop to latest
If you have not already updated the QuickBooks software to the latest release, then it recommended to first update QuickBooks desktop. After that, you need to email a test transaction to yourself. The process to update QuickBooks to the latest release by setting automatic updates are as follows:
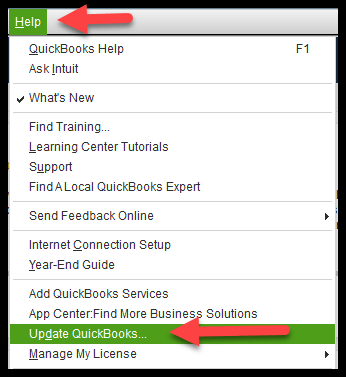
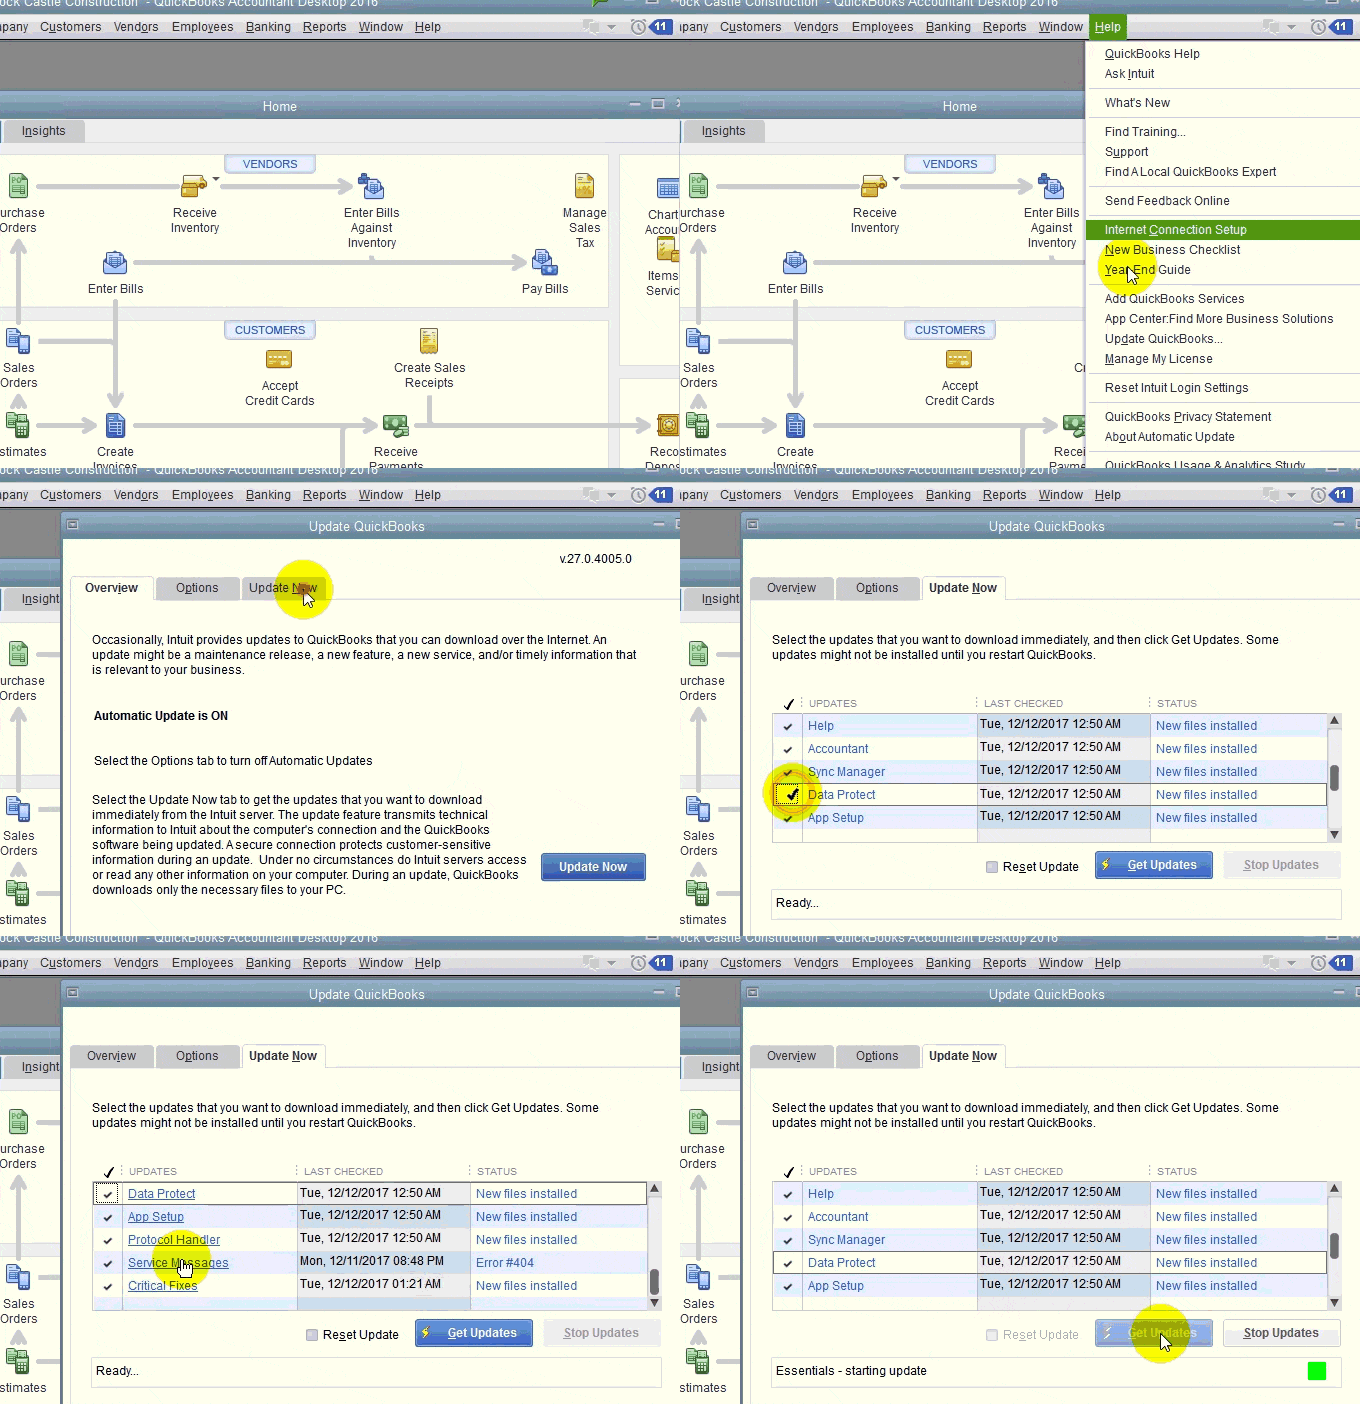
First of all, you need to visit the Help menu and then choose the Update QuickBooks desktop.
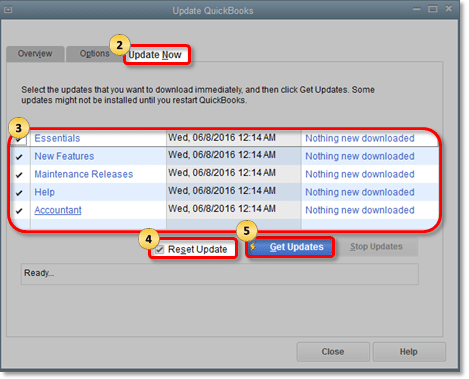
And then, visit the Update now tab. Also you can select the Reset update checkbox to clear all previous update downloads.
Followed by selecting Get updates and begin with the download process.
Next step is to restart QuickBooks after the download finishes.
Now it is required to Accept the option to install the new release when prompted.
Step 2: Checking the email settings
In case the first step failed, you will then have to check the email settings. For this, you will have to open the online email service. And review the settings and filter preferences. These might block the emails from QuickBooks accidently, which makes it important to check and configure them.
The steps for the email service are as follows:
Gmail users
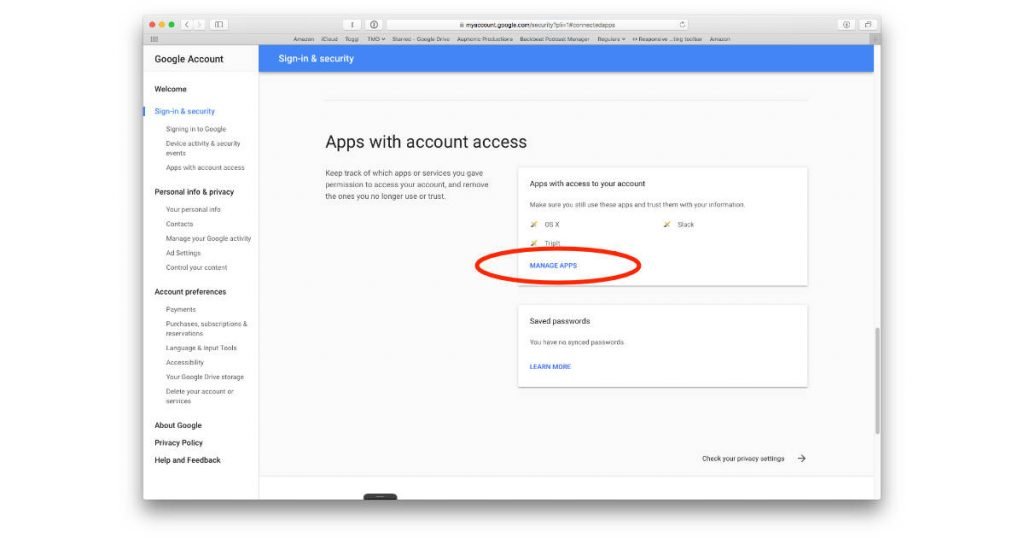
You need to check the App preferences. It should be noted that something might be blocking the connection to the google account. The steps involved in this process are as follows:
You are required to follow the steps to Enable access for less secure apps.
The next step is to Set access preferences for specific apps like QuickBooks.
Also, you need to go back in-to QuickBooks and email a Test transaction.
In case you are still unable to send emails, then you will have to turn off the 2-step verification feature for your Gmail account. It is important to noted that this would turn it off for all apps and not just QuickBooks.
Yahoo mail users
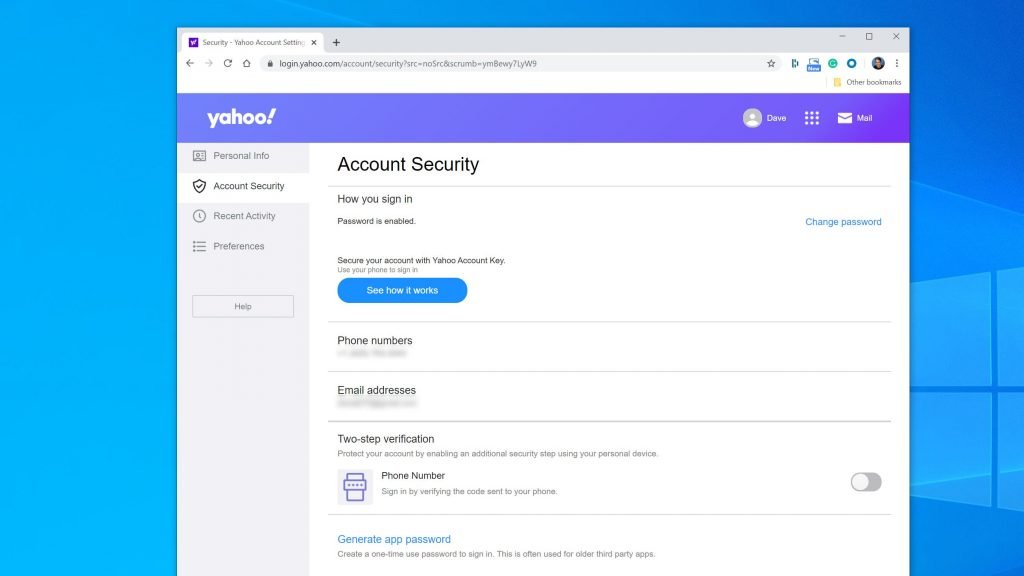
The steps for yahoo mail users will be different, as it uses a 2-step verification process. You will have to review the security settings by the steps below:
You are supposed to visit the Yahoo account security page.
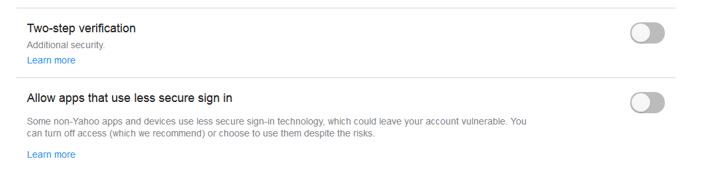
And then Turn on the two-step verification and permit the apps that use less secure sign in features.
The next step is to go back into QuickBooks and email yourself a test transaction.
In case you are still unable to send emails, then using the Yahoo’s generate third party app passwords tool is recommended. This tool will create some random password that can be used to connect QuickBooks. And this has to be done only once. Also, it should be noted that if you are sending emails in batch, then the password will get expired after sending 12 invoices. And then, you will have to generate a new third-party app password to continue.
First step requires you to follow the steps to Get a password.
And then go back in to QuickBooks and Email a test transaction.
Followed by entering the third-party app password in the password field box. After that hit OK.
It should be noted that to send email to QuickBooks, Yahoo mail powered generates a secure mail key when sending emails using third party desktop app as its new feature.
Other email services (Aol, Hotmail and others)
If you are using other email services, then make sure to check the security and filter settings. And make exceptions or rules so that QuickBooks isn’t blocked.
QuickBooks in RightNetworks
Complete a multi-factor authentication request with RightNetworks. In case you are unable to log in to the RightNetworks from a browser, then you need to contact them for help in setting up it properly.
At times, the antivirus software might accidentally block the connection. In such a case, you will have to look for the antivirus provider’s website for the steps to allow the port exceptions. The steps listed below are applicable for Norton and McAfee:
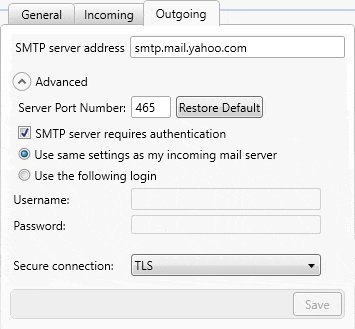
Make Port 465 open for Yahoo mail.
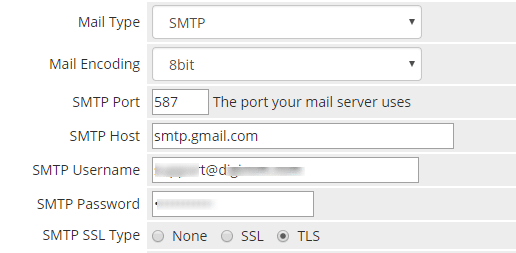
And also making Port 587 open for Gmail and all other email services.
In case if you are a McAfee user, then you need to open the antivirus program and look for excluded processes list. You will have to add these names to the list so that they can run freely.
To sum up, we can say that the above stated steps would be more than enough to get rid of the webmail password issues in QuickBooks desktop. Whereas, if the error prolonged even after that, then in that case we recommend you to consulting with our team of QB specialists and certified accounting professionals is must. You can simply schedule a call with our experts and allow them to fix the webmail password issues for you.
Frequently Asked Questions
How to reset my email password in QuickBooks?
To reset your email password in QuickBooks, you are required to log in to the website of your email provider, and following that, proceed ahead by going through the password reset process and updating the password in the settings of QuickBooks.
Why am I unable to connect my email through QuickBooks?
QuickBooks may not connect to email for a multitude of reasons, of which the most common ones include incorrect login credentials, outdated email settings, email-related security restrictions, or a compatibility issue.
How to get a password for QuickBooks?
To get a password for QuickBooks, the user needs to go for the creation of an Intuit account, sign up for a QuickBooks subscription, and follow the prompts to set up the login credentials, including a password.
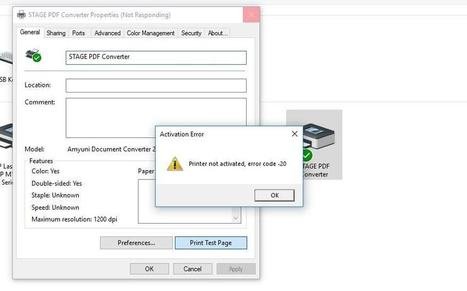
Have you stumbled upon QuickBooks error code 20 (Printer not activated issue) and are seeking different ways to fix this technical snag? Well, this is something that you might experience, while upgrading from Windows XP or Vista to Windows 7 or later versions. This is because the new operating system eliminates the use of the software key in the registry settings, which ultimately leads to printer related issues. In case you are trying to print from QuickBooks 2009 installed on Windows 10 system, then it is most probable to encounter this error. This error can also appear on the screen when you try to print a pay slip, form, or a PDF using QuickBooks desktop. There are numerous facts associated with this error code that will be discussed later in this article, along with the tips and tricks to get rid of it.
If you want to unleash wider known facts about QuickBooks error code 20: printer not activated, or want our experts to fix this issue, then you can consult to our industries best accounting experts. Our team of experts will not only fix the error for you, but also it will hardly take anytime to the professionals to fix this issue for you.
What is QuickBooks Printer Not Activated Error 20?
Printer not activated error 20 in QuickBooks is one of the most commonly encountered error that usually occurs when the new operating system puts the Hkey_Current-config\software key in the registry settings. This error is a common printing and PDF related issues faced by QuickBooks users, especially when emailing invoices or saving forms as PDF files. As a result of this error, you wont be able to print or send invoices and Payslips, which leads to further nuisance. This error is also caused by many other software’s apart from the QuickBooks but there is significance on QuickBooks is more than any other software. The good news is that QuickBooks error code 20 is fixable in most cases without advanced technical repair. So, without further delay, let's discuss more about this error.
You may see the following error message on your desktop screen when you are trying to print a file:
“You cannot print directly to the QuickBooks PDF converter. Try using QuickBooks Save as PDF menu option”.
Now that you have learnt what is meant by this error, it is time for you to find out what triggers QuickBooks error code 20. This error code can be seen, if:
QuickBooks 2009 has compatibility issues with Windows 10
You are still using QuickBooks 2009.
QuickBooks Windows registry file issues may also lead to Error 20.
Unsupported printer drivers may be set up on your system.
An outdated application key
The PDF converter might not be configured properly
There is an outdated Windows operating system set up on your system.
Important Points
Important points to remember before rectifying printer problems. Before beginning with the rectification process of QuickBooks error 20: Printer not activated error, it is recommended to read the pointers below:
Create a registry backup
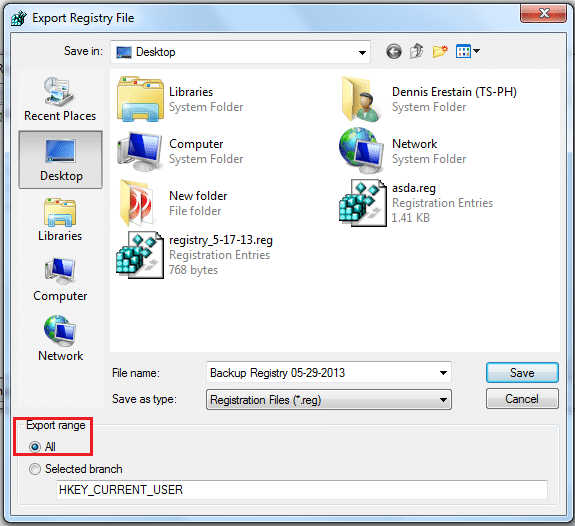
Take the registry backup, before jumping on to any process.
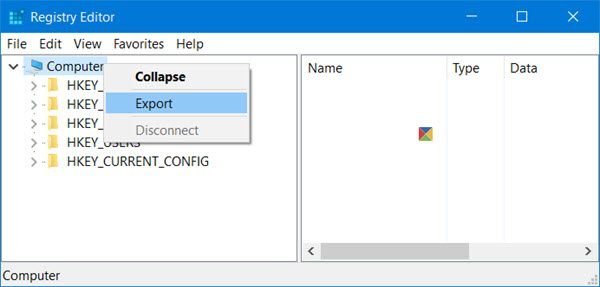
Visit the Registry Editor and then click on Computer, which can be seen in the folder tree in the left side.
Select the File option and then hit Export option.
To end the process, click on Save and you good to go.
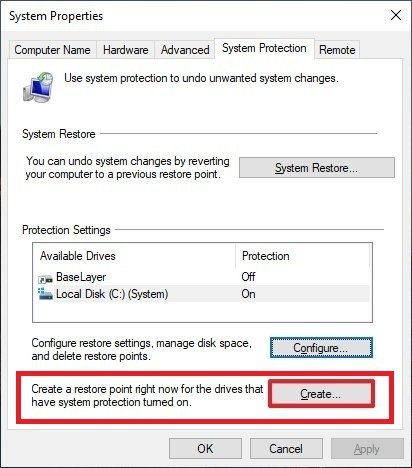
Create a system restore point
It should be noted that the restore guide is not only labeled for Windows 10, but also they work on Windows Vista, 7 as well as Windows 8.
Ensure that you are not using a discontinued version of QuickBooks. This is because every QuickBooks version is only good for 3 years from the year in which it was launched.
Make an attempt to install 32-bit version of Windows, in the case of Windows XP or Vista.
Change the Directory
You can take the below points into consideration before changing the directory:
Generate backup, when making any changes to the current registry. In case you are unable to solve issues with modified registry, then it is recommended to use old registry.
In order to handle further complications, it is recommended to create a system recovery point.
Close the final draft
In order to close the final draft on the system, you can simply carry out the steps below:
For Windows 10 or later versions:
Move to the Start or Windows icon on the screen.
Right-click the Final draft9/8 tile.
Hit a click on Run as admin tab.
For Windows 7/Vista:
If you are a Windows 7 or Vista user, then click on Start menu and also click on Programs tab.
Hit a right-click on the final draft 9/8' and click on Run as administrator tab.
Try to save the documents in PDF format. You will be able to save the script in PDF format without any issue.
Updated Methods to Fix QuickBooks Error 20 (Printer not Activated)
Once you have explored the symptoms, causes, as well as precautions, you are all set to carry out the steps to rectify QuickBooks Printer Not Activated Error 20. Well, the list of solutions to this error code is huge, but not all methods work in all cases. Thus, we have enumerated below some of the most effective and recommended methods, which will help you in fixing the issue. So, without wasting much time, let us begin with the processes.
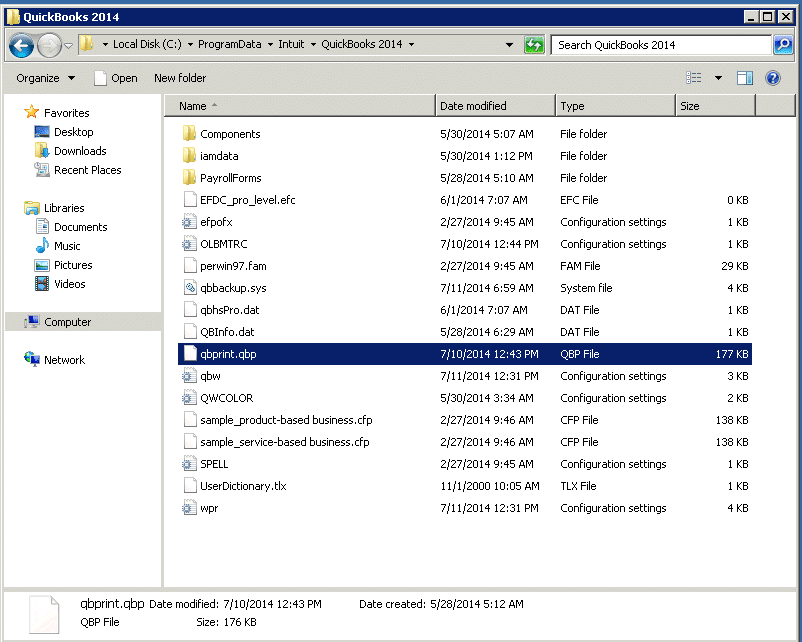
Method 1: Mend QuickBooks PDF component QBprint.qbp file
The very first method that can be adopted by you, can be to fix QuickBooks PDF component QBprint.qbp file.
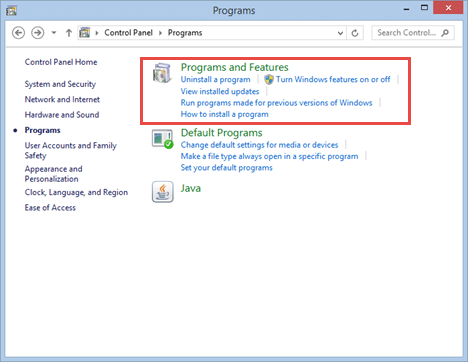
Open the Windows Control Panel and then visit the Programs and Features tab.
Pick the QuickBooks software from the list of installed programs.
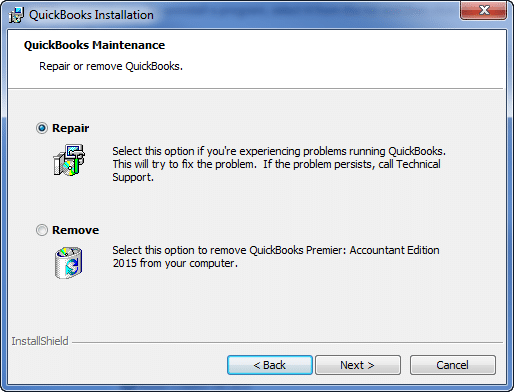
Hit a click on change and then begin with the repair process, along with that, follow the instruction till the end.
Once done with that, make sure to reboot the system, when the QuickBooks repair process comes to an end.
Now make an attempt to print something, and find out whether the error continues or not.
Method 2: Turn off the UAC settings
Hit Windows + R keys, and after that type in Control Panel inside the Run window.
Tap on the OK button.
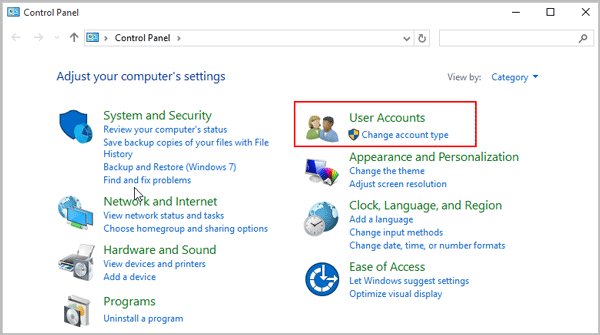
Hit a click on the User Accounts that can be found under the Control Panel.
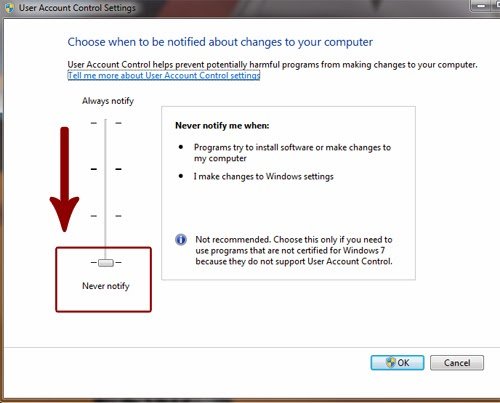
Once done, click on Change user access control settings and then move the slider to Never to notify.
The final step is to hit OK and restart the system.
Press the Start button, on your keyboard and open Control Panel.
Select the Programs and Features tab.
Hit a click on Turn Windows features on or off.
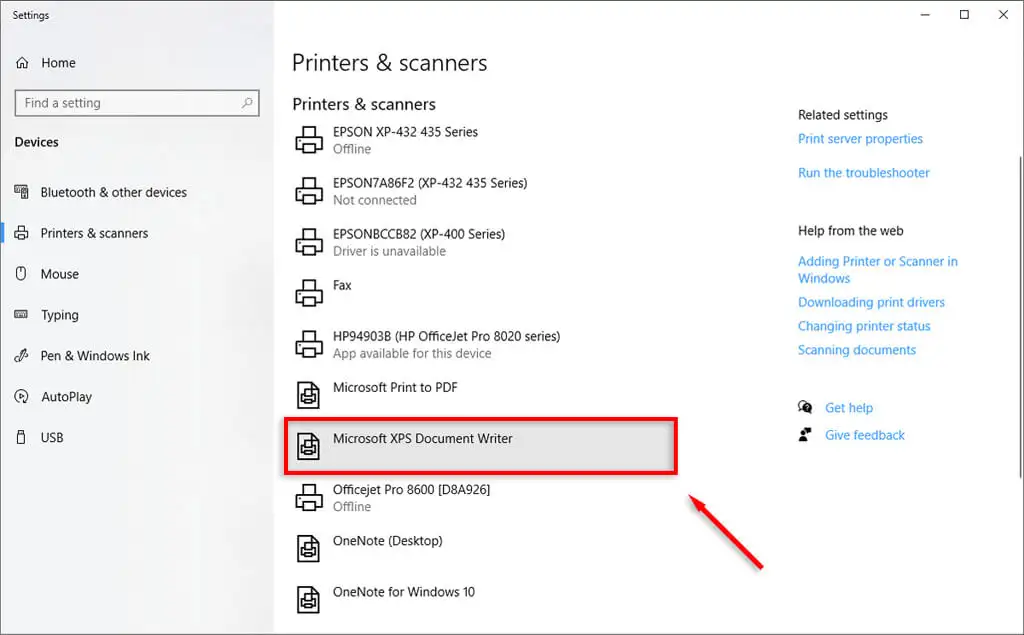
Now tick an uncheck mark on Microsoft XPS Document Writer option.
Once done, reboot your system.
If the problem has fixed then re-enable the XPS Document Writer again by hitting a check-mark on it.
Method 4: Setting Full Control Access for software folder in Windows Registry
If none of the above methods worked, then try to set full control access for software folder in Windows registry. As this methods can help you to get rid of QuickBooks error code 20. The steps involved in this method are as follows:
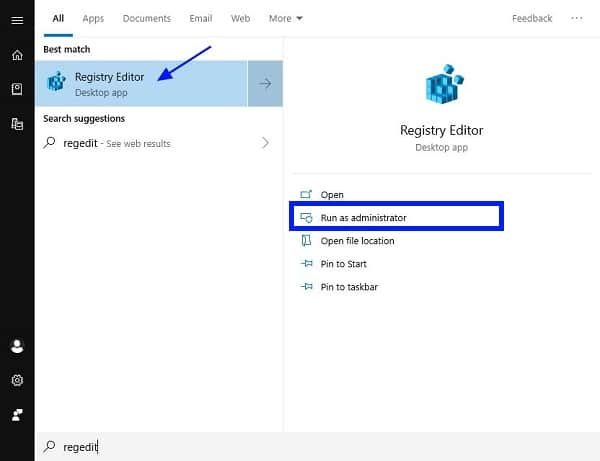
Hit the Start tab and then type in Regedit.
Right click on regedit icon and then tap on the run as admin option.
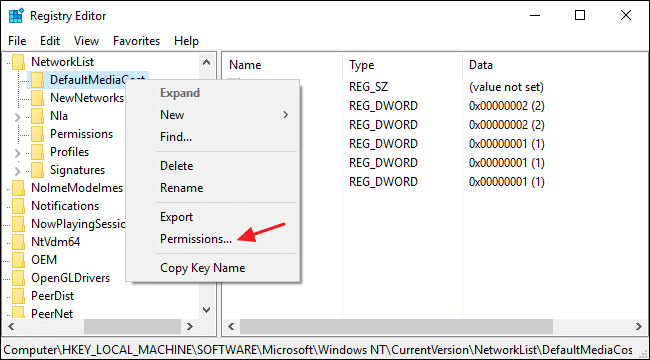
Move to the HKEY_CURRENT_CONFIG folder and then hit on the software folder.
Now click on permissions.
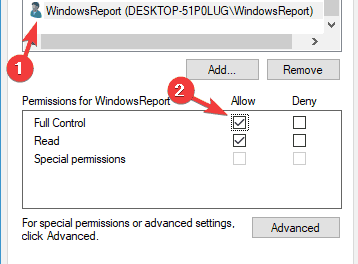
Now check Full control for the users.
Hit on OK and then close the registry editor.
End the process by opening QuickBooks and then try to print a pdf to check if the error persists.
Method 5: Check default email program in Windows registry
Press the Windows + R keys initially, and then type in command as Regedit.
Hit a click on OK tab.
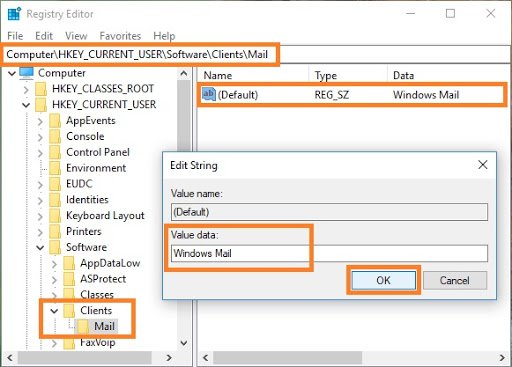
Move to the HKEY_CURRENT_USER-> Software -> Clients -> Mail.
Now verify the default email name, in case it is not the default program, hit a click on Default section and then type in the name of the email program.
The last step in the process is to hit OK button and then reboot Windows.
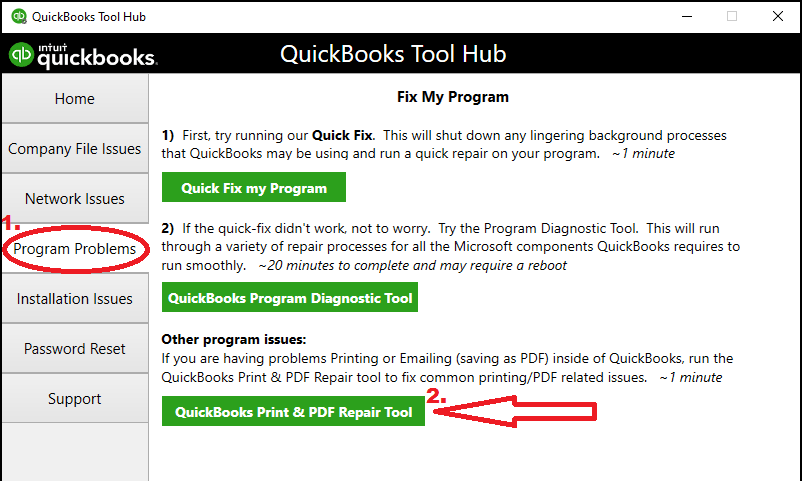
Method 6: Use QuickBooks Print and PDF repair tool
If none of the methods worked in your favor, then you can make use of the QuickBooks print repair tool. The steps to be followed are:
You can download the QuickBooks PDF and Print repair tool from the QuickBooks tool hub program.
Run the tool in administrator mode.
The application will run with a red background and will let you find the solution.
Make sure that the QuickBooks version is updated.
Also ensure that the printer is printing out of your QuickBooks.
You will be prompted to restart after running the tool.
While running the tool, keep in mind that all other running applications are closed.
Method 7: Permit the usage of PowerShell script
Well, it should be noted that this option is only for the Windows 10 users. You can update the registry key editor manually by offering authority to use Powershell script. The steps involved in granting permission are as follows:
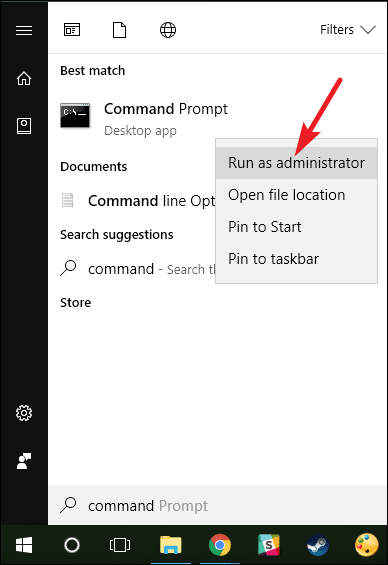
Hit a click on Start tab and type in cmd.
Choose Run as admin option, after right-clicking Cmd.
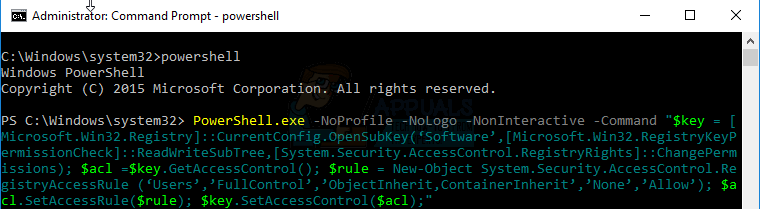
Now type PowerShell in the command prompt and then hit on Enter key.
To end the process, make sure to copy and paste the following code in the command prompt.
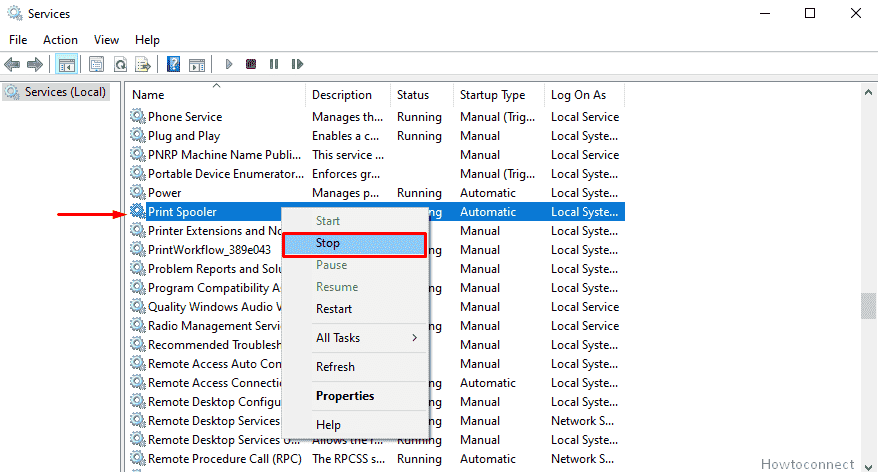
When none of the methods helped, make sure to activate the print spooler service. The steps to be carried out in this process are as follows:
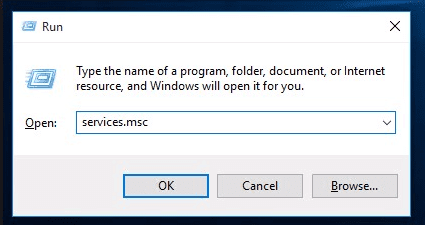
Hold down the Windows logo and then Press the Windows + R keys together.
The next step is to type services.msc and hit Enter key.
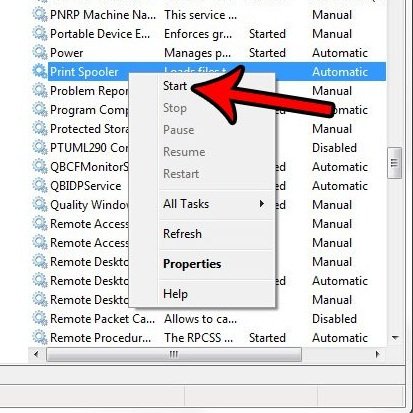
Choose the Print spooler option and then select the Stop option.
Once done, hit a right-click on it and click on Start option.
Now check if the error is resolved or not.
Method 9: Re-install QuickBooks desktop
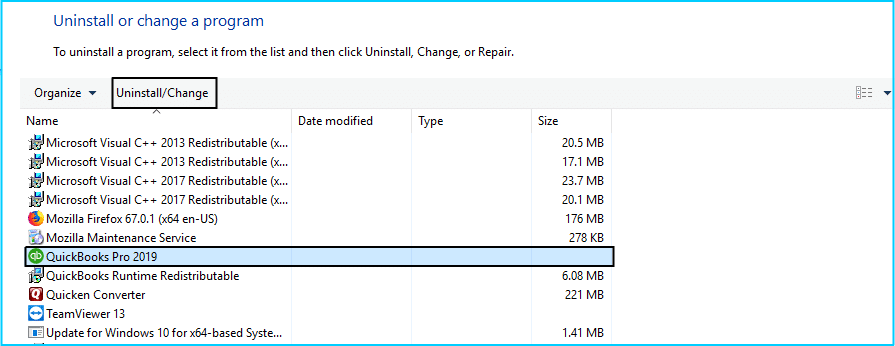
Open the Control Panel and then click on Programs and Features option. After that, locate the software.
Hit on uninstall option.
Download the proper version of the software, ensuring its compatibility with the operating system.
Now make sure that the printer and the program are working fine.
In case you encounter certain issues regarding the un-installation, then use the system security application, just like Reimage or RegCure Pro, in order to clean the system from corrupted files.
Method 10: Fix Microsoft Document Writer Windows component
The Microsoft document writer is preinstalled Windows component, and it helps in printing file. The component enables Windows to assist the QuickBooks application in saving the information in PDF. The steps involved are as follows:
Right-click on the QuickBooks icon and then choose the open file location tab.
Move to the temp folder.
Locate and double-click on the .exe file, and complete the installation.
Now open QuickBooks once to register the license.
In case you are facing an issue in installing ABS PDF driver, or it stops responding, then try reinstalling them again.
Print again and then verify the QuickBooks error code, once the installation process completes.
Winding up!
Tackling QuickBooks error 20 printer not activated can be a daunting task, but carrying out the above listed methods can assist in fixing the issue. However, for any kind of technical assistance, or if the same error still persists, do not hesitate in ringing up our dedicated helpline i.e. 1.800.761.1787. Our XpertBooks Pro consulting professionals will ensure to provide instant assistance. We will be happy to help you!
FAQs
Can I encounter the Printer Not Activated Error Code 20 on any version of QuickBooks?
Yes! This error can occur on different versions of QuickBooks. These can include QuickBooks Desktop (Pro, Premier, Enterprise), QuickBooks Online, and QuickBooks Point of Sale.
Can a third-party PDF printer cause the Printer Not Activated Error?
Yes! this error can be caused by a third-party PDF printer or having multiple printer drivers installed on your system.
Does the Printer Not Activated Error 20 only affect printing, or does it affect emailing as well?
This error can affect both the printing and emailing functions within QuickBooks.
Does QuickBooks Error Code 20 affect all printers?
No. The issue is usually connected to QuickBooks PDF services rather than the physical printer itself.
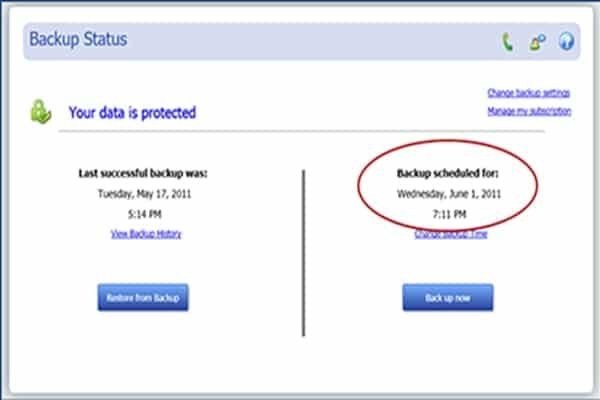
Are you in search of the process to setup, install and update Intuit data protect? If yes, then you have landed at the right place. In this segment, we are going to talk about the Intuit data protect, its set up process, its install and update process, and a few other associated facts. Intuit Data Protect is a backup service that works in conjunction with QuickBooks. You can set it up, in order to back up the data every day.
We will be exploring the process to set up, install, and update the Intuit data protect one by one. So, without wasting time, let us quickly jump on to the article. But if in case you are seeking for effective strategies to setup, install and update intuit, proceed to the related piece of information. Or discuss regarding the same with our accounting professionals. They will assist you round the clock.
Before we learn the processes of setting up, installing and updating Intuit data protect, it is very much important to unleash a few facts about this service. Intuit data protect is basically a subscription-based back-up providing service from Intuit. You can make use of this service for creating backups for the data files and folders stored on QuickBooks. Intuit data protect basically safeguards the data against data loss, theft, file corruption, and other dangers.
System configuration for installing Intuit Data protect
Operating system - Windows 7, Windows 8.1, Windows 10, Windows 11, Windows Server 2008 R2 SP1, Windows Server 2011, Windows server 2012 R2, Windows Server 2016, Standard and essentials.
Browser- Internet Explorer 11, Microsoft Edge, Google Chrome, Mozilla Firefox, Safari browser.
System Hardware- 4 GB RAM, 4 GHz Processor, at least 5 GB of free disk space, 4X DVD-ROM drive (in case installing from a CD), 1280 x 1024 screen resolution.
Steps to set up Intuit data protect
The steps involved in setting up Intuit data protect are as follows:
To begin with, you need to open the QuickBooks on the system or server that is having the QuickBooks company file. Or press F2 key in QuickBooks to find out.
After that visit the File menu and then select the Back up company and then set up/activate online backup.
Now sign in with the Email address you used when you signed up. It is a bit different for the QuickBooks login.
And then, after the setup is complete hit Continue.
Also, select the QuickBooks company file, followed by choosing Continue. In case you have the entire system plan, then choose the folder you want to back up and then hit on Continue.
Next step is to select the checkbox for back up local selected documents and then hit Continue.
Now you need to select the Files and folders you want to backup and then click on Continue.
Also, schedule the Daily backup and then tap on Continue again.
To end the process, ensure that you Setup the notification settings and hit Continue.
It should be noted that the first backup might take several hours. It actually depends on the number of files and also the file size. You need not to worry, as the backups after the first one would hardly take a couple of minutes. You can also see the below given video in order to setup the intuit data protect.
Why is it important to update Intuit data protect?
Updating an application ensures to keep you from a wide range of online threats. It further ensures improved security, better and faster performance and security of information.
You should keep the Intuit data protect up to date, as it offers advanced security to safeguard critical information and prevent data theft.
Moreover, you can avail improved performance of web application and tools.
Another option is of enhanced stability on other operating systems.
Complete data safety and protection from data loss is another perk of updating Intuit data protect.
Steps to Update Intuit data protect in QuickBooks
It is recommended to update Intuit data protect occasionally for improvements. If you are having automatic updates turned on, then the software itself will download the update for you. Or you can also check for updates manually at any time. The steps involved in this process are as follows:
First of all, download the latest update for Intuit data protect, by selecting update QuickBooks from the Help menu.
And then select the Update now tab.
Ensure that you have selected the Data protect from the list, and then choose the Get updates option.
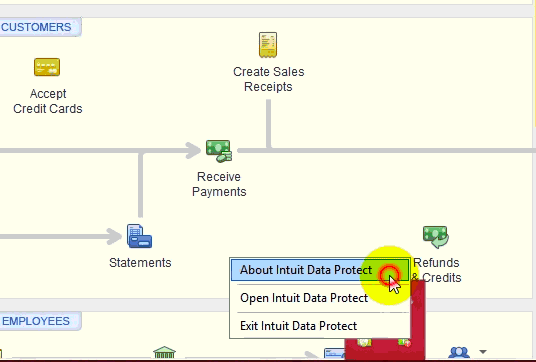
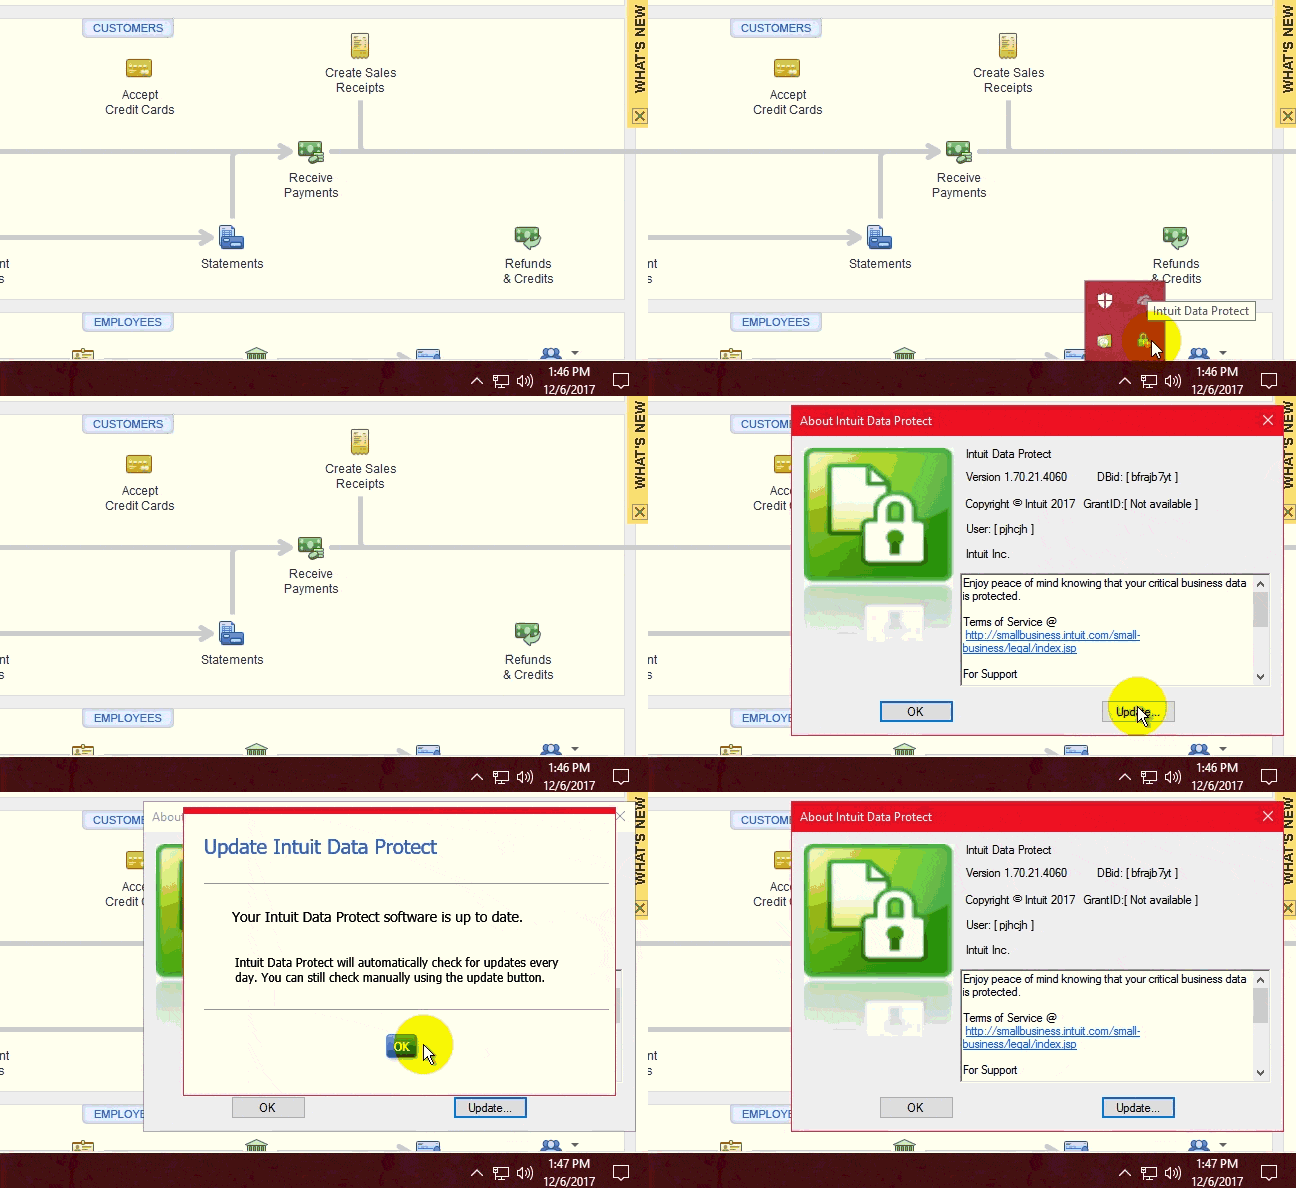
After that Install update and select the up arrow on the desktop toolbar.
The next step is to right click the Intuit Data protect icon and then choose About Intuit data protect.
Now, select the Update option.
And also select OK once finished.
Process to make a backup with Intuit data protect
Now that you have learnt the steps to set up and update Intuit data protect, it is time to find out the process to make a backup with Intuit data protect. It backs up the files and folders automatically once a day. You can also backup manually at any point of time. Let us explorer the steps involved in backing up.
First step is to right click the Intuit data protect icon and then choose the Open Intuit data protect. The icon might look like a green padlock on the windows toolbar.
And then choose the Back up now option.
Followed by selecting the Files and folders that you want to back up. Also, hit Continue.
Now choose the Backup now. Also, you will receive a message stating that the backup is successful.
Intuit data protect can be of great assistance, if installed and updated properly. If you want further assistance related to Intuit data protect, you are invited to schedule a call with our U.S based accounting personnel and let our team of QB specialists handle the situation on your behalf. Our experts will carry out the process smoothly, ensuring no further mess.
FAQ's related to Intuit Data Protect
What is Intuit Data Protect?
Intuit Data Protect is a cloud-based backup and recovery service. It can assist in the protection of the accounting data in QuickBooks as well as other crucial files related to the QuickBooks program.
How do I set up Intuit Data Protect?
Setting up the IDP requires signing up for the service and then downloading and installing the tool on the system.
How do I update Intuit Data Protect?
For updating Intuit Data Protect, you need to download and install the tool from Intuit website. You can also enable the automatic update feature.
Can I use Intuit Data Protect with other software besides QuickBooks?
Yes! Intuit Data Protect can be employed to back up crucial accounting files and documents in addition to the QuickBooks data.
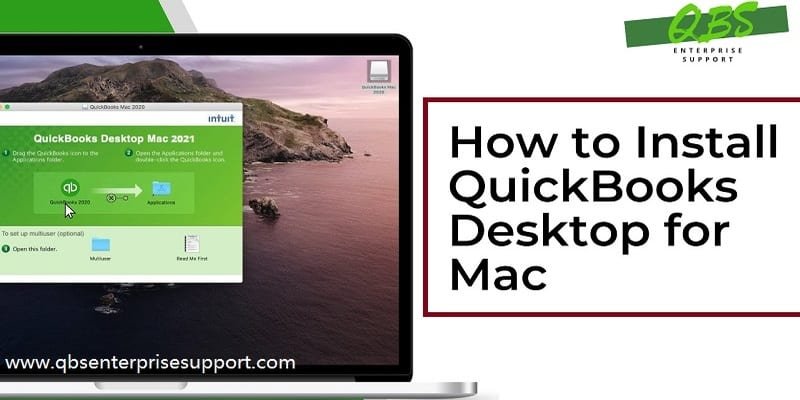
If you are a Mac user and looking for a good accounting software, then QuickBooks is a great solution. It is available for Mac users and that too with some features that are exclusively for Mac users. A few of the features include the following: Automatic reminders in iCalender, timely notification in the menu bar, auto contacts sync in Mac operating system’s address book. Setting up and installing the latest version of QuickBooks desktop for Mac involves a few simple steps that are given below in this article. So, keep read on!
However, if you want an expert to install and set up QuickBooks Desktop for Mac, then give us a call right away and seek assistance from our experts. Our professionals will gladly assist you in installing and configuring QuickBooks desktop for Mac. Alternatively, you can scroll through this post and explore further information.
Essential points to consider before setting up QuickBooks Mac
There are certain points that you should consider before setting up and installing QuickBooks Desktop for Mac. Let us check out the points one by one:
Before starting with the installation process of QuickBooks desktop for Mac, it is important for you to consider certain pointers including the following:
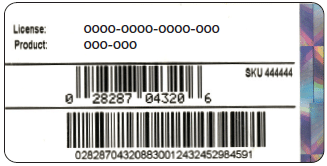
In case you have the CD, then you need to look for the scratch-off label on the packaging.
Least system requirements for Mac Desktop
There are certain system requirements that are required for installation of QuickBooks desktop for Mac. Let us check out those system requirements:
You need to have at least MacOS 10.14 (Mohave); supported by MacOS 10.14 (Mojave)
Also, Intel processor, Core 2 Duo or higher is mandatory.
You should also have a multi-user server: Intel Core 2 Duo or higher processor in order to run a server
At least 2 GB RAM is a must, however, it is recommended to have 4 GB RAM
Ensure that the product is registered
Also, for Mac, using Intuit checks to print checks
Another thing is that the printer should be 100% Macintosh-compatible printer, in order to print invoices, checks, deposit slips, lists, purchase orders, mailing labels, etc
250 MB of disk space should be available
Also, the CD/DVD drive or the internet connection for downloaded installation.
Limitations of QuickBooks Desktop for Mac
Despite of the above stated plus points, there are certain limitations of QuickBooks desktop for Mac.
Maximum three user licenses: It should be noted that QuickBooks for Mac offer two user license and you can buy only one license additionally.
No access to data via mobile: Another limitation of QuickBooks desktop for Mac is that the QuickBooks online permits you to access the data from mobile phones, but this feature is not offered by QuickBooks for Mac.
Limited technical assistance: One more limitation of QuickBooks for Mac is that it comes with unlimited tech support for 30 days, but later on you will have to purchase the support plan.
Steps to Install and Set Up QuickBooks Desktop for Mac
This section contains all the essential steps for installing and setting up QuickBooks Desktop for Mac. It should be noted that this is only for QuickBooks desktop for Mac. In case you are using QuickBooks for windows, the set of steps would differ. Let us check out the steps involved in here:
Step 1: Ensure that the QuickBooks Desktop for Mac will run on the system
In this step, you need to check the system requirements for Mac version, that we have mentioned in above. This is to ensure that the QuickBooks can be installed on the system without any issue.
System requirements:
An operating system of at least Mac OS X v11.3 (Big Sur) or later
An internet connection for the downloaded installation
Integration/compatibility requirements:
Export report data - Apple Numbers v3.5, and Microsoft Excel 2016 or later, including Mac Office 365
E-mail as PDF - Apple Mail, Microsoft Outlook 2016 or later, including Mac Office 365
File conversion - QuickBooks Mac 2022 supports:
One-way conversion to QuickBooks Online
One-way conversion from QuickBooks Windows 2022
Conversion to and from QuickBooks for Windows 2022
Step 2: Spotting the license and product numbers
In case you have downloaded a digital copy: You might have got an email confirmation that would have the license and the product number. If, the mail isn’t received, then you may locate the license number or you can contact support team.
In case you got a physical copy: In such as case, you need to look for the scratch off label on the packaging, then you need to scratch the label to spot the license and the product number.
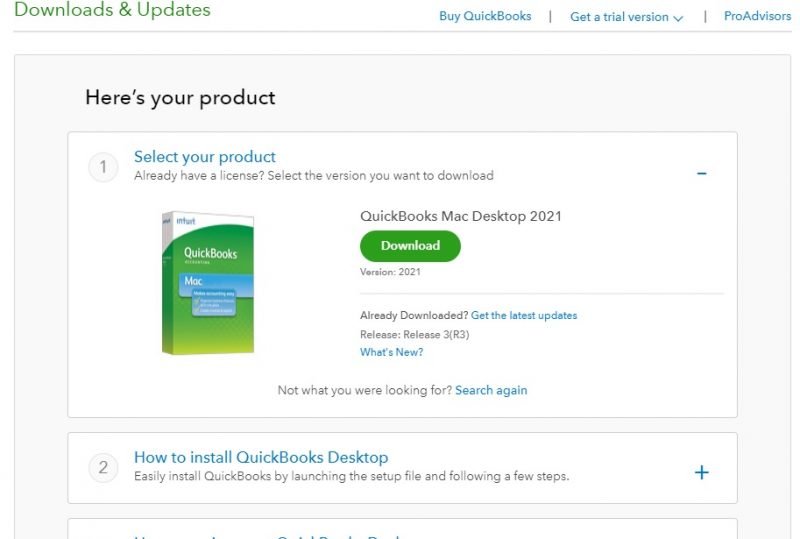
Step 3: Download & Install QuickBooks Desktop for Mac
The procedure to download and install QuickBooks desktop for Mac on your respective systems, you can perform the easy-to-follow instructions given below.
Note: It should be noted that if you are trying to download the installer and are having trouble, then you might need to clear the browser’s cache and cookies or use a different browser.
Close all the running applications.
And then double click the downloaded installer or the QB executable file to run the installation process.
When the extraction of file complete, you need to click on yes to all.
Furthermore, hit a click on next tab to start the installation.
Go through and agree to the Software license agreement.
Moreover, enter the license and product numbers, along with clicking on to next tab.
You now have to choose the installation type:
Express: This will help you to permit the installer to make the suggested choices for you. Including replacing your previous version of QuickBooks, in case you have one. Keep a note that the accountant edition doesn't replace older years by default.
Custom and network options: You need to choose this particular option if you are using multiple versions of QuickBooks desktop.
Heading forward, you need to choose where you will be using QuickBooks.
It should be noted that if you choose express in the previous step, then skip the next step only.
Or if you choose express in the previous step, then skip the step.
Choose, I'll be using QuickBooks on this computer
Or I'll be using QuickBooks on this computer. And I'll be storing our company file here. So it can be shared over our network: go for this option, if you will be running QB.
Hit on next to install the software to the default directory. Or, if in case you wish to go for the of your choice, then browse the directory and choose the location and hit Next.
Click on install to continue and also click on back, if needed to.
In case you have upgraded from previous version of QuickBooks desktop for Mac, then you need to update the company file to work in the newer version. The steps involved in this process are:
To begin with, open the company file in the newer version.
After that, when the QuickBooks software prompts to update or convert the company file, then select upgrade.
And then, select OK button if you see any pop-up on your screen.
And lastly, check the balance, reports and accounts to ensure the correct company file is converted.
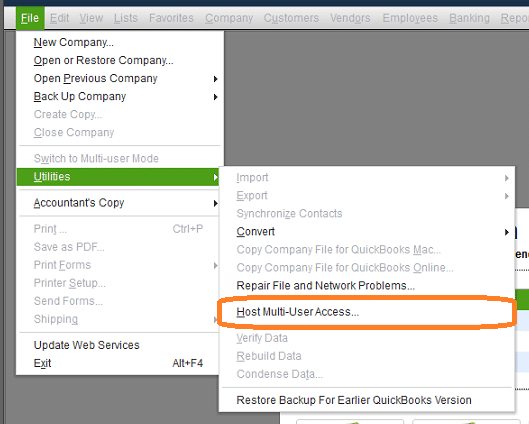
In case you have more than one user license, then you could set up QuickBooks in multi-user mode to ensure that all users can access the file at the same time. The steps to be carried out are as follows:
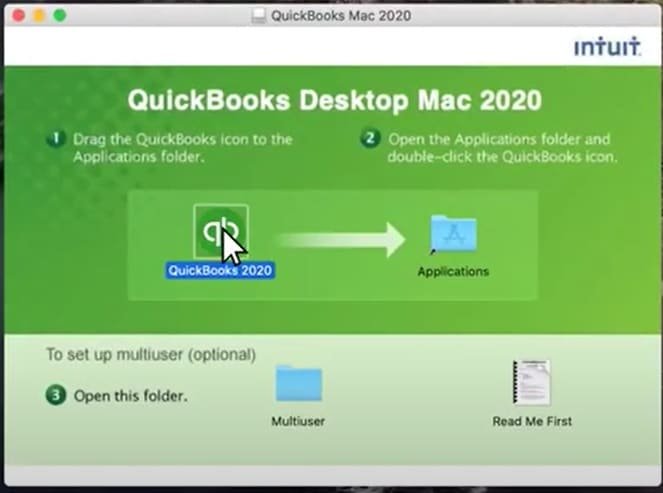
The very first step is to open the multi-user folder.
And then drag the QuickBooks server icon to the applications folder. User added image.
The next step is to select the authenticate to modify the applications folder if asked. And then enter the admin username and password and select Ok button.
After that, launch the QuickBooks and open the company file.
To end the process, make sure to visit the file and then choose enable multi-user mode to share the company file.
Perks and Pitfalls of QuickBooks Desktop for Mac
If you are starting off with QuickBooks mac desktop, then it is important for you to learn the perks and pitfalls of the same.
Limitations
Although the QuickBooks Desktop for Mac comes with assorted benefits, it does suffer from some limitations, which include the following:
One of the major limitation with QuickBooks for mac is that it has maximum of three user licenses. It generally comes with two user license and you can buy one addition license only.
Another pitfall can be limited technical support. When you buy QuickBooks Mac desktop, you get unlimited tech support for 30 days but you have to buy a plan to get QuickBooks support and help.
You don’t have mobile access to data. Unlike QuickBooks online, you don’t get access to the data from mobile phones but need to have the software installed on the system in QuickBooks mac desktop.
Advantages
What makes it compelling is its user friendly interface. QuickBooks mac desktop is easy to install and set up and navigate, just in case you don’t have an accounting background.
It also offers many advanced features for a one-time investment cost.
Just in case you require setting up your business or you have any queries, then you can find a bookkeeper or accountant who is familiar with QuickBooks for Mac.
Installing and setting up QuickBooks desktop for Mac doesn’t involve any rocket science, all you have to do is to carry out the above-stated steps. However, if you feel the need for technical assistance at any point in time, then you must get in touch with our XpertBooks Pro team. Our dedicated QB experts team and certified professionals will be there to assist you in a single call. This process might seem to be a bit technical, so we recommend you to contact us without any hesitation. We will be happy to help you.
FAQs
Is it possible to install QuickBooks desktop for Mac on multiple computers?
It should be clear that QuickBooks desktop for Mac is licensed per user, not per system. As such, the program can be installed on multiple computers when you've separate licenses for every user.
Is degradation from an older Quickbooks Mac version to a newer version possible?
Yes! You can upgrade from an older version of QuickBooks Desktop for Mac to the latest version.
Can I import data from other accounting software into QuickBooks desktop for Mac?
QuickBooks desktop for Mac lets you import data from other accounting software or file formats such as CSV or Excel.
Is setting up of several company files allowed in QuickBooks Desktop for Mac?
Yes! You can set up multiple company files in QuickBooks Desktop for Mac, with each on operating independently.
At the time of creating or opening a portable company file with the extension .qbm, QuickBooks users often face portable company file issues on QuickBooks desktop. Well, in such a situation panicking is not a solution, there are a couple of steps that could help in getting out of this issue. According to some experts, QuickBooks portable company file issues usually encounters when the portable file becomes damaged, incomplete or transferred through an unstable network or storage device. When this error occurs, your QuickBooks may unable to access the company company or it become unresponsive.
This article will brief you on the ways to fix portable company file errors in QuickBooks desktop, so that you can use the portable company file to move the data or repair the file. Thus, make sure that you scroll through the article carefully. However, this error can be simply rectified with the help of an efficient US based accounting professionals team, who will blend their expertise with your requirements and come up with a great result instantly.
Why Portable Company File Issues Occurs in QuickBooks Desktop?
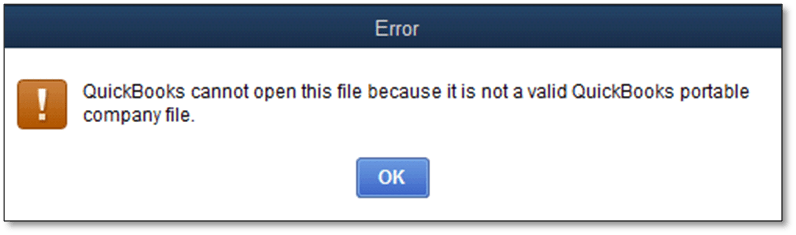
A portable company file in QuickBooks desktop uses the .QBW extension. It is a compressed version of your company file which is designed for easy transfer and sharing of your data between systems, accountants or office locations. However, many users run into QuickBooks portable company file issues while restoring or opening the file. In some cases, the QuickBooks becomes unresponsive at the time of restoration the data or it gets freezes for a while. If you are unable to restore a portable company file in QuickBooks desktop, and getting portable company file errors, then this post will help you to find the exact causes and fixes the problem safely without risking company data. When this error encounters, you might appear such error messages on your screen:
What Causes QuickBooks portable company file issues?
These are some possible causes behind to QuickBooks portable company file issues:
Any corrupted or damaged .QBM portable file.
Damaged external storage device or USB drive.
In case there is damaged QuickBooks company file before conversion.
Steps to Resolve QuickBooks Portable Company File Issues
There can be a couple of steps that you can implement in order to fix the portable company file issue in QuickBooks desktop. Let us check them out one by one:
Method 1: Creating a manual copy of the company file
This issue might be basic just like the company file’s location. You can create a copy of the company file and use it to create an additional portable copy. The steps involved in this particular process are as follows:
Open the Windows menu.
Type in File explorer into the search bar.
Open the File explorer.
Once done with that, search for and spot the folder that is having the company file.
The steps to be followed ahead, completely depend on the task being performed at the time when the error was encountered.
Case 1: Error encountered while creating a portable company file
Well, if you encountered the error at the time of creating a portable company file, then in that case the steps below can be implemented:
Next step is to hit a right click on File and choose Copy.
Navigate to the Windows desktop and also right click and choose paste.
Open QuickBooks, but avoid opening the company file.
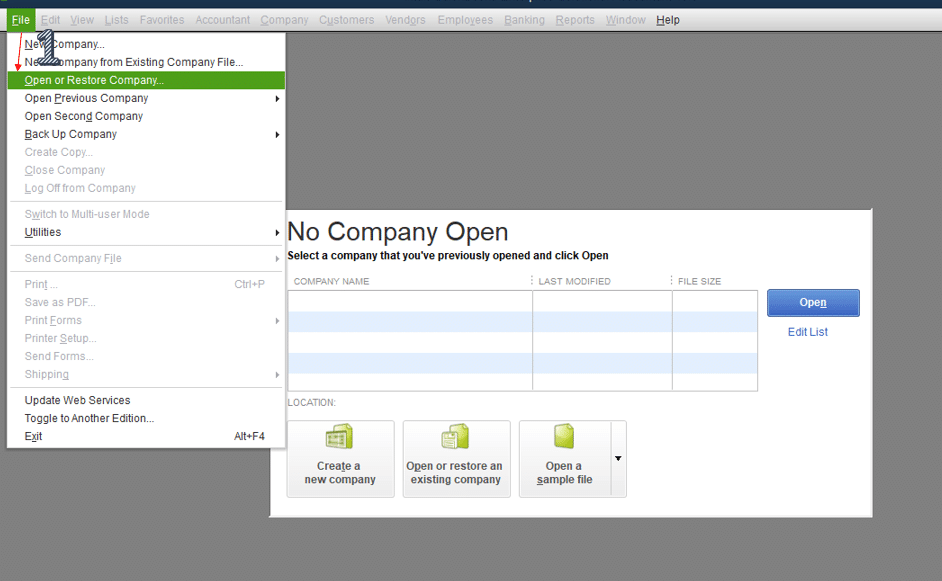
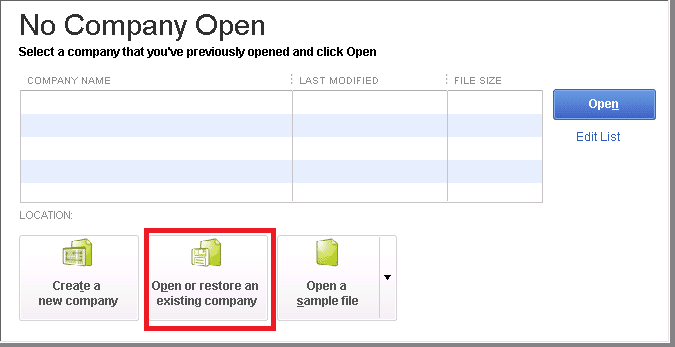
Now select open or restore an existing file. Also, select the open a company file option.
Next step is to browse the system and open the copied company file pasted to the Windows desktop.
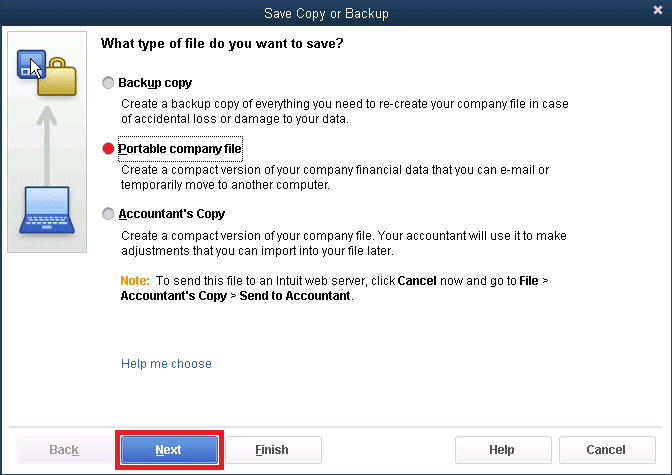
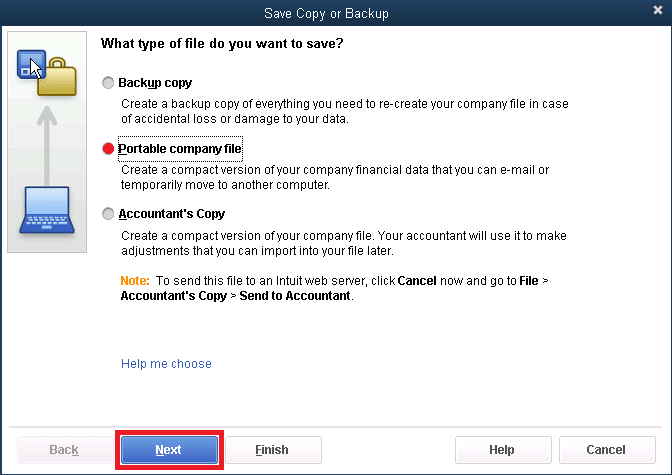
Move to the File menu in the open Copy of the company file and also select Create copy option.
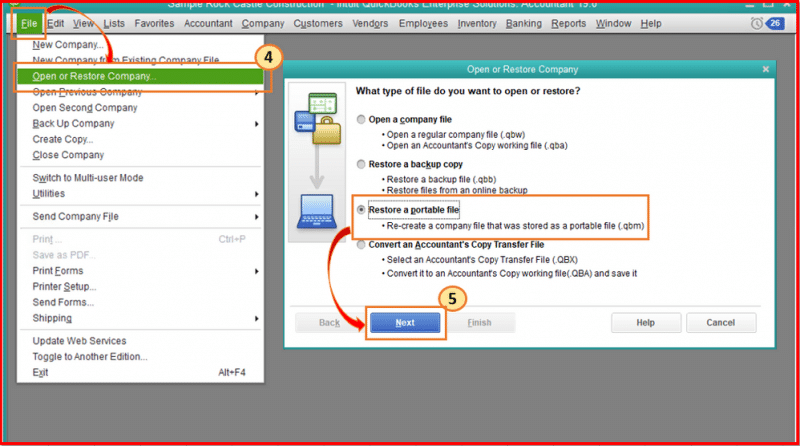
Now select Restore portable company file and also hit Next.
The final step is to carry out the on-screen prompts and create another portable company file.
If you are able to create a company file, then the issue lies in the original company file’s location. You will have to use the copied company file as the main company file from now on. After which, you should rename the original company file and place “old” in the name to avoid using it again.
Case 2: If the error was encountered while restoring the portable company file
In such a situation, look for the portable company file with a .qbm extension. This would look like [Your company file].qbm.
Hit a right-click on File and select Copy.
The next step is to move to the Windows desktop and also right-click somewhere and choose Paste.
Now open QuickBooks, but don’t open the company file.
After that, choose Open or restore an existing file.
Along with that choose the Restore a portable file option.
Browse the system and open the Copied portable company file pasted to the windows desktop.
In case you are able to open the copied portable company file, then the error is fixed. You can make use of it to move the accounting data. Also, renaming the original portable file to .OLD is recommended.
Method 2: Opening a sample company file
Another step is to use a sample company file, in order to create a portable company file. This will help you to identify if there is any bigger issue with the company file. The steps involved in here are:
Open QuickBooks accounting software.
Rather than selecting the company file, hit a click on Open a sample file. This will open one of the sample companies.
In the sample company file, follow the steps to create a portable company file. Along with that, save it to the Windows Desktop.
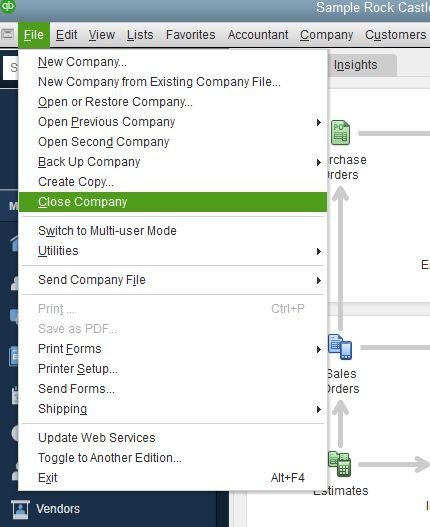
Navigate to File menu in QuickBooks. Followed by selecting the opt to Close company/log off.
Carry out the steps to Open the portable company file being created in the sample company.
If you have successfully able to restore the portable company file from the sample company, then the main company file might have certain issues. You can then, opt for the troubleshooting data damage on the company file, in order to fix the error.
If the existing portable file is damaged, creating a new one from the original company file may help.
Open the original QuickBooks company file.
Navigate to the File menu and hit on Create Copy from the drop-down list.
In the create copy window, choose Portable Company File option.
Hit a click on Next tab.
Browse the location where you want to save the portable company file.
Save the new portable file in a secure location.
QuickBooks will create the portable file with the .QBM extension.
Wait for the process to complete successfully.
Conclusion!
With the help of this post, we have tried to share with you some of the most effective solutions that would help you in the rectification of the portable company file errors in QuickBooks desktop. However, if you find these errors to be too complicated for you to handle, then in that case, we are here to help you. We would love to answer all your queries and handle the situation on your behalf. Reach out to error handling experts today and let them resolve the issue for you.
FAQs
What is a QBB and QBW file?
QBB and .QBW are the extensions of the QuickBooks company file. While .QBW is the standard extension of the company file and .QBB is the extension of the company file backup.
How big is a QuickBooks company file?
The size of the company file depends on the version of your QuickBooks desktop. If you are a user of QuickBooks Pro or Premier versions, then the company file size is limited to 250 MB. However, for QuickBooks Enterprise, the maximum size of the company file is 1.5 GB.
What is a portable company file in QuickBooks?
Portable company file is a compressed form of the company file, that can be sent via email or can be transferred to an external storage device.
What is the file format for QuickBooks Portable?
The file format for QuickBooks Portable is .qbm (QuickBooks Portable Company File).