A lot of times, QuickBooks users might come across an error message "Your QuickBooks subscription has lapsed" email. The error usually arises when QuickBooks fails to validate your subscription with Intuit’s servers. This is basically a sign that you are unable to charge the billing account for the subscription. In simple terms, this error mostly encounter at the time the software is unable to verify an active QuickBooks subscription or payroll service. There can be a couple of reasons that might cause such issues like the credit card on file got outdated or not valid, or the card issuer might have declined the payment. When installing or updating the QuickBooks enterprise solutions, you might end up in the error message:
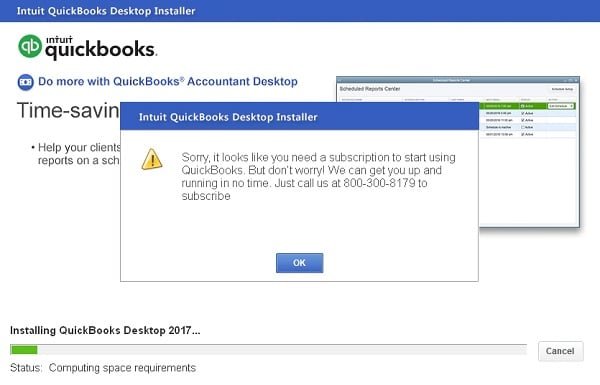
Sorry it looks like you need a subscription to install QuickBooks desktop
Sorry, we need to verify your subscription before installing QuickBooks desktop.
Payroll subscription is inactive or expired
If you face this error only on one particular workstation and not on all the workstations, then it basically indicates an issue with a Windows user or third-party application that is blocking the QuickBooks processes. Another scenario where you could face the subscription issue could be while trying to update the payroll to the latest tax table. In such case, you can face problem in verifying the payroll subscription.
If you're experiencing one or more of these subscription errors in QuickBooks desktop, then reading this article ahead will assist you in dealing with that issue without any difficulty. Moreover, we also recommend you consult a professional in case you have any queries or need further technical assistance with these such type of issues.
What are the Causes of QuickBooks Subscription Lapsed Error?
You might encounter this error due to one or more of the following reasons:
Expired or inactive QuickBooks desktop subscription.
Incorrect billing or payment details.
Outdated QuickBooks Desktop version.
Damaged or missing entitlement file.
Internet connectivity issues preventing license validation.
Firewall or antivirus blocking communication with Intuit’s servers.
Important points to follow before troubleshooting:
Before proceeding to the solutions, make sure to follow these steps:
You have access to your Intuit Account login details.
Methods for Resolving QuickBooks Subscription has Lapsed or Expired Error
If you ended up in QuickBooks desktop subscription has lapsed or expired, then do not worry. We will not let your company’s data get affected by this error, as here are a couple of solutions that you can implement.
Solution 1: Update the billing information
If you have recently changed the business credit cards or accounts, then you just need to update the payment details for the subscription. The steps involved in this process are as follows:
Sign in the customer account management portal as an admin user.
After that choose the QuickBooks desktop from the Products and services.
In the Billing information section and then hit a click on Edit.
Next step is to Update the payment information.
Once done choose Save and close.
Now open QuickBooks desktop.
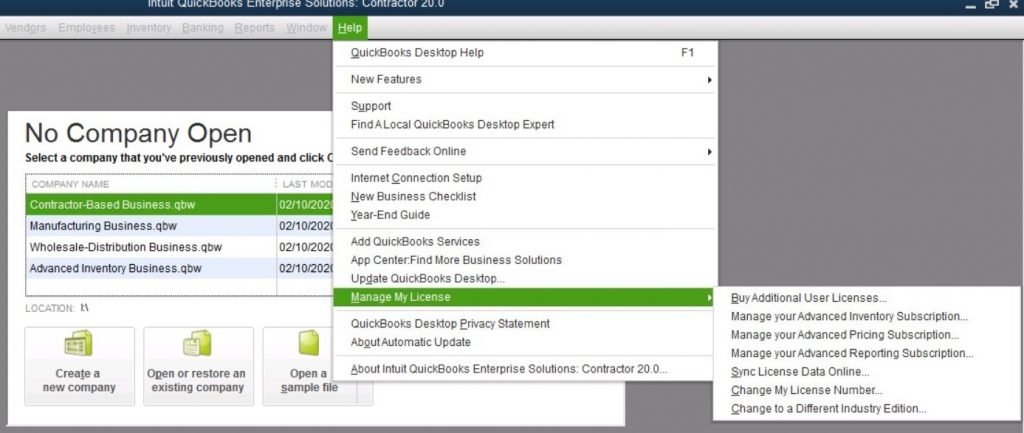
To end the process, visit the Help menu and then hover over Manage my license.
After that select Sync license data online.
Solution 2: Verify Subscription Status
The another step is to confirm whether the QuickBooks or payroll subscription is active.
Open QuickBooks desktop.
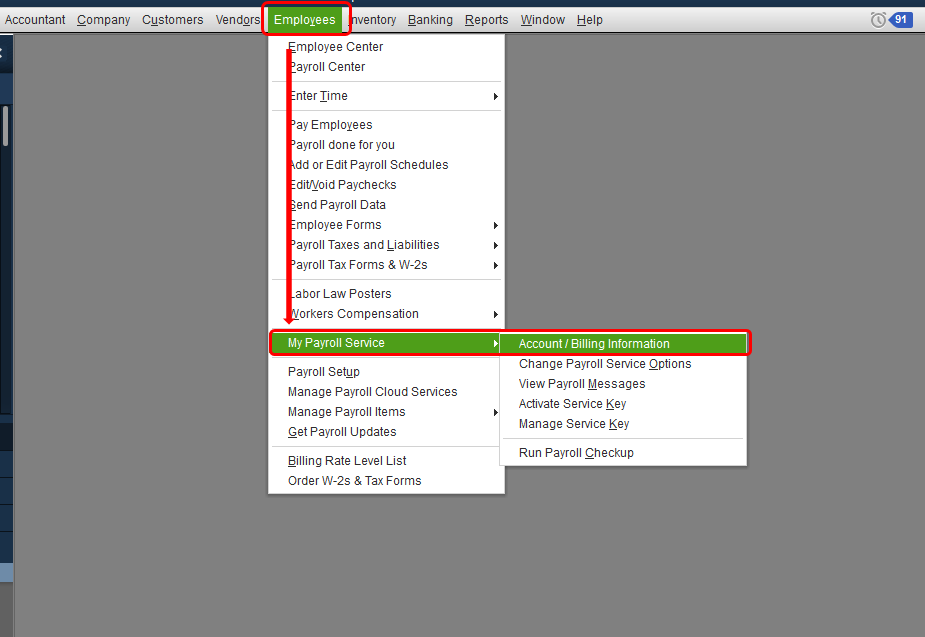
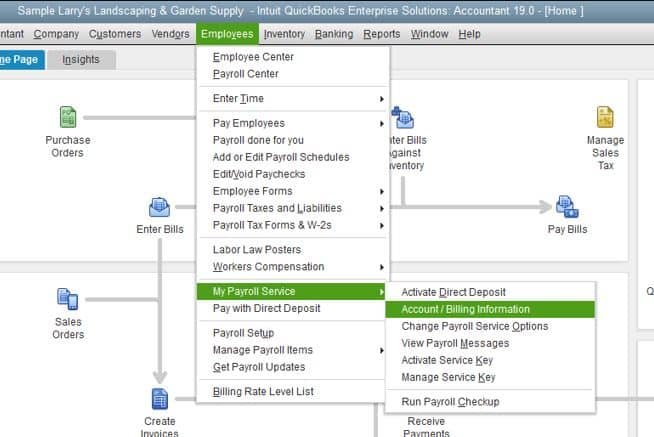
Move to the Employees section and choose My Payroll Service option.
From the May payroll service, select Account/Billing Information option.
Now sign in to QuickBooks using your Intuit account credentials.
Here check the subscription status carefully.
Make sure your billing details and payment method are up-to-dated.
Solution 3: Use QuickBooks Desktop Tool hub
At times, damaged Windows files might prevent the QuickBooks desktop from connecting to online services. The steps involved in the process of downloading and installing the QuickBooks tool hub are as follows:
First open QuickBooks desktop tool hub on your system.
QuickBooks saves a file with the product and license info to the hard drive. In case there is an issue with it, the file is easy to restore:
First step is to get the Product and license info. In case you don’t have it on hand, then you can find it.
After that close QuickBooks Desktop.
And then open the Windows start menu.
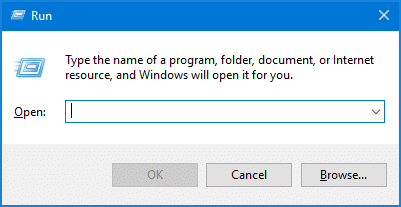
Now type run into the search box and then select the Run tab.
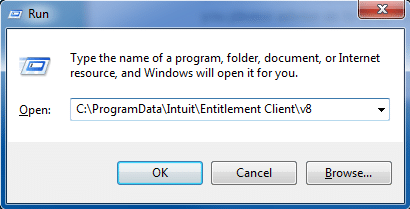
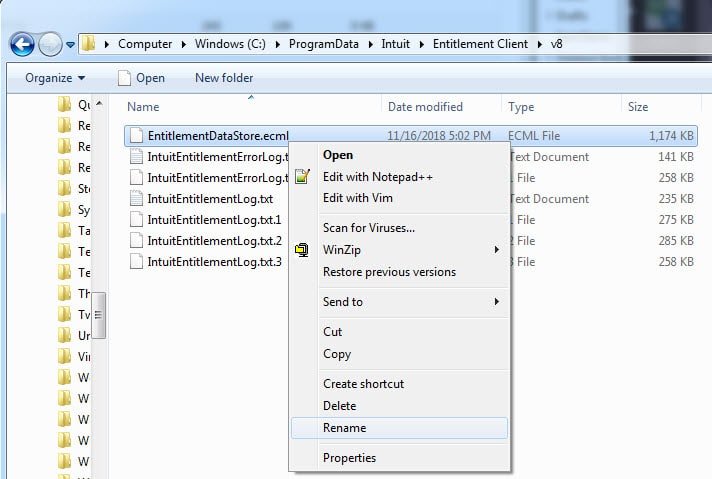
Next step is to type C:\ProgramData\Intuit\Entitlement Client\v8 and then hit Enter. If this doesn’t open a folder and then enter C:\ProgramData\Intuit\Entitlement Client\v6 instead.
Look for the file EntitlementDataStore.ecml. Also, right click it and also choose Delete option. And also, select Yes to confirm.
Once done with that, open QuickBooks desktop and the company file.
Solution 5: Check the internet connection settings
In case you continue to see a subscription error, then you might need to change the internet connection settings in QuickBooks. Also, carry out the steps to check the internet connection settings, so that the QuickBooks software can connect to our online services.
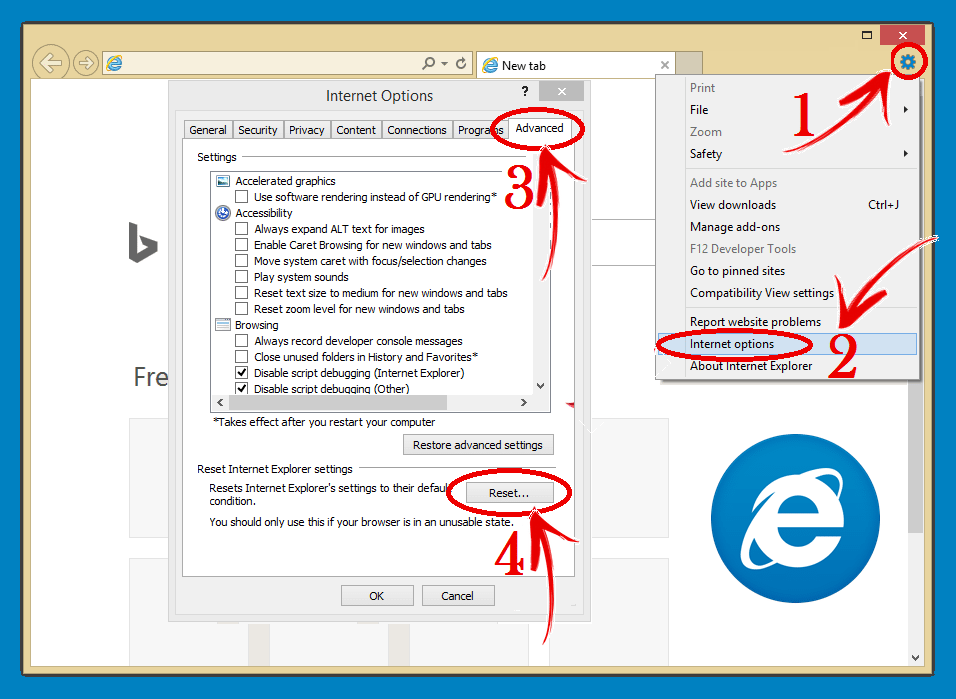
Solution 6: Reset the Internet Explorer settings
Open the Internet Explorer.
Visit the Tools menu and also select the Internet option.
Also press the ALT key if the menu bar is not showing.
Select the Reset or Restore defaults tab from the Advanced tab.
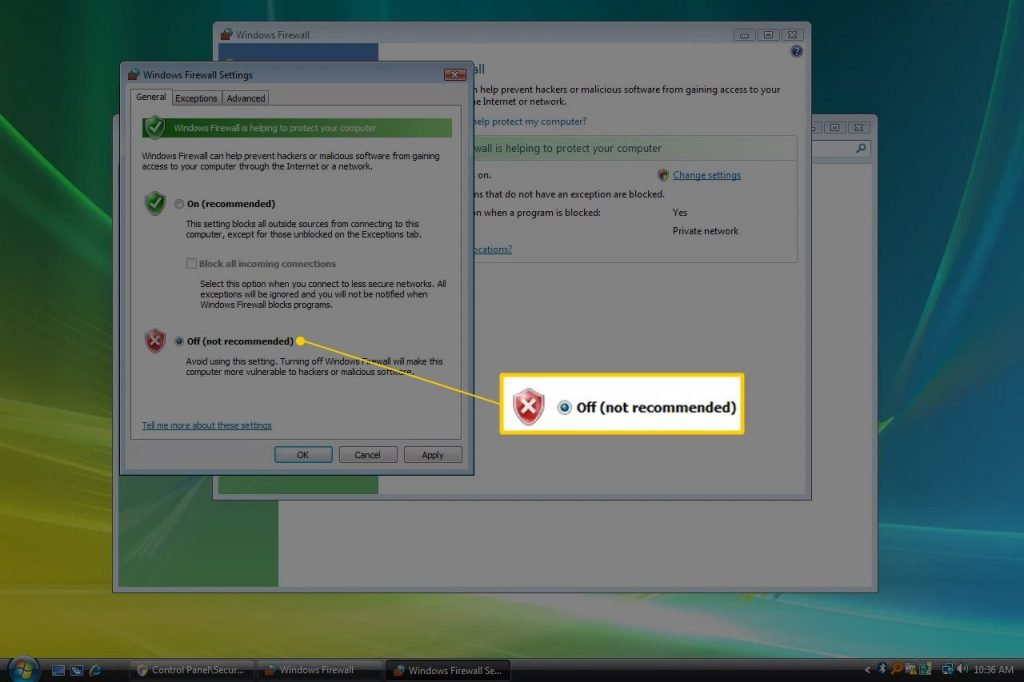
In case none of the above methods worked for you, then you can manually disable the firewall or antivirus software. The steps involved in this process are as follows:
First of all, Disable the firewall.
And then Turn off the antivirus software. Also, note that at times the antivirus software cannot be disabled, while others need certain rights to make changes.
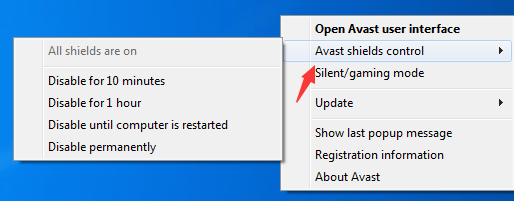
Locate the icon for the Third-party antivirus in the system tray at the bottom right of the desktop screen.
Hit a right-click on Icon and then opt for Disable option.
Installing the latest, free updates for the version of QuickBooks desktop. This method often fixes subscription-related errors. Not only this, but it also ensures that you have the latest features and fixes.
Solution 9: Install the digital certificates
Steps to install certificates using Google Chrome:
From the address bar and then choose the Padlock symbol.
Next step is to choose the View Certificates option.
In the certification path tab, choose the Symantec class 3 secure server CA- G4 item.
Now choose the View certificate option and then Install certificate.
Once done, follow the Default options to Import.
A window prompting successful import will appear on the screen, then hit OK button.
Close the certificate Window and retry installing or updating.
Steps to install certificates using the internet explorer
You need to follow the onscreen instructions to complete the install and import.
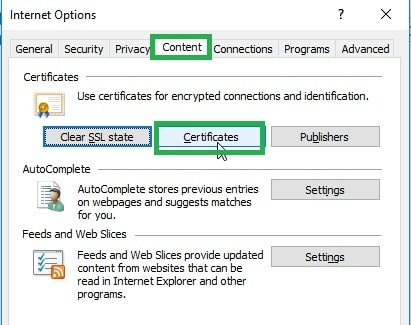
Visit the Tools menu and then choose the Internet options.
After that, visit the Content tab and then select the Certificates option.
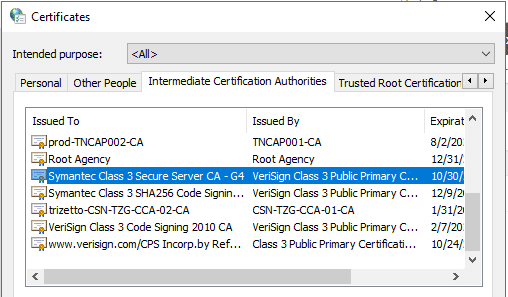
Moving ahead, visit the Intermediate certification authorities tab.
And then choose the Symantec class 3 server CA-G4.
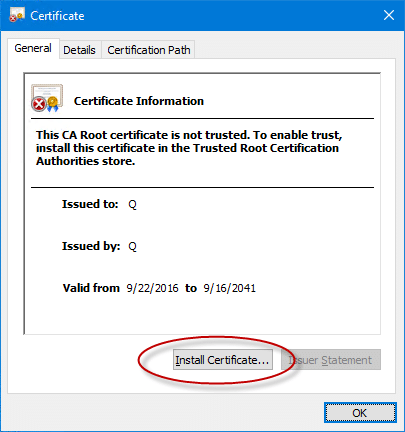
After that choose the View certificate and then click on the Install option.
The last step is to retry Installing or updating.
What If the - Problem in verifying the payroll subscription?
As we mentioned earlier, you might face issue while trying to update the payroll tax table. This error might relate to verifying the payroll subscription. There can be a couple of factors leading to this issue:
An inactive payroll subscription can be one common issue.
Or more than one active payroll agreement with an inactive direct deposit agreement.
You might also face this issue in case of data damage.
Also, if the product is not updated, then this error might appear on the screen.
Wrong employer identification number in the company file.
Next, open the Payroll account management portal. After that, close the page.
And then reboot the system.
Followed by downloading the Payroll Update again.
Lastly, Reset the QuickBooks desktop update.
Also, the point to be noted here is that if you are using the direct deposit for the company file having this particular issue, then you can contact professionals.
In case the above steps failed to help you, then carry out the steps below, avoid using them in case you are running the direct deposit.
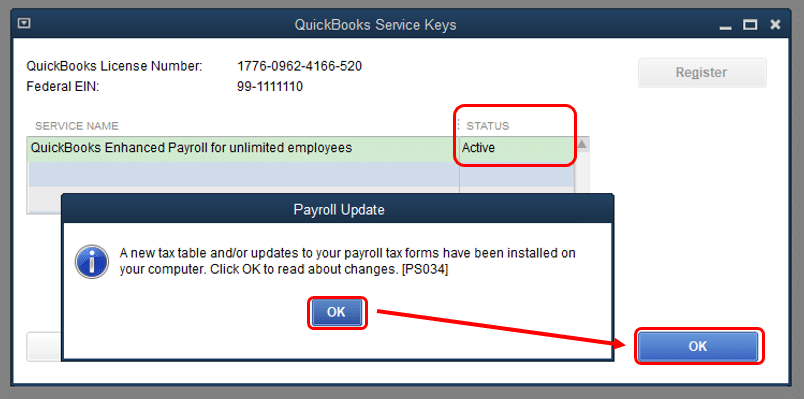
You can open the Payroll account management portal. And check if the payroll service shows Active. Also, close the page.
What does the "subscription has lapsed" error in QuickBooks desktop mean?
The "subscription has lapsed" error in QuickBooks infers that the QuickBooks subscription has expired and needs to be renewed.
How do I renew my subscription in QuickBooks Desktop?
For renewal of a QB subscription, users can head to the Help tab in QuickBooks and follow up by clicking on Renew Your Subscription.
What if I am not ready to renew my subscription yet?
If you are ready to proceed with the renewal of the QuickBooks subscription due to various reasons, you can continue using QuickBooks desktop in the read-only mode for up to three years.
Can I still access my company file after my subscription has lapsed?
Yes! You can access the company file after the subscription has lapsed, however, the file can only be viewed, and no modification of the company file is possible.
Do I need to purchase QuickBooks again if my subscription expired?
No, you don’t need to buy a new product. Simply renew your existing QuickBooks subscription by updating your billing details or payment method in your Intuit Account.
Final Note..!
Subscription issues in QuickBooks desktop can be easily resolve by carrying out the steps through the procedures we have mentioned above. However, in case you are still experiencing the same again and again, then make sure to consult with one of our accounting professional right now. Our team of QB specialists will be happy to assist you.
QuickBooks accounting software has created a lot of buzz in the accounting industry, especially in the recent few years. This software is known for it's impressive features and functionalities, but all these plus points cannot hide the fact that the QuickBooks software is prone to certain errors. One such error is QuickBooks error code 15106. This error code is normally seen at the time of updating the QuickBooks software. It also indicates that the update program has been damaged. This is a payroll update related error, and it can cause trouble for you at large. However, if you're looking to eliminate this payroll error, then this article can be a great assistance to you. Getting rid of this error can be a troublesome and tiresome task for you, so in that case, it is highly recommended to speak with a certified support professional. The causes and fixes to this error are discussed later in this post.
What is QuickBooks payroll error 15106?
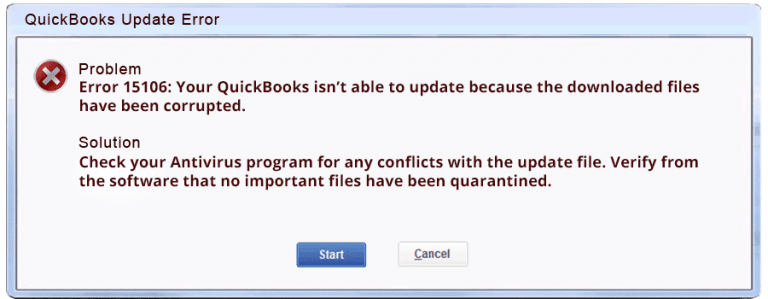
According to some experts, QuickBooks payroll error 15106 usually seen by users when they try to download the latest QuickBooks updates or payroll updates. When this error takes place, QuickBooks may fail to install and download the updates successfully and the update process may stop unexpectedly. This error hinders the updating process of QuickBooks payroll. Before you begin with the fixation process of this error, it is important to find out the facts associated with this error. You might see the following error message on the screen:
QuickBooks Update Error
“Error 15106: The update program cannot be opened”
Warning
“Error 15106: The update program is damaged”.
Triggers to QuickBooks update error 15106
Now that you know what this error is all about, it is important for you to learn the causes of the error. Understanding the root cause of the issue can be of great help in fixing the bug. Let us check of the causes of QuickBooks update error 15106:
Not having or not using the Administrator credentials to login while updating the software.
Pre-installed anti-virus software or program can be one major factor responsible for blocking the update process. For example, Spy Sweeper is present in the Webroot anti-virus.
Restricted access to the QuickBooks update folder.
UAC i.e. the user account settings if enabled can be a major cause behind the update error 15106 in QuickBooks.
Methods to Fix QuickBooks Error 15106 (The Update Program is Damaged)
Before you begin with the solution steps of QuickBooks error 15106, in case you have an active QuickBooks desktop payroll subscription, then make sure to download the latest tax table after every step, in order to ensure payroll information isn’t affected. Now, without any further delay, let us begin with the solutions:
Solution 1: Login the system with admin credentials
Step 1: In case you have already logged in as a different user follow the steps below:
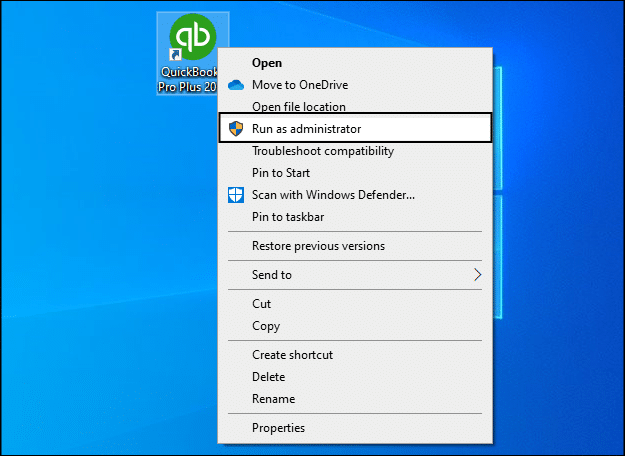
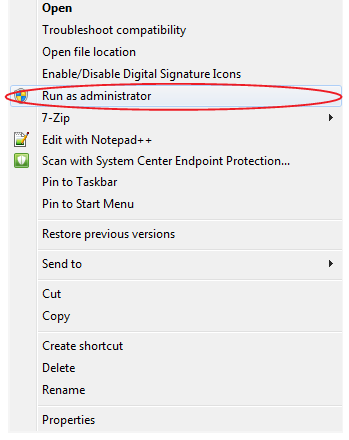
Move to the QuickBooks desktop icon.
And then right-click on the same.
Select Run as administrator option.
Now type Admin credentials and hit hit a click on OK tab.
This will log you in as an admin.
Step 2: You can login the admin account by switching the account, by carrying out the steps below
Hit a click on Start menu.
Then click on the Switch user option from the bottom right side arrow.
Now enter Admin credentials.
This will easily Switch the user account to admin account.
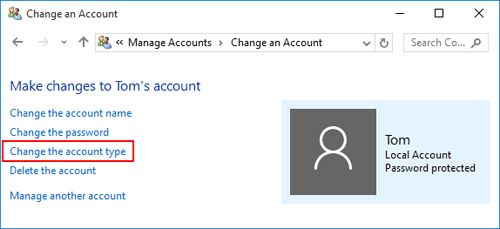
Solution 2: Turn off User Account Control (UAC)
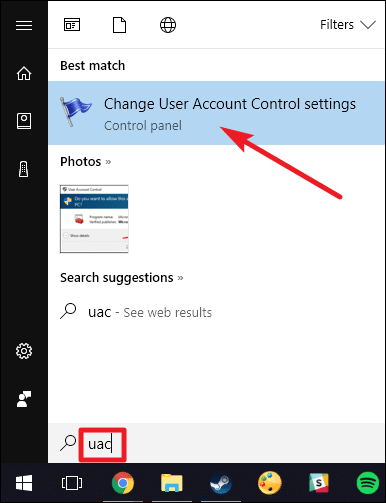
In case the above method failed, then you can turn off the user account control (UAC) by carrying out the steps below. It should be noted that the steps to change UAC settings may differ for various versions of the Windows Operating system, such as Windows 11, 10 and 7. Steps to change the user account control settings for Windows 10, 8.1, 8, and 7:
Open the run box by pressing Windows + R tabs.
Type Control panel on the search bar and then click on Ok tab.
Select the User accounts.
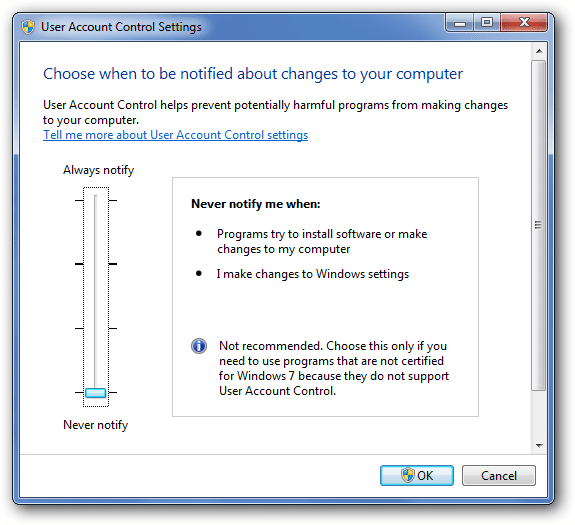
Click on Change user account control settings.
The point to be noted here is that, if you are getting any prompt by UAC, in such case it is most favorable to select the Yes option to continue.
Now move the slider. If you wish to set to Turn UAC OFF, then it is recommended to click on Never notify and select Ok. Whereas for turning the UAC ON, set to Always notify and hit Ok.
The last step is to restart the system, and you are done.
Solution 3: Uninstalling the Antivirus program and rename the folder
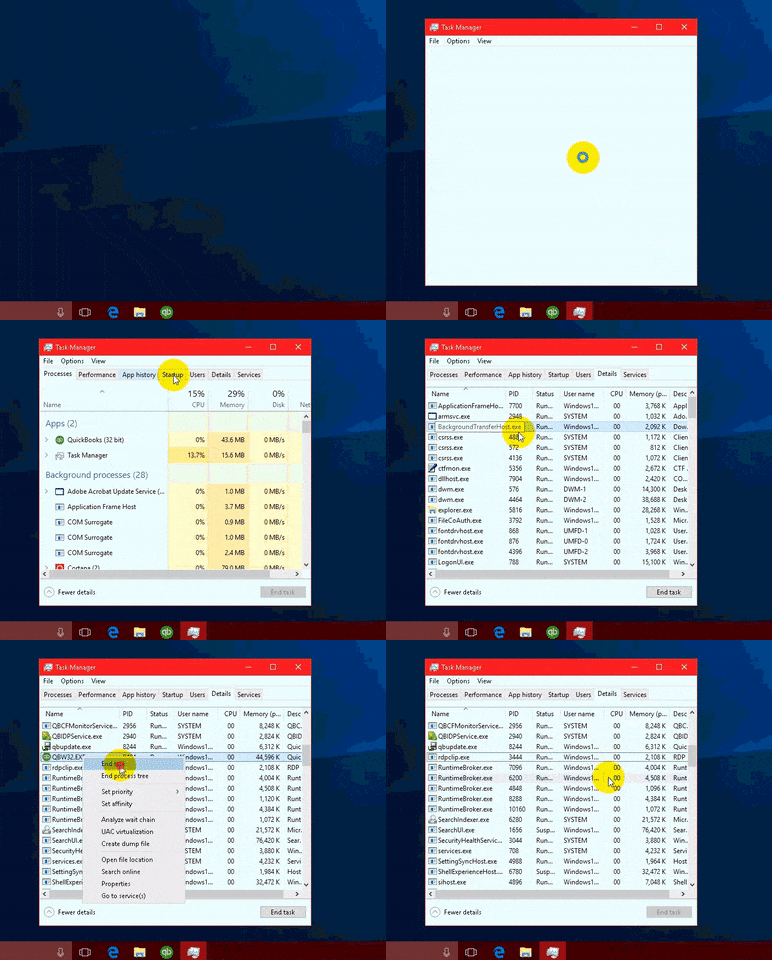
Open the Task manager by pressing Ctrl + Shift + Esc keys.
Move to the Processes tab and then look for the [ANTIVIRUS].exe file, which is in the system. (For example: Spy Sweeper.exe)
Lastly select End process.
It should be noted that, in case you are getting any issues while performing the task, then it is important to uninstall the antivirus application.
Renaming the QuickBooks update folder
Open the file explorer by pressing Windows + E keys.
And then move to the C:\Program files\ Intuit\ QuickBooks (year)\Components (for 32 but users). For 64-bit users, the path C:\Program files (x86)\Intuit\ QuickBooks (year)\Components is to be selected.
The next step is to right-click the downloadqbXX folder > Select rename option. Also, the XX stands for the version year of QuickBooks.
Lastly add .old extension to the end of the name. (Example: downloadqbxx.old.)
And then try to update the software once again.
Solution 4: Clean install of QuickBooks in Selective Startup Mode
Step 2: Login to the system in Selective Startup Mode
To ensure that no other application blocks you from completing the task, you are required to switch to selective startup mode:
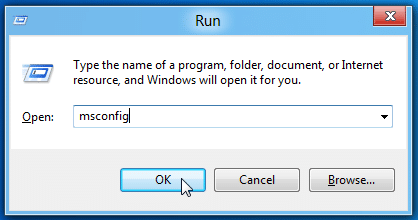
Open the Run box by pressing the Windows + R keys, and then type msconfig and then click on Ok tab.
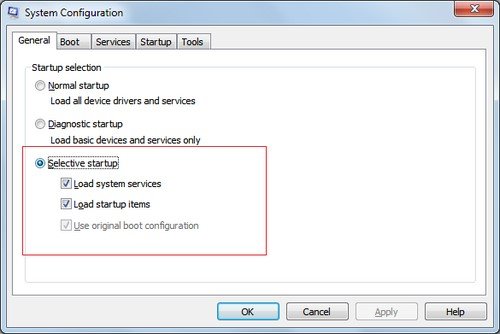
Move to the General tab and opt for the Selective startup mode and then Load the system services.
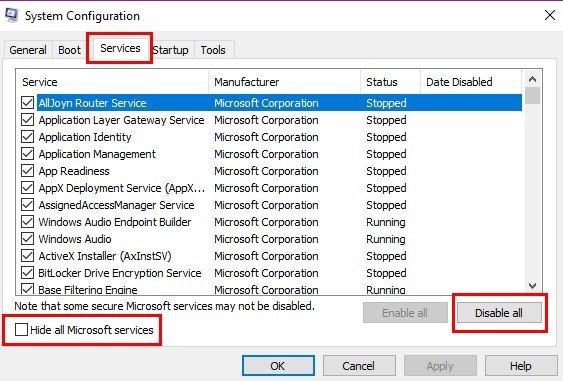
Move to the Services tab and opt for the Hide all Microsoft services.
Now check the Hide all Microsoft services check box and also click on Disable all option.
Please remember to Check Windows installer checkbox from the list of services.
Select the Restart option.
Step 3: Uninstalling and reinstalling QuickBooks desktop
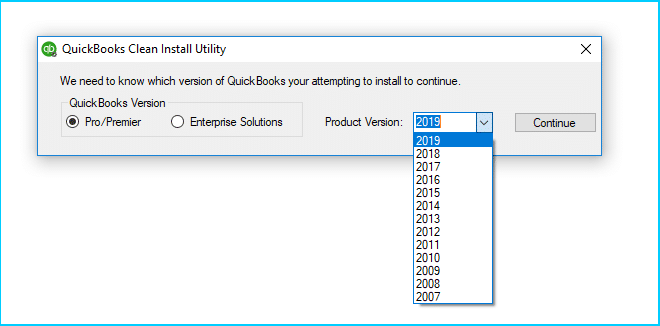
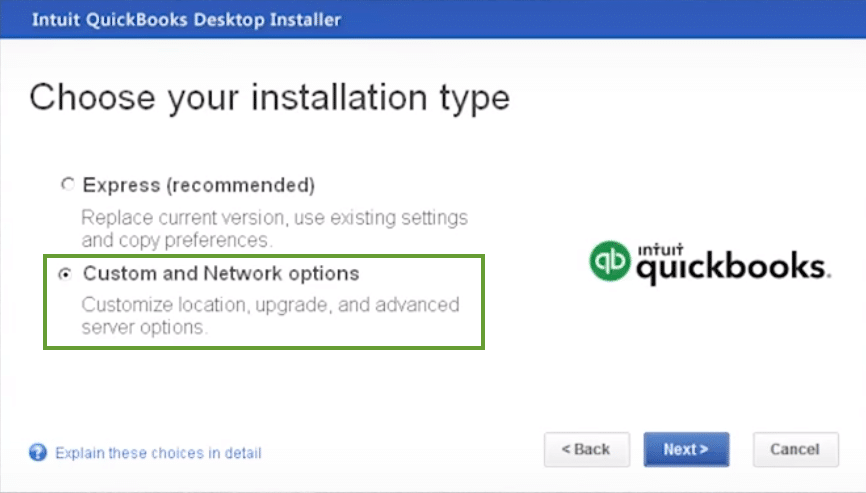
After you restart the system, you are supposed to open uninstall the QuickBooks desktop after the system opens and then reinstall the QuickBooks application.
Step 4: Now switch to normal startup mode
After the QuickBooks desktop reinstall process completes, you are required to to restore the system settings to the normal configuration.
Open the Run box and then type in Misconfig followed by hitting OK button.
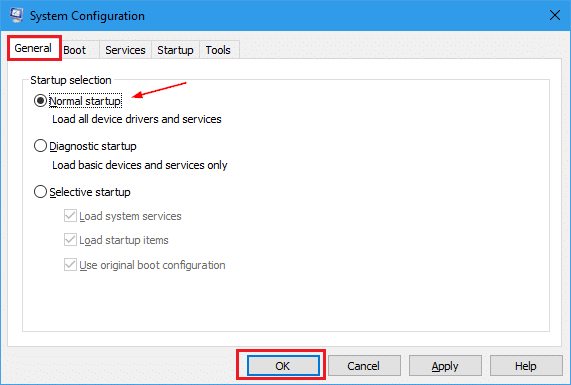
And then choose the Normal startup, and in the General tab, click on Ok tab.
The next step is to select Restart opt on the System configuration window.
That's all for the solutions to QuickBooks payroll error 15106. Implementing the above-stated methods for fixing the error permanently. However, there can be situations when even after applying the above discussed methods fail to remove this technical snag. In such situations, XpertBooks Pro team can be a savior for you. Simply contact our technocrats and leave the rest to them.
Frequently Asked Questions
What is QuickBooks Update error PXXX?
Ans. These errors belongs to the group of 15xxx series of error codes that are usually encountered while updating QuickBooks to a newer version.
What is the procedure to fix the Payroll Update Errors?
Ans. This error can be fixed by performing the following solutions: 1. By logging into your system as administrator can resolve such an error. 2. Turning off the User Account Control (UAC) can also a good way. 3. Fix this issue by using the Selective Startup Mode.
What are the main causes of payroll errors PXXX?
Ans. Some of the main factors that can instigate Error 15106 in QuickBooks are: 1. Not using the Administrator credentials to login when updating the software. 2. User Account Control (UAC) may be enabled.
QuickBooks bookkeeping and accounting software comes with multiple features and benefits for mid and small-sized businesses. A few feasible features are:
Quick and straightforward business management
Easy tracking of sales, employees, and clients
Easy management and reports tracking and management
Preparing taxes
And more…
But despite being one of the most advanced accounting tools available in the market, QuickBooks, like any other software, isn’t completely free from technical errors and glitches. Therefore, through this article, we are going to discuss one of the most common error – QuickBooks Error Code PS058. This error usually seen when QuickBooks desktop fails to download or install the latest payroll tax table updates. When this error encounters, QuickBooks gets fail to complete the payroll updates successfully and some payroll features can stop working properly. You may encounter one of the following error messages:
QuickBooks has encountered an error while updating payroll.
Or
Payroll update did not complete successfully.
According to some sources, this error may be occur due to a system glitch as well as a human mistake. So let’s go ahead and learn about all the possible causes and solutions of this error.
What causes QuickBooks payroll error PS058?
One or more of the following may trigger this QuickBooks payroll error PS058:
Windows Explorer files in your computer are corrupt.
Incorrect payroll subscription information. Your QuickBooks company files are damaged/ corrupt.
Your system firewall or some other security software is preventing access to QuickBooks accounting software.
Further in this post, we will discuss some of the most reliable troubleshooting steps that are already tested by some of the most efficient experts. Try these to fix QuickBooks payroll error PS058:
Method 1: Re-download payroll updates
The first troubleshooting approach requires users to re-download the payroll updates. The steps for the same are given as under:
Go to payroll server and download the payroll update again.
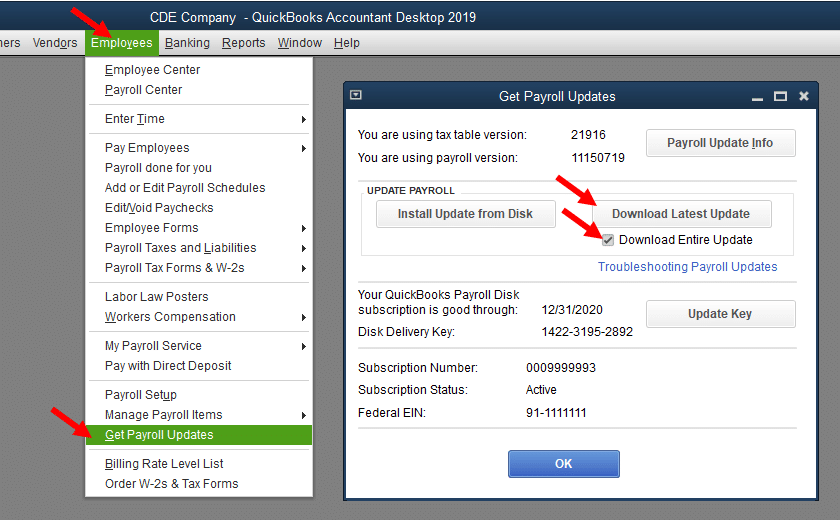
Navigate to the Help menu, select Employees and click on Get Payroll Updates.
Now check the Download Entire Update checkbox.
And lastly, select Download latest updates.
Method 2: Rename the CPS Folder
Close QuickBooks desktop and other running apps.
Move to the following location: C:\Program Files\Intuit\QuickBooks XX\Components\Payroll\CPS
Hit a right click on CPS folder.
Then select Rename option.
Now add .OLD extension at the end of the folder name.
Once done, open again your QuickBooks and try to download payroll updates again.
Method 3: Check and download the latest upgrade release from Intuit’s official website
If you don’t know your QB version, open QuickBooks and press the F2 key on your keyboard and look at the product line on the product information Window.
Find the version of QuickBooks and the latest QuickBooks updates from Intuit’s website.
Method 4: Download the latest QuickBooks updates online
To perform this step, you must have good internet connectivity.
Download qbwebpatch.exe patch file from the support page of QuickBooks website.
Save the downloaded file on the computer that has QuickBooks on it.
Complete the installation of the patch file and then update the tax file from CD/Flash Drive.
Method 5: Check if the company file has any issue
At times, this error may also be caused due to some company file-related issues. The procedure below should help you check if the company file has any technical errors.
Firstly open your QuickBooks.
Press Ctrl+1 or F2 keys on the keyboard and open Product Information.
On the product info Window, press Ctrl+2 or F3 keys.
Open Tech Help Window and click on Open File.
Find file named qbwin.log and double-click on that.
Press Ctrl + F keys and open the Search box.
Type in Error in the box and press Enter key.
Check the error code you receive and perform appropriate troubleshooting steps.
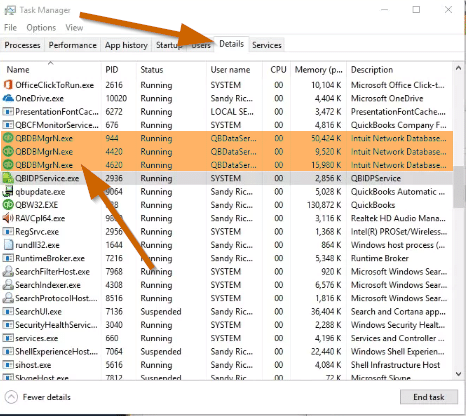
At first open the task manager by pressing Ctrl + Alt + Del keys.
After that hit a click on Processes tab and find QuickBooks and processes related to it.
Now End all programs one by one.
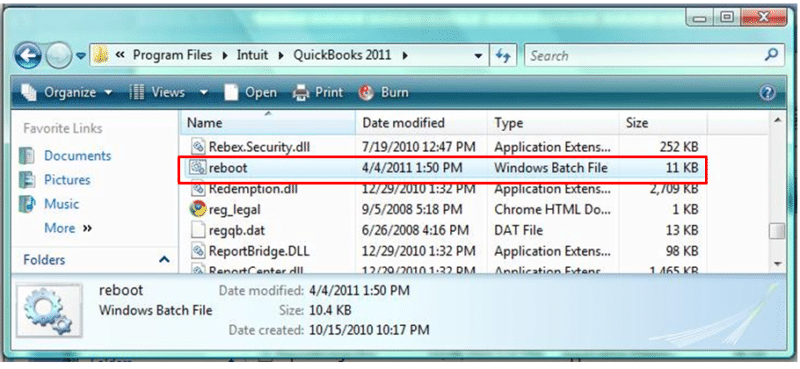
Press the Start button on the keyboard or on the screen, and in the search field, type reboot.bat.
Press Enter key.
Run the file and let the process take its time.
Close it after the process is over.
Restart your computer and try to download the latest payroll tax.
In most cases, solutions, as mentioned above, will help you fix this QuickBooks payroll update error PS058.
FAQs
What is QuickBooks payroll error PS058?
Payroll Error PS058 occurs in case of technical issues related to the QuickBooks Payroll update process.
Can a corrupted QuickBooks company file cause Payroll Error PS058?
QuickBooks Payroll Error PS058 in QuickBooks is typically indicative of issues related to the payroll update process and does not depict corruption in the company file.
Can a third-party antivirus or security software cause Payroll Error PS058?
Yes! Certain third-party antivirus or security software can interfere with the QuickBooks Payroll update process and lead to Payroll Error PS058.
When does QuickBooks payroll error PS058 occurs?
This QuickBooks error code PS058 appears on your computer’s screen when you download a payroll update. Generally, the error occurs when the update, download or installation fails.
Did you came across to QuickBooks error code 1603, 1601 and 1642 and are unable to decide what to do? Well, need not worry, as these are common QuickBooks installation or update related issues that usually appears while installing, updating or repairing the software. These errors are caused by damaged or missing Microsoft components like .NET Framework, C++ or MSXML. These errors, majorly, are seen when you try to update or install QuickBooks desktop in the system. When these errors encounters, your QuickBooks installation/updation gets stop and the software become unresponsive. These errors directly affects all of QuickBooks desktop versions including, Pro, Premier, Enterprise Solutions, POS and Payroll.
However, we have got some effective solutions for you. In this article, you will learn the easy steps to fix QuickBooks error code 1603, 1601 and 1642. But before we proceed, let us tell you that if you are clueless about how to fix these errors - just read this article till the end. Below we have explained the causes and troubleshooting steps to fix these issues in an organized and easy-to-understand way. The following error messages appear when you receive this error:
Error
Warning
[Error 1601]
Windows installer is not accessible
[Error 1603]
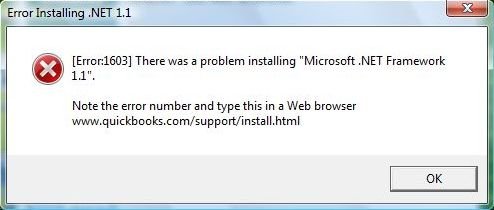
There was an issue installing Microsoft .NET Framework and Here the update installer encountered an internal error
[Error 1642]
Error installing Microsoft .Net Framework when installing the QuickBooks
There was a problem installing Microsoft .NET Framework.
These messages explain the prime reasons that may have triggered the upsetting QuickBooks error. The reasons primarily include the issues with the installation or update file you’re using and not your accounting data. You can perform the steps to get rid of QuickBooks error code 1603, 1601, and 1642 on your own.
What causes QuickBooks errors 1603, 1601 and 1642?
A few of the common factors leading to these errors include the following:
If the Microsoft windows installer is damaged.
The source of QuickBooks installation may be damaged or corrupted.
The system is facing virus and malware attacks.
Damaged Microsoft .NET Framework components can also lead to such errors.
How to Resolve QuickBooks Error 1603, 1642 and 1601?
Now that you are aware of the facts that may cause QuickBooks error codes 1603, 1601 and 1642 – let’s explore the methods to fix them. You can try these troubleshooting steps in any sequence, but we suggest performing them in the provided order for the best results.
Solution 1: Disable Antivirus software
Disabling your antivirus software doesn’t take much time, and it may help you to fix these errors. Here is how you can disable your antivirus program on a Microsoft computer.
Press the Start key on the keyboard or the desktop screen.
Go to Settings and then click on Update & Security followed by Windows Security, Virus & Threat Protection and Manage Settings/Virus & threat protection settings.
Find Real Time Protection and turn that off.
By doing this, you will still be able to run scheduled scans.
This step may help you fix and avoid QuickBooks errors since files that are downloaded or installed will not be scanned until the time next scan is scheduled or you do that manually.
Solution 2: Reinstalling QuickBooks for Microsoft .NET framework
Next step is to reinstall QuickBooks for Microsoft .Net framework and try fixing the issue. This particular method should be opted for in case you are getting an error while updating the QuickBooks software. A complete uninstall and renaming of the folders would help, when the existing sources might be causing the issue. The steps to be followed in this are as follows:
Step 1: Uninstalling QuickBooks desktop
The steps to uninstall QuickBooks desktop are given as follows:
Press the Windows and R keys and open the Run command.
After that look for the Control panel and open it.
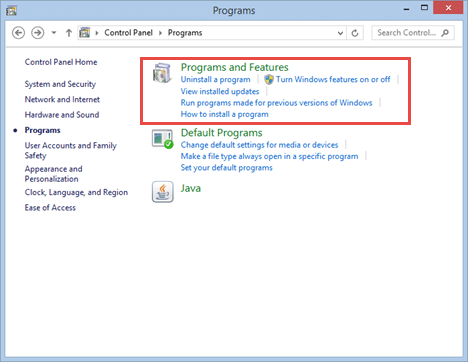
Followed by selecting the Programs and features.
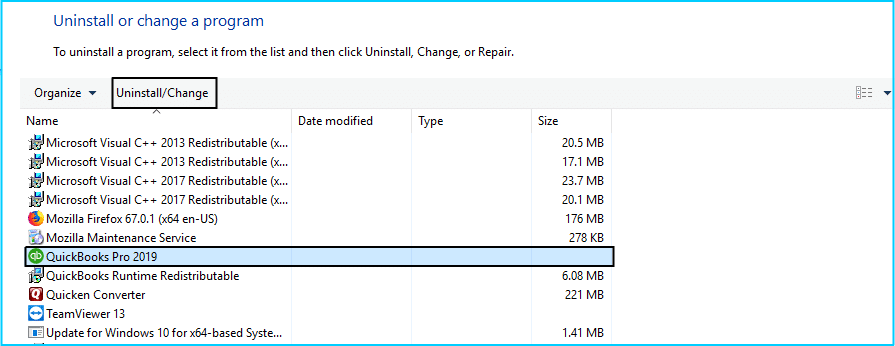
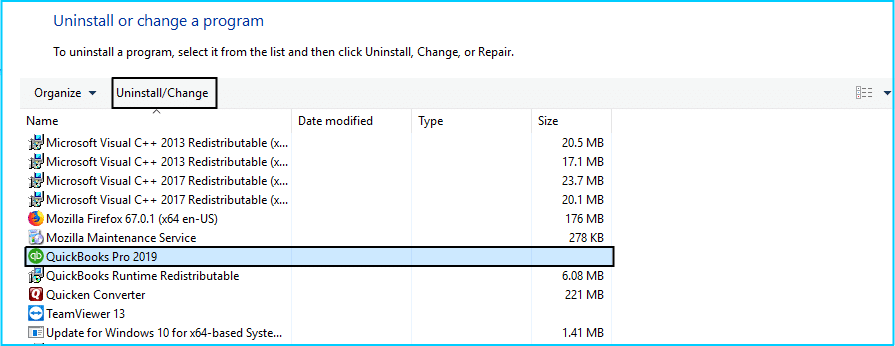
And also choose QuickBooks and hit a click on Uninstall/change tab.
The final step is to follow the on-screen prompts and complete uninstalling QuickBooks.
Solution 3: Reinstalling and repairing Microsoft .NET framework
You can also reinstall and repair Microsoft .Net framework and try fixing these bugs. The steps to be followed here are:
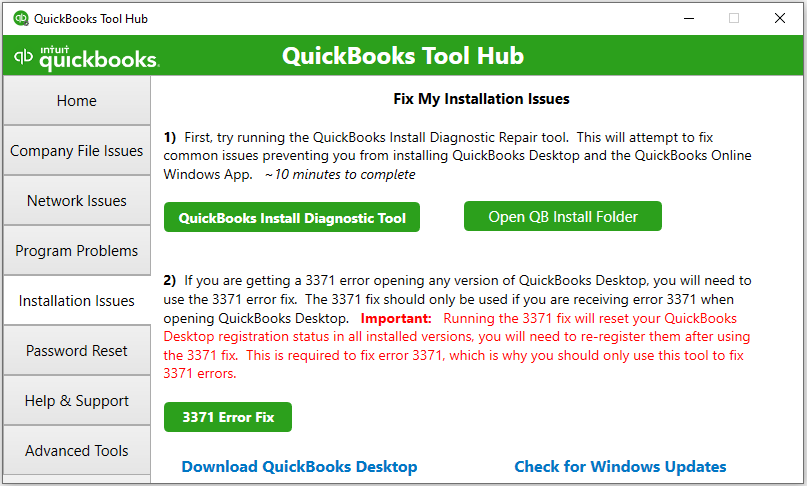
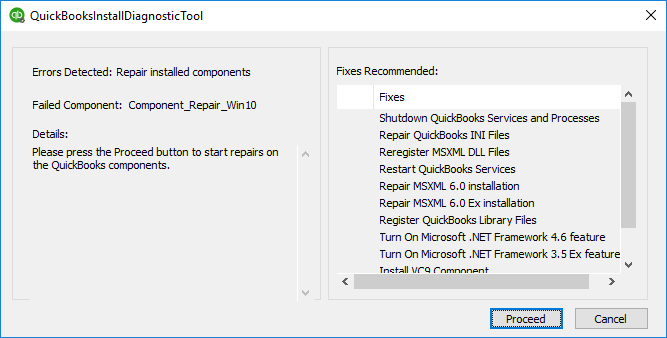
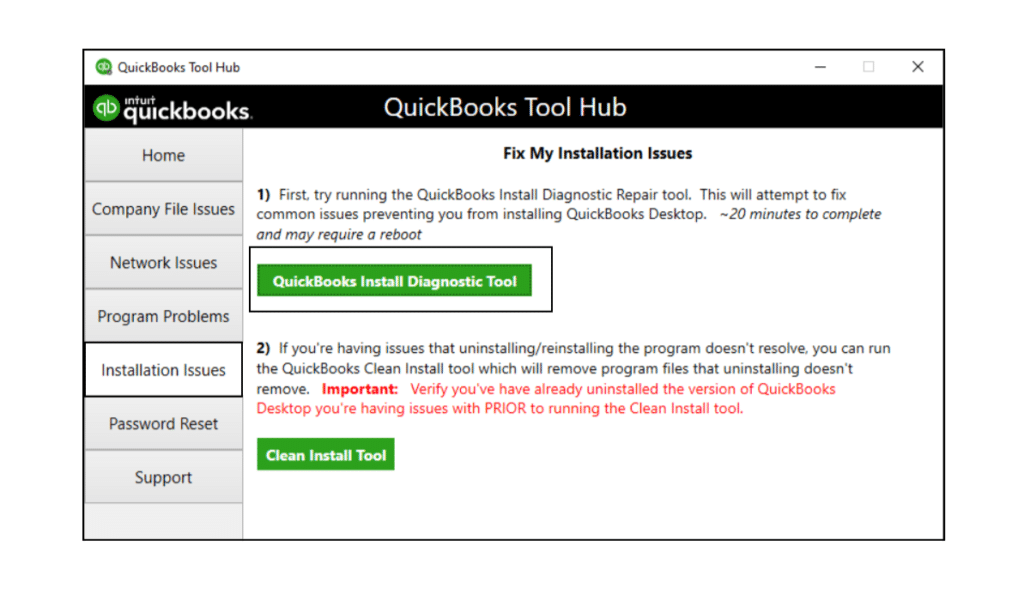
Step 1: Use QuickBooks Install Diagnostic tool using QuickBooks Tool Hub program
It is a feature of the QuickBooks Tool Hub program that helps to fix common issues. To get the most out of your experience, we suggest using the Tool Hub program with Windows 10, 64-bit.
Close your QuickBooks.
Download the latest Version of QuickBooks Tool Hub and save the file in a place where you'll be able to find it easily.
After that open the file you downloaded (QuickBooksToolHub.exe).
Follow the instructions on the screen to install the software and accept the terms and conditions.
Once the installation is completed, double-click the icon on the Windows desktop to launch the tool hub.
On the tool hub program, choose Installation Issues tab.
Close all open programs and double-click on the QBInstall_tool_v2.exe to run it.
Now run the tool for approx 20 minutes so you have patience.
Once the install diagnostic tool completes the diagnosis process, you need to restart the system to ensure that the components are updated.
Step 2: Updating windows OS
The steps to be performed for updating the Windows Operating system are discussed below:
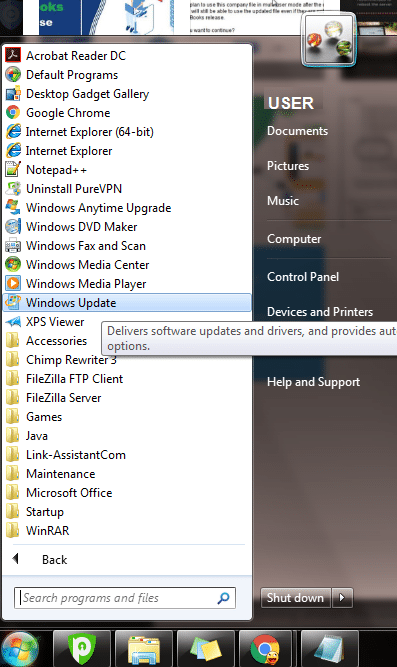
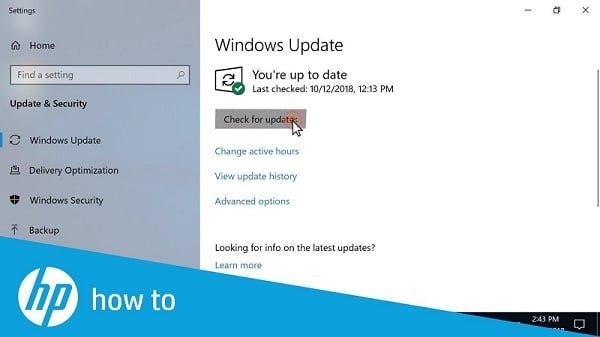
Press the Windows key and type Windows update in the Search bar.
Also click on Check for updates, and proceed ahead with downloading the updates.
Now install all the available updates.
Restart the system once the installation gets finish.
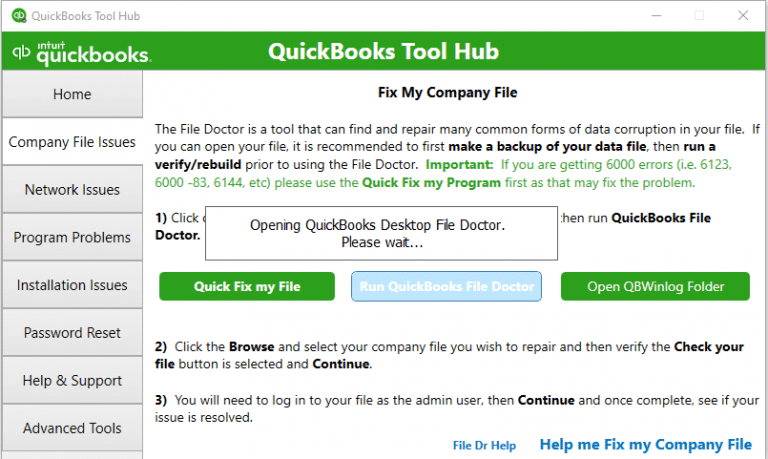
Solution 4: Using QuickBooks File Doctor Tool
In case you have encountered these issues while installing QuickBooks, then in that case, you can use the QuickBooks file doctor tool. The steps to be followed here are:
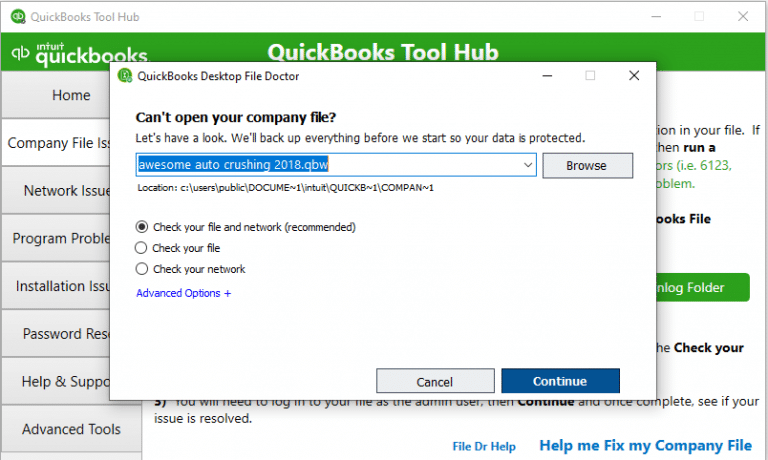
Open the tool hub program and navigate to Company File Issues tab.
After that select Run QuickBooks File Doctor option. It will take up to 1 minute to open the file doctor.
Now use the file doctor tool and try to fix data corruption issues.
In File Doctor, browser and select your company file from the drop-down menu.
Select Check your file opt and click on Continue.
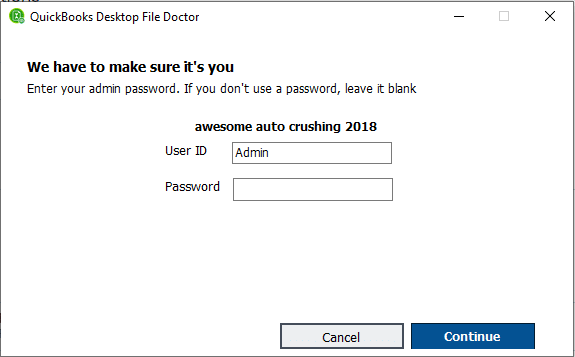
Now enter your QuickBooks admin password and then select Next.
Other things you can try
Install all available updates for the Windows operating system.
Also install all the updates for the Windows drivers.
We hope that you find this article informative and helpful. You might face these QuickBooks errors 1603, 1601 and 1642 even after following the above-mentioned solutions. If the error still persists, then feel free to contact our XpertBooks Pro consulting team. With years of experience and innovative tools and technologies, our experts can help you to fix these errors as well as any other QB-related issues at the earliest.
FAQ's
What is QuickBooks Error 1601, 1603 and 1642?
These error belong to the family of QuickBooks Error 16xx and usually occurs at the time users try to install or update QuickBooks desktop to the latest version.
How do I fix Error 1601 in QuickBooks?
You can try the following steps: 1: By disabling the Antivirus program, you can fix such issue. 2: Reinstalling Microsoft .NET Framework or Reinstalling QuickBooks using clean install.
What causes Error 1601, 1603 and 1642 in QuickBooks?
These error codes can be caused due to the following reasons: 1. Microsoft Windows installer may be damaged. 2. The installation source was damaged or corrupted. 3. Firewall settings are preventing QuickBooks from getting updated.
While installing QuickBooks updates, did you ever receive a message “Error 1606: QuickBooks couldn’t access network location”. Well if yes, then need not to worry anymore, as today through this post we will be dealing with this error, and will also discuss the causes of the same. According to the experts, QuickBooks error code 1606 shows that QuickBooks is unable to find or access a network location during the installation of QuickBooks, or the Windows current user account has been damaged. Sometimes, this error also occurs at the time when QuickBooks can't access the network location that is linked to Windows user folders (like documents, desktop or AppData). You may see the following error message on your desktop screen:
Warning
Error 1606: Could not access network location
There can be a variety of factors causing this error, which we will be discussing later in this article. So, make sure that you read the article carefully till the end.
What are the triggers to QuickBooks error 1606?
As we said before there can be a couple of causes behind the QuickBooks error code 1606 out of which, we have tried to cover some of the common ones below:
In case your profile on Windows system has been corrupted.
When the installation of QuickBooks has not been completed due to a corrupt setup file.
If the Windows registry is damaged or corrupted.
Any Damaged Microsoft components are there.
Another situation when such error might appear can be if the windows installer is failed to access the data from QB installation disk.
Solutions to Fix QuickBooks Error 1606 (Could Not Access Network Location)
Below are some of the most effective methods that can be implemented by users to fix the QuickBooks error code 1606. Let us check out each of the methods one by one:
Method 1: Repair Windows Registry Settings
Editing the Windows registry incorrectly may create serious system issues. We recommend you to create a backup before making changes.
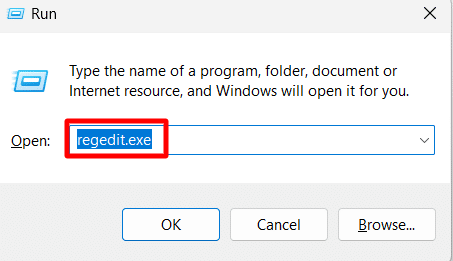
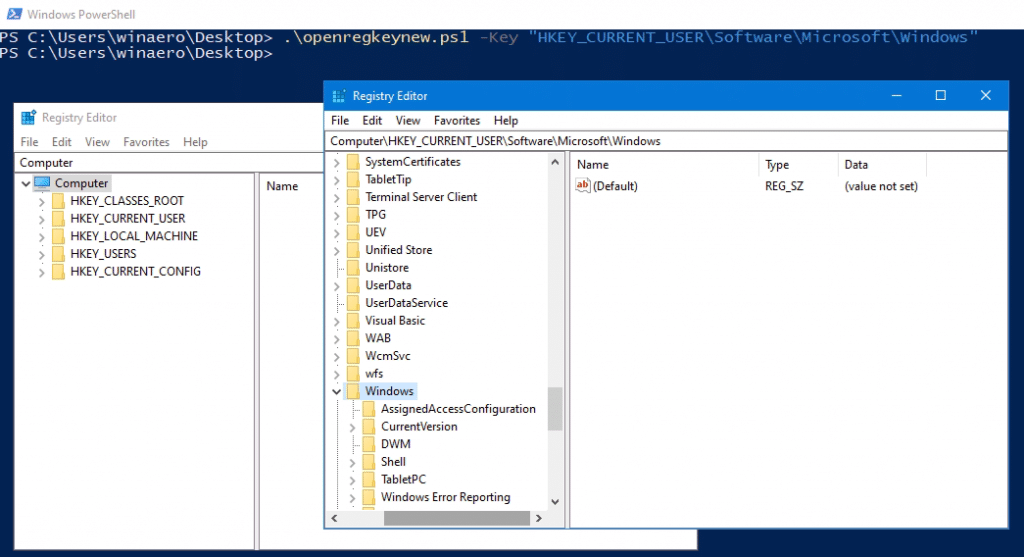
Open your system and press the Windows + R keys together.
Then type regedit command on the run box.
Hit a click on OK or press the Enter key.
Then verify the folder paths - HKEY_CURRENT_USER\Software\Microsoft\Windows\CurrentVersion\Explorer\User Shell Folders
Make sure that the paths are pointing to valid locations.
Next step is to modify the Incorrect Registry Values.
Last step is to restart the QuickBooks and retry the QuickBooks installation again.
Method 2: Downloading and installing QuickBooks using admin credentials
The first method can be to download and install QuickBooks using admin credentials. This can be done by carrying out the steps below:
Initially reboot your system and then sign into the account by using the Windows admin username and password.
Then locate the QuickBooks setup file and hit a right click on the installer.
Now select Run as Administrator option.
You need to follow the installation instructions carefully.
After that install and run QuickBooks to see if error 1606 is resolved or not.
Method 3: Installing QuickBooks again in Windows safe mode
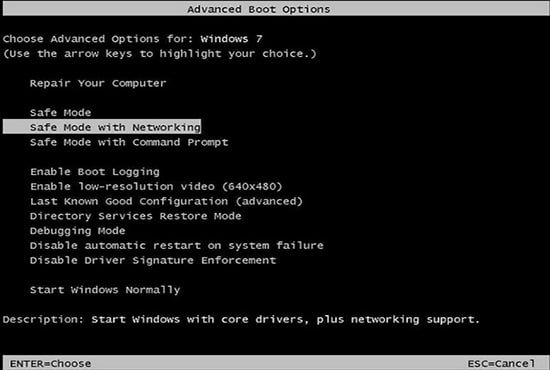
It is recommended to start your Windows in Safe mode and then attempt to install QuickBooks.
Restart the computer and press the F8 key repeatedly on the bootup screen.
From the Advanced boot options list, select Safe Mode with Networking option and hit on Enter key.
Now install QuickBooks via the setup file.
Method 4: Installing QuickBooks via new Windows admin user
You need to create a new user account on Windows with admin privileges. You are also needed to reboot the Windows and sign in to the recent account.
Windows 11:
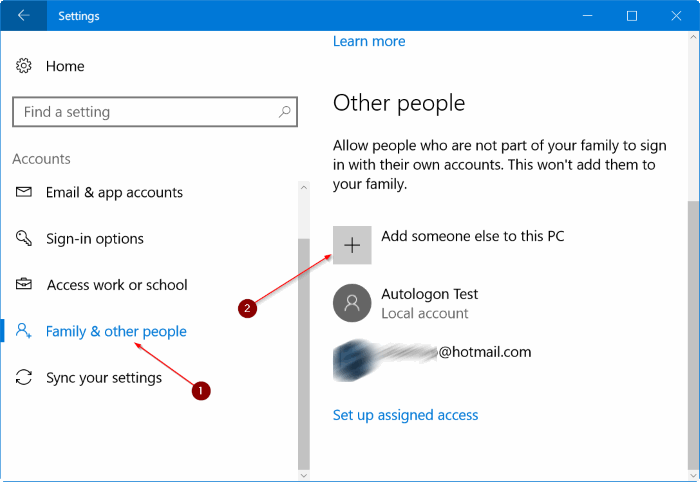
For Windows 11 users, the procedure to create a new Admin user is given below:
Select Windows start and Settings.
In the accounts section, select Family and other users.
Choose the Add someone else on this system option.
Select I don’t have this person’s sign in information and then hit a click on Add a user without Microsoft account.
Now type the User name and the password.
Hit a click on Finish and also select Account.
Last step is to select Admin from the account type section and then hit OK key.
Windows 7 and 8:
The steps for Windows 7 and Windows 8 users are discussed as under:
Press the Windows start button.
In the search programs box, enter User accounts.
Also select User accounts, before that select Manage account.
Now assign a name to the New account and select Admin and click on Details.
Finally install and launch the QuickBooks software.
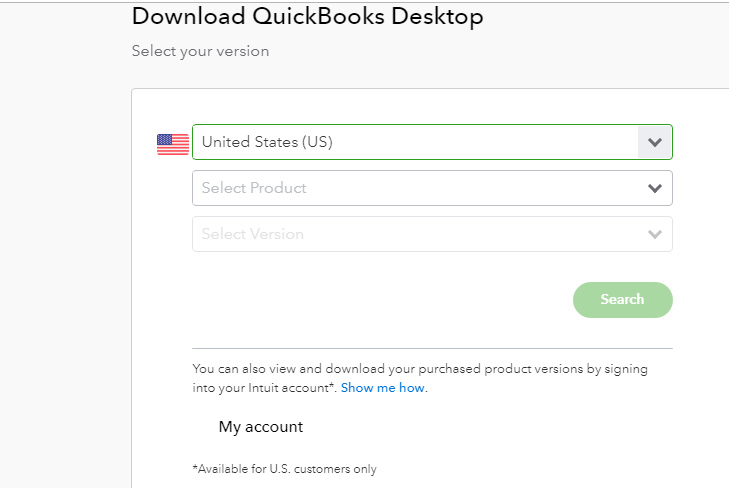
Method 5: Download the QuickBooks installation file
At times, the CD drive fails to run the data on the CD as a consequence of scratches on the installation disc. This makes it necessary for you to download the setup file from the QuickBooks product download page.
Method 6: Installing the QuickBooks in selective startup
If none of the above-mentioned methods work out, then try logging in in the selective startup mode. Once that is done, again try installing QuickBooks.
In this particular method, first press the Win + R keys on the keyboard to open Run command.
And then type Msconfig and then select OK tab.
Move to the General tab and select the Selective startup option, followed by Load system services.
In the services tab, and then choose the Hide all Microsoft services option.
And then, opt for Disable all icon.
Now unmark the Hide all Microsoft services checkbox.
And also verify the services list, and ensure that the Windows installer checkbox is selected. In case not, then mark it.
Also select the Ok icon.
The final step is to move to the system configuration window and click on Restart tab.
Method 7: Fixing any wrong registry subkey
The process is supposed to be followed by system admin. This process includes editing the registry, which, if not done correctly, could result in serious damage to the device.
Method 8: In case you are running QuickBooks desktop in Windows 7 installed in Parallels
Log out of your parallel and then log in again.
In the parallel Desktop, choose Devices and then click Shared Folders.
Now select Disconnect All (you will be logged out of the parallel).
Lastly sign-in and install QuickBooks desktop.
Final Words....!
We have tried to summarize some of the best possible solutions to the QuickBooks error code 1606 in this article. And we hope that after scrolling through the same, you might be able to get rid of this error successfully. But if by any chance, if you are unable to do so, then you need not to be worry, as our QB experts team will be there to help you out.
FAQs
What is the error message associated with QuickBooks Error 1606?
The error notification that shows up in association with Error 1606 is "Error 1606: Could not access network location."
How can I prevent Error Code 1606 in the future?
Follow the directions given below: 1. The QuickBooks installation should be allowed to complete without any interruption, and the system requirements should be checked first. 2. QuickBooks should be updated frequently. 3. A seamless network connection is mandatory to prevent any network issues.
What should I do if the network location mentioned in the error message does not exist?
1. Revert to a previous backup. 2. Remove any remnants of the previous installation.



![How to Solve QuickBooks Error PS058 [When Installing Payroll Updates]?](https://xpertbookspro.com/wp-content/uploads/2021/06/Resolve-QuickBooks-Payroll-Error-PS058-E28093-Update-Download-or-Installation-Failed-Screenshot-Image.jpg)