Intuit, the developer of QuickBooks, releases its latest version every year, with new and enhanced features. If you aren’t aware already, you need to know that the QuickBooks desktop enterprise 21.0 has already stepped into the accounting industry. This newer release includes a lot of new and enhanced features, which serve complex business needs. Well, before to make your mind to either opt for it or avoid this release, make sure that you read this article thoroughly.
In today’s article, we will be talking about the latest features introduced in QuickBooks desktop enterprise 2021 to improve efficiency for complex business needs. However, if you need our assistance at any point of time, then you can simply get in touch with our XpertBooks Pro consulting team. Our certified accounting professionals will ensure to provide you with immediate assistance and the most relevant information.
New Features that Roll out in with QuickBooks Desktop Enterprise 21.0
There are loads of newly introduced features with QuickBooks desktop enterprise 2021. Let us explore each of the features one by one:
Improved - Data Level Permissions
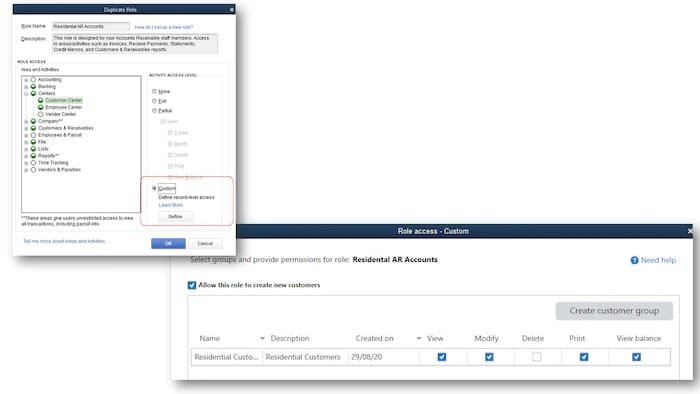
This feature allows you to customize your access to view, edit, or delete from a specific group of customers, vendors, and related data. This feature improves the security and confidentiality by restricting the user’s access. Here are the steps to implement enhanced data-level permissions:
You need to at first, log into the file as the admin user. And then, from the menu bar, select the company users, and also setup users and roles. You will then have to select the roles tab. Now, edit the role or create a custom role.
After that, you should choose the accounts receivable role and then click on the right to duplicate.
Now you will have to type a role name with an optional description for in depth restrictions.
Next step is to click on centers in the role access and also click on customer center.
Once done with that, you need to click on custom and then hit edit.
In case, no customer group exits, you need to create a customer group. You can also select allow this role to new customer and then opt for permitting the assigned users of the role to view, modify, delete, etc.
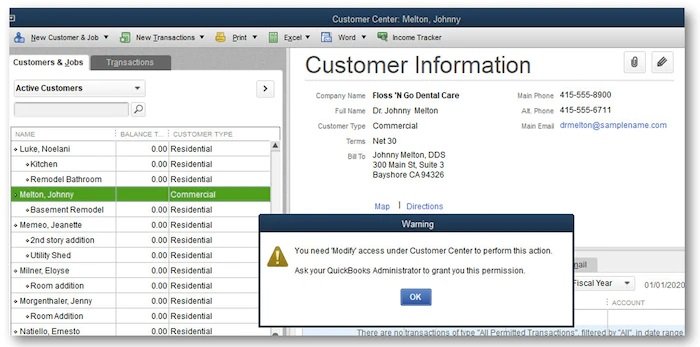
The below image shows you with restricted Residential AR Customer role is making an attempt to modify a Customer record that's assigned a Commercial customer type.
Enhanced Landed Costs Feature
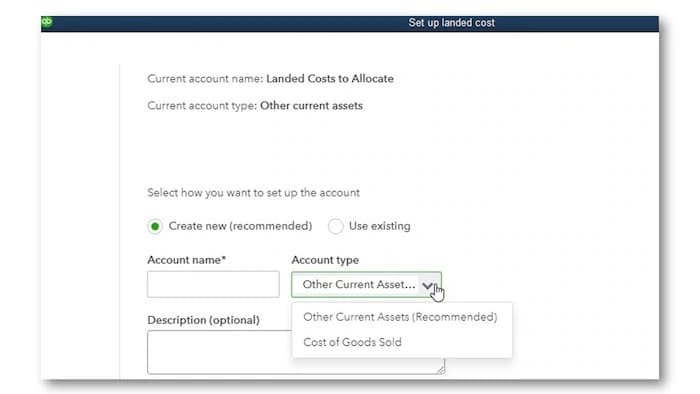
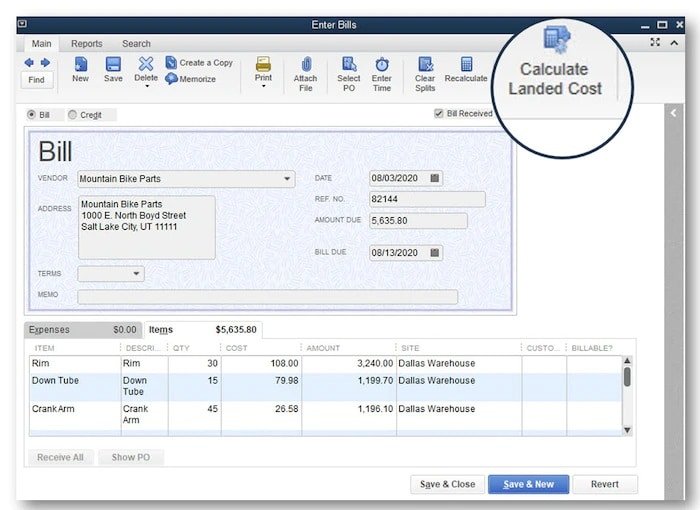
Another enhanced feature of the new release is the landed costs, which upgraded from that available earlier. This basically permits you to allocate the freight, shipping and other charges, but the new and upgraded feature offers more control and flexibility in calculating and sharing landed costs. At the time of setting up landed costs feature, you get the option to select other current assets or the cost of goods sold account type in order to record the landed cost amount.
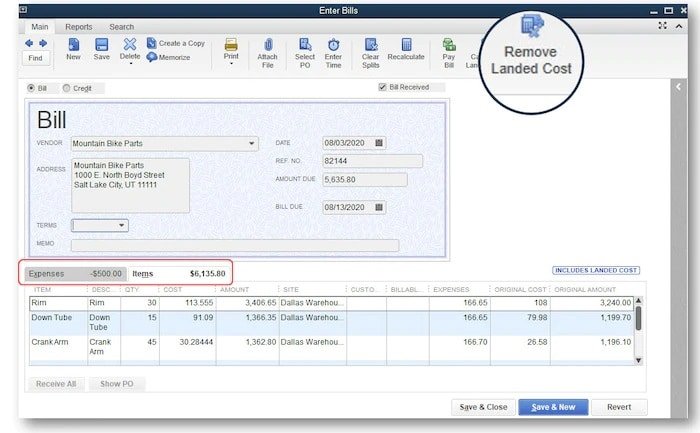
The advanced landed costs feature helps in permitting to calculate landed cost for vendor bills in closed accounting sessions. You get better control over delicate information by printing bills with or without landed cost details. This feature can be accessed by:
At first selecting the file menu.
And then choose edit option.
Along with that, opt for the preferences tab.
Now hit a click on items and inventory.
And choose company preferences.
Next step is to opt for advanced inventory settings.
And lastly, hit a click on the landed cost tab.
At the time of setting up the landed cost feature, you can go for either Other current assets or cost of goods sold account type, in order to record the landed cost amount. However, selecting the first feature is recommended. This particular feature has worked upon and enhanced to permit calculating the landed costs for vendor bills in closed accounting periods. The best thing about this feature is that, it permits to have better control over sensitive information by printing bills with or without the landed cost details.
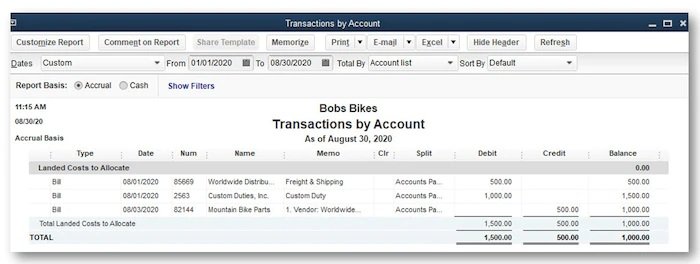
The below image indicates the other current asset type account being used. Moreover, the allocation account value has reduced by the amount allotted to the inventory items, which in turns increases the inventory asset account value.
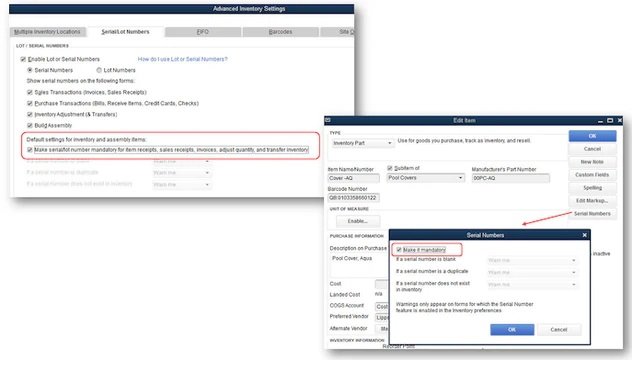
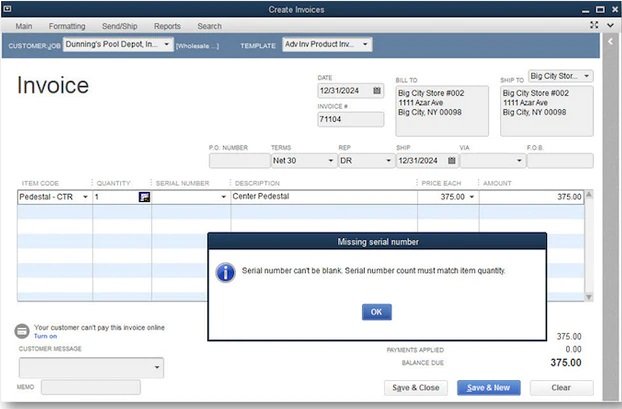
This is a newly introduced feature that says new advanced inventory serial/lot number global preference setting, or individual inventory item settings, needed for entry of a lot number before the transaction is saved. Most importantly, it should be noted that this feature will release with the QuickBooks desktop enterprise 21.0 platinum subscription after R1. And earlier it was included with the QuickBooks desktop enterprise 20.0 platinum subscription.
This feature can be access with the help of the steps below:
Initially you need to select edit option to set the global preference from the menu bar.
Choose preference tab.
Now hit a click on items and inventory.
Select the company preference tab.
Pick the serial/lot numbers.
Also, select the default settings for serial/lot numbers.
This step is optional, as you can set the requirement on the individual inventory item from the menu bar.
By selecting the lists and the item list option, respectively.
With the help of the cursor, you need to select the item.
Once done with that, you need to right-click and edit.
Also, hit a click on the serial tab on the right side.
Followed by selecting the make it mandatory option.
Improved Bank Feeds
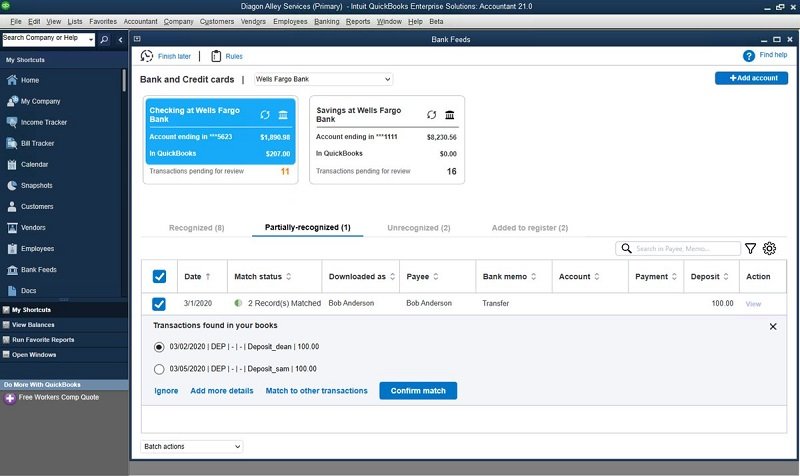
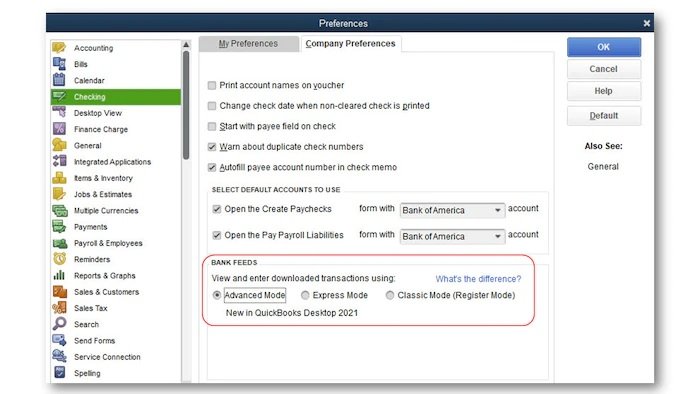
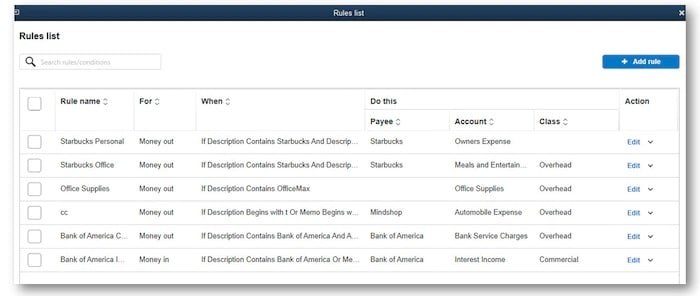
This feature can be accessed from the menu bar, followed by selecting edit, preference, checking, bank feeds, and advanced mode respectively. You need to select the banking, bank feeds, bank feeds center to launch the bank feeds from the menu bar. This feature will automatically categorize bank transactions in detail, with the help of enhanced rules, batch editing, and improved matching. Moreover, you will have more flexibility and efficiency with enhanced rules that allows to look for things easily.
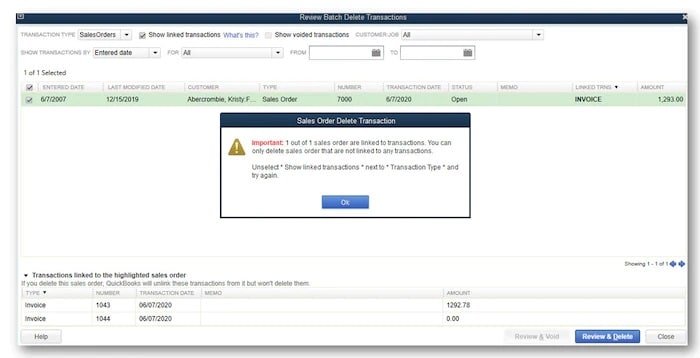
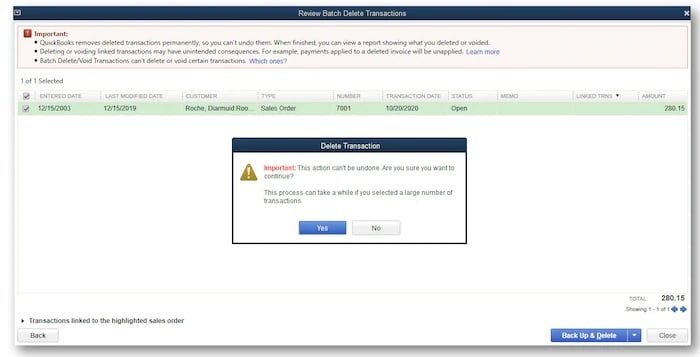
This new feature helps in managing client files more efficiently by being able to batch delete sales orders that are not linked to an invoice. In the earlier release of QuickBooks desktop enterprise, the accountant option with the option to delete or void in batch, invoices, bills etc. was available. This feature can be accessed from the menu bar by selecting the Accountant > batch delete/void transactions.
New - Barcode Label Prices
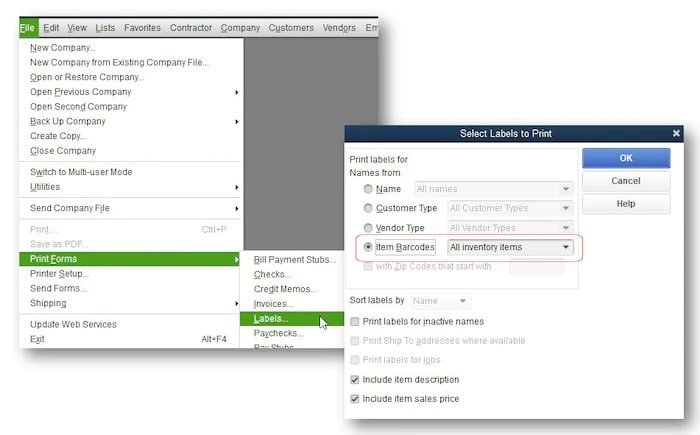
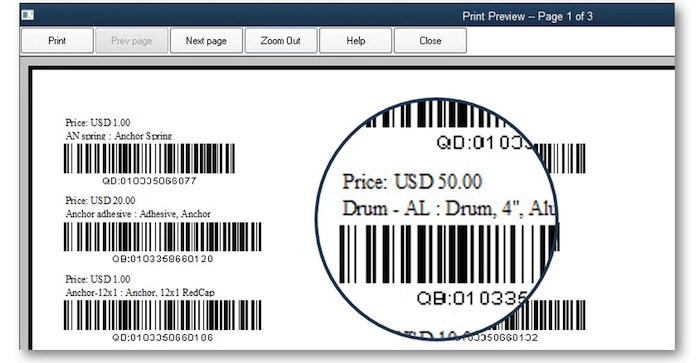
This is the new feature introduced in this release, i.e. the barcode label prices. QuickBooks automatically includes the sales price on the printed barcode labels to supplement the item name and description. It also provides greater pricing visibility to customers and employees by including the sales prices on barcodes. Along with that, the shopping experience for the customer is also enhanced by giving essential pricing information on each and every inventory item. You can access this feature by:
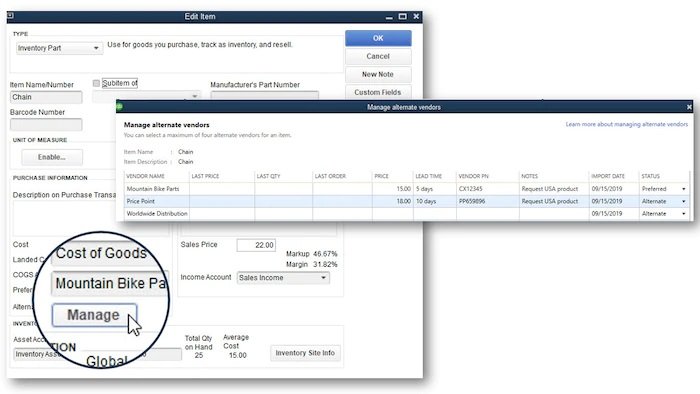
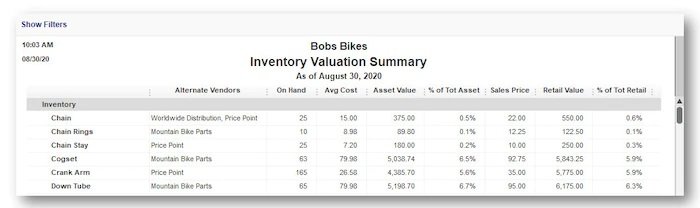
This feature was released in the last version, and it allows you to have an information center having vendor contact and pricing data, assisting in making more informed purchasing decisions. You can easily make purchase orders with vendor information automatically included. The new release improves this feature and the experience by including the alternate vendor column in specific reports. In order to access this feature, the steps below can be used:
At first, you need to select reports from the menu bar.
And then use the inventory option.
Along with that, you need to select the inventory stock status by item.
You can also select the inventory valuation summary.
In order to include the alternate vendor column on the displayed report.
You need to hit a click on the customize report tab.
Also, on the display tab, scroll to select the alternate vendor column.
Automated Receipt Management
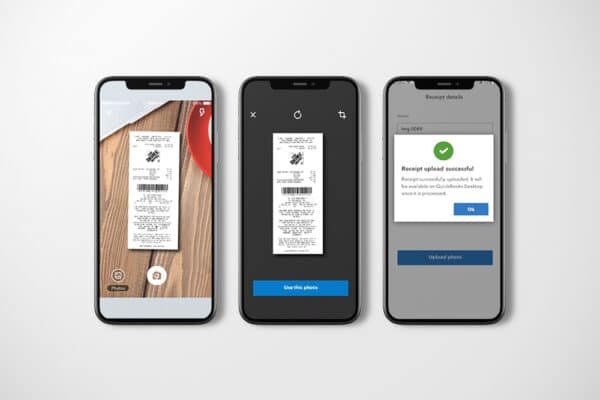
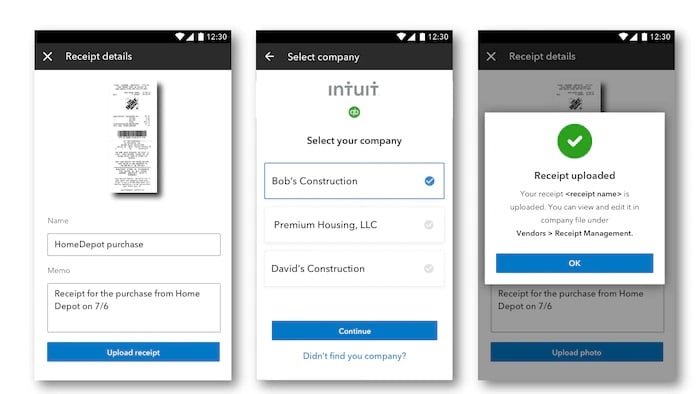
This feature has been introduced in this release only, and it automatically creates and categorizes the receipt expense transactions in QuickBooks using the QuickBooks desktop mobile app to capture the data. With the help of this feature, you can stay organized by attaching digital receipt images to expense transactions for audit trails. You can simply use this feature as follows:
You need to choose the vendors option from the menu bar initially.
Choose the receipt management.
Perks of automated receipt management
There won't be any lost receipts after this feature, as the users and the employees can immediately take an image via their mobile app.
Also, there is no need to stuff receipts here and there. The QuickBooks software will store digital copies of the receipts in the user's system.
There won't be any need for manual data entry now, you simply have to import bank feeds faster by automatically categorizing or batch-editing the bank transactions by payees, accounts, and classes.
This feature saves a lot of time by automatically creating categorized receipt expense entries using the QuickBooks desktop mobile app.
Moreover, you can accurately categorize and record multiple receipt transactions at once.
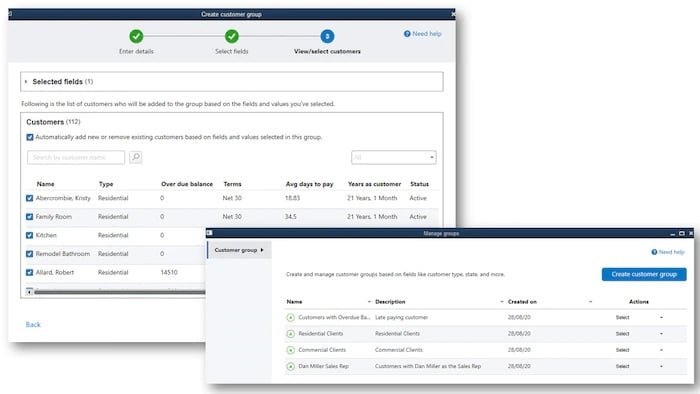
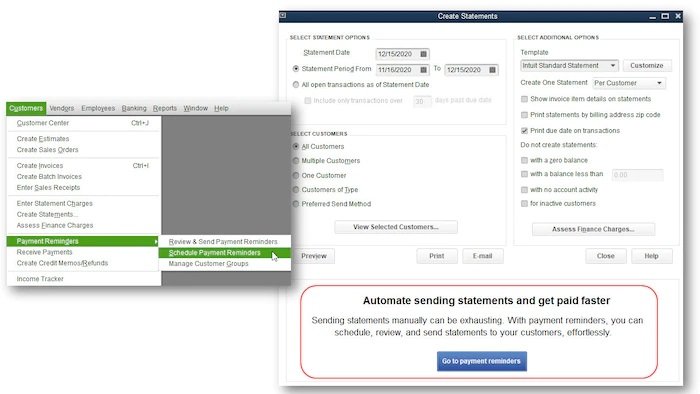
Another newly introduced feature is the customer groups, which helps in creating rule-based customer groups based on fields such as customer type, status, location, sales rep, so that one can manage and automate communications with much ease. In simple words, customer groups can be used to automate sending invoices or statements. You can make use of this feature as follows:
First of all, select customers from the menu bar.
And then choose the payment reminders.
After that, hit a click on the option to manage customer groups.
Or you can also select the lists and manage groups options.
Auto Matching for Customer Merchant Payments
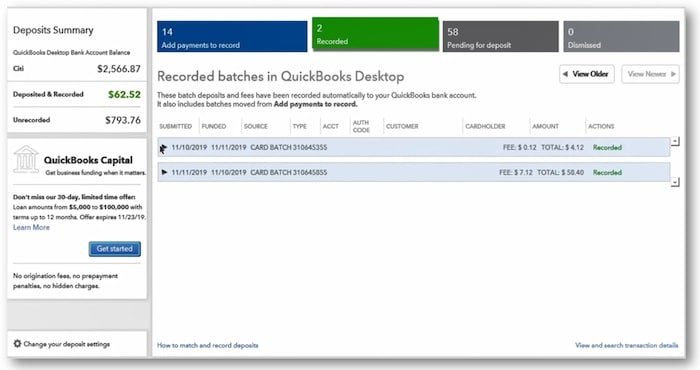
The Auto matching for customer merchant payments assists the QuickBooks Desktop Merchants to auto-match the payments to their accounting records every time. Almost all of the download payment transactions will be automatically assigned to the relevant open invoice. Moreover, with the help of this feature, you can efficiently target the category of transactions that require instant attention. The best part about this is that the credit card payments are deposited the next day into the merchant's account, with no extra expenditure or merchant action needed!
In order to access this feature, you will have to carry out the steps below:
First of all you will have to select the menu bar.
After that, hit a click on customer tab.
Now choose credit card processing activities.
And also, click on record merchant service deposits.
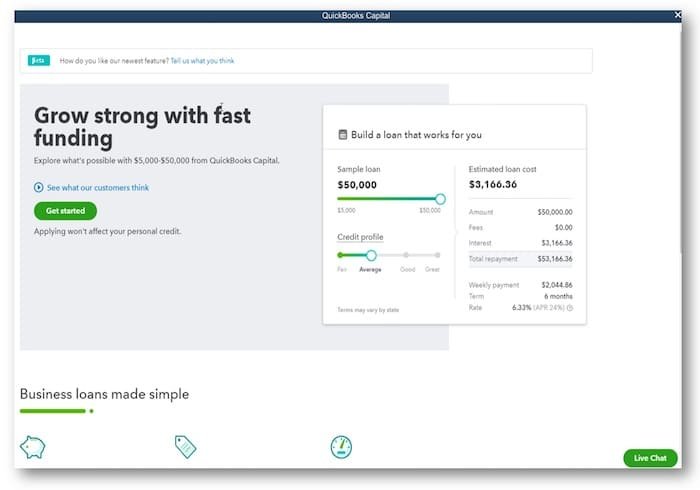
You can easily access transparent, simplest, and highly flexible business funding with absolutely no origination fees, prepayment penalties, or any sort of hidden charges. And also, can apply this feature directly in QuickBooks and without even affecting the credit score.
This feature can be easily accessed from the menu bar by selecting the banking option and also the get financing.
PDF Invoice and attachment review
This is regarded as a slipstream release. And this new feature is available with QuickBooks desktop pro, pro plus, premier, premier plus, accountant 2020, and Enterprise 20.0 (Maintenance R5) or the latest.
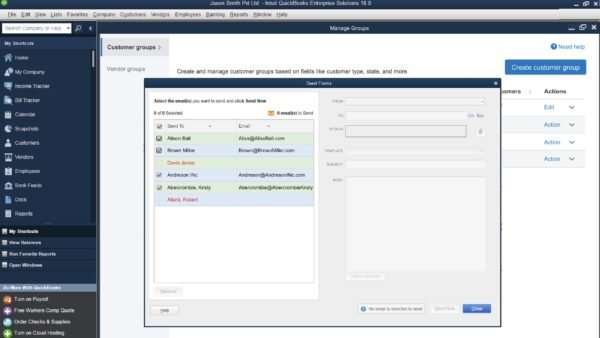
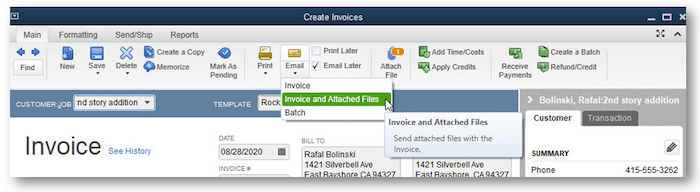
This feature can be easily accessed from the displayed create invoices transaction by selecting email on the main ribbon toolbar.
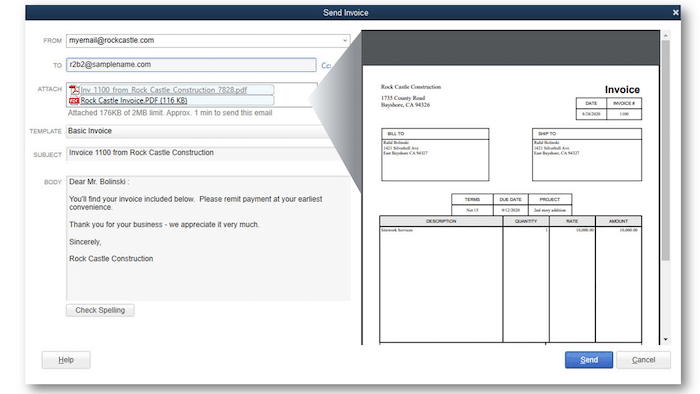
This feature allows automatically previewing the invoice and attachments from the send invoice view in QuickBooks. You will now need not manually open each attachment outside QuickBooks to confirm the accuracy of the email content. This saves a lot of time for you and makes things easier.
Payroll liability reminders
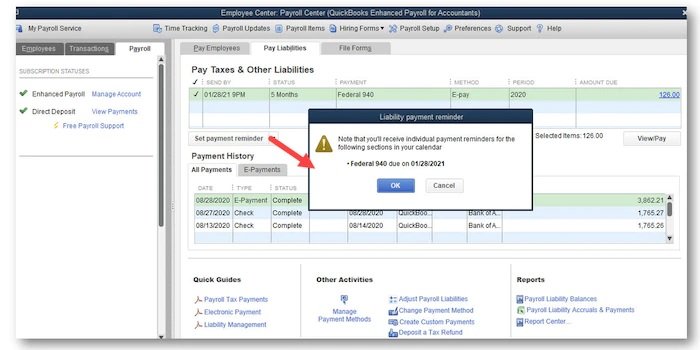
This is included with QuickBooks desktop pro, pro plus, premier, premier plus, Accountant 2020, and Enterprise 20.0 or newer with an enhanced payroll subscription. This feature assists businesses to set up calendar notices to make sure that they are reminded of the upcoming payroll taxes and liability payments. Moreover, it is helpful as you can get reminders outside the software. You can hold on to the money a little longer and pay the liabilities on time instead of paying before the date. This also permits tracking the different deadlines to pay liabilities and also getting reminders in a timely manner.
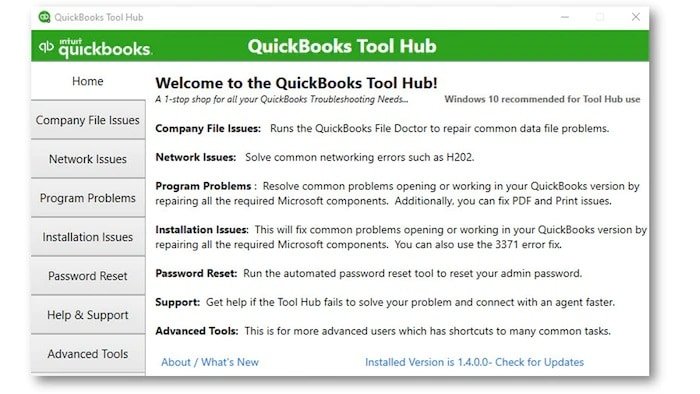
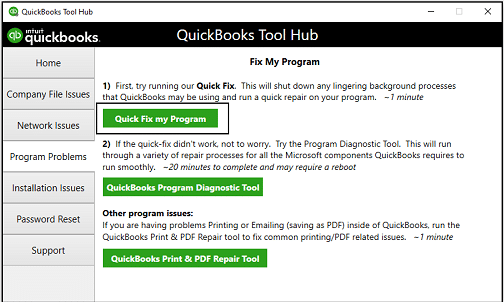
Tool Hub is a one-stop solution for assistance related to troubleshooting common QuickBooks issues. You can Fix common problems and errors with the QuickBooks Desktop Tool Hub. You can download the latest tool hub program from here.
Fix most common QuickBooks errors using the QuickBooks Tool Hub program.
You can find all the common tools of QuickBooks in one place.
You can fix the issues with just one click and it saves your time.
Automated Send Statements/Payment Reminders
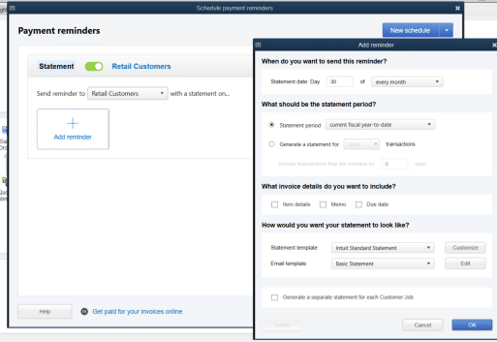
Automated send statements is also a newly introduced feature, which will automate regularly sent statement emails, tailored to different customer needs. The statements can be reviewed and sent from QuickBooks with the help of the predefined email and templates configured during the automated statement setup. You can make use of different templates for different customer groups. In order to select the scheduled statement timing from the menu bar, you need to choose the edit tab and also the preferences tab. Also, opt for the payments option. On the assigned day and time, you will get a pop-up reminder to be sent.
To access this feature, follow the steps below:
First of all, you need to select customers from the menu bar.
And then, choose the option to create statements.
Once done with that, you need to select the option to go to payment reminders.
Or can select customers.
Followed by selecting payment reminders.
Now choose schedule payment reminders.
And also select new schedule and statement options, respectively.
Benefits of automated statements reminders
This feature will save a lot of time by automating recurring statements to different customer groups based on their needs or tendencies.
Also, you can get paid faster by regularly reminding customers what they owe.
With this feature, you can get paid faster by automatically reminding customers when payments are due.
Moreover, customize the reminders for specific customers, so that you can keep healthy business relationships and be confident that you get paid on time.
QuickBooks Desktop Manager
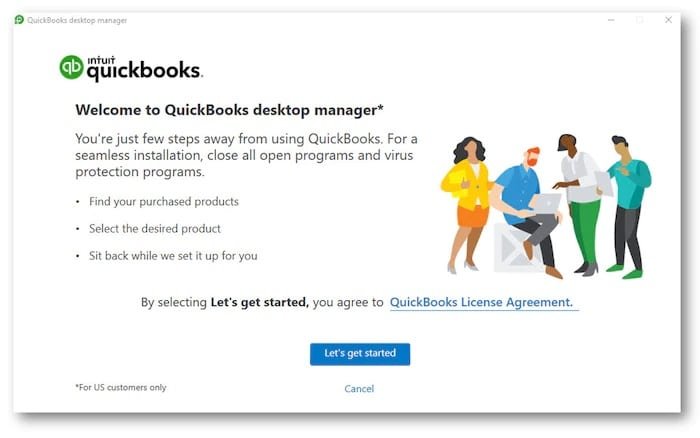
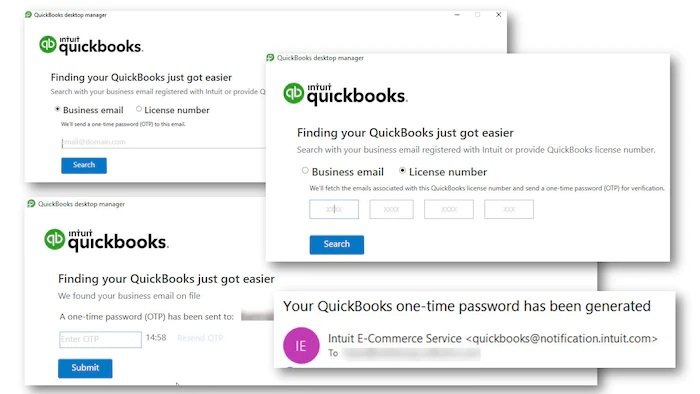
The QuickBooks desktop manager can be used for installing any non-subscription owned QuickBooks desktop products, especially starting with the year 2010 through the latest version. It should be noted that, for subscription products, only supported versions of QuickBooks desktop will be accessible when it comes to installation.
You can download the latest QuickBooks desktop manager tool from here.
You can find and install all the QuickBooks desktop products with much ease that too from a single management tool. All you have to do are four simple clicks to install or upgrade the QuickBooks desktop.
The important point here is that the QuickBooks desktop manager doesn't include owned licenses of QuickBooks point of sale or QuickBooks for Mac.
At the end of this article we expect that the information shared in this article, might be enough to start with the QuickBooks desktop enterprise 2021. However, if you need any technical guidance or for any further information, get in touch with experts at 1.800.761.1787. Our certified QuickBooks ProAdvisors will be happy to help you, in providing the best possible accounting services.
FAQs'
Is QuickBooks Desktop Enterprise 2021 cloud-based or does it require local installation?
QuickBooks Desktop Enterprise 2021 is not cloud-based, and can only be installed locally on the computer.
Is it possible to integrate third-party applications with Enterprise 2021?
Yes! QuickBooks Desktop Enterprise 2021 exhibits compatibility with a myriad of third-party programs and can be integrated with them. The integration is done as it can potentially boost business operations pertaining to e-commerce, inventory management, CRM, time tracking, etc.
Can I import data from other accounting software into QB Enterprise 2021?
Yes! You can import data from other accounting programs to QB Desktop Enterprise 2021.
If you are looking for the process to convert the Quicken data to QuickBooks desktop to continue growing the business, then your search ends over here. We have come up with this article, where we will be talking about the detailed process to convert Quicken data into QuickBooks. There are two simple ways to switch from Quicken to QuickBooks. This includes converting directly to QuickBooks desktop or use the Quicken converter to upgrade the file first.
So, interested users can continue scrolling through this post. Or an alternate for the same can be to connect with our accounting experts using our dedicated helpline i.e. 1-800-761-1787. Our team of U.S based certified accounting professionals will ensure to provide the best possible support services immediately.
Major differences between Quicken and QuickBooks
Before jumping to the conversion process, it is advisable to go through the conspicuous differences between Quicken and QuickBooks. The major differences are listed in the table below:
Quicken
QuickBooks
This accounting program is suitable for personal use.
QuickBooks is used for small and mid-sized businesses
It can be used for the seamless handling of management of Rental property.
QuickBooks does not support the Rental property management feature.
Things to consider before converting from Quicken to QuickBooks
Following pointers should be borne in mind before going for the conversion process.
The process of file conversion from Quicken to QuickBooks can't be reversed. This means that once the Quicken file is converted, then it cannot be reverted back, and you will not be able to use these files in Quicken later on.
Also, it is important to ensure to create a backup of the quicken data that is to be converted, as you might have to access this data in Quicken software.
Lastly, if you have used Quicken software on Mac, then you will have to convert Quicken Mac files into Windows file first, as only Windows files of Quicken can be converted to QuickBooks.
Situations Wherein the Quicken program can be used
QuickBooks converter is a multi-beneficial tool that can come to your rescue in a number of different situations. The situations where this tool can offer you assistance are given below:
You should only use the Quicken converter if you are migrating from a Quicken version that is NOT a parallel version of QuickBooks desktop. This includes Quicken 2017 to QuickBooks Pro, Premier, or Enterprise 2019.
You can skip using the converter and convert directly to QuickBooks using the conversion utility. In case you are having a version of Quicken which is parallel version of QuickBooks.
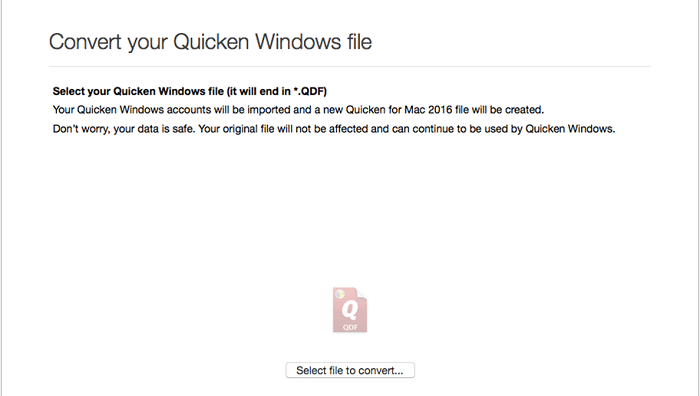
In case of Quicken for Mac, the converter and the conversion utility in QuickBooks can’t converter Quicken for Mac data file. In case you are having Quicken for Mac, then converting the data file first to Quicken for windows or creating a new QuickBooks company file is recommended.
Steps to Convert Quicken Data Into QuickBooks Desktop Data
To convert Quicken data into QuickBooks desktop perform the following steps:
Step 1: Using Quicken Converter
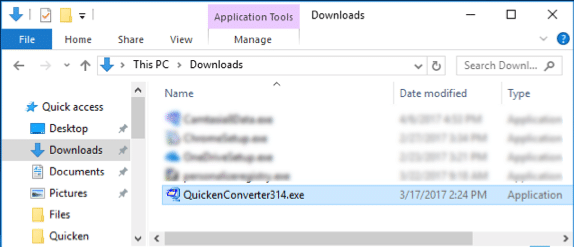
Before jumping on to the process of using the tool, you are recommended to ensure that you are not having another version of it installed. In case, you do have, then make sure to uninstall it from the system and then download the right one below:
1: You need to download the version of converter tool which matches the year version of QuickBooks Desktop:
2: After that you can install and convert by using the steps below:
First of all, Launch the downloaded Quicken converter and then choose Next.
After that it is supposed to choose I accept the terms in the license Agreement and also hit Next.
Next step is to Start the installation of the Quicken converter also, choose Next and hit Install.
Now you need to choose Launch Quicken converter and hit Finish.
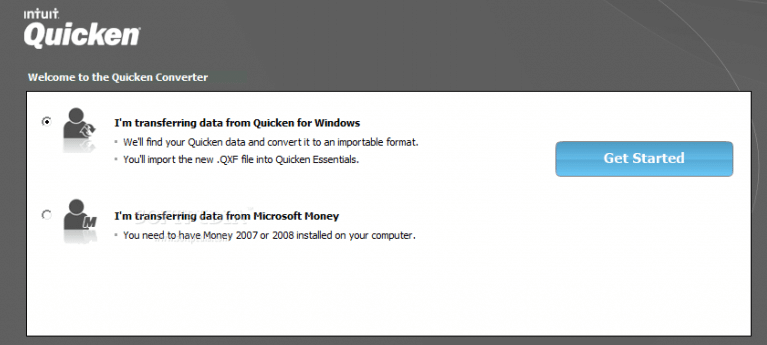
Once done with that, choose I am transferring data from Quicken for Windows and also choose to Get Started.
Next, choose Open a data file located on this system and then opt for the select File option.
Now browse to choose the Quicken file and then choose OK button.
After that, select Convert it and also hit OK button.
Final step is to Save the new Quicken data file and choose Save, and also hit Edit option.
After the file is upgraded to a compatible version of Quicken, QuickBooks users can start converting using the conversion utility in QuickBooks.
Step 2: Look For .QDF And Not .QFX
The tool says it is creating a .QFX file, but it is also creating a .QDF file. This is the file that you want to convert, not .QFX. You need to go for the upgraded .QDF file in a folder named Q18Files or Q17Files, which is at the same location as your original Quicken file. The .QDF file might also have the same name as the original data file.
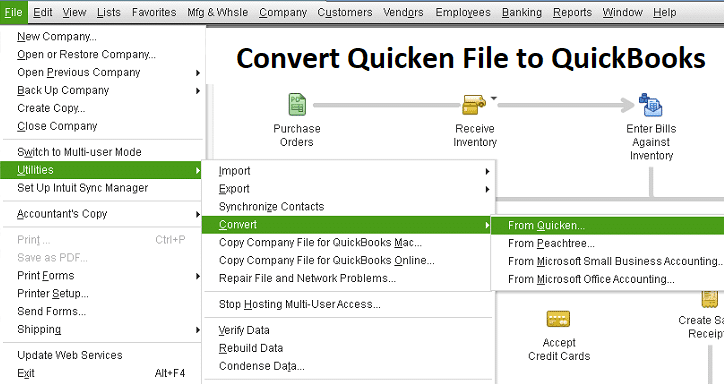
You canconvert the Quicken file using the conversion utility in QuickBooks. This can be done by using the steps below:
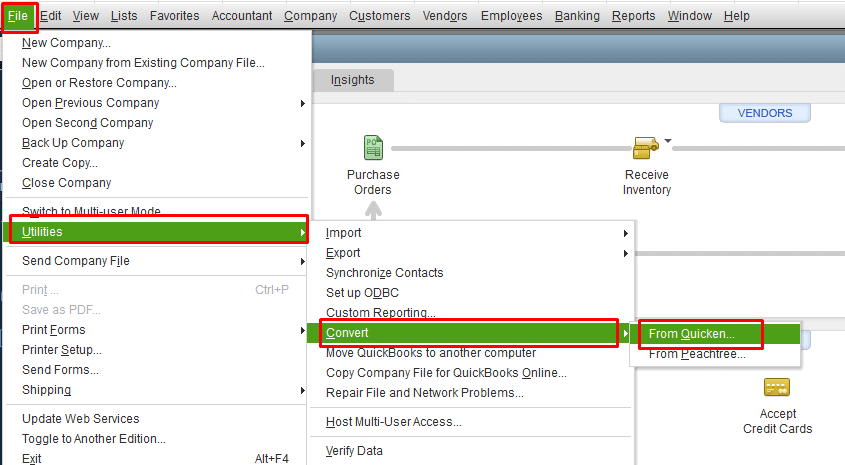
You need to first move to the file option, and then select utilities. Also, choose convert and opt for from Quicken.
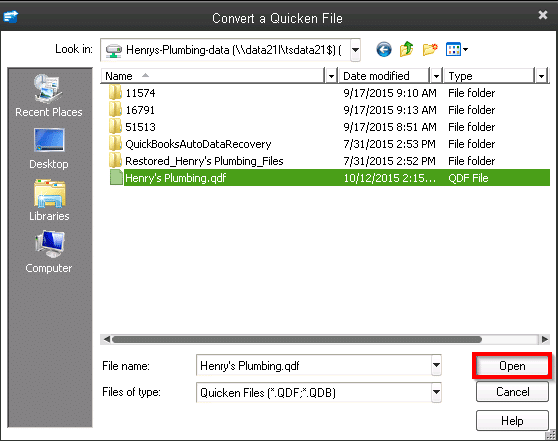
After that, choose the Quicken file [.QDF] that you wish to Convert.
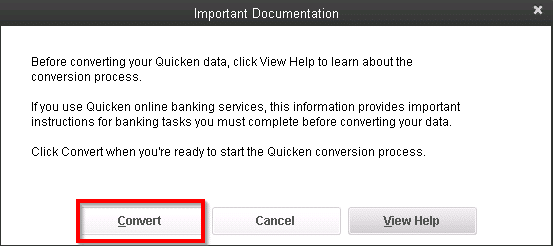
Now hit a click on Convert.
The final step is that you will be guided by the conversion utility all through the rest of the conversion.
Important Note: You can also press the F1 key to access the help window in QuickBooks Desktop to get any further details related to the conversion utility. Also, you can type convert from Quicken.
If you have used the Quicken Conversion Tool you will see a folder on your desktop that contains the appropriate QDF file to use. The folder will be named as Q12Files or Q13Files.
Procedure to Move your Quicken Data to QuickBooks Online
The procedure discussed above should help you in transferring your Quicken data to QuickBooks Online. You can also follow the other steps given below for moving your Quicken files to QuickBooks.
Step 1: Exporting the Quicken Data in .csv format
Initially you need to export the Quicken data to a .csv file.
This file can be imported to QuickBooks.
Step 2: Importing the .csv File Into QuickBooks
Sign in to your QuickBooks account.
After that, click on Settings.
And further choose Import Data option.
After that, select the list type to import.
Now click on Browse and locate the .csv file you created in Step 1.
Once done with that, click on Open, followed by hitting on Next.
You will see Map data page on your screen.
Now click on dropdown menus for mapping the fields.
Once done, click on Next.
Finally, check that all the entries are correct.
Once verified, hit on Import option for importing the file to QuickBooks Desktop.
Step 3: Get Connected to Your Financial Institution
The final step requires accessing your bank account via QuickBooks to group your transaction-related data.
Wrapping up!
Converting Quicken to QuickBooks desktop and online might become easy once the above steps are followed successfully. However, for any further information or for any further technical assistance, do not think much about getting in touch with our team of QB specialists. Schedule a call today and our experts will be there to help you. Help is available 24/7/365.
FAQs
How to quickly transfer Quicken data to QuickBooks?
Quicken data can be easily converted to QuickBooks using the QuickBooks converter tool.
What type of data can be converted from Quicken to QuickBooks?
QuickBooks converter supports the conversion of different account types, including savings, checking, credit cards, etc.
Which Quicken version does QuickBooks conversion support?
Quicken 2017 and later versions are compatible with data transfer to QuickBooks.
Is there any possibility of converting Quicken files into a single company file in QuickBooks?
No! One Quicken file can only be converted to a single Company file in QuickBooks.
Being a QuickBooks user, you might have at least once heard about QuickBooks conversion tool. The conversion tool generally helps to convert the company file from another program. Amongst the several features and tools that are available in QuickBooks desktop, the conversion tool is one of the most useful tools. This tool usually allows them to convert the company from a plethora of different programs. With the help of conversion tool, users can do things like the conversion of QuickBooks 2017 to QuickBooks desktop premier to QuickBooks desktop premier 2018 or Pro 2018 or QuickBooks desktop enterprise solutions 18.0. Though the tool is a bit complex, it completest the process without any sort of data security compromise.
In simple words, the QuickBooks conversion tool help you to convert the company file from one program to another. This tool never compromises with the data security. If you are interested in knowing the process to use QuickBooks desktop conversion tool, then make sure that you read this post carefully till the end.
What is QuickBooks conversion tool?
QuickBooks desktop offers a wide range of features and tools , one of them is QuickBooks data conversion tool. This tool permits you to convert the company file from a plethora of different programs. What makes this tool even better is that it completes all sorts of conversion task, regardless of their complexity that too without any data security compromise. With the help of this tool, one can do things like conversion of QuickBooks 2017 to QuickBooks desktop premier 2018 or pro 2018 or QuickBooks desktop enterprise solutions 18.0.
What it can convert?
Account, Employee, Item, Customer, and vendor lists
Account balances
Customer and vendor transactions
Employee profile and contact info
Payroll General ledger account balance info
Paychecks (convert as journal entries)
What can't be converted?
Payroll transactions and employee year-to-date info (paychecks, year to-date adjustments).
Work tickets
Fixed Assets
Individual employee wage or deduction information.
Closed or partially closed Sales orders, Purchase orders, and Estimates.
You should also note that, you can only convert versions of Sage 50 and QuickBooks desktop from the same region. In case you are having a US version of Sage 50, you might have to convert it to a US version of QuickBooks desktop.
Advantages of QuickBooks desktop conversion tool
As we mentioned earlier, QB conversion tool comes with amazing features and functionalities. The advantages include the following:
This tool permits the setup process for the conversion of QuickBooks file.
Another advantage of this tool can be if the conversion tool doesn’t change the current/existing data files.
Also, this will help in understanding the current state of the business.
This tool creates a log for every conversion, simply to maintain the records systematically.
It offers a choice for the imports list. This helps to list plus/minus balances as well as historical transactions in one go.
If the tool ensures that no such data security compromises are possible at the time of conversion taking place.
System Requirements for the QuickBooks conversion tool
Before you start with the QuickBooks conversion tool, it is important that whether your system is compatible with the tool or not. There are certain system requirements that a user should have to meet in order to get the conversion tool.
Operating system: Windows 10, Windows 8.1, windows 8
Processor: 500 MHz Intel Pentium II
Memory: 512 MB
Hard drive: 2.5 GB free space.
Microsoft .NET framework: Version 2.0 is least.
QuickBooks Desktop: Pro, Premier, or Enterprise 2018.
Sage 50: Version 2013 and above.
It should be noted that the operating system should be either windows 7, 8, or 10, or windows vista, windows XP.
Look for and open the folder having the downloaded file.
Hit a right click on the QuickBooks conversion tool icon and also select properties.
Under the compatibility mode, you need to select the checkbox for run this program compatibility for, and then select from the dropdown the window operating system being used.
You will then have to click on ok tab.
Lastly, right click the file i.e. QuickBooks ConversionToolSetup.exe and also choose run as admin.
Steps to Use the QuickBooks Conversion Tool Effectively
Now that you know the relevant information related to the QuickBooks conversion tool, it is the right time to start using it. The below steps would surely help you in making the best out of the conversion tool.
Initially you are supposed to double click the Conversion tool and open it.
Followed by selecting one of the Two options that would appear on the screen i.e. My Client Company or My own company.
Select the accounting software.
Choose next and opt for the Company file and also hit Next again.
You will then require to select the QuickBooks product and navigate to the folder where you have saved the company file and also hit Next tab.
Go for the Conversion levels as per the list which you see on the screen and then hit Next.
You will then have to select the Accounting preferences as per the date and name of the company, and then hit Next button.
Final step is to check all the details for the last time and then hit on Start, and after the process is complete, you need to click on Finish tab.
Steps to Convert from Sage 50 to QuickBooks Desktop
Now comes the process to convert sage to QuickBooks desktop. Well, if you are a Sage 2010 user, then the below steps will help you out in converting it to QuickBooks:
1st Step: Firstly, you need to set up the data access credentials
For which you need to launch the Sage application and also open the company file.
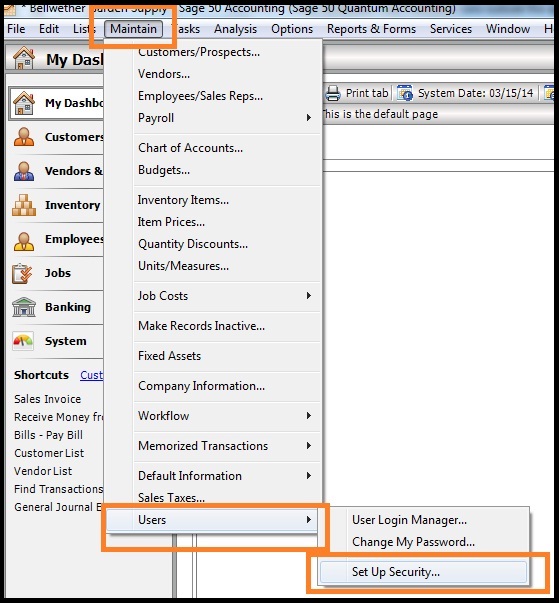
Move to the Main menu and choose Maintain, along with Users and setup security tab.
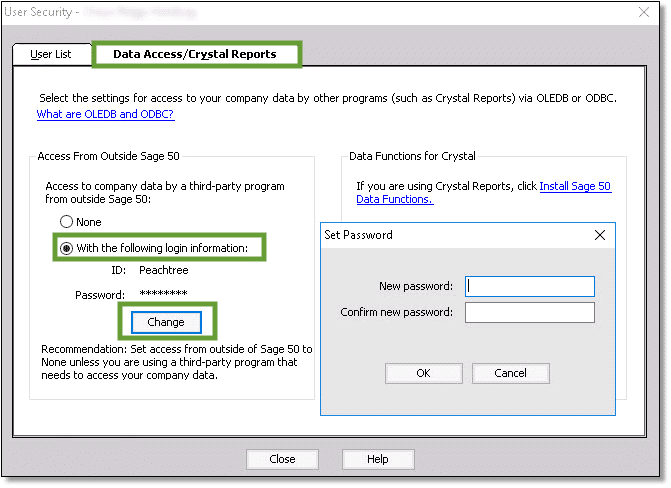
You will also have to click on Data access/crystal reports.
Now click on Change to set the password.
Followed by choosing Close Sage.
2nd Step: Once done with that, select the Sage company file
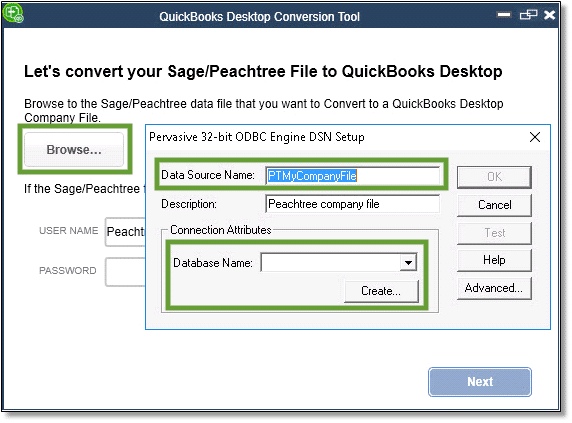
Download and install QuickBooks conversion tool from the Intuit website. You will then have to use the tool by running it as Admin. Now, you need to right click the QuickBooksConversionToolSetup.exe file and also choose the run as admin option.
Select the Company file by clicking the Browse option, from the database name window.
3rd Step: The next step is to convert the company file
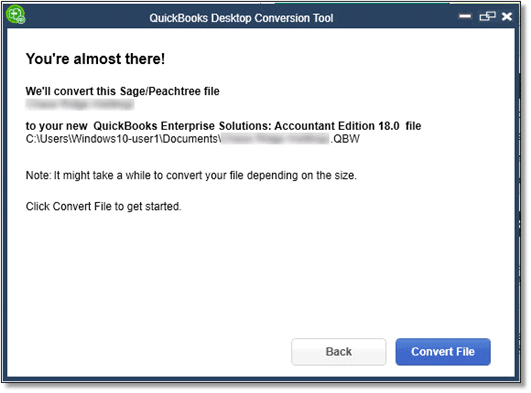
This can be done by simply selecting the QuickBooks version to convert Sage to and also look for the folder, where the QuickBooks file is to be kept. Also, hit Next.
Now, in the new window, you will have to Verify the accuracy of the information, and then hit Convert file option.
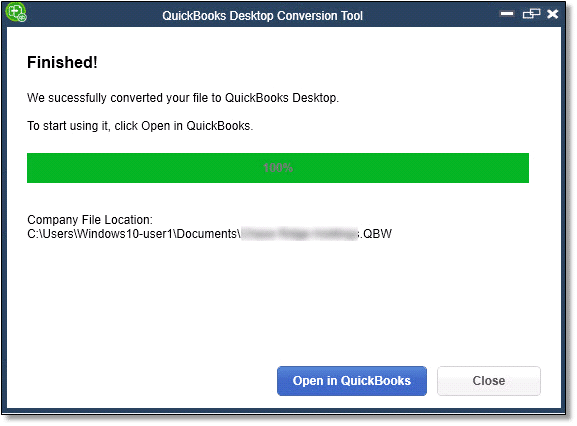
The process might take some time, and you will have to wait for the message to appear prompting done.
Open the QuickBooks file and check if the process was completed successfully or not.
4th Step: Review the conversion
In this step, you need to opt for the option to open in QuickBooks, after the tool completes the task. You need to review the data in QuickBooks and also ensure that everything is present. You will then have to review the transfer log:
Open the windows start menu.
Look for and open the file explorer.
Move to the C:USERS[Your Windows User Name]My DocumentsIntuitQuickBooks.
Now review the failed transaction log file in the folder. This will tell you if the data didn't transfer over.
Important Point: It should be noted that, you can only convert the versions of Sage 50 and QuickBooks desktop from the same region. In case, you are having a US version of Sage 50, then it is important for you to convert it to the US version of QuickBooks desktop only.
Steps to Convert from Quicken to QuickBooks Desktop
Quicken 2011 or the earlier version users can easily switch to QuickBooks, with the steps listed below:
First download the QuickBooks conversion tool. In case you are converting to QuickBooks of same year from Quicken of same year, then the tool is not needed. This tool is very much effective and is needed when the QuickBooks is newer than Quicken.
You will have to launch the Quicken converter and then hit Next tab.
Also, Accept the terms in the license agreement and click on Next and install options.
Followed by, selecting Launch quicken converter and click on Finish tab.
You will then have to select I am transferring data from Quicken to windows option and then choose the Get started option.
Now you need to select Open a data file located on this system option and also Browse the file by clicking on select File tab. You should also hit Convert and OK tabs.
Once done with that, click on Save to save the updated quicken file and also choose the Exit option. The Quicken file will not be upgraded.
After completing the steps above, you should launch the QuickBooks desktop.
Followed by moving to the File and Utilities tab. You will also have to opt for Convert and from Quicken option.
The final step in this process is to carry out the onscreen prompts.
Limitations of the QuickBooks conversion tool
Along with the above stated features, there are certain limitations to the QuickBooks conversion tool as well. These limitations are related to importing data, transaction, and account balances from other financial software into QuickBooks. This would help in converting employee list information which includes the social security number, as well as payroll general ledger account balance information.
There is certain payroll information, that one can’t convert using the QuickBooks conversion tool. This includes: paycheck, employee year to date information, payroll item, individual employee wage, etc. Along with that, job costing, fixed asset items work tickets and then close or partially closed sales orders, estimates, and purchase order might not be converted with the help of conversion tool.
This drives us towards to the conclusion of this article, where we expect that information shared in above information might be of some help in using the QuickBooks desktop conversion tool. However, if you have any query regarding the same or for any further information, you can contact our XpertBooks Pro team of professionals. Our team of U.S. based CPA's and accounting professionals will ensure to answer all your queries immediately.
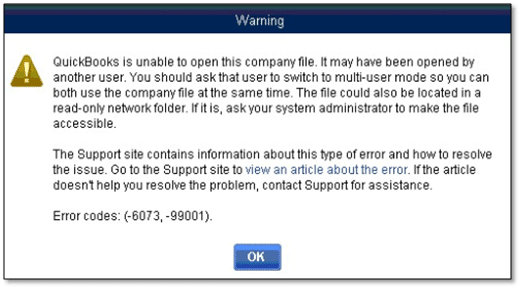
No matter how much you try to work with no bugs on QuickBooks, some or the other bug might shatter your desire. Even after being a great software with bundles of features, even this software has a downside i.e., the error that you might often face, while working on it. One such common error is the QuickBooks error code 6073 and 99001. This error is usually seen when you open the company file in the multi-user mode. This error comes up with an error message stating:
Warning: QuickBooks is unable to open this company file. It may have been opened by another user. Error codes: (-6073, -99001)
This is a very common error, which you would find a bit difficult to handle. Considering all the facts, we've come up with this article, where we'll be talking about the error 6073, its causes as well as solutions. Therefore, you would have to read the piece of information carefully to unleash the ways to fix the QuickBooks company file error 6073 and 99001.
What Does QuickBooks Error 6073 Means?
QuickBooks error code 6073 and 99001 usually occur when you try to open your company file in multi-user mode. These errors simply mean QuickBooks cannot access the company file due to restrictions in hosting setup or file permissions. This error can be frustrating for you as it blocks you from opening or working on your company files. This error is fixable and we recommend you to resolve it ASAP before getting any mess.
What are the causes of QuickBooks error code 6073, -99001?
Error message 6073, 99001 is usually seen when you make an attempt to open a company file that has the file extension .qbe in multi-user mode. An error message stating "QuickBooks is unable to open this company file" might appear on the screen.
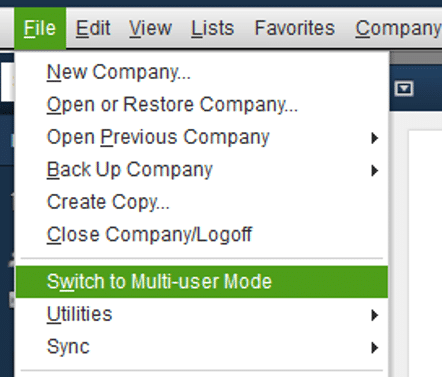
You are recommended to switch to multi-user mode, so that you can use both company files simultaneously. The file can also be spotted in a read only network folder, if it is, then it is recommended to contact the system administrator of the system to make the file accessible. This error is usually seen due to a couple of reasons, some of the common ones are listed below:
If the file is open on another system in single-user mode.
You can also face the error code if the file is being accessed using a remote software and the host system sees that you are still logged on.
If the file is located in a read only network folder.
In case the files are hosted on a Linux server and are using more than one set of login credentials to sign on to the shared folder.
What are the Solutions to Fix QuickBooks Error 6073, 99001?
There can be a handful of solutions that you can implement in resolving the QuickBooks error 6073 and 99001 when you try opening your company file. Let us check out those methods one by one:
Solution 1: Run the QuickBooks file doctor from tool hub program
For this, you can download the most recent version of the QuickBooks tool hub from here. And save the file where it can be accessed easily.
Opening the file which was downloaded earlier is the next recommended step.
Pay heed to the on-screen set of steps to Install and agree to the terms and conditions.
Double click the Icon on the Windows desktop for the purpose of opening the tool hub.
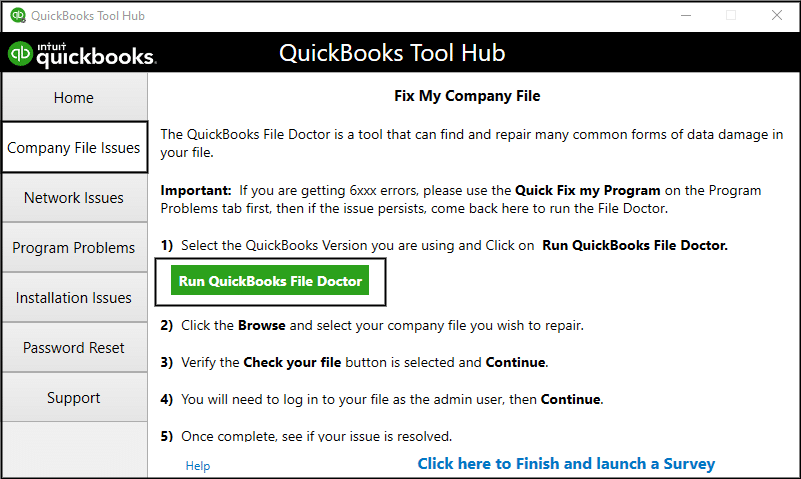
Furthermore, pick Company file issues tab from QuickBooks tool hub.
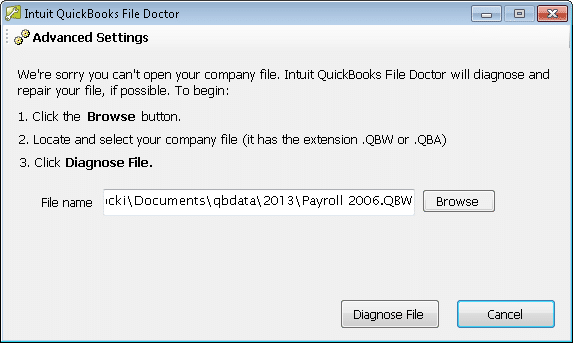
Tap on the Run QuickBooks file doctor tab. This might take a minute, but if the tool fails to launch, then you are required to launch the file manually.
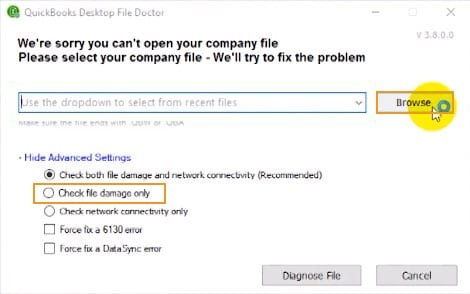
Pick the Company file option from the drop-down menu in the tool. In case you are unable to find it, then select the Browse option.
Now select Check your file option and also hit Continue.
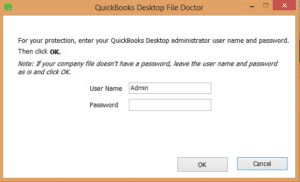
Then enter Admin password and then hit Next.
Solution 2: The network data files (.nd) and transaction log files (.tlg) are usually labelled as the hidden files
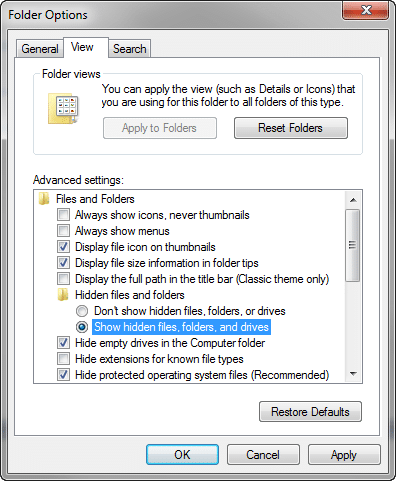
For this, open my computer and then move to Tools menu and also click on Folder options.
Head towards the View tab and also click on Show hidden files and folders.
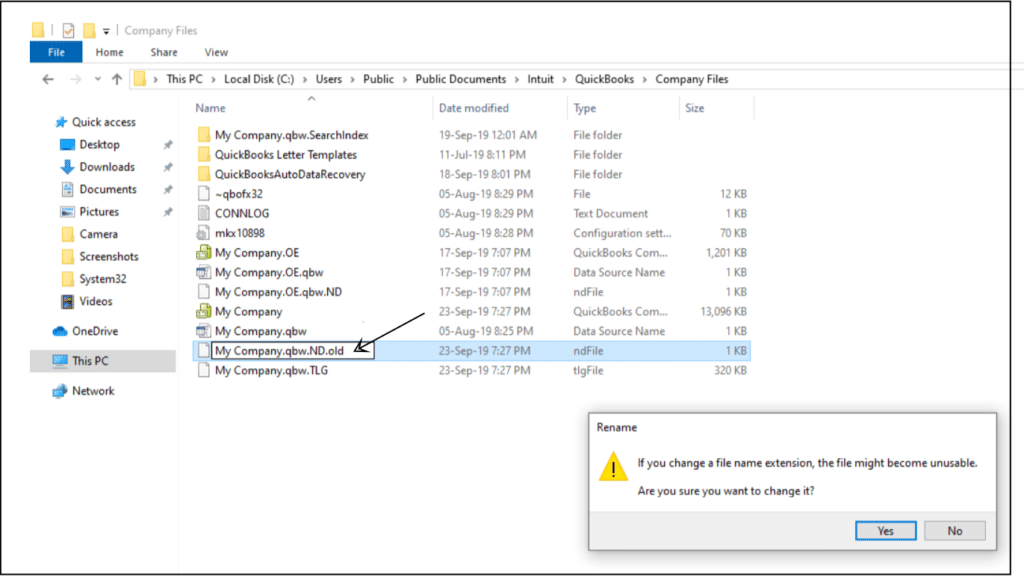
Open data folder to see the network data files and transaction log file.
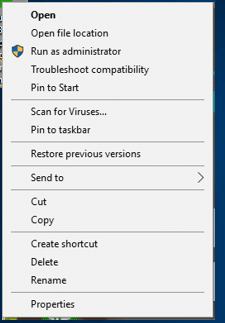
Right click the Network data file and choose Properties.
Towards the end of the process and the segment, we believe that you might be able to eliminate the QuickBooks error code 6073 and 99001. If by any chance you continue to encounter this error, then it is highly recommended to seek out a professional help and request to fix the issue on your behalf. You can consult with our XpertBooks Pro team, who will ensure to provide you with the best quality accounting services. We provide round the clock assistance.
FAQ's related to this error
Could remote access software be the culprit?
Yes. Tools like LogMeIn/GoToMyPC can leave a session holding the file; fully disconnect remote sessions on the host and try again.
Why does it happen only in multi‑user environments?
A workstation may be trying to open the file while another instance holds it in single‑user mode, hosting is misconfigured, or share/NTFS permissions block write access to the .QBW folder.
Why do I get -6073/-99001 only after switching users or remoting in?
A prior remote session (LogMeIn/GoToMyPC/RDP) can leave the file locked, or a different Windows user lacks Full Control on the company folder; fully sign out remote sessions and grant Share/NTFS Full Control to the correct user group before reopening.
Does opening the file via UNC path help diagnose -6073, -99001?
Yes. Try \ServerName\Share\Company.QBW, if UNC works but a mapped drive fails, recreate the mapped drive with persistent credentials, then rescan the folder in Database Server Manager.
How do I confirm only the server is hosting?
On each workstation, go to File > Utilities. It will show “Host Multi-User Access” (not active). You need to enable hosting only on the server, then rescan folders in Database Server Manager.
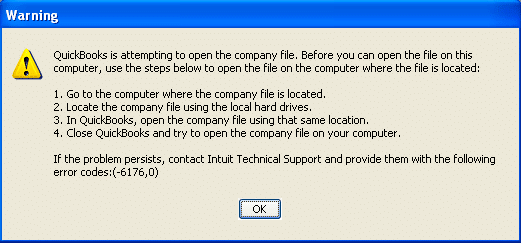
QuickBooks desktop has never failed any chance to prove it’s usefulness. However, sometimes the program may not work properly, and cause some issues. Error code 6176 is usually encounters when the software can’t find the server’s system address. It can be also causes in the event that security settings for firewalls or internet explorer settings are incorrect. This error indicates that QuickBooks desktop couldn’t fix the path to the company file. It a frequent error and usually appears with an error message stating:
Warning
QuickBooks is attempting to open the company file. Before you can open the file on this system, use the steps to open the file on the computer where the file is located. Error codes: (-6176, 0)
This error leads to a failure in connecting to the system, that is the actual location of the QuickBooks company file.
If you're facing the same error in your QuickBooks, then this article can be quite helpful to you. In this article, we are going to explain the causes and the quick fixes for QuickBooks error code 6176, 0.
What is QuickBooks error 6176,0 and what leads to it?
QuickBooks error 6176 is a company file error that appears when QuickBooks is unable to connect with the system hosting the company file. This error might lead to an issue in connecting QuickBooks software to the system that indicates the location of the company file. Further, it might lead to the software being unable to access the network identification of the server. This issue can be pops up when you try to open the software or QuickBooks tries to obtain the server's system address but fails to do so. Also, this error may appear if the firewall configuration is incorrect or the Windows have a wrong internet setting.
What triggers the QuickBooks error code 6176?
You might end up in QuickBooks error message 6176, in certain circumstances. Let us have a look at the factors causing this error:
If there is any sort of virus or malware infection, then you might face corruption in Windows system files or program files related to the QuickBooks desktop.
Any recent QB-related software change may also cause corruption to Windows registry.
Presence of any other program that mistakenly or maliciously deleted the files related to QuickBooks.
Effects of error code 6176
The major signs/ effects of this QuickBooks error are given as under. Although the list of the symptoms observed is adverse, we have filtered out the most common ones below.
Error code 6176 may result in Windows crashing repeatedly.
You might also face slow-running Windows.
No response to mouse and keyboard inputs is another effect.
The input device such as mouse or keyboard will face a delay in the response provided with them.
Learn how to troubleshoot QuickBooks error 6176 (When opening a company file)
For resolving the QuickBooks error 6176, you need not to be a pro. All you need is to perform some methods and rectification steps, especially the ones that we have discussed below:
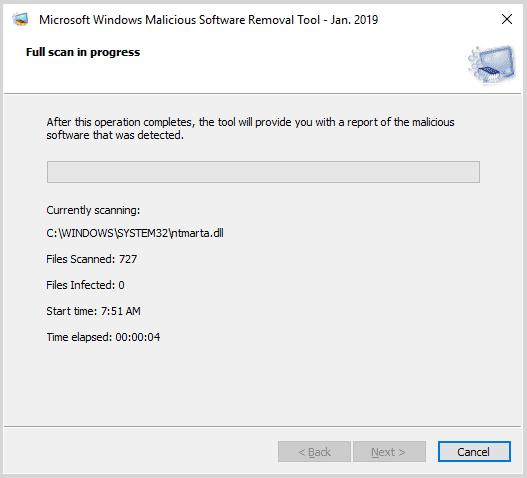
Solution 1: Scanning the Windows
You are always recommended to do a full scan after updating the antivirus software. The steps involved are as follows:
It is recommended to immediately scan the system to identify and fix the issues.
Also, upgrade the antivirus software.
Next step is to run the full scan after the activation of the antivirus software.
Once done with that, if you are unable to run or update the antivirus, there is a possibility of having a virus.
In case no virus detected, you are required to copy the company file to another system and open it.
Moving ahead, you need to Repair the Windows installation on the system, if the company file successfully open on another system.
In case the QuickBooks company file shows the same error, then the company file might be damaged.
Solution 2: Use the QuickBooks file doctor tool
You are recommended to make use of the QuickBooks file doctor tool, in order to get rid of the QuickBooks error code 6176. The steps involved in this process are as follows:
Solution 3: Try to fix the QuickBooks installation
You are recommended to fix the QuickBooks installation, if none of the above methods worked. In this situation, the steps to be followed are as follows:
The initial step is to close your QuickBooks.
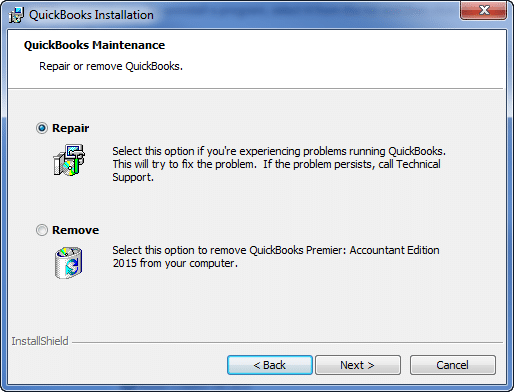
After that repair the installation of QuickBooks desktop.
Check if the error persists. In case the error continues, then try another method.
Solution 4: Update all the device drivers in your system
In case the error continues even after carrying out the above steps, then the only option left is to update all device drivers of the system. Or you can consult a professional. The steps to be followed here are:
The first step is to move to the home screen and then right click the start tab.
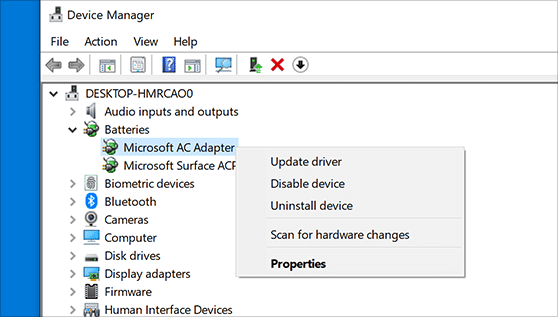
Hit on the Device Manager from the list of options.
After this, you will be able to go through all the drivers one by one. For which, you should hit a right click on every driver and update it manually.
Lastly, after the drivers are updated, you should reboot the system and apply the latest drivers.
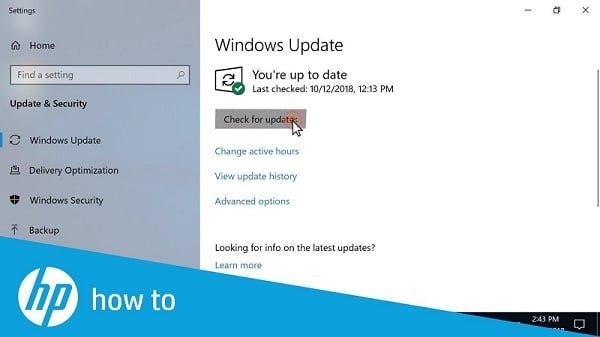
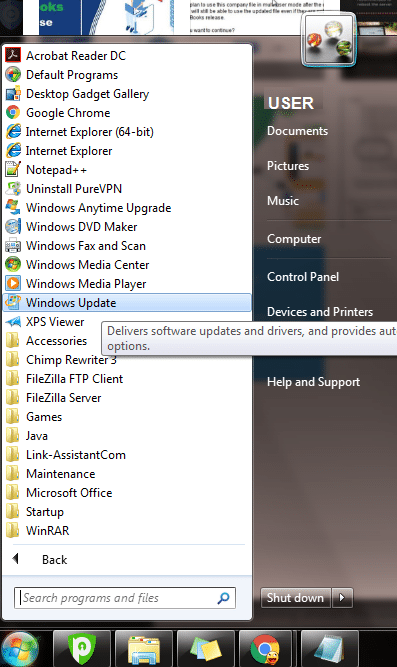
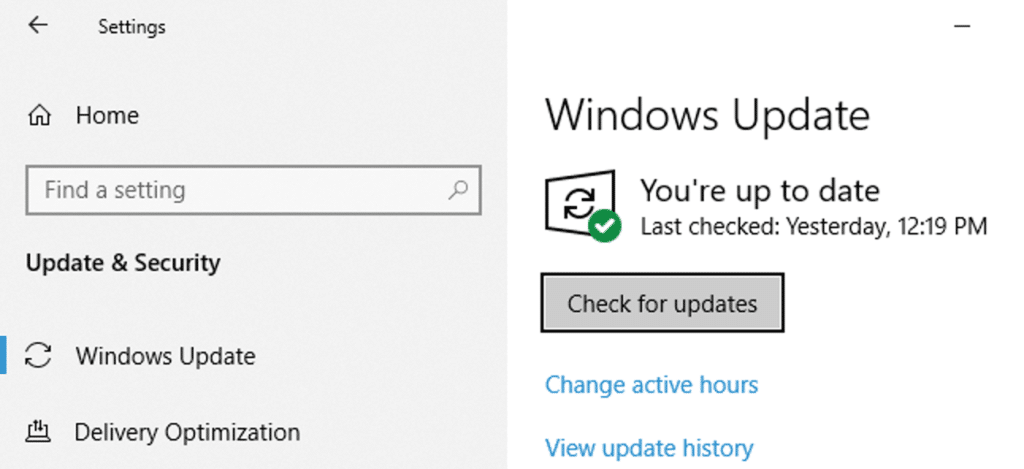
In Windows 10, you can get the latest updates to keep your device running smoothly and securely. In order to manage your options and see available updates, choose check for Windows updates.
Choose Start button, and then go to Settings.
Navigate to the Update & Security settings.
Now hit a click on Windows Update.
Next step is to click on Check for Updates option.
At lastly, install the latest updates if there is any!
Solution 6: Repair the damaged Registry entry
You need to first select start and type in command in the search box.
Press Ctrl + Shift and then select Enter key.
Select Yes, when the permission dialog box might appears.
In the next step, you will see a Black box with an irregular cursor.
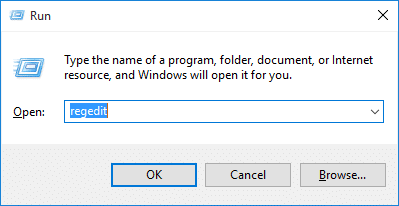
Now, type in Regedit and hit the Enter tab.
You will then have to enter the error code 6176 for the purpose of backup.
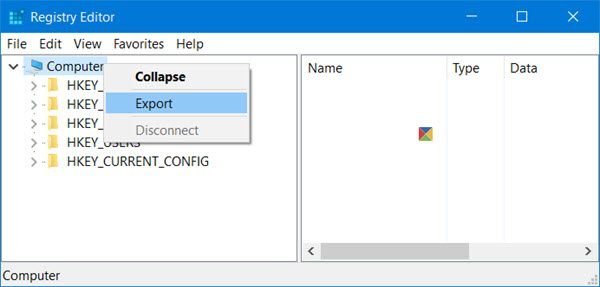
Followed by, navigating to the file menu and clicking on the export tab.
Also, hit on the Save list and file name options, respectively.
Once done with that, you need to opt for export range and save tab.
In last, take a backup of QuickBooks registry entry.
Solution 7: Ending QuickBooks tasks from task manager
To start with, you will have to log in as admin in the system.
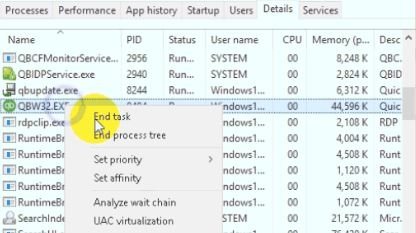
Furthermore, press Ctrl + Shift + Esc keys to open the Task Manager.
Press Q key from the keyboard to see the QuickBooks process.
You are then recommended to opt for the QuickBooks processes as:
QBW32.exe
qbupdate.exe
QBDBMgr.exe
You will then have to hit on the End task tab.
Additional solutions you can try to fix the QuickBooks error 6176
Other than the above stated solutions, you can check out the below solutions as well:
You can update the device drivers to the latest version and remove the unused device drivers.
The fixation of the QuickBooks error code 6176, 0 isn’t involve any rocket science. A few simple steps performed correctly will disappear the issue permanently. But, there can be situations where you confront the same problem even after completing the steps given above. In these situations, the only way to resolve the issue is to seek the advice of an expert or a professionals guide who have a deep knowledge of excellence.
You can connect with our executives using our helpline number : 1.800.761.1787, and ask our professionals team to fix the error on your behalf. Our experts are available round the clock to provide the best possible assistance to all users across the globe.
FAQs
Can a firewall or security software cause error code 6176?
Yes! A firewall or security software can potentially block QuickBooks from accessing the company file, leading to such error.
Is QuickBooks Error 6176 specific to a particular version of QuickBooks?
No! this error can be triggered in different versions of QuickBooks, which can include QuickBooks Pro, Premier, and Enterprise.
Can using a virtual environment or remote desktop connection trigger Error 6176?
Yes! Employing a virtual environment or remote desktop connection can trigger such issue. This can occur when the remote access configuration is set improperly.
Why does 6176 occur only in multi‑user mode?
Hosting or network permissions are often misconfigured, the QuickBooks Database Server Manager may not be serving the path correctly, or security software is blocking the connection between the workstation and the server.
Will QuickBooks File Doctor help to fix errors?
In many cases, yes. It can repair common data issues and refresh network configurations that block access to the company file path.
What if the company file is actually damaged?
You need to run the Verify/Rebuild utility first. If still the damage persists, then you can consider restoring from a recent backup or use Auto Data Recovery (ADR)..
Can damaged .ND/.TLG files cause 6176?
Yes. sometimes, corrupted .ND or .TLG files can block the access between company file and the QuickBooks. Renaming them to .ND.OLD and .TLG.OLD forces QuickBooks to recreate fresh connection pointers when the file is opened next.