Often QuickBooks users seem to be dicey about the process of opening a QuickBooks company file located on a remote computer. But need not to worry anymore, as performing certain steps can help you in accessing QuickBooks desktop company file from a server computer. This article is crafted with an aim to help you in opening a company files that is stored on the network without any sort of difficulty. So, for further information, make sure that you read the article carefully till the end.
Moreover, if you feel the need of professional assistance or any kind of technical assistance, then do not hesitate in speaking with our U.S based certified professionals. We provide round the clock assistance all across the globe.
Users are required to map server on host computer as a network drive to the individual workstations. The point to be noted here is that, in case of any trouble in mapping the network drive using UNC, you can try the same process by using the IP address of the server. Whereas, if nothing works, try contacting an IT professional.
Users are also required to set up computers that are supposed to access the files for multi-user mode.
Before you start with the process, you need to set the folder where the company file is located.
Steps to open a company file located on a remote computer in QuickBooks
This article will brief you with the steps to open a QuickBooks company file located on a remote server. Here are the steps along with the basic requirements for opening a company file located on a remote server.
Step 1: Installing QuickBooks database server manager on the remote system
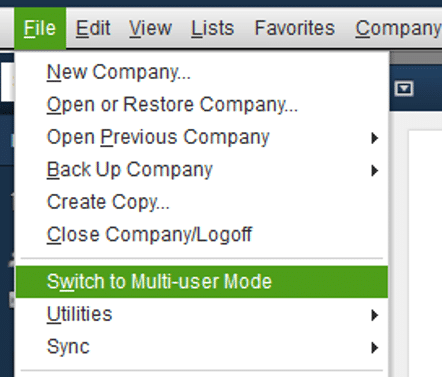
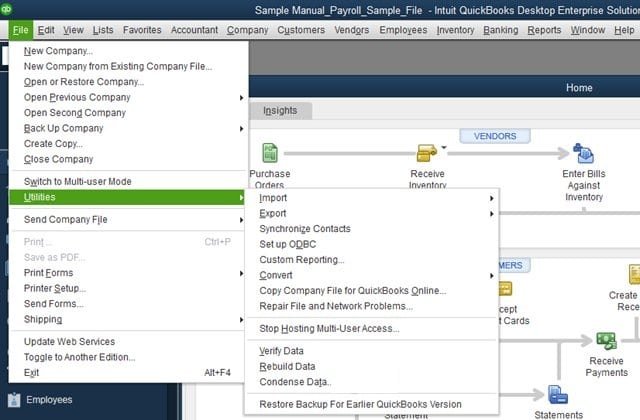
And then, opt for switch to multi-user mode from the QuickBooks file menu.
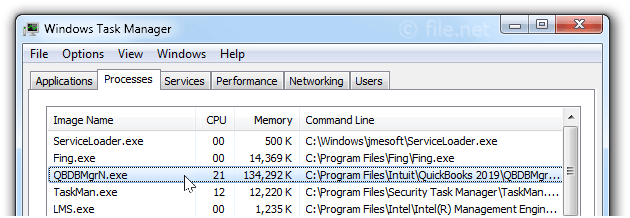
Next step in the process is to choose Yes in the multi-user hosting setup required window. The point to be noted here is that QuickBooks desktop installs and runs qbdbmgrn.exe as a background service. This service must be running on the computer storing the company file, especially in case when QuickBooks desktop is not open.
After that you are required to choose OK on the multi-user setup information window.
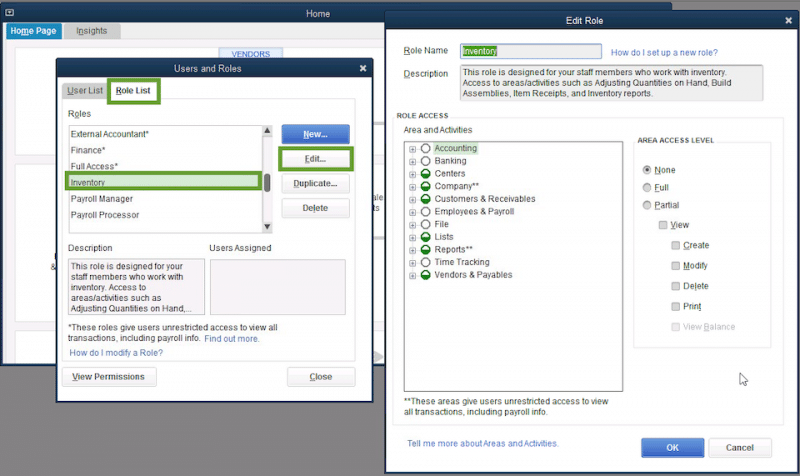
Towards the end, you are supposed to add necessary users by going to company options and then choosing users. Followed by opting for set up users and roles option.
Now end the process by selecting new.
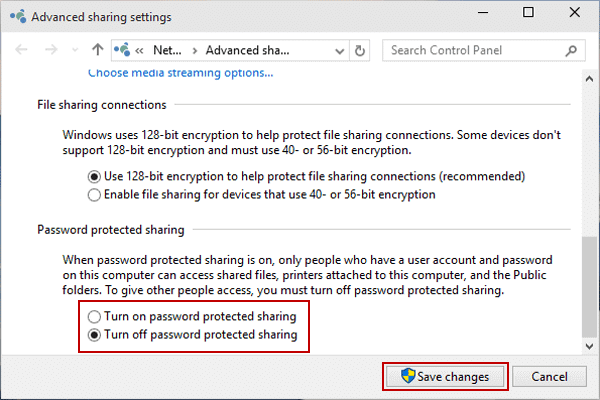
Step 2: Turning network discovery on and password protected sharing off (Optional)
This method is not mandatory, but the server needs to have network Discovery turned on and visible, to try opening the company file using a UNC path. Along with that, you will be asked for a network password by Windows, in case the password protected sharing is turned off. In such a scenario, you can either login using network password or turn off the feature.
Users are supposed to carry out this process on the server or host system and all the workstations required to access QuickBooks remotely over the network. The steps involved in this process are as follows:
First step, you are supposed to open control panel.
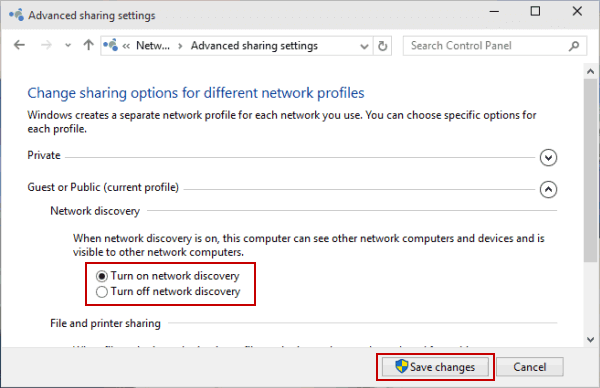
Select network and sharing center, followed by opting for change advanced sharing settings tab.
Expand the profile type that you are currently using.
Now select turn on network discovery under the network discovery option.
Next, you have to choose the turn off password protected sharing option under the password protected sharing tab.
In case you are experiencing difficulty in opening the company file located on a remote system even after carrying out the steps mentioned above, then in that case do not hesitate in connecting with our CPA's and accounting professionals. Our QB experts team will be available to assist you in one single call. They are available 24 hours a day to provide the best assistance to all users within the shortest possible time.
FAQ's
Can I open a QuickBooks company file located on a remote computer?
Yes! You can open a QuickBooks company file on a remote computer by using QuickBooks in a multi-user mode or through remote access function.
What is the multi-user mode in QuickBooks, and how does it help in opening a company file located on a remote computer?
The QuickBooks multi-user mode allows several users to access the same company file at the same time. By setting up the company file for multi-user access, you can access it from a remote computer which is connected to the same network as the host computer.
What if I need to open a QuickBooks company file located on a remote computer but don't have access to the network?
If you don't have direct network access, use the remote access solutions like VPN (Virtual Private Network) or Remote desktop applications for the same.
Can I simultaneously access the same QuickBooks company file from both the host computer and a remote computer?
No! QuickBooks allows only one user at a time to make changes to a company file.
When you try to update QuickBooks, several errors might annoy you. Getting update-related errors in QuickBooks is quite frequent nowadays, and these errors are easily fixable by applying a few simple methods. QuickBooks desktop update errors appear anytime while downloading the updates or switching to the new releases by Intuit. These errors often hinders the updating process, thereby leading to unnecessary delay and fuss. So, if you are also encountering any such issue, then you need not worry, as this article will assist you in uprooting the update errors. We are going to discuss the ways in which one can tackle these errors smoothly. So, stick to the article till the end.
Moreover, if you are sceptical about handling these errors on your own, then our professionals are there to assist you. Our U.S based diligent team of accounting experts is putting unprecedented efforts into making the QuickBooks software error-free for all users.
What are QuickBooks update errors?
Well, the QuickBooks update errors are usually seen when you try to update the QuickBooks desktop or downloading a latest release. You gets a reminder from the software itself, whenever a newer update is available. These errors pop up, when you try to download these updates and also hinders the process. In majority of the cases, the error messages are not seen, but you might get any kind of hindrance while updating the software. A few of the common update errors include:
The list doesn’t end over here, there can be many other errors as well. But need not to worry, as these errors can be fixed easily, by carrying out a few simple processes, which we will be discussing later on.
What triggers the QuickBooks update errors?
The causes of these errors are not many. We have tried to jot down a few of the common causes, due to which you might stumble upon the annoying update errors.
Poor internet connection is one of the major factors leading to these update errors.
Restrictive settings of personal Firewall or internet security can also be an active trigger to update errors.
There can be a few easy methods that can be implemented in order to tackle the update errors in QuickBooks. Let us explore the methods one by one:
Method 1: Access QuickBooks desktop as an admin
The QuickBooks Desktop update issue could appear if you don't have admin credentials to install the most recent version. To fix the problem, you must run QuickBooks as an administrator. This is how you do it:
Exit the QuickBooks Desktop.
Switch the computer off.
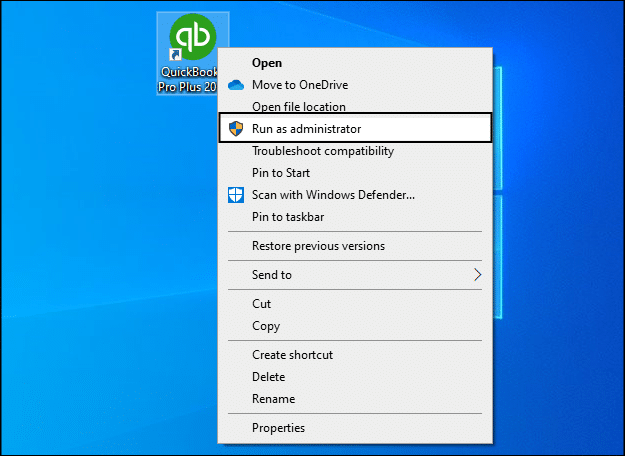
Find QuickBooks and use the right-click menu.
After that, choose Run as Administrator.
Continue to the following technique of mistake correction if the QuickBooks desktop updates error still exists.
Method 1: Configuring the Internet connection settings
In order to check the internet connection, you need to open a web browse and move to the chase banking page. If you are unable to open the page, then below mentioned steps can be carried out:
The very fast step is move to the Help menu and select the Internet connection setup.
Choose the use my computer’s internet connection settings to establish a connection when this application accesses the internet.
Once done with that, you need to hit a click on next option.
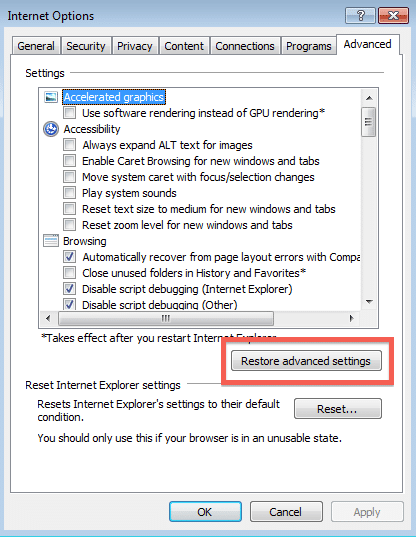
Move to the Advanced connection settings.
Next step in the process is to select the Restore advanced settings.
Click on Done.
The last step is to update the QuickBooks desktop software once again.
Important:
It should be noted that QuickBooks users who use a dial-up connection should ensure that the minimum internet speed they get shouldn't be less than 28.8 kilobytes per second.
Also, users who use America Online, log on to their AOL account with the master login id, in case possible, and you should ensure that the parental controls settings are disabled. Users also can refer to AOL's online support for more information.
Users who regularly use download accelerator should ensure that such software are not enabled while the QuickBooks updates are downloading. Or the software will interfere with the new QB updates.
Method 3: Verifying the system date and time
The steps to configure the system date and time are as under:
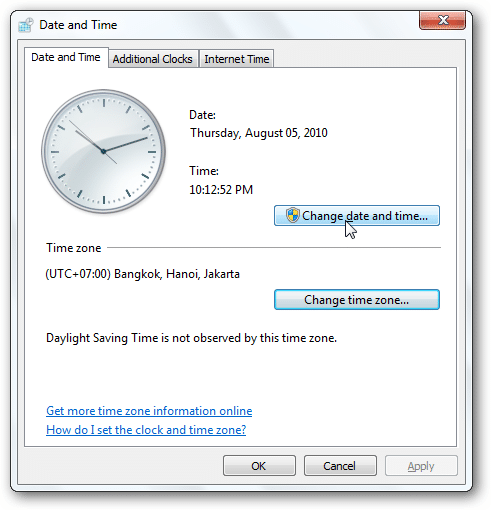
Hit a right-click on the System clock placed on the desktop screen and then opt for the Adjust date/time option.
Choose the Change date and time and also write the Current date and time.
Now hit a click on Ok twice.
Close and open the QuickBooks program again.
To end the process, run the update process of QuickBooks desktop again.
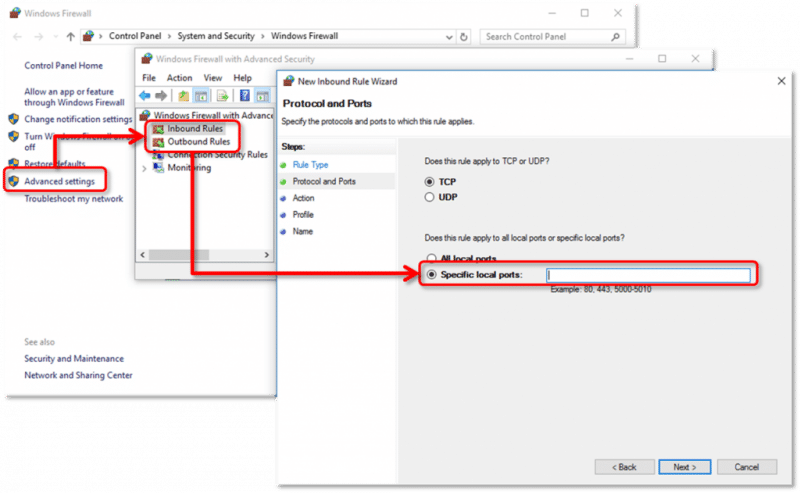
Method 4: Configuring the internet security or personal firewall application settings
At times, the internet security or firewall settings hinder the updates. This increases the demand for checking and verifying the configuration of the internet security and personal firewall software settings. The steps involved in the process are:
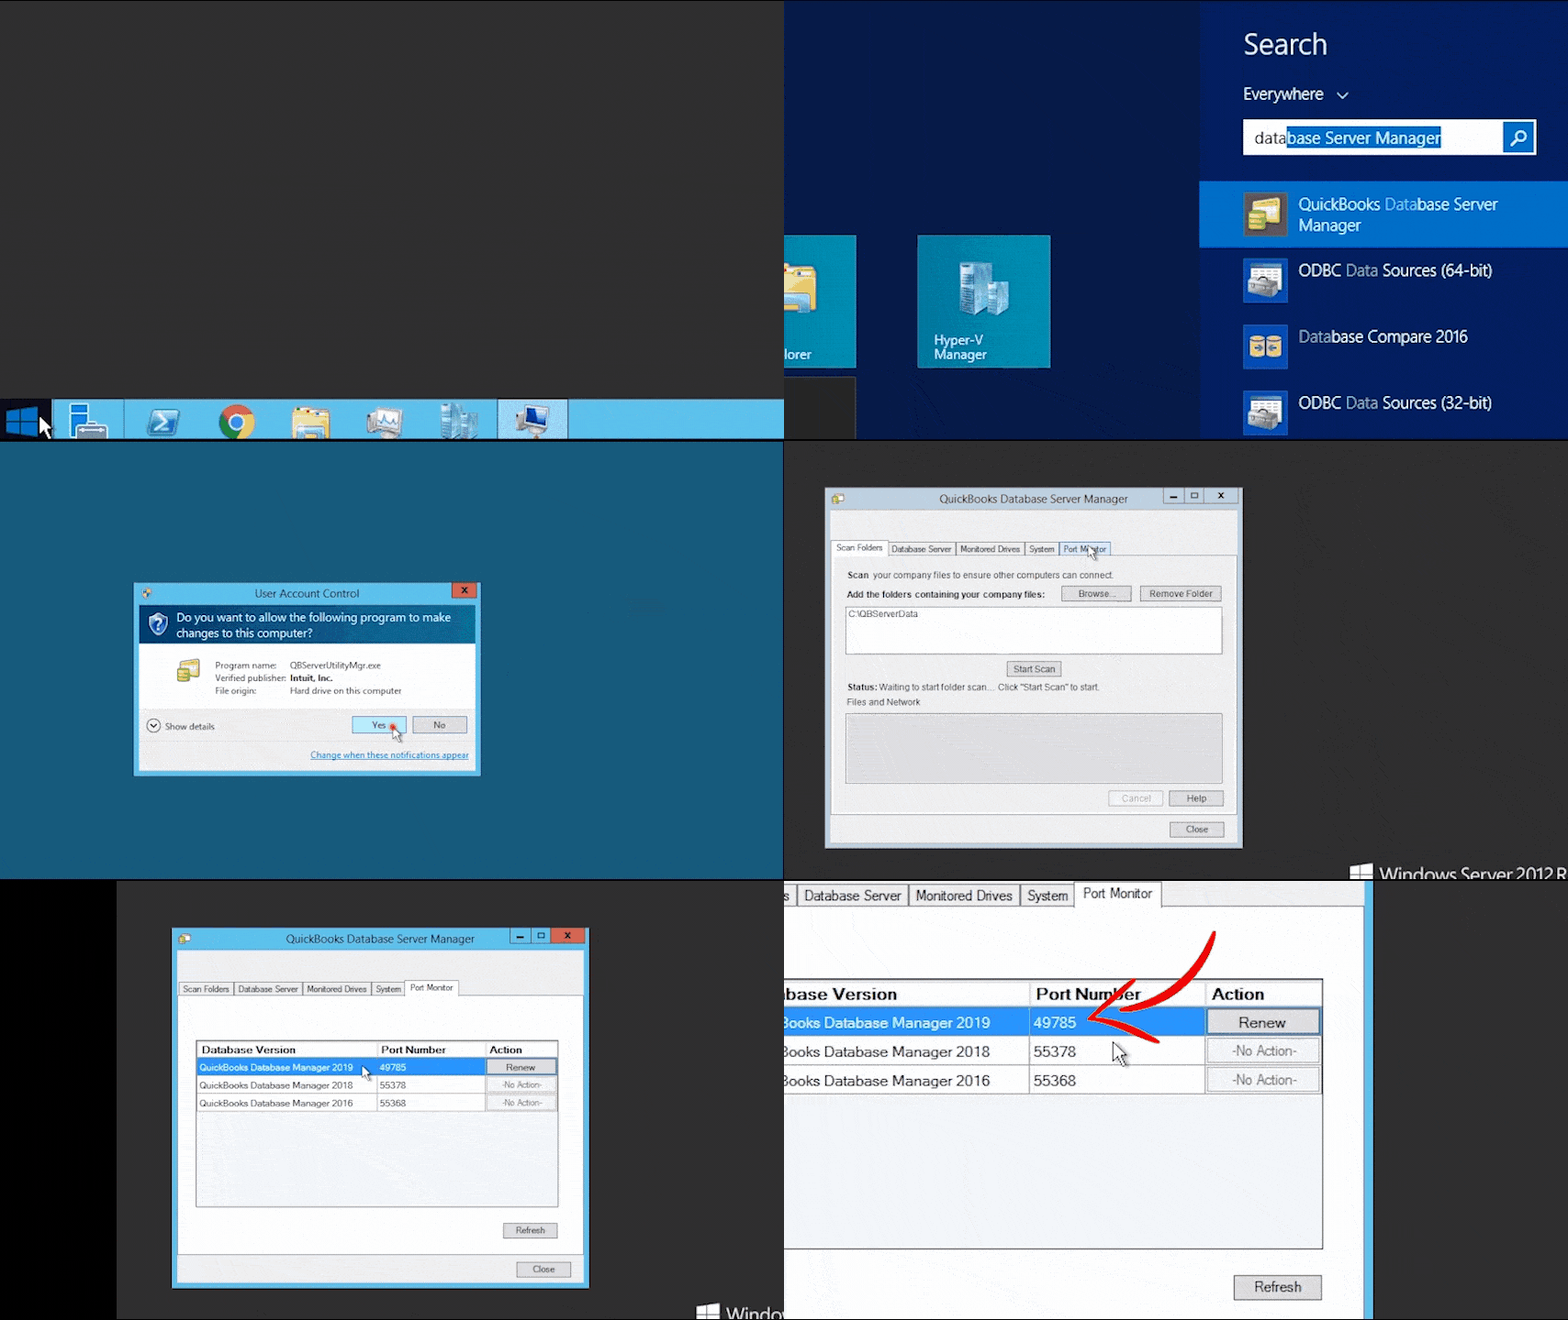
Click on the QuickBooks database server manager from the list and then choose the Port Monitor tab.
Note down the Port number of the version of QuickBooks desktop.
Now, hit click on the Start tab, and follow it up by searching for the Windows firewall.
Opt for the Windows firewall and hit click on the Advanced settings option.
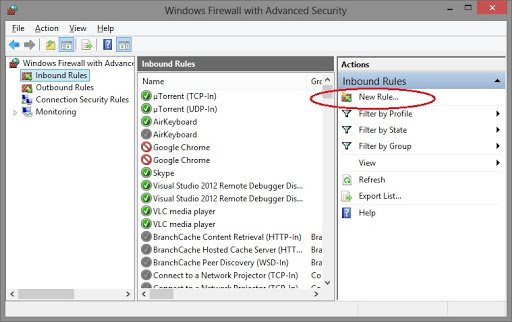
Right-click the Inbound rules option and then hit the New rule.
Now click on the Port option and hit Next tab.
Followed by enabling the TCP option.
Once done, checkmark the Specific local ports and enter the Port number.
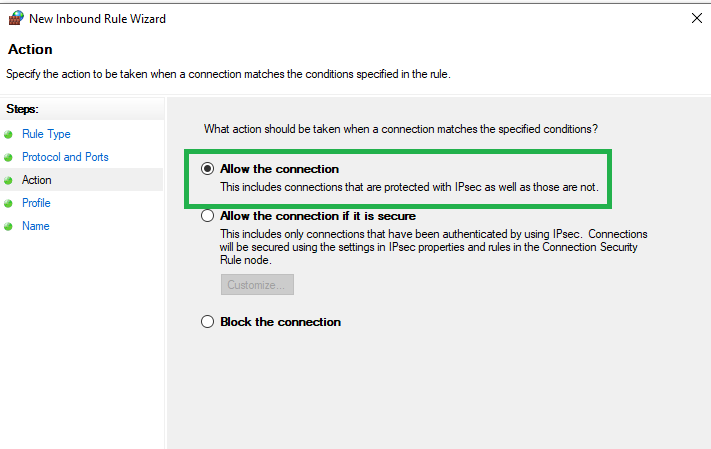
Now, click on Next and select Allow the connection.
Click on Next again and name the New rule.
To end the process, follow the same steps for Outbound rules.
Additional Steps
Enabling the ports 80 and 443 is a must.
Permit access to the below-listed files:
AutoBackupExe.exe
Dbmlsync.exe
DBManagerExe.exe
FileManagement.exe
FileMovementExe.exe
IntuitSyncManager.exe
QBCFMonitorService.exe
QBDBMgr.exe
QBDBMgrN.exe
QBGDSPlugin.exe
QuickBooksMessaging.exe
QBLaunch.exe
QBServerUtilityMgr.exe
QBW32.exe
In case all these ports are used by some other processes, the QuickBooks database server will use a fallback port, 56719.
Method 5: Multiple instances of QuickBooks desktop on same system
As we mentioned earlier, the QuickBooks update errors can occur if you are having more than one installing of QuickBooks desktop of the same version year installed on the same system (For example, QuickBooks Enterprise Solutions 19.0 and QuickBooks Premier 2019). In case this situation occurs, you need to download and install a manual update for one or more versions of QuickBooks desktop.
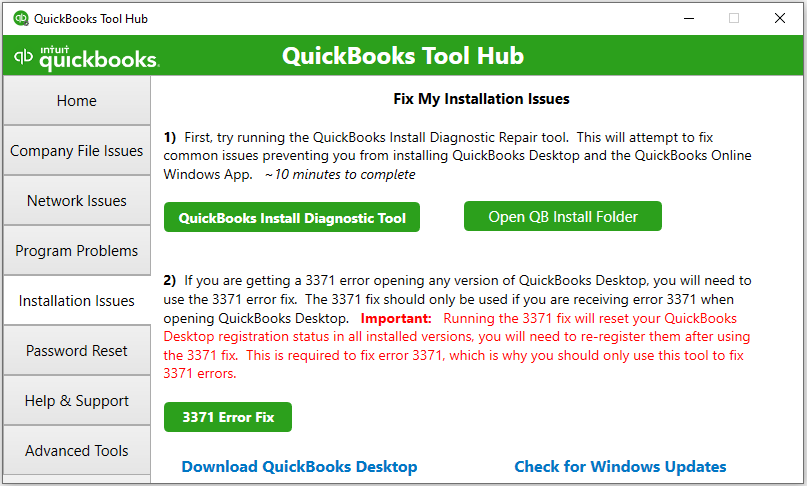
You can use the QuickBooks install diagnostic tool from QuickBooks Tool Hub to fix the problem if the installation files are to blame for the QuickBooks update error. These are the actions to take in order to do this:
Re-launch the QuickBooks Tool Hub.
In the tool hub, click the "Installation Issues" tab.
Select the "QuickBooks Install Diagnostic tool" after that.
The tool will start trying to fix the installation problems.
Restart your computer after the program has fixed the installation problems.
Fixing Error 15XXX When Downloading QuickBooks Desktop Updates
While updating QuickBooks desktop or payroll, you might receive an error with the number 15XXX as initials. These errors include:
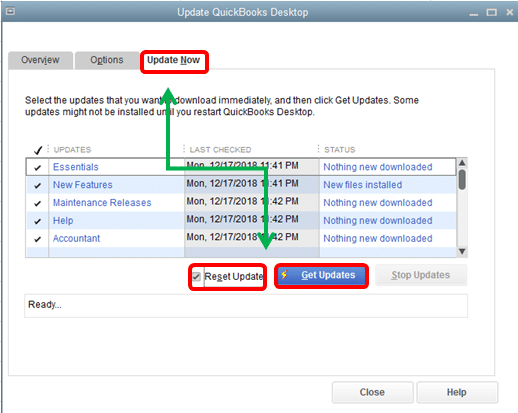
Visit the Update Now tab. Also, mark the Reset the updates checkbox.
The next step is to choose Get updates option to re-download the updates.
Once the download process is complete, close and re-open theQuickBooks software.
Conclude the process by hitting on Install now.
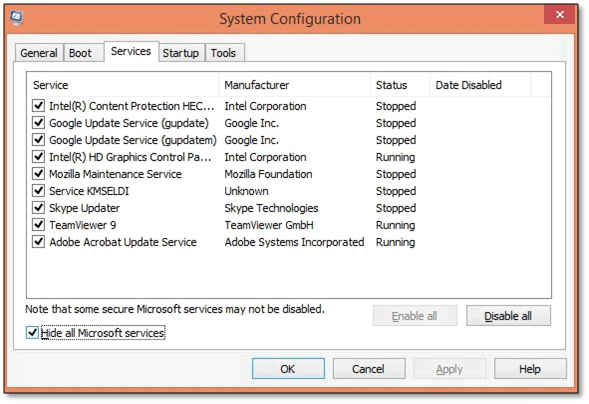
You can also verify and troubleshoot QuickBooks desktop Internet Explorer settings if the error persists. Also, you can Uninstall and Install QuickBooks desktop in selective startup mode.
Conclusion!
If the right approach is followed, the QuickBooks desktop update errors can be easily dealt with. Thus, following the above stated methods in a proper way can help you to get rid of the errors without any problem. However, if the confusion persists, consulting an expert from a reputed and renowned service provider can be the right decision. We, XpertBooks Pro has always been at the forefront of the QB related services and we do not leave any stone unturned to provide the best possible assistance to all our users. Simply schedule a call with our experts regarding your issue, as our executives hold the expertise in tackling all sorts of accounting errors and will help you in dealing with them.
FAQs
Can a firewall block QuickBooks Desktop updates?
Yes, a firewall can impede the QuickBooks Desktop updates. This is possible when the firewall settings are incorrectly configured.
Is it necessary to have administrator rights to resolve QuickBooks Desktop update errors?
Yes! Possessing administrator rights is a necessary prerequisite to resolve QB desktop update errors.
Can I skip a QuickBooks Desktop update if I am experiencing errors?
It's generally not recommended to bypass QuickBooks Desktop updates.
Facing QuickBooks error code 6175, 0 and confused about what’s causing it? You don’t have to panic — you’ve come to the right place. This error code pops up when you try to access the company file through the QuickBooks software. It primarily occurs due to misconfigured hosting settings, firewall blocks, or network conflicts that interfere with QuickBooks’ communication with the company file server.
Moreover, it also occurs when the QuickBooks software cannot read the database services. This article will provide a thorough insight into the causes and quick fixes to the QuickBooks error 6175, 0. If you are also troubled by this error, then make sure you read this article until the end.
You might see the following error message on your computer screen while using the QuickBooks desktop:
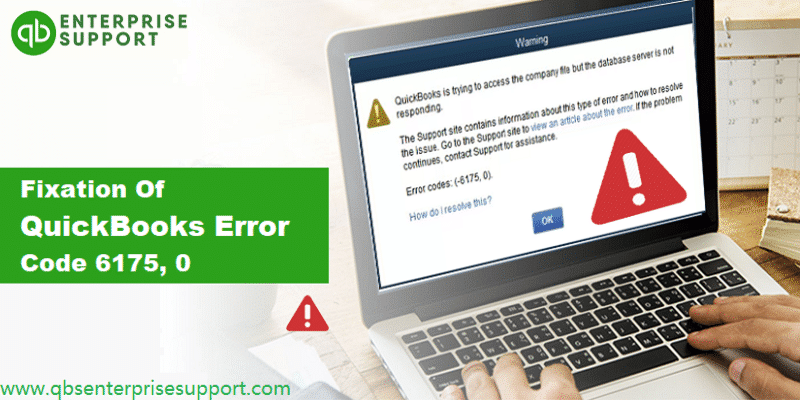
Warning
QuickBooks is trying to access the company file but the database server is not responding.
Error codes: (-6175, 0).
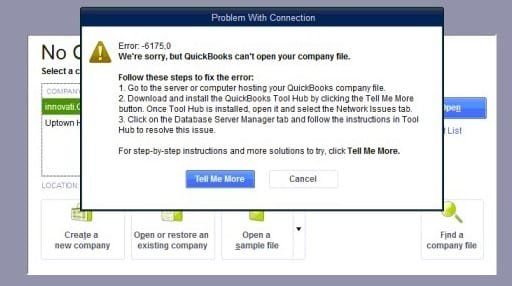
Problem With Connection
Error: -6175,0 - We're sorry, but QuickBooks Can't open your company file.
The QuickBooks error code 6175, 0 is usually seen when you access your company file. On the sideways, you observe that the QuickBooks database server manager is not responding. You might also face this problem if you try to host the QuickBooks company file for multi-user access. Another reason triggering this issue can be if the multi-user settings are misconfigured or if the firewall blocks the communication. To get further clarity on the causes and fixes of this error, make sure to scroll down carefully.
Triggers to the QuickBooks error code 6175, 0
There can be certain causes behind the occurrence of such an issue, out of which the most common ones are listed below:
The server hosting the company file may be busy.
Server hosting the company file may be busy.
Damaged or corrupted QuickBooks company file.
Presence of firewalls, content blockers, or related technical intricacy.
System generated the issue during the communication.
Also, if the database server manager is running in multi-user mode.
The software is unable to start the QuickBooks Database Service.
Also, if the database server manager is running in multi-user mode.
Signs and symptoms related to the QuickBooks error 6175,0
Identifying the QuickBooks database error code 6175, 0 becomes easy with the signs and symptoms enlisted below.
The very first sign can be if you are unable to access the company file.
You should keep a point in mind that one or more of the systems might be set as the server for QuickBooks and the workstations can be in multi-user mode. But the server should be the only system that is set to host the mode.
You need to check the Windows user settings. Or add QBDataServiceUser as a user with the admin rights.
At first, open the QuickBooks desktop software on any of the workstations.
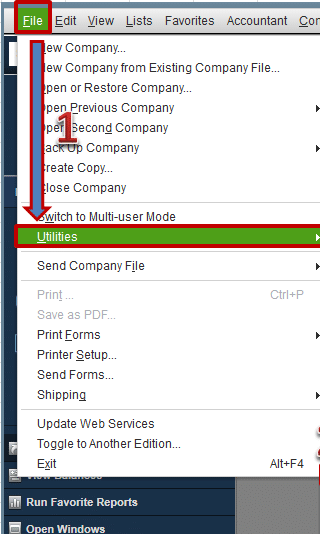
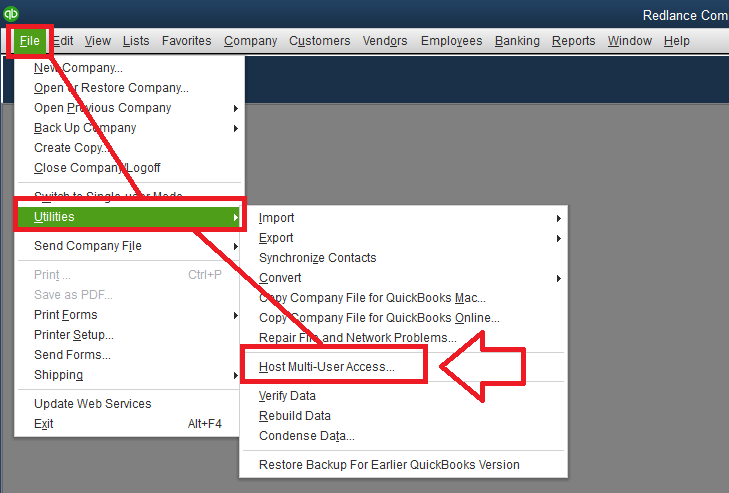
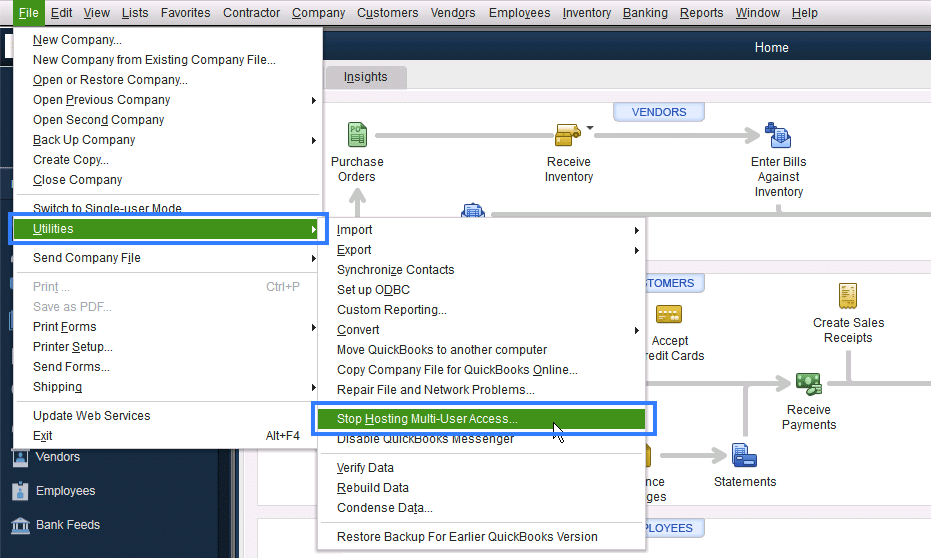
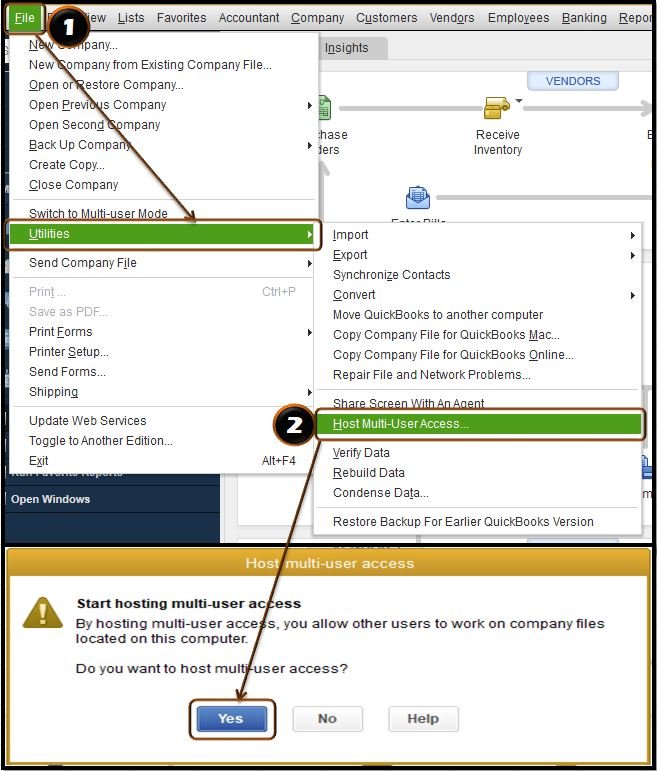
Move to the File menu and also choose to Utilities tab.
Hit on the Host multi-user access option from the utility.
Next, click on Yes tab.
Click on Yes after the message states the company file must be closed appears on the screen.
Hit OK on the window for Multi-user setup information.
The concluding step is to check if you are able to Switch to the multi-user mode.
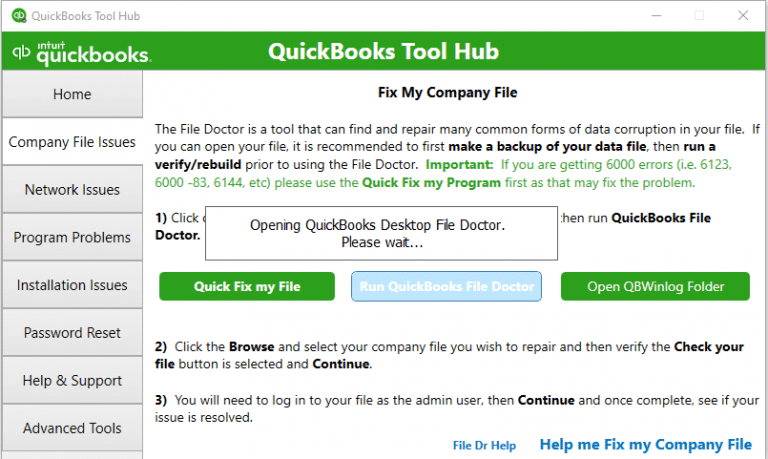
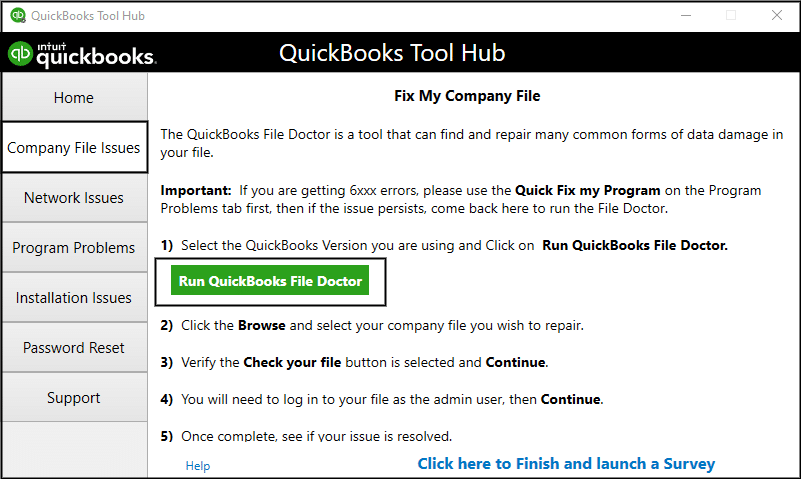
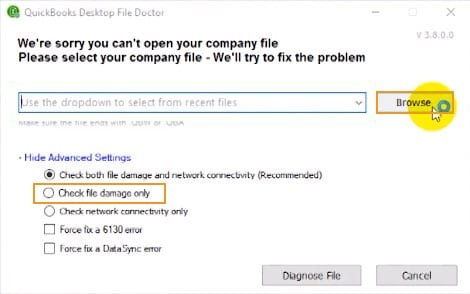
Method 7: Run QuickBooks file doctor tool from tool hub program
The QuickBooks file doctor tool can be of great assistance when it comes to fixing any sort of QuickBooks-related issues such as company file issues, multi-user related errors, etc. You can carry out the steps below to make the best use of the file doctor tool:
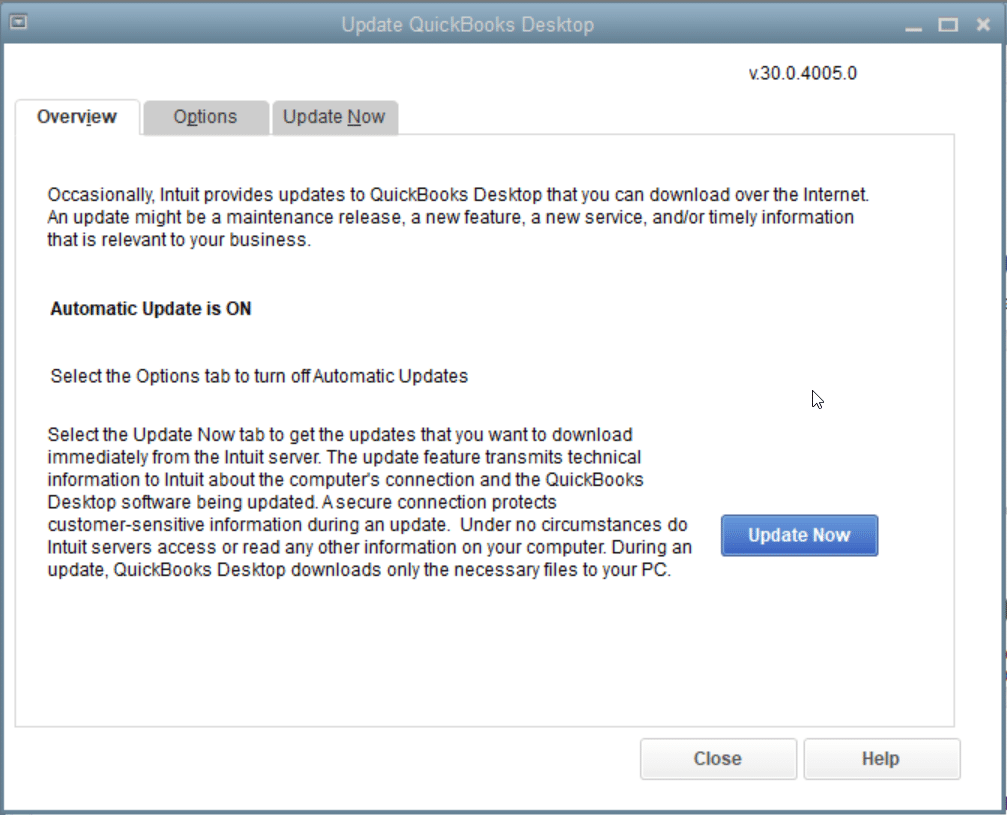
Updating QuickBooks Desktop to the latest version is deemed necessary. This is because every update comes up with up-to-date features and functionalities missing in the previous versions. As such, it also uproots innumerable bugs and technical snags existing previously. Follow the steps below to update QuickBooks Desktop software:
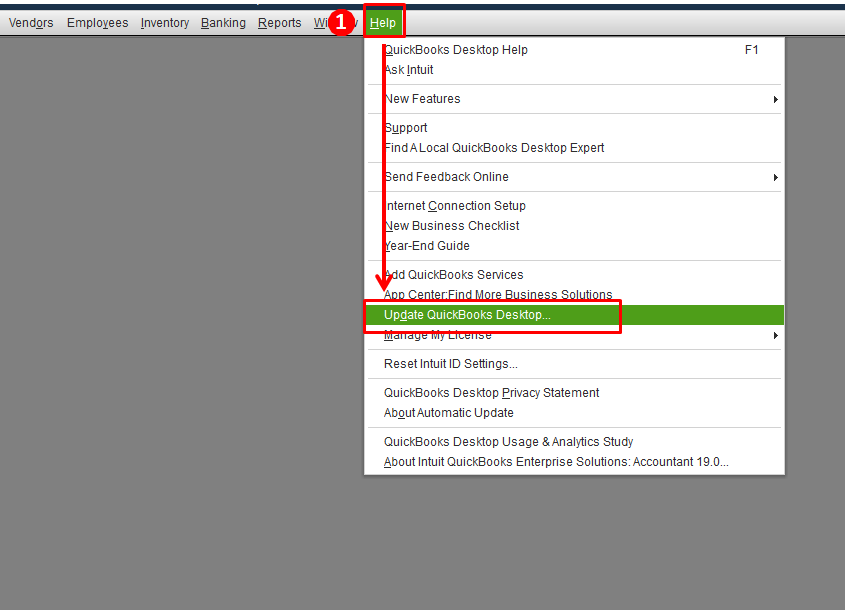
At first, launch the QuickBooks Desktop software
Visit to the Help tab, followed by Update QuickBooks Desktop.
After that, hit on Update Now option.
Also click on Get Updates.
The update process may take some time to conclude, depending on your internet connection and speed.
Once done, open your QuickBooks software and check the error is solved.
Method 9: Terminate the QB related processes
Press Ctrl + Shift + Esc keys to open the Task Manager
After that, select the Processes tab
Now end all instances of the "qbdbmgrn.exe" process by clicking on End task..
We are hopeful that the above-illustrated measures for rectifying the QuickBooks error 6175, 0 proved useful to you. However, if you continue to face the same issue or other relevant snag, then without any second thought, reach out to our XpertBooks Pro Experts. Our team of QB specialists will assist you instantly and will make sure that the error gets ousted. Our professionals can be contacted 24/7 in a day.
FAQs
What QuickBooks Error Code 6175 0 implies?
This is a technical error when you try to open the Company file.
What causes 6XXX series of errors?
The main causes include busy server, Firewall issue, QuickBooks database manager error, etc.
How do I fix error code 6175 in QuickBooks?
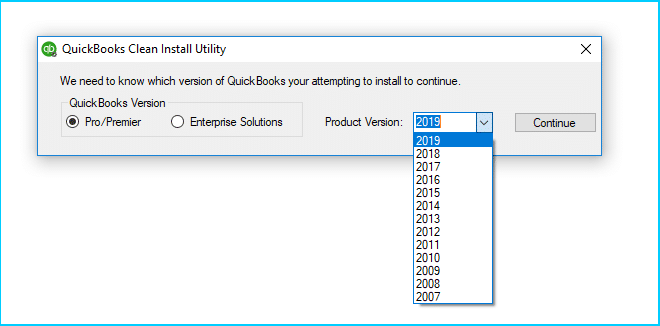
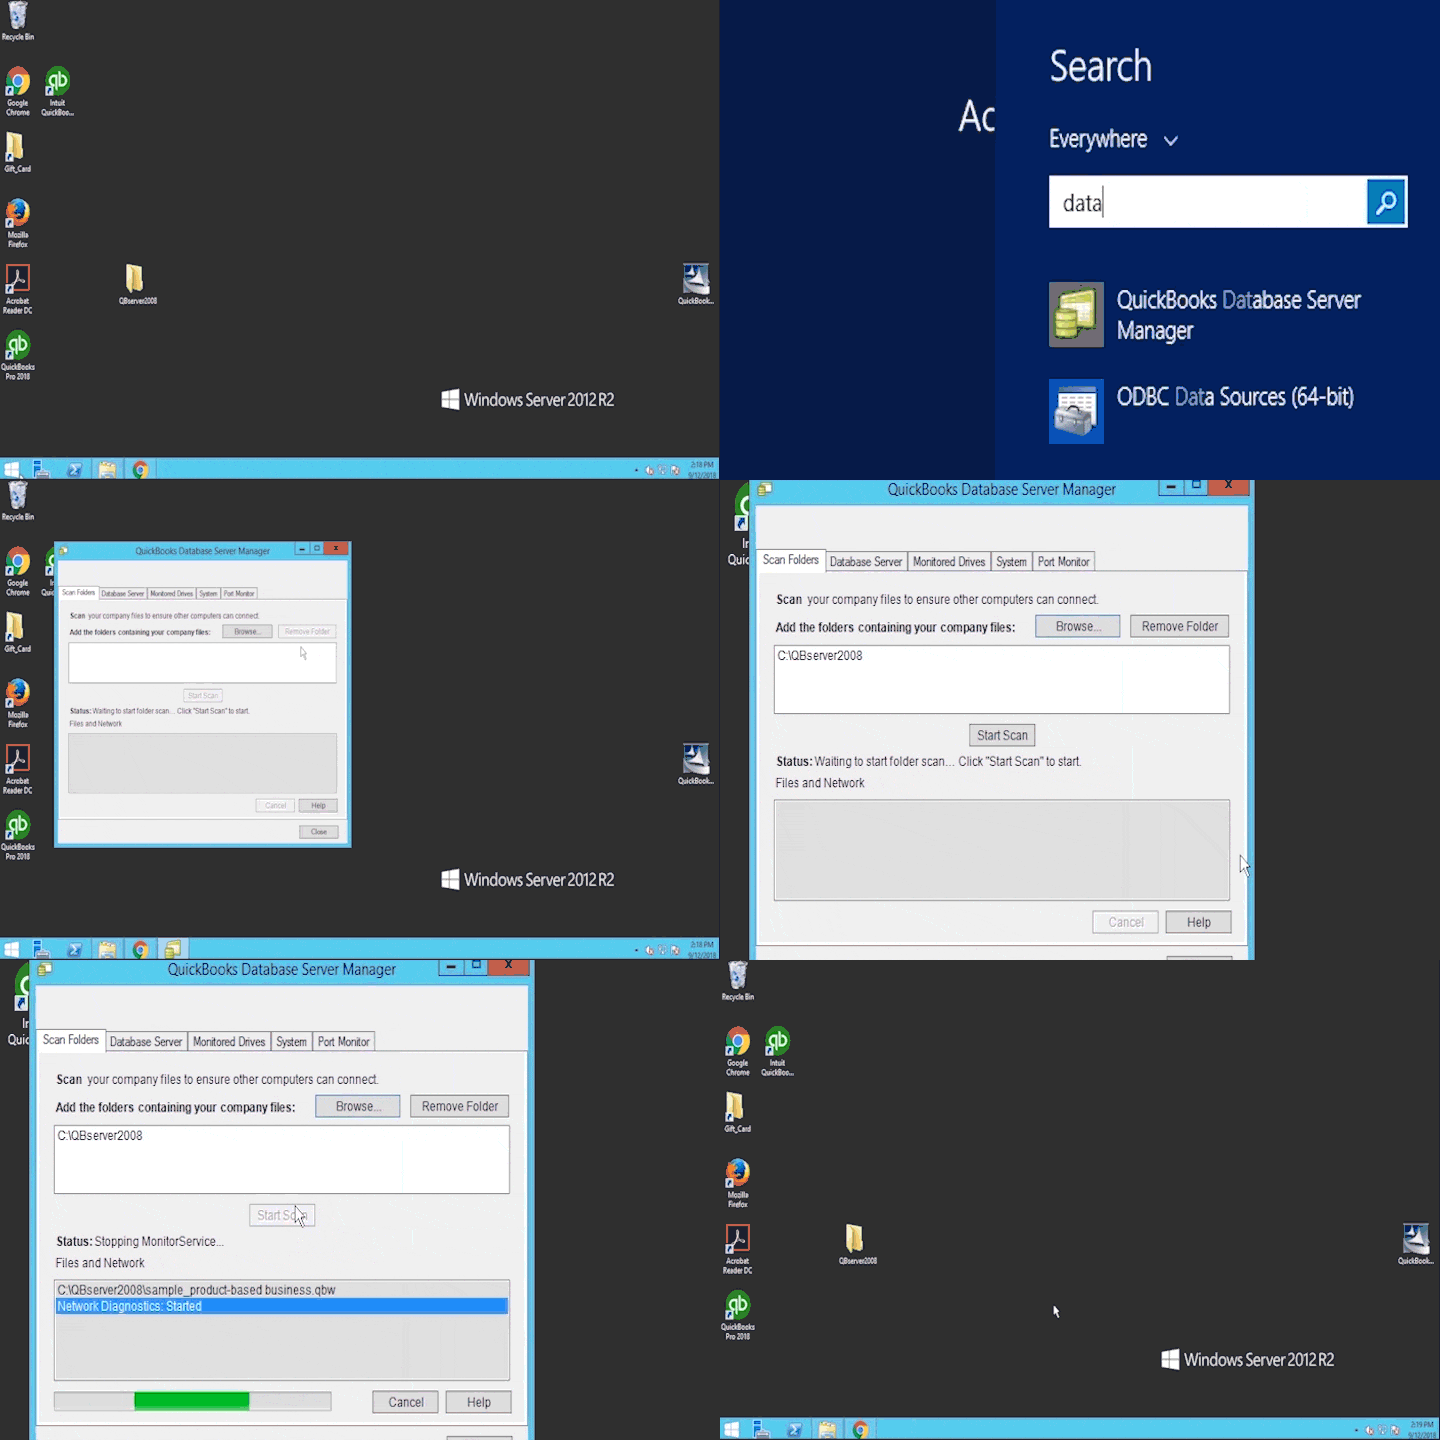
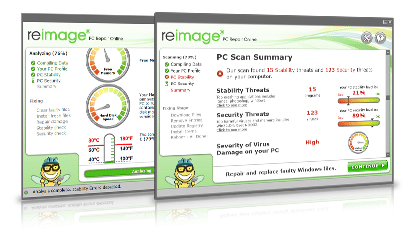
You can fix this errors by Clean Installing QuickBooks, Configure QuickBooks Server Manager, Use Reimage Repair Tool, Configure hosting settings and Run the QuickBooks File Doctor.
Are you looking for an easy ways to set up QuickBooks Desktop to work from home and office? Well, in this situation majority of the people are working from home, and the most significant problem they face is setting up their QuickBooks desktop remotely so that they can work from home. However, you need not fret, as through this post, we will be talking about the steps required to set up QuickBooks desktop to work from home. Accessing the company file would be easy once you carry out the required process. You can read this article ahead and find out and learn the step-by-step process to set up the QuickBooks desktop to work remotely or from your home. However, you can also get in touch with our dedicated support team in case of any required technical assistance. Our professionals will ensure to provide the highest possible and quality services.
Steps to Set Up your QuickBooks company file so you can access it from anywhere
There are 4 options that can help you to access your QuickBooks desktop and company file from anywhere:
Option 1: Moving or installing QuickBooks on another system
The very first option is to move or install QuickBooks on another system. We have made it easy for you to move or reinstall the QuickBooks to another system. In case you prefer to install QuickBooks on the home system versus the office, the below steps should be opted:
You need to Move or reinstall QuickBooks desktop to another system using the Migrator tool.
On the old system
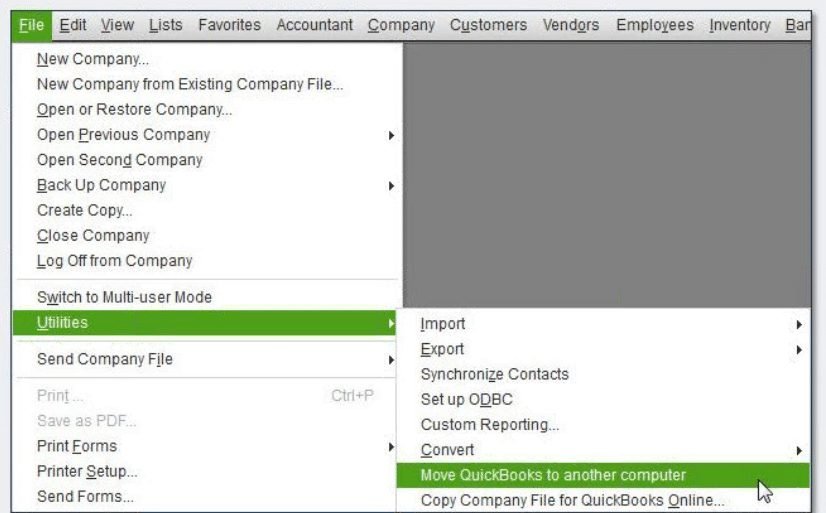
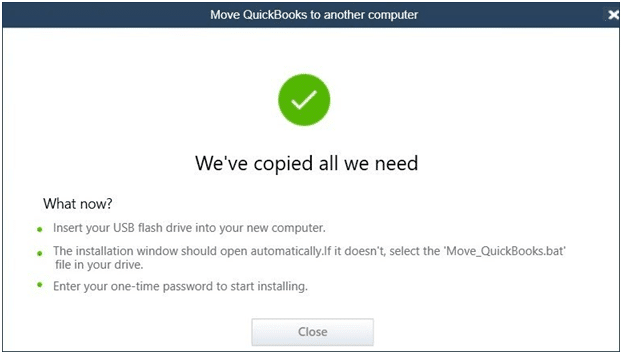
Firstly, move to the File menu from QuickBooks and select Utilities tab and also choose Move QuickBooks to another system.
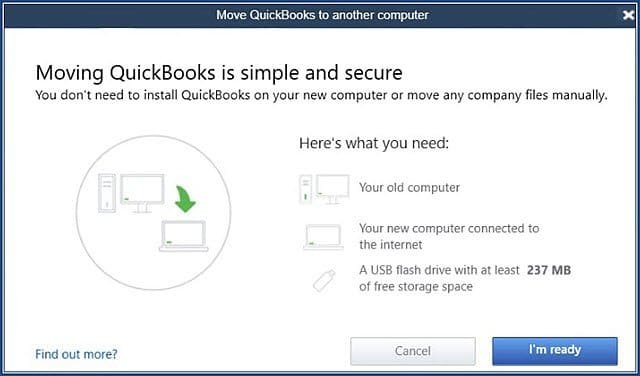
After that, select I'm ready.
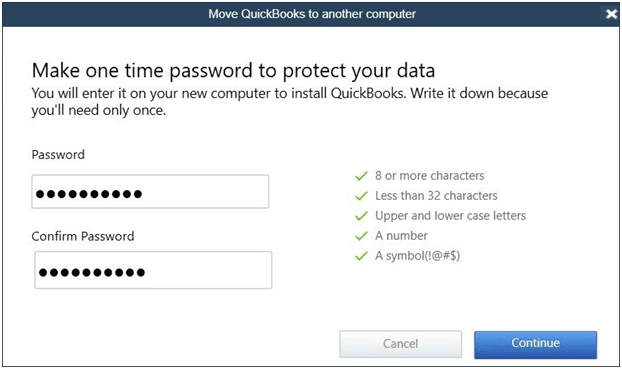
And then create a One-time password.
Also follow the on-screen prompts to select the USB flash drive that will be used and then wait for the files to be copied.
On the new system
In this, you need to insert the USB flash drive. Due to Windows security restrictions, the migrator tool won't automatically launch.
Then open the flash drive to view its files and then double click the file Move_QuickBooks.bat to start the migrator.
After that, Enter the password that has been created and then select the Let's go tab.
Now wait for the Migrator tool to finish.
And then Move the company files to another system.
Under this, step ensure to install QuickBooks desktop on the new system.
After saving the backup file, assign it a unique name, so it becomes easy to identify. This will also prevent accidental overwrites.
Now save the backup company to the new system. You can either put the backup on a flash drive or an external device. Or you can share it if the system is on the same network.
The final step is to Install and setup QuickBooks Desktop for Mac.
Option 2: Setting up or opening a company file from the remote server
In order to access the QuickBooks desktop product and data file stored at a different location, you might require a hosting service. You can store the QuickBooks product and data file on a service provider’s servers. This permits you to use QuickBooks securely, anywhere and anytime. As long as you are having access to the internet, you can use a remote desktop connection.
Option 3: Setting up or opening a company file from a remote system
For accessing the QuickBooks desktop data file stored at a different location, you might require a designated client system. You can also install the QuickBooks product on more than one system, but only one system can access the data file at one time. Carry out a couple of steps to access the data file remotely:
Step 1: You can open a company file located on the remote system
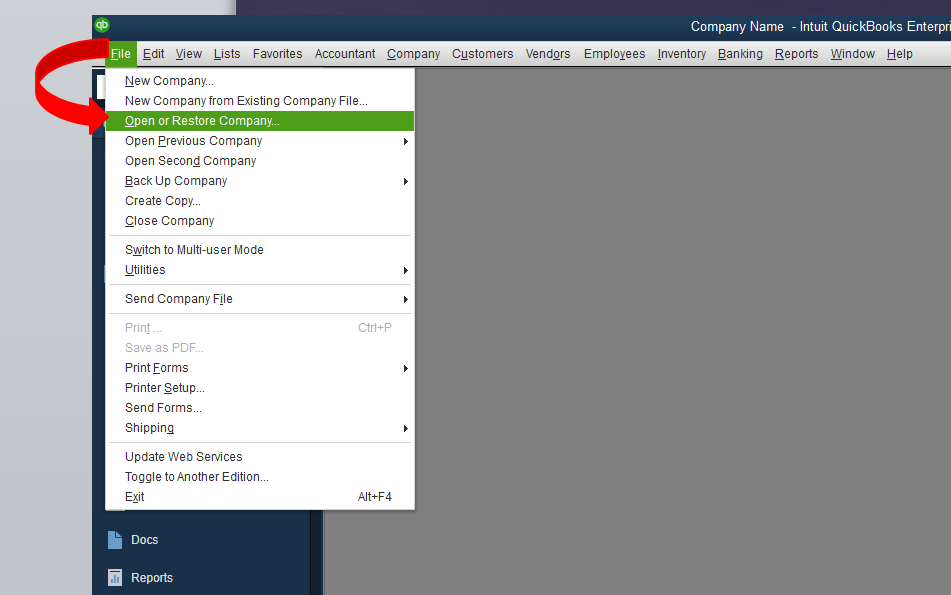
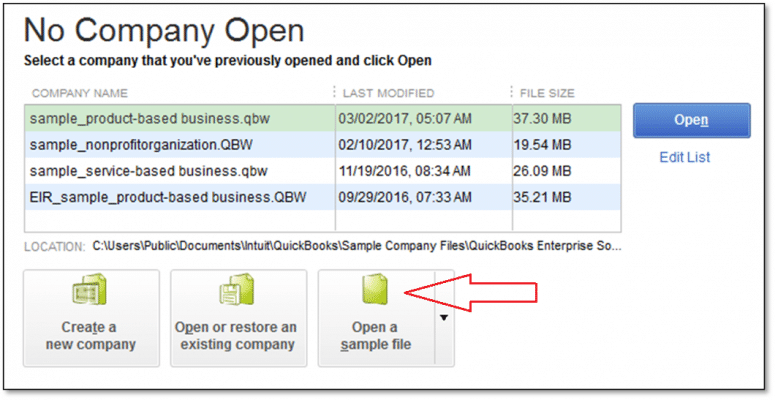
From the File menu, choose Open or Restore Company
Furthermore, choose Open a company file and also select the Next tab.
You now have to Browse the location of the company file.
In case the company file is mapped to Drive E, then look for the company files name in the list.
And further, choose the company file from the list and also select the Open tab.
Enter the User name and password.
Step 2: And installing QuickBooks database server manager
When QuickBooks asks to select an Install type, go for Custom or network options.
And also, choose the Next tab and avoid selecting the Express tab.
You now have to choose the best opt for the Network setup and select the Next tab.
Both options can install the database server manager.
In case QuickBooks desktop is already installed on the server system, then this would not overwrite the existing company data.
In case you wish the database server manager and QuickBooks desktop on the server system, then choose I'll be using QuickBooks desktop on this system, and I'll be storing.... We strongly suggest this option.
If you want the database server manager on the server system, then choose I will not be using QuickBooks desktop.
Pay heed to the on-screen prompts. When done, choose the Install tab.
Step 3: You can also map a network drive in Windows
Step 4: And check the recommended networks for QuickBooks
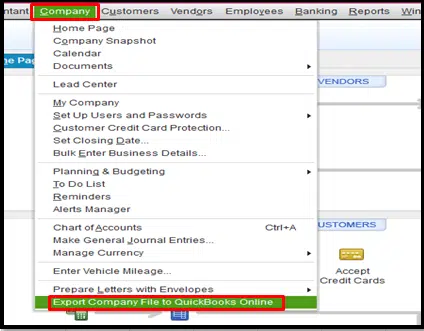
Option 4: Switching the QuickBooks desktop to QuickBooks online
We have tried to summarize the entire process to set up QuickBooks to work from home. However, if you are stuck somewhere, then feel free to contact our XpertBooks Pro consulting team by means of our helpline i.e. 1.800.761.1787. Our professionals will be happy to help you and will come up with the best possible accounting solutions for you.
FAQs
Is a separate license required for QuickBooks in order to work from home?
No! The same office license can be used in the work-from-home mode as well.
What is network sharing and how to set it?
Network sharing allows several computer systems on a single network to allow them to get access to the company file. This mandates turning on the network sharing on the office computer and subsequently connecting to it on the home computer.
Can the firewall on my home computer cause a problem in QuickBooks?
A firewall can trigger technical hindrances between QuickBooks and the network. If the firewall is enabled, the user should configure it for allowing QuickBooks to access the network.
Can I use a cloud-based file sharing service to access my company file from home?
Yes! You have the feature to employ a cloud-based file-sharing service for accessing the company file from home.
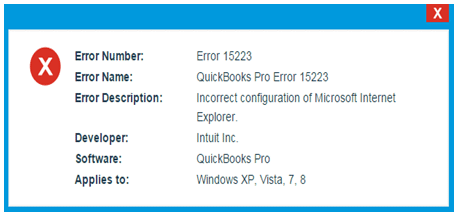
Is your QuickBooks desktop suddenly crashed into QuickBooks payroll error 15223 and can't come up with an ideal solution to chuck off the issue? Well, not to worry at all, It is one of the update-related errors that usually occur while updating QuickBooks desktop or while downloading a payroll update or when QuickBooks fails to connect with the server due to Internet Explorer settings, SSL certificate misconfiguration or security restrictions.
As QuickBooks program relies on Internet Explorer to create a secure connections, and if any issue with the IE settings or digital signatures, it can can block updates and triggering such errors. In order to technically rectify such type of errors, this segment is crafted by our industries best accounting experts. Moreover, this error might come up when there is any sort of error with the Windows registry. You might see a warning message that says:
Error
Description
Error 15223:
The QuickBooks Desktop update did not complete successfully.
Error 15223:
Cannot connect to QuickBooks Desktop Payroll.
There can be other facts related to error code 15223 in QuickBooks, which we will be mentioning later in this article. Just in case you do not wish to manually fix the error, then connecting with our tech geeks is highly recommended. Our certified ProAdvisors, will provide you with immediate assistance and will fix the issue for you in no time.
What are possible causes for QuickBooks error code 15223?
You can end up in the payroll update error 15223 in QuickBooks, due to the below mentioned factors:
QuickBooks related files are deleted mistakenly by any of the programs.
There is many damaged windows registry files.
In case of corrupted or damaged Windows or QuickBooks desktop files.
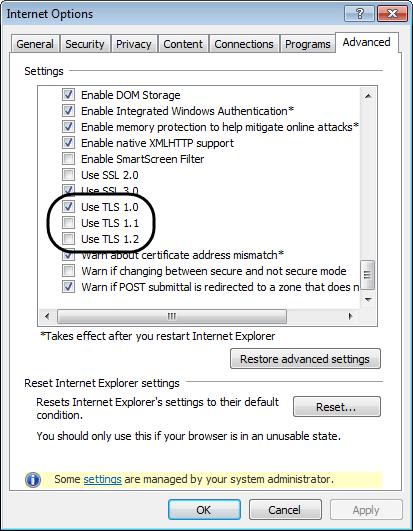
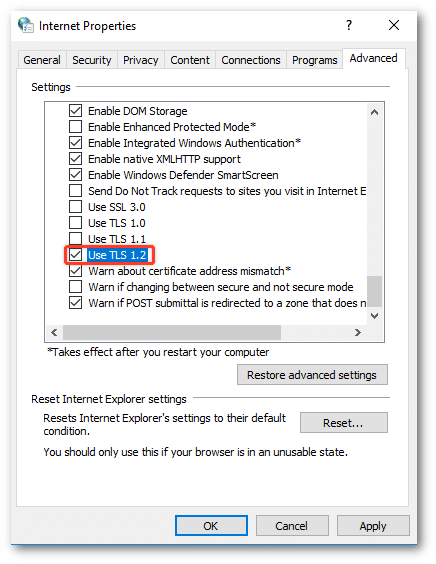
Incorrect Internet Explorer configuration.
You Internet Explorer digital signature requires an update.
Methods to Troubleshoot the QuickBooks Error 15223
Here is a guide to resolve the QuickBooks error code 15223 - while updating or downloading a payroll update successfully. Let us explore each of the methods one by one:
Method 1: Install or uninstall QuickBooks in selective startup
The very first method to fix such error can be to register the .DLL files. The steps involved in this process are as follows:
First step is to press Apply and hit OK to leave the window.
You will have to register the first file with the help of the below steps:
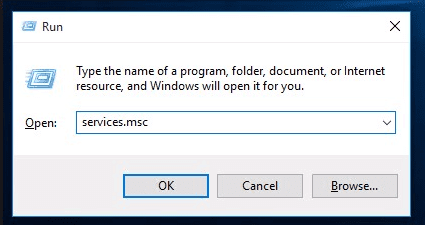
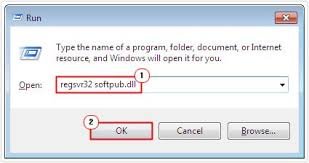
This can be done by pressing Windows Start or Windows Icon + R keys and then moving to the Run tab.
Copy the regsvr32/s% systemroot/system32/softpub.dll.
Paste this in the open field and also hit the OK tab.
If you don’t receive any message, the file was registered successfully. If you receive a message, ensure that you have copied the register file exactly as it appears.
Next, again press Windows + Rkeys to open Run command on your keyboard, then copy the following code: regsvr32 /s %SystemRoot%\system32\WinTrust.dll.
Now you will not get any messages.
Towards the end, Verify and ensure to copy the register file the same way.
Registering the second file
You can register the second file by pressing Windows.
Copy the regsvr32/s% systemroot/system32/wintrust.dll.
After that, Paste in the open field and then click on OK tab.
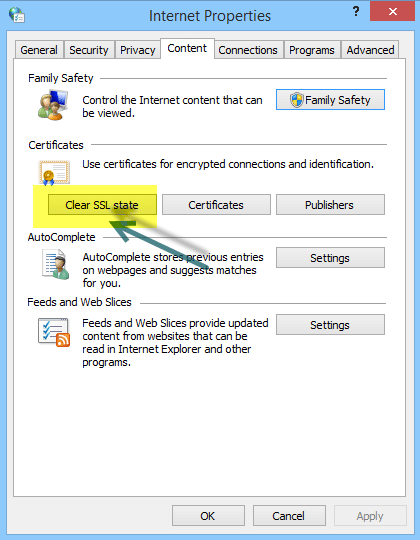
Now you need to Clear IE SSL state.
Also, open the Internet Explorer again.
You will then have to select the Tools and the Internet option and hit Content.
Next step is to press Clear SSL.
Also, reboot the system and open the QuickBooks desktop to download the tax table update.
Conclude the process by configuring the firewall.
Method 4: Clear the Internet SSL state
Another method can be to remove the Internet SSL state. The steps involved in this process are as follows:
First of all, open the Internet Explorer browser.
Go for the Tools and the Internet options and also the Content tab.
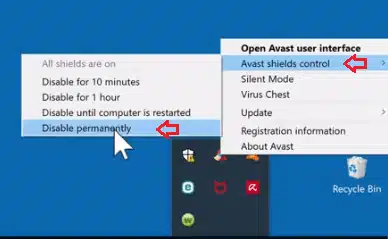
Method 6: Temporarily turning off the antivirus protection
Just in case the foregoing method of firewall configuration doesn't work out, then users are advised to temporarily disable their antivirus protection by right-clicking the Antivirus icon on the taskbar, followed by choosing the opt that relates to Disabling the antivirus protection. Likewise, firewall protection should also be disabled. Now, the user should re-attempt logging into QuickBooks to examine if the error got under control.
FAQs
What are the errors in QuickBooks Error 15xxx series of error codes?
Various error codes belonging to the family of Error 15xxx include QuickBooks Error 15204, QB Error 152155, Error code 15311, QB Error 15317, QuickBooks Error 15101, etc.
What tools can fix QuickBooks Error 15223?
These tools include QuickBooks Install Diagnostic Tool, QuickBooks Fix My program, QuickBooks File Doctor, including others are some common tools to fix such issue.
Can outdated QuickBooks cause Error 15223?
Yes, using an older version of QuickBooks Desktop can prevent payroll updates, triggering this error. Always keep QuickBooks and payroll updated.
Will restarting my computer can help to fix this error?
Sometimes. Restarting can refresh network settings and services, which may fix temporary connection issues causing the error.
Do I need professional help to fix this error?
Not always. Many fixes are user-friendly, but if the error persists, contacting QuickBooks ProAdvisors or QuickBooks help team ensures quick and safe resolution.
Conclusive lines..!
Once you follow the above steps carefully, you might successfully fix the QuickBooks error code 15223. But, if by any chance you continue to end up into the same error, then feel free to call us at any point of time to our error handling experts team. Feel relaxed and have a cup of tea and let our professionals help you to resolve this issue for you.