Want to update your state unemployment insurance rate? Well, talking about the SUI rate, your state sets the same and it is unique to your business. In case you are a new employer, then your state will assign you a new employer rate till the time you file unemployment taxes of a certain period of time. In order to update your State Unemployment Insurance Rate in your QuickBooks online payroll or QuickBooks desktop payroll, then reading this informative article till the end will definitely work.
Why you need to update State Unemployment Insurance?
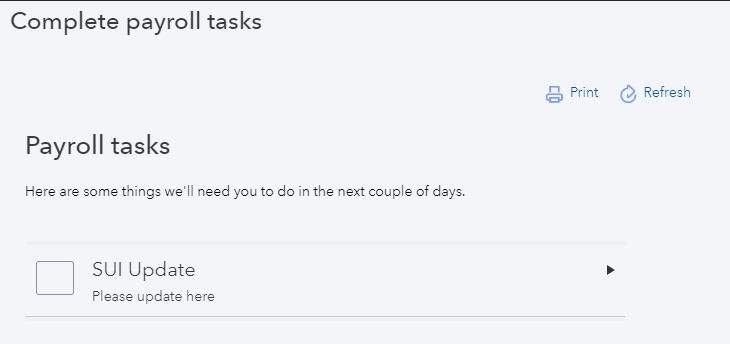
Each time the SUI rate changes, you will have to update it in your payroll, simply to keep the SUI tax liability accurate. It should be noted that, state unemployment insurance is only paid by the employer, unless the state is AK, NJ, or PA that needs the employees to contribute. Usually, the state sends out the accurate and updated rate notices towards the end of the year, or even at the beginning of the new year. After you have received your SUI rate, you simply have to update it by performing the right steps.
Steps to Update State Unemployment Insurance SUI Rate in QuickBooks
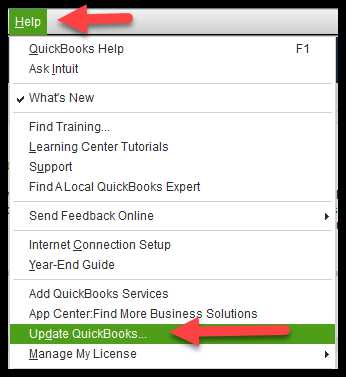
The steps to update SUI rate in QuickBooks vary for QuickBooks online payroll and QuickBooks desktop payroll. Thus, make sure that you apply the steps accordingly. Steps to update state unemployment are as follows:
QuickBooks Online Payroll
To begin with, you will have to sign in to QuickBooks online.
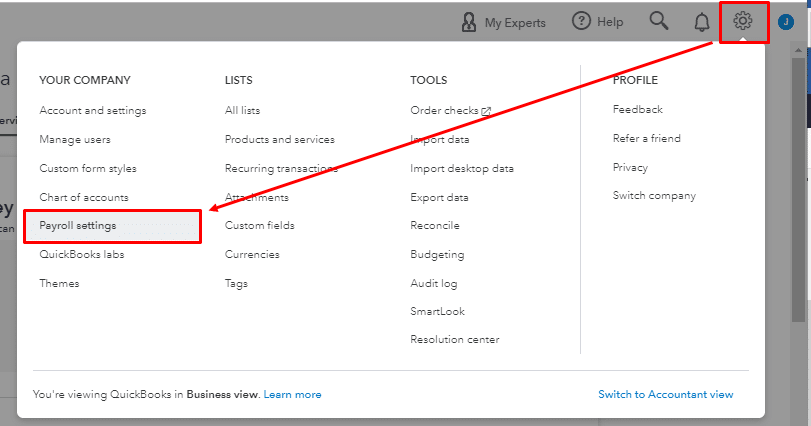
Furthermore, you need to proceed with the Settings tab.
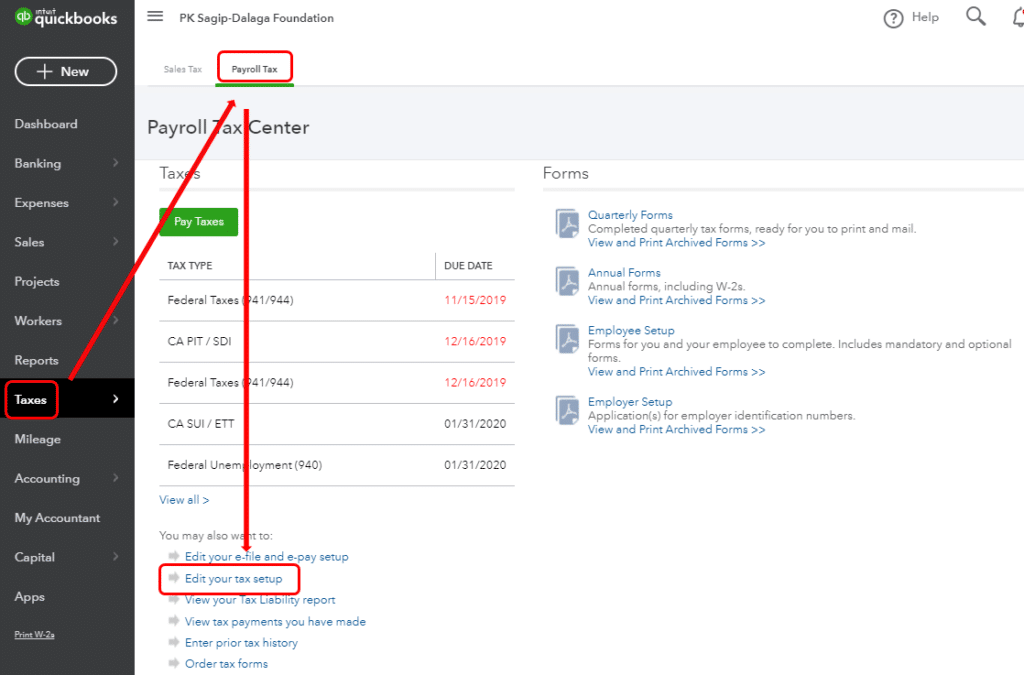
Go for the Payroll settings.
And also choose Edit for the state you want to update.
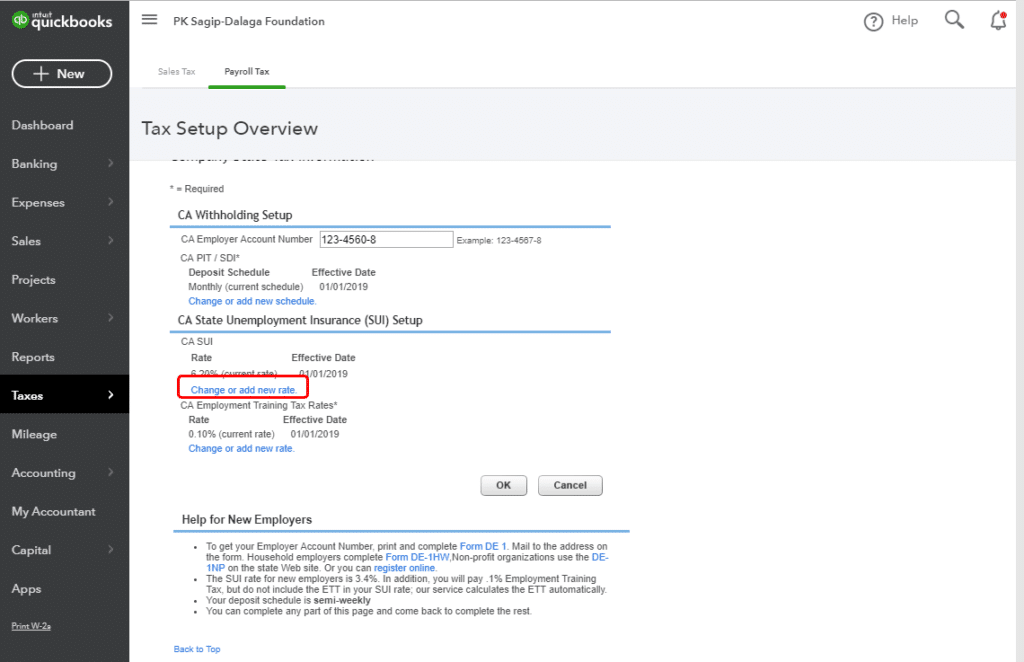
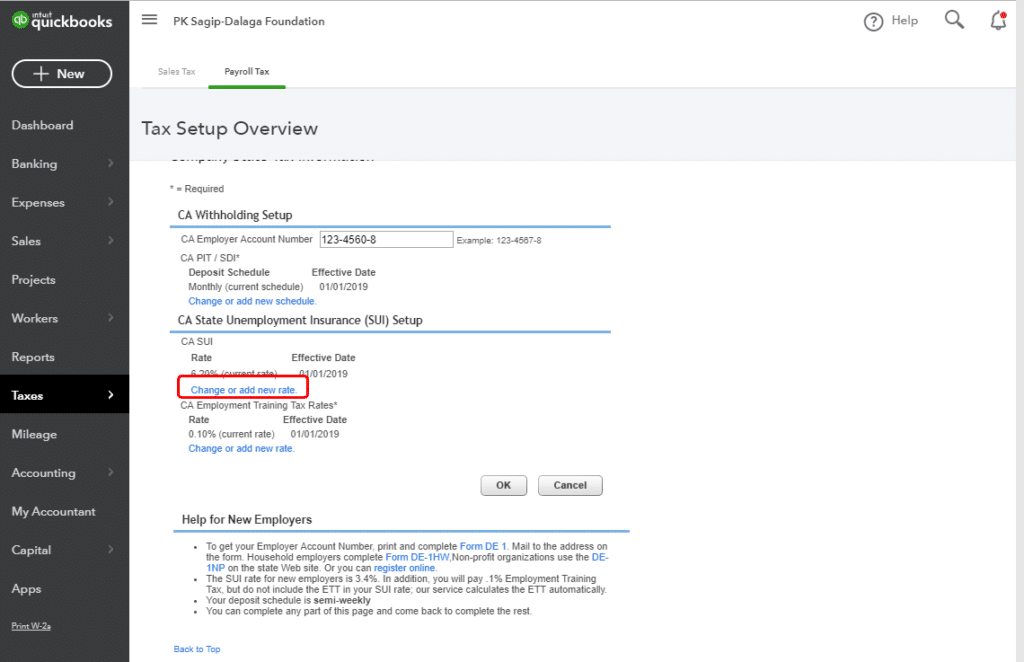
The next step is to select Change or add new rate in the state unemployment insurance setup section.
You will further have to Enter your new rate and its effective date.
For majority of the state the effective tends to be 1/1.
And then, for TN, VT, and NJ the date is 7/1.
In case you can’t change the current year’s rate, then you will have to Send notice to Intuit and they will update the rate for you.
The next step is to choose or enter any updated surcharge or assessment rates.
The last step here is to choose Save and OK tab and you are done.
QuickBooks Desktop Payroll
Just in case you are a QuickBooks desktop payroll user, then your SUI rate isn’t part of the normal tax table updates, and so you will have to update it manually.
Here you need to head to Lists menu.
Furthermore, choose Payroll item list.
After that, double click the Unemployment company ‘’[state abbreviation] -Unemployment Company’’.
And choose Next tab till you reach the Company tax rates window.
Followed by entering the correct rates for each quarter.
The last step here is to choose Next and then go for the Finish.
In case you have surcharges or assessments
If that is the case, then you will have to update additional rates in your QuickBooks software. The steps to be performed here are:
Head to the Lists menu at first, and then proceed to Payroll item list.
You now have to double click the State surcharge item.
Once done with that, choose Next tab and perform the onscreen prompts.
Now, on the Company tax rate page, you will have to manually enter the rate as percentage.
How to Update your Unemployment Rate in QuickBooks Online Full Service Payroll?
To update SUI in QuickBooks Online Full Service Payroll, you should directly connect with our QuickBooks experts and know the easy procedure for the same.
Relationship between FUTA and SUI
There is a certain relationship between the State Unemployment Insurance (SUI) and Federal Unemployment Tax Act (FUTA). It should be noted that the FUTA tax rate is 6%. However, organizations can also go for a 0.6% rate if they successfully pay their SUI taxes on time. Furthermore, the company should not be in a Credit Reduction State.
Conclusion!
Following the steps shared above will definitely help you in successfully updating state unemployment insurance rate in QuickBooks. However, for your assistance our XpertBooks Pro team is available at 1.800.761.1787, and you can directly connect with the experts in case of any queries. Our accounting consultants will ensure to provide you with the right solutions to all your accounting software–related queries.
Frequently Asked Questions (FAQs)
What is SUI in the US payroll?
SUI is the symbol of State Unemployment Insurance, a tax program by employers for offering distinct benefits to their workers.
Is SUI an expense?
SUI rates form part and parcel of the payroll taxes that the employer is required to pay to the employees who have suffered a recent layoff or have been fired from the company due to other reasons, except misconduct.
What category is SUI?
SUI deduction from the paycheck is made to siphon the funds to the state with a pursuit to support workers out of their jobs.
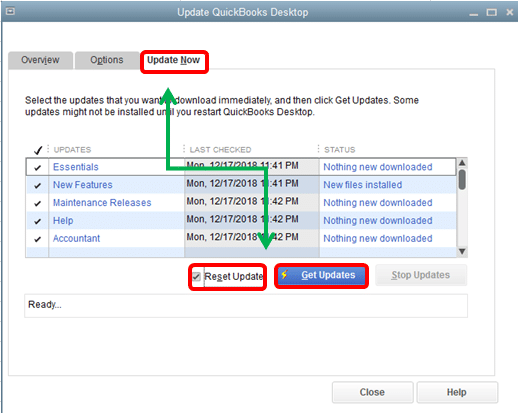
Failed to complete your QuickBooks activity due to error 12038? Well, often when performing an update in QuickBooks desktop, you might end up in an unwanted error i.e., QuickBooks error message 12038. The error shows up for varied reasons and come up with a warning message on the screen stating:
Failed to download the update.
The error is definitely fixable, all you need is to find out the right fixes for the same. This article shares the complete insight into QuickBooks error code 12038, its causes and the right fixes you can implement.
What is QuickBooks error code 12038?
Well, Error 12038 falls under the 12xxx series error and is linked to the QuickBooks update. Whenever your QuickBooks software installation or update gets corrupted or gets interrupted due to some reason, the probability of experiencing this error increases. QuickBooks error code 12038 can be rectified using the right solutions.
Causes of QuickBooks error 12038
A bunch of reasons can lead to update error 12038 in QuickBooks, which include:
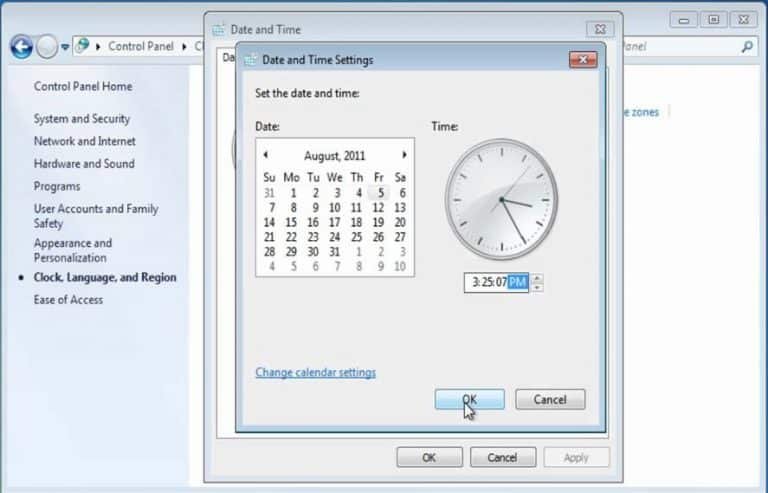
One of the core reasons can be improper date and time updated on the system.
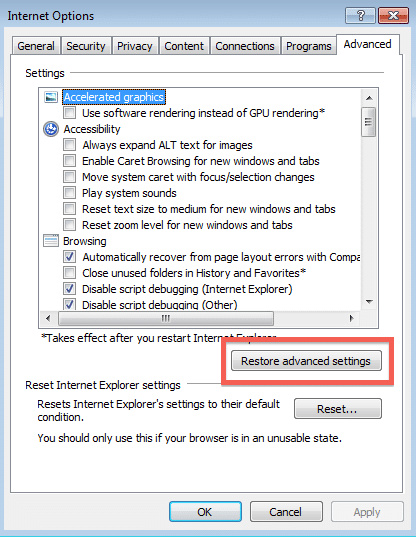
You can further end up in such an error if the internet connection settings aren’t configured properly.
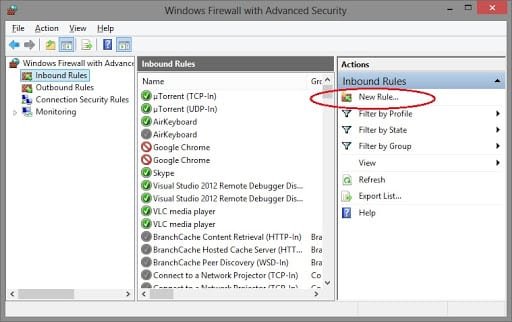
Another reason behind such an error can be if the QuickBooks services are being blocked due to some sort of third party security software.
Moreover, if there are multiple versions of QuickBooks present on the system.
Terminating such QuickBooks payroll update errors are not that difficult to handle, once you know the right procedures. Hopefully, the steps shared above might be of some help in fixing the QuickBooks update error 12038 for you. If still you land into the same error every time you try updating QuickBooks, then you definitely need to connect with XpertBooks Pro. Schedule a call today and your queries will be addressed by our accounting professionals right away.
FAQs
How can I determine if my QuickBooks company file is causing Error 12038?
You will get a screen pop-up on your desktop screen with the error code 12038 mentioned on it.
Are there any specific network settings I need to check to fix Error 12038 in QuickBooks?
Yes, certain network settings should be checked in trying to fix Error 12038. These include: 1. Check your network proxy settings are properly configured. 2. Check that no network restrictions are blocking the connection of QuickBooks to internet.
Can a problem with the QuickBooks server cause Error 12038?
Of course Yes! If there is an issue with the QuickBooks server or the server is temporarily unavailable, it can cause such type of errors.
QuickBooks desktop sometimes show unexpected errors that can hinder the smooth working of the software. On such errors, few are easy to fix, whereas, some can be extremely challenging for users. To help the users to deal with these QuickBooks errors, here we are with this segment sharing information about how to deal with such accounting problems. Have you noticed QuickBooks error code skipped 111? Well, if that is the case then you need to tackle through it immediately. You might come across this error, in case the company file gets corrupted or damaged. This error is a unique error that can be resolved by using the right steps. To find out the reasons causing the error and solutions to the same, make sure to keep scrolling!.
What is QuickBooks error skipped 111?
QuickBooks error skipped 111 is usually encounters when trying to update QuickBooks desktop or download the latest payroll updates. This is a common update related issue that appears when QuickBooks skips one or more update files during the download or installation process. As a result of this error, the update may not install completely. The error shows up every time when you run the verify data tool. There are certain potential reasons causing error code skipped 111. This error shows up on the screen with a warning sign:
QuickBooks error 111-recover data file or QuickBooks error code 111- QuickBooks is not working.
What leads to QuickBooks error code skipped 111?
You might come across QuickBooks error code skipped 111, due to the following reasons:
One of the core reasons can be if the company file is damaged.
Another possible cause can be if the company file isn’t backed up for the longest time.
You can also end up in such an error if your system is infected with a virus.
Be ready to face same issue if the hard disk is either out of space or damaged.
Also, if QuickBooks software is not updated to the latest release.
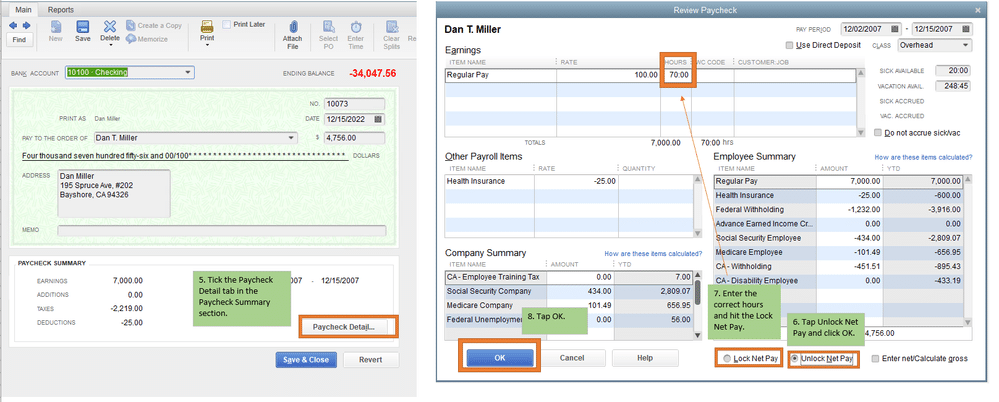
Toggling the paycheck information can at times resolve skipped error 111 in QuickBooks (While trying to backup the company file). Under this process, you need to perform the steps below:
Under this process, you need to head to QuickBooks.
After that click on Paycheck option.
Once done with that, temporarily change the date and amount of the paycheck.
You now have to click on the Paycheck details for editing other information.
The next step is to click on OK tab and then click on Save and close.
Once done with that, you will see a list of the edited transactions.
Click on the Yes and Save tab.
After you have made the edits, you need to replace the edited changes back with the originals and then save it.
We have reached the end of this segment, where we expect that you might be able to get rid of QuickBooks error code skipped 111. In case your queries aren’t addressed in this article, then contacting our accounting consultants at XpertBooks Pro, will definitely work. Our professionals team will ensure that your issue is resolved immediately. Our goal is to help users resolve problems efficiently while minimizing disruptions to their daily workflow.
FAQs - QuickBooks skipped error 111
What does QuickBooks Error 111 infer?
This error typically is a backup related error which appears when users try to backup their QuickBooks files.
Is Error 111 in QuickBooks due to an incorrect paycheck?
In most cases, this error can be related to wrong paycheck information.
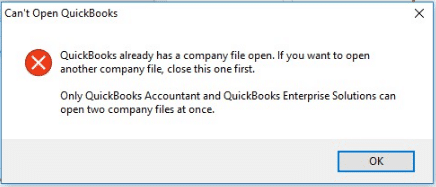
Noticed an error, where you fail to open your company file in QuickBooks desktop? Well, no need to stress over it, all you need is a better insight into the error and you will be able to shun it away easily. At times, when you try opening your company file, it might show up on the screen: QuickBooks can’t find your company file. If you moved your QuickBooks company file recently, you’ll point QuickBooks to the location. You can do this by searching for your company file using ‘Find‘ in the start menu. This could be due to damaged company file or some issue with your QuickBooks software. Fixing the error becomes mandatory, as the company file stores crucial and sensitive information of the business.
To assist you in tackling through the “Can’t open company file in QuickBooks desktop error”, here we are with this quick segment sharing the most helpful information. However, if you feel any need of technical guidance while performing the troubleshooting steps given here, then feel free to reach out to XpertBooks Pro.
Why does company file not opening error occurs in QuickBooks desktop?
At times, while working on QuickBooks software, you may stumble upon an error message that says "QuickBooks can't open company file error". This error may crash your running program or freezes your screen and also you might loss any of your unsaved accounting data. There are various error messages associated to this company file. The different forms of such error messages that may appear on the screen are as follows:
QuickBooks company file stopped responding
You can’t access company files
QuickBooks can’t access company files.
QuickBooks not responding when opening company file
What causes QuickBooks can’t open company file issue?
There can be some common factors driving into can’t open company file error. This includes:
In case there is some issue with the company file, which can be either a damage or some sort of corruption.
The file is already open on another computer on the same network.
One of the basic factors can be if you are not following the right path or method to open the file.
Another possible cause can be if the hard drive file storage is corrupt.
You can also end up in similar error if there are issues with the location and extension of the file.
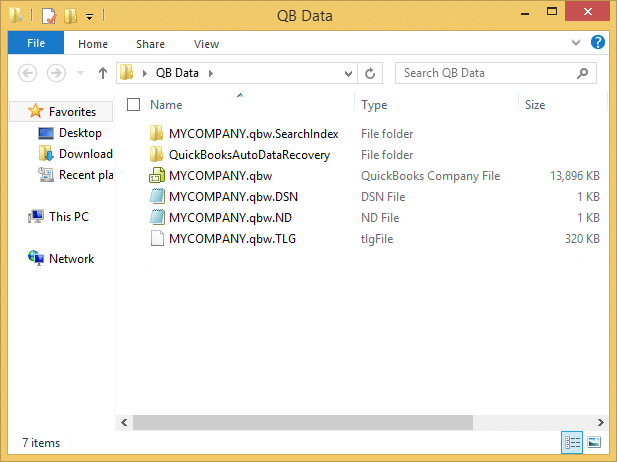
Often an issue with the QBW.tlg file can trigger company file error in QuickBooks.
You can further end up in similar error if you are still using an outdated QuickBooks version creating troubles.
Steps to Solve Can't open your company file in QuickBooks Desktop problem
Once you understood the causes behind the occurrence of the error, implementing the solutions become easier, as you might know what solutions can work for you. You can try out the below given DIY methods to fix QuickBooks desktop can't open company file error.
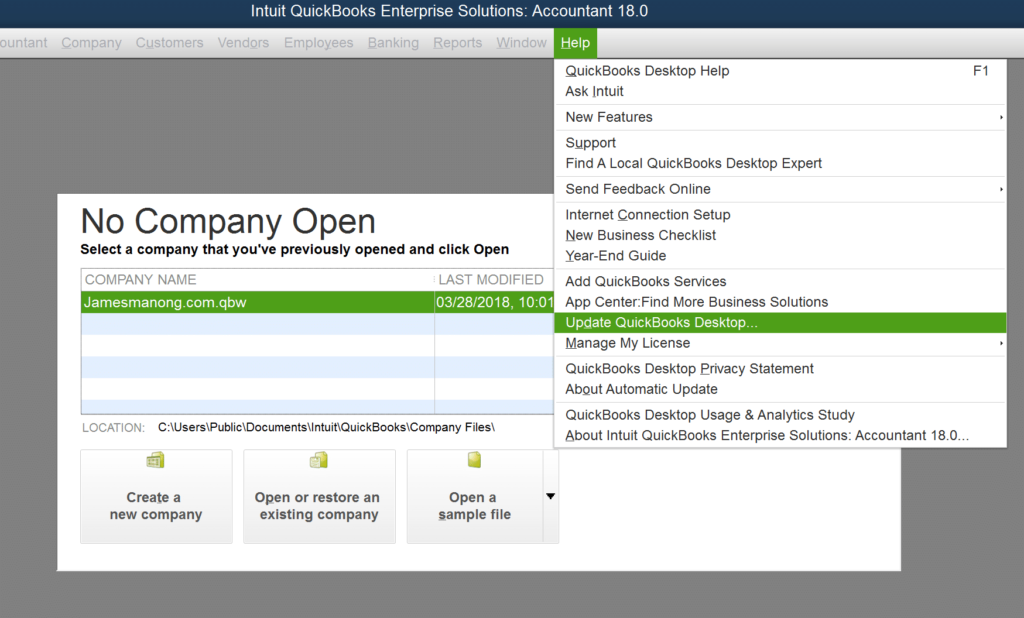
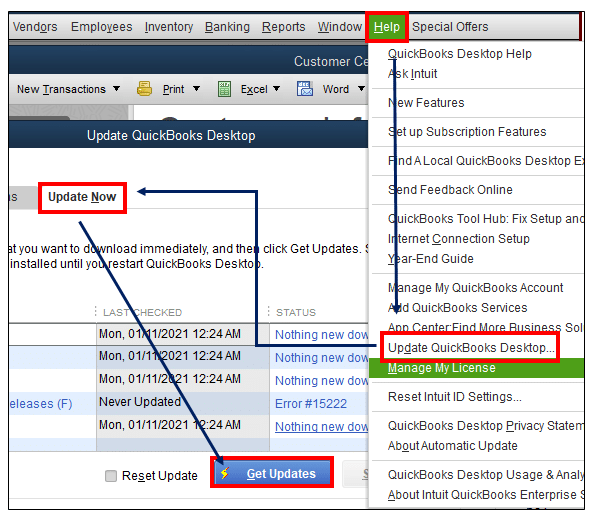
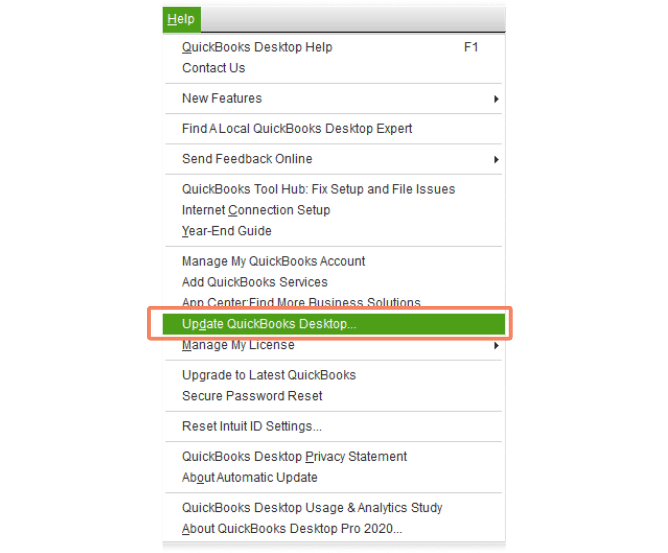
Method 1: Updating QuickBooks Desktop
At first, you need to open QuickBooks Desktop.
Then press F2 key to open the Product information window.
Check your QuickBooks version and release.
Option 1:
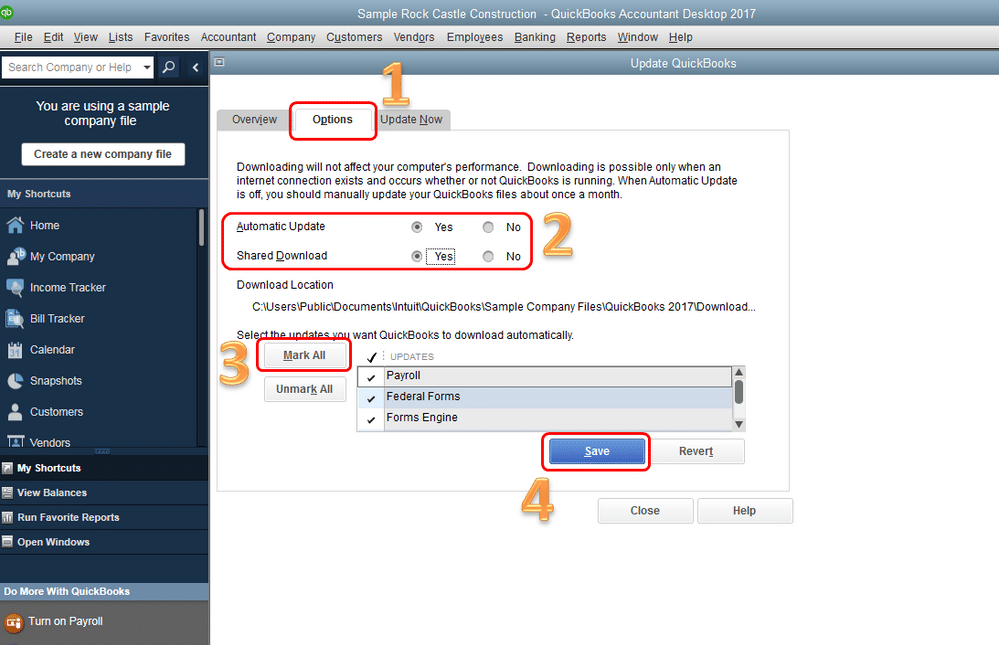
You can set up automatic updates to keep you QuickBooks Desktop updated.
It should ne noted that turning off the Host Multi-User Access option on your computers. These computers, connected to your network, don’t host your company files. The file should only be hosted by your server computer.
At first, open QuickBooks desktop on one workstation.
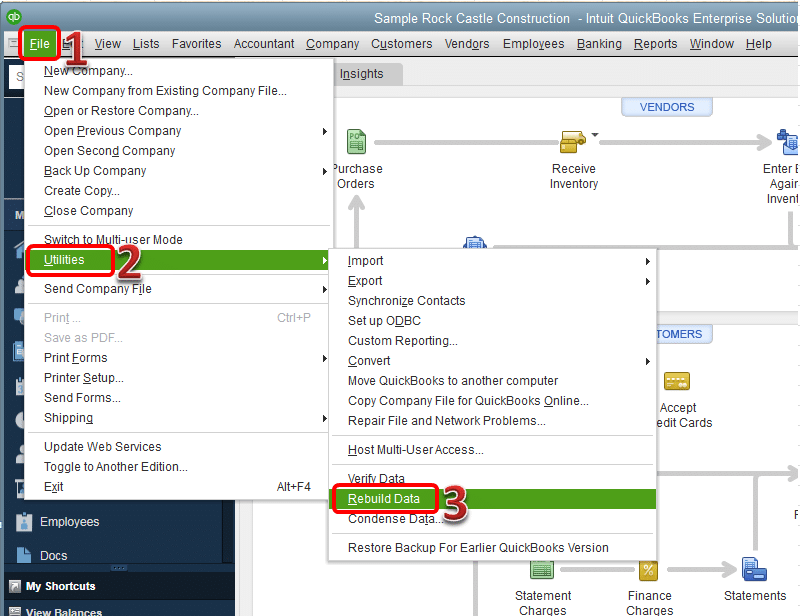
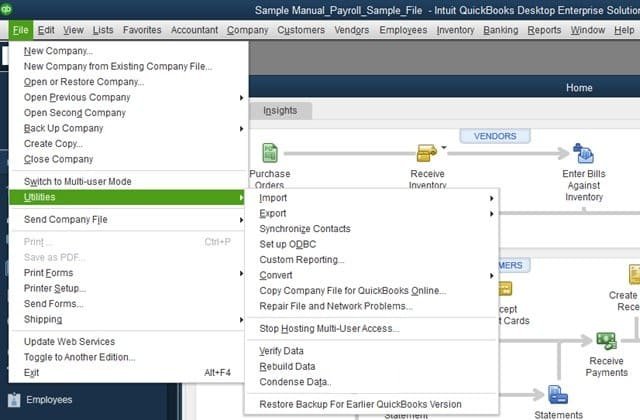
After that go to File menu and move to Utilities.
Here you need to verify if the "Host Multi-User Access" opt is visible, don’t select it and move on to next workstation. This computer isn’t causing the problem.
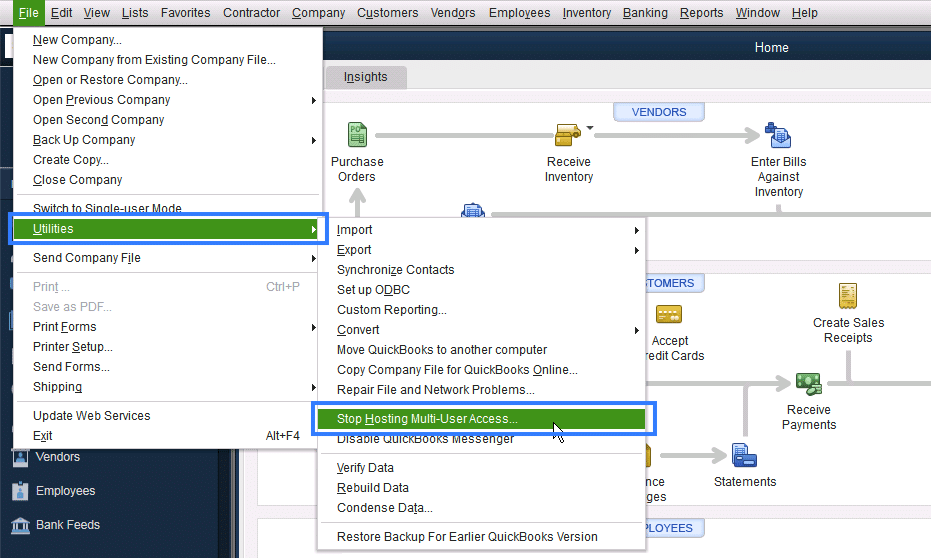
Now select If you see the Stop Hosting Multi-User Access option, in the new workstation.
Repeat the above-mentioned steps on all of your workstations.
Next, move on to the computer that hosts your company file.
Open QuickBooks on your server computer.
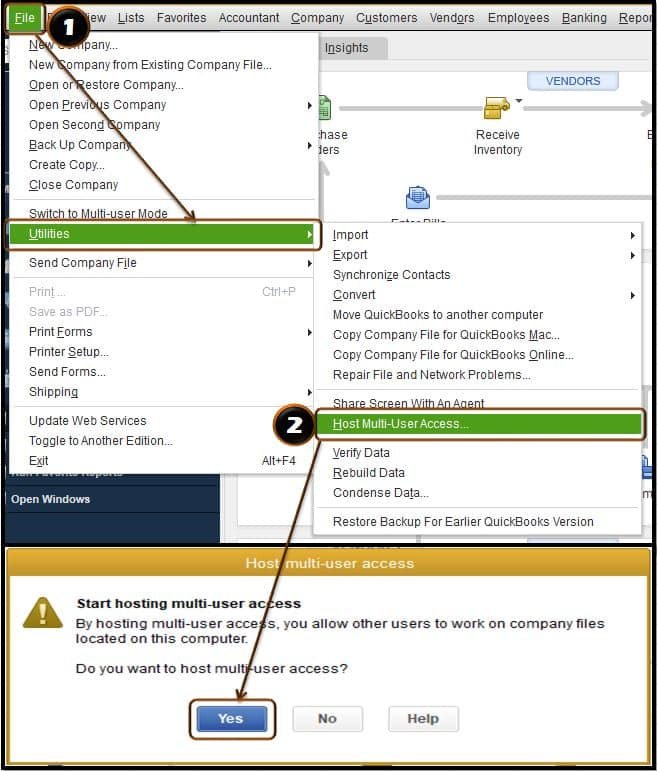
And then, go to File menu and go to Utilities.
In the next step, you need to select Host Multi-User Access.
Also, change the setting and repeat the process.
Now select Stop Hosting Multi-User Access to reset Multi-user Mode.
Repeat the process once again and select Host Multi-User Access this time and also tap on Yes.
Once you've done everything, try again to open the company file.
To open a sample company file, you simply have to open Windows start menu.
Furthermore, choose Ctrl and then go for QuickBooks.
Once done with that, choose Open a sample company file.
In case the sample company file doesn’t open, then the software is the main issue. And if the company file opens up, then you need to proceed further with the solutions.
Method 4: Check the company file you’re opening
QuickBooks Desktop has many types of company files with different different types of extensions. Every extension has it's different role. Make sure you open a company file (QBW) with a .qbw extension at the end of the filename. Other file types, such as backups (QBB) and portable files (QBM) can't be pulled up in the same manner.
In case your company file’s location is an issue, then you can simply fix it by moving the file and open it from the new location. You need to proceed with the steps below:
Head to start tab and further enter File explorer into the search bar.
You now have to open file explorer.
Once done with that, find the folder with the company file.
And then, right click the Company file and choose Copy.
The next step is to right click anywhere and then you need to click on Paste.
Also, open QuickBooks.
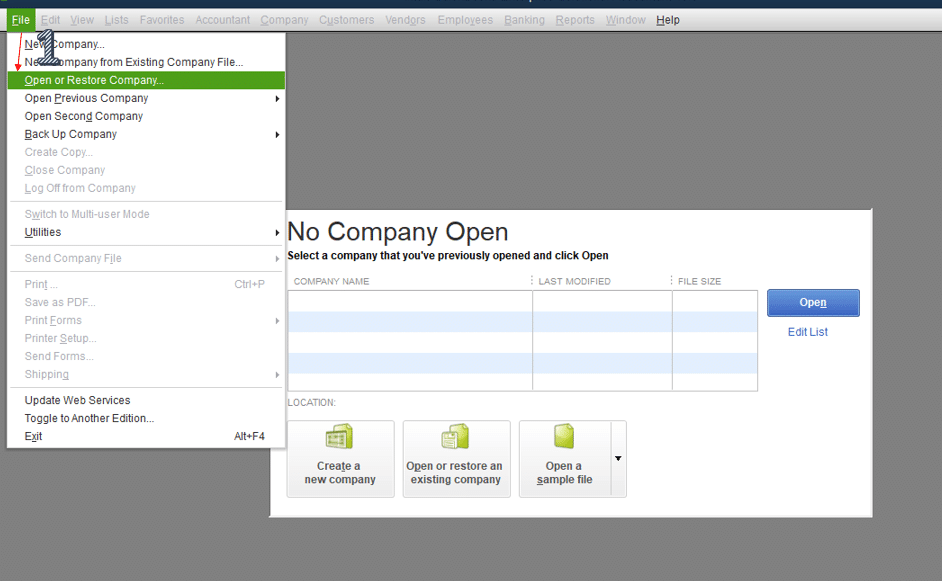
Head to file and choose Open or restore company.
The next step is to choose the company file you copied to the desktop and then choose Open.
In case the company file opens from the desktop, then the file location is the issue.
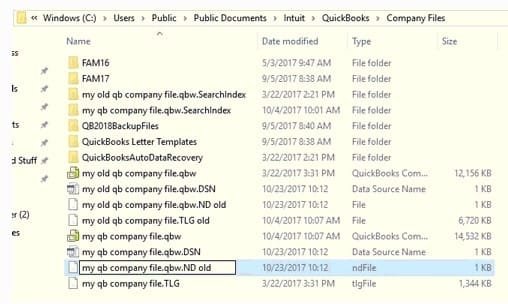
Method 6: Rename .TLG and .ND files
Under this solution, go to QuickBooks company file folder location.
After that, select transaction log file and hit a right-click on it.
Rename the company file (OLD.qbw.TLG).
Now, open the file.
QuickBooks create files of the .TLG and .ND extensions.
Don't lose or delete these files as they are important to recover the lost data.
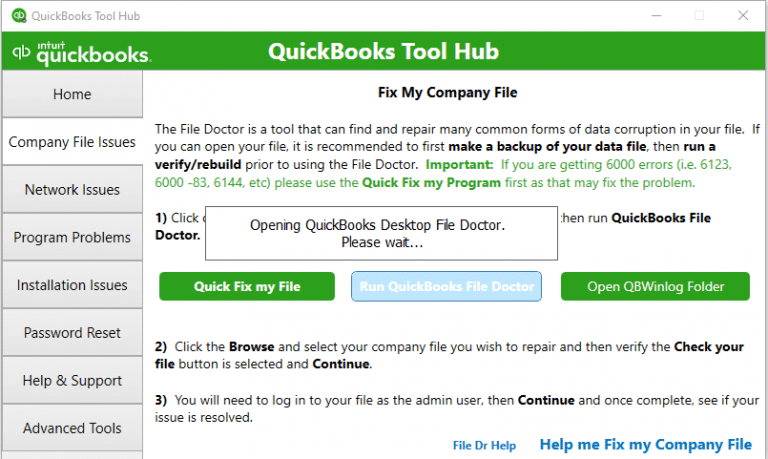
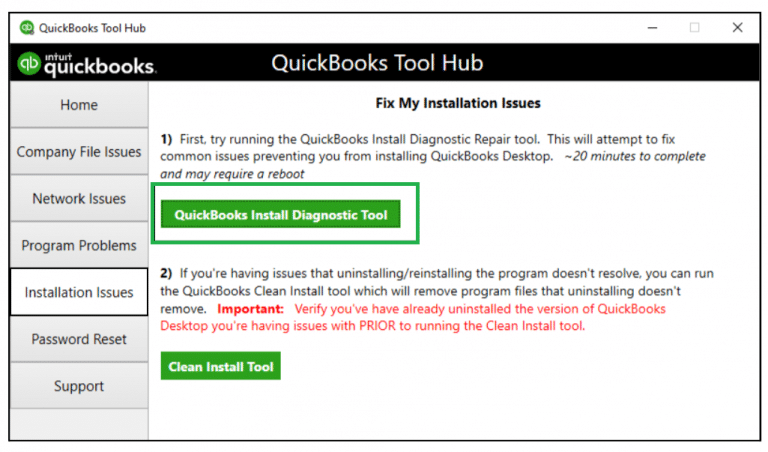
You can run the QuickBooks Install Diagnostic tool from the QuickBooks Tool Hub program. This program is a set of multiple of tools and help you to fix many errors. If you don't already have an updated and most recent version of Tools Hub installed on your Windows, install it and then run it. See if the file open. If not, move on to the next option.
Run a repair on your installation files
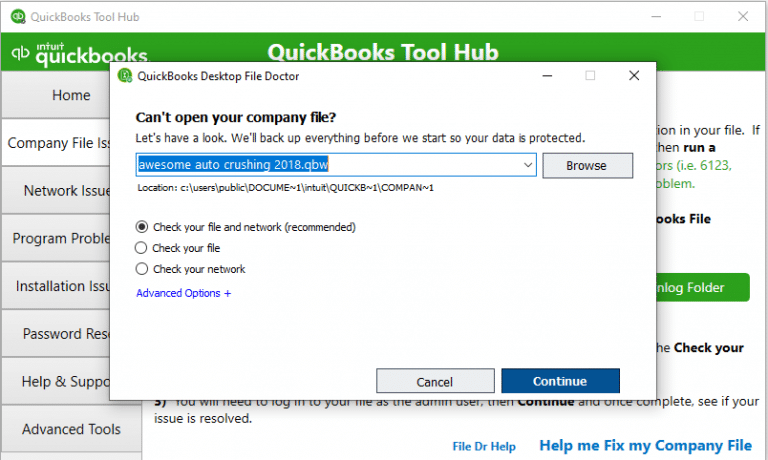
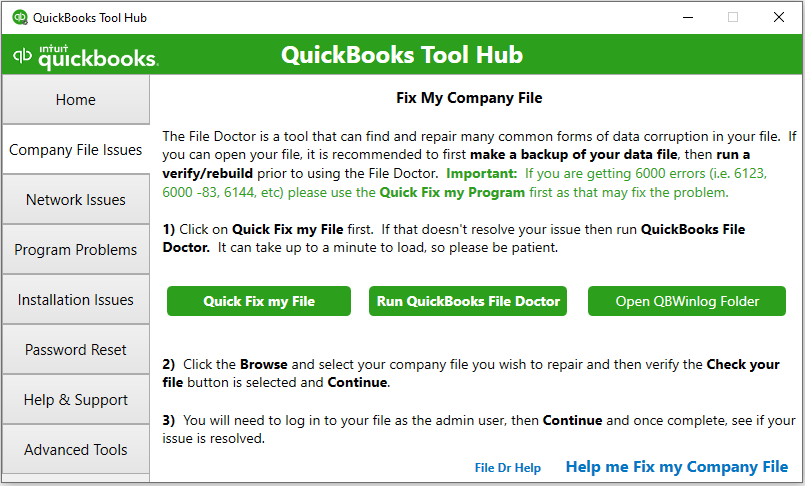
You already have installed diagnostic tool in the previous step. Now, run Quick Fix my File and file doctor tool one by one and then open your company file.
Eliminating can't open company file QuickBooks desktop isn’t that challenging, especially when you have the steps in handy. Just in case you continue to face the error, then reaching out to our independent accounting professionals will help. Our team will help you get out of this chaos instantly without affecting your operations and data.
FAQs
How do I fix company file issues in QuickBooks desktop?
Company file and network related issues can be easily resolved by using QuickBooks File Doctor and verify and rebuild tool.
Why can't I open my QuickBooks Company file?
There can be many reasons behind to not opening the company files. Most common ones are if you have damaged company file or company file has corrupted data.
What is company file extension in QuickBooks?
The company files have a .qbw extension.
How do I set the maximum number of company files in QuickBooks?
Try these quick steps to set the maximum number of company files: 1. Open your QuickBooks and login to any available file on the server. 2. After that go to file menu and select open previous company. 3. Now here you can set the number of previous companies and select the number of files. 4. To save the changes, select Ok. That's it!
Did you just run into QuickBooks error code 6131, 0 and unable to process your accounting tasks? We have got you covered. Well, this error is generally consider as company file access error that opens up on the screen when QuickBooks fails to open or restore a company file. It usually indicates that the software is unable to communicate properly with the file due to some interruption. Often when your company file has some sort of damage, it can trigger to such error.
The error falls under the error series of -6000 and can show up if you try opening the company file locally. Fixing the error quickly is essential, as it is associated with the company file. To help you in terminating the QuickBooks error 6131 permanently, here we are with this segment sharing the insight into the error and the quick solutions that you can implement to eliminate it completely.
Understanding what is QuickBooks error 6131
QuickBooks Error 6131 indicates that there is a problem with communication between QuickBooks and the company file. This error commonly shows up with a message like:
“Error 6131, 0: QuickBooks is unable to open this company file.”
This error mostly occurs at the time:
Opening a company file
Restoring a backup file
Switching to multi-user mode
Factors leading to QuickBooks error code 6131
Here are some quick reasons causing QuickBooks error code 6131. Let us have a look:
Incorrect hosting configuration in multi-user mode
In case there is improper folder permissions
If the .nd and .tlg files got damaged somehow can be one of the basic reason.
Issues with QuickBooks Database Server Manager
You can further come across error 6131 if the installation you made of QuickBooks earlier isn’t complete.
Quick and Effective Solutions to QuickBooks error code 6131
Resolving error becomes easy, once you understand the core reasons of the error. Here are some quick solutions that you can try to fix the QuickBooks error 6131 on your own.
Post that, right-click QuickBooks.exe icon and then click on the Properties tab.
Now click on the Open file location.
Followed by clicking on the company file and pressing Ctrl and C to copy the file.
Now Create a new folder and then open it.
The user needs to then press Ctrl and V keys tab to paste the files.
Later on, open QuickBooks and also click on the option to Open the company file.
Lastly click on Browse and choose the file that you copied to the new folder.
Solution 4: Changing the name of .ND and .TLG files
Move to the Company file folder.
After that look for the files that have the extension set as .nd and .tlg
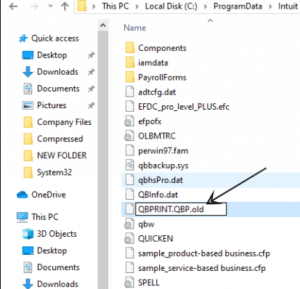
Post that, right-click and choose the Rename tab.
Add .old to the filename.
Towards the end, open the company file and check if the issue still persists.
Solution 5: End QuickBooks tasks in task manager
If none of the above methods worked for you, then try ending all the background processes using the steps below.
Press Ctrl and shift along with Esc to open the Task manager.
Click on the Processes tab.
Followed by, selecting all QuickBooks processes including qbw32.exe, qbupdate.exe, and qbdbmgrn.exe and further close all tasks by clicking on the end task.
After that open QuickBooks and try opening the company file.
Hopefully, now the error might not show up on the screen.
QuickBooks error code 6131 is mainly a network file access error, not a major data problem. Once the connection between QuickBooks and the company file is restored, the error usually gets resolved. Once you have discovered the solutions that can be performed to get rid of QuickBooks error 6131, it becomes way easier to tackle through it. However, if you have any queries, then our XpertBooks Pro professionals will help you address the issue. You can schedule a call at with our experts, and our accounting professionals will ensure that you get the right assistance to fix the errors that you come across while working on QuickBooks.
Error 6131 - Frequently Asked Questions (FAQs)
What is error 6131 in QuickBooks?
Error 6131 belongs to the 6xxx series of error codes that pertain to a damaged company file in QuickBooks.
What is company file error in QuickBooks?
QuickBooks company file errors show up in the form of a wide range of error codes, typically the 6xxx series of error codes. These errors are caused due to corruption of the company files or some network-related issues.
How do I fix .ND file in QuickBooks?
The Network Files (.ND) files can be fixed by renaming or deleting them. The steps to rename them are: 1. Head to the Company file folder in the QuickBooks folder. 2. Search for the .ND files. 3. Right-click on the file and then click on Rename. 4. Add ‘.old’ at the end of the file name. 5. The .ND file is fixed.
How does a QuickBooks file get corrupted?
QuickBooks company files can get corrupted due to various issues. These include: 1. Frequent system shutdown due to power failure. 2. Network issues. 3. Virus attack. 4. Damaged .ND and .TLG files