Did you know incorrect COGS in QuickBooks can lead to further mismatches in your financial records? An incorrectly recorded COGS can lead to an improper profit and loss report. COGS basically stands Cost of Goods Sold by a company. At times, even after checking the item list, the QuickBooks accounting software might display a negative COGS or in the worst case it might fail to include the COGS number in the reports.
In such scenarios, it becomes essential for the users to correct the incorrect COGS in QuickBooks by performing the right steps and procedures. And thus, to help you out in this process, here we are with this guide sharing the complete steps to correct the incorrect COGS.
What leads to Incorrect COGS in QuickBooks?
Here are some quick reasons why you can experience incorrect cost of goods sold in QuickBooks:
If you have mistakenly entered incorrect value of the item.
In case the cost of the item once it was sold has been recorded.
If the data being retrieved is from the wrong account.
Another reason causing this error in QuickBooks is if the inventory products are being sold separately after being purchased in bulk.
Or if the changes made to the COGS account doesn’t reflect in POS.
Methods to rectify incorrect COGS in QuickBooks
Here are some possible solution steps that you can perform to eliminate incorrect COGS in QuickBooks desktop.
Method 1: Verifying the amount for the item sold and entered correctly
You need to first choose Sales and further go for Item summary.
And then, you need to modify the reports by clicking on the Modify option and further click on Revert.
The user will then have to sort the items starting that how you wish to view it like with the Item name section.
The next step is to look for item having $0.0 in the ext cost section now.
Also, note a few things that doesn’t have any Setup costs.
Now, choose Item list from the inventory section.
Look for the item that is sold that how many items that item has been sold for free.
Choose the Edit tab.
And further head to the Item’s history and then choose it.
You need to complete Selling price of the products.
Method 3: Make sure that the correct COGS account is setup
The very first step here is to open QuickBooks POS application and then move to the File menu.
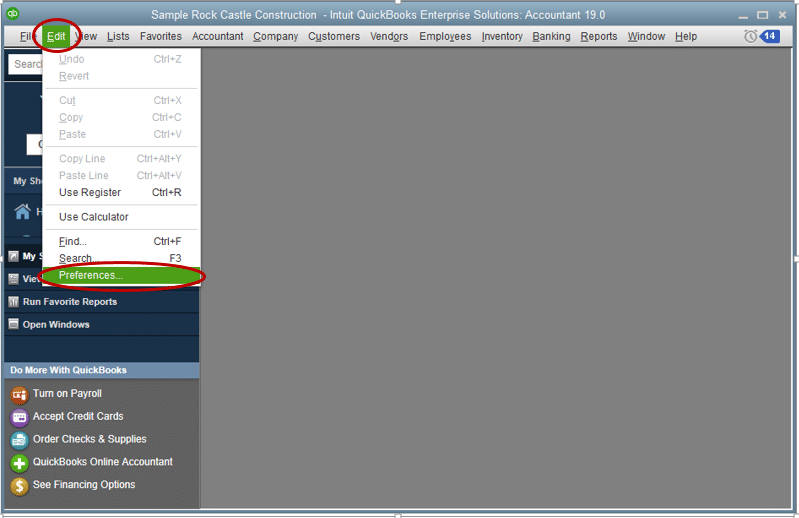
And then, choose Preferences option and then select the Company option.
After this, you need to click on Financial and then choose Accounts opt.
You will then have to verify that the correct COGS account has been selected for each listed item.
Choose the Item list option from the Inventory section.
Also, go for the Customize columns from the Column header.
The next step is to check and verify that the Set cost of goods account is correct.
In case the account is not correct, you need to click on the Item list and select the Correct account for it.
After this, open the QuickBooks and then create a journal entry to transfer the amount to the correct account.
Method 4: Inspecting for any Deleted Transactions
The user first needs to move to Sales History section in QuickBooks POS.
After that, select I wish option.
Then go for Financial Detailsto Display option.
In case the financial information is sent to QuickBooks Successfully, the status shows, but there is no option to access the file in QuickBooks, then, in that case, the entry might have been deleted.
However, in case QuickBooks does not contain the receipt, the user should opt for resending the document available under the next Financial Exchange option.
Now deselect the sent checkbox if any receipts show a Not sent status and if the option to Mark this document as successfully sent is chosen.
Finally, hit on Ok to complete the step.
Conclusion!
Correcting cogs in QuickBooks desktop isn’t a huge task, especially when you know what steps are to be followed. With this segment, we have tried to provide you with the entire set of steps that you can follow and fix the cost of goods sold in QuickBooks. If you continue to face the issue or if you are stuck at some point, then you can definitely reach out to our XpertBooks Pro experts, and your queries will be addressed by our team immediately. Our experienced professionals can help diagnose complex problems and guide you toward an appropriate resolution.
FAQs
What is COGS in QuickBooks Desktop?
COGS is knows as Cost of Goods Sold. It indicates the direct costs incurred in the production or acquisition of the products.
What can cause incorrect COGS in QuickBooks Desktop?
Incorrect COGS in QuickBooks desktop can occur due to various factors like incorrect inventory settings, incomplete purchase orders or inaccurate sales orders.
Can I use 3rd-party tools to correct incorrect COGS?
Yes! you can use different third-party tools to fix incorrect COGS in QuickBooks Desktop.
QuickBooks users, ever since it is rollout by Intuit.inc in 1983, have been bothered by numerous error messages and technical error codes. Although most of the well-known technical errors get wiped out by updating the QuickBooks software to the latest version, new error codes keep emerging and troubling the users every now and then. Well, this segment is crafted to discuss about one of the common error that you might be struggling with while adding an item to the list in QuickBooks. An error message describing: Unable to add item to the list, might show up on your screen during the conversion process from QuickBooks for Mac to QuickBooks for Windows. You can also witness QuickBooks unrecoverable error at the same time while such an error shows up on the screen.
Another warning message that might show up can be:
QuickBooks is unable to finish the operation for ADD item into the list and needs to restart”. “QuickBooks will get open automatically”.
As this error is a bit confusing and not so common, having an understanding of the right steps is a must to fix it as soon as possible as it can create other problems on your company files. Thus, to provide you with the right steps and procedures to fix QuickBooks unable to add item to list error, here we are with this segment.
What factors trigger New VAT code - QuickBooks unable to add item to list error?
Here are some of the factors that can land you into the QuickBooks unable to add item to list error.
One of the reasons can be if the company file is corrupted.
Another possible reason can be if the QuickBooks software being used is either outdated or not compatible.
You can further end up in QuickBooks unable to add item to list error if you try to add a new employee item to the list.
Another reason can be if the file size is way too large to manage
Or if the user permissions to add items to the list is insufficient.
You can also end up in similar issue if there is corruption in QBWUSER.ini file.
Another factor causing the issue can be if there is some sort of network connection issue.
Effective Methods to rectify QuickBooks update unable to add item to list error
Here are a few methods that you can opt for, in order to eliminate QuickBooks update unable to add item to list error.
Method 1: Locate the file QBWIN.log file in QB directory
You can open the file in the notepad or in the MS word, using the set of steps listed below:
Initially, it is required to locate the QBWIN.LOG file in the QuickBooks directory.
Hit a right click on the File and further head to Open with option.
Now, head to the list of programs from the Notepad and proceed with the method below.
Method 2: Verify log and end verify log
You need to verify a log and end verify log. In case you are unable to find the errors between these sections, then you can simply search them in between: rebuild log LVL_ERROR – QuickBooks has faced a problem and needs a shut down.”
Method 3: Go for LVL-SEVERE-ERROR _ the list element writes failed to abort transaction and is forcing a roll back now list name:
Name of QuickBooks list item name: You will see an error message: item that is causing the issue. You need to further note that the record was not added to the transaction table. For e.g.: LVL_SEVERE_ERROR – List element write failed to abort database transaction and forcing rolling back now.
List name – Payment method
Item name – E-check. Error message: Record cannot be added to a transaction table. "error code: -6032.’’
QuickBooks for a mac file
In this procedure, you are simply required to move to the Lists menu.
And then, head to the right list of components to simply find out the particular item.
Now, find out the list of the components in the QBWIN.log and further fix it or remove it.
The next step is to remove an item, and then choose it and click on Edit tab.
While you reach the end of this segment, we expect you to be able to fix the QuickBooks unable to add item to list error easily using the steps discussed above. If that didn’t work for you, then our accounting experts are at your rescue. You can schedule a call with our experts and your queries will be immediately addressed by XpertBooks Pro team. We will be happy to assist you,
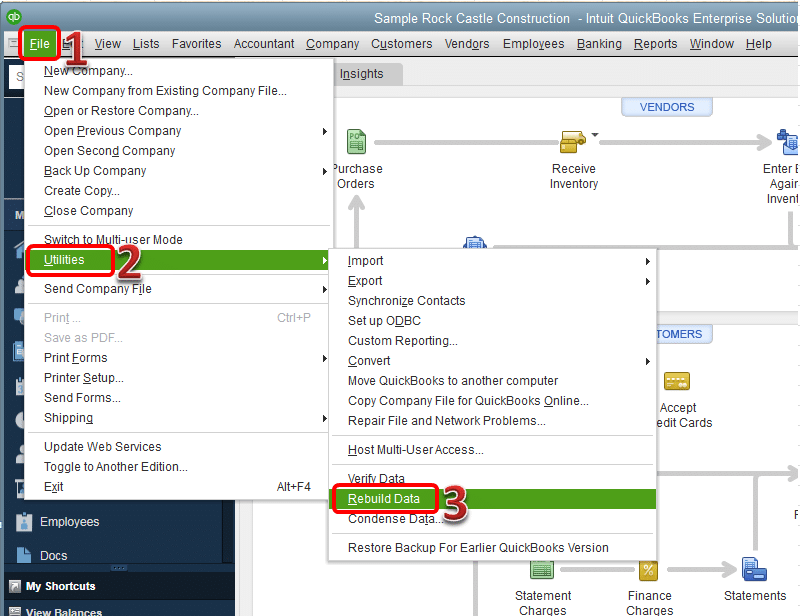
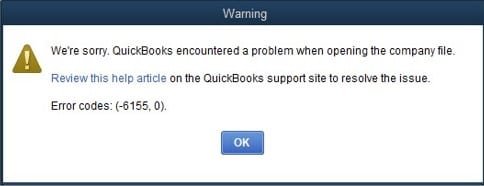
Distracted by error 6155 in QuickBooks? Well, just like many other QuickBooks users, you might end up in the QuickBooks error code 6155 while trying to open company file. As this error falls under the 6xxx error series, it is associated with the company file. Experiencing this error is quite possible, when the installation files are either damaged or are missing for some reason. You will see the error stating:
Error -6155, 0 an error occurred when QuickBooks tried to access the company file’. or We’re sorry. QuickBooks encountered a problem when opening the company file.
Not just that, but it could show up if there is incomplete installation of QuickBooks. Fixing the QuickBooks error code 6155 is quite possible with the right steps implemented. And understanding this, we have curated this segment where we will be talking about how this error occurs and what actually can be done to tackle through it.
What factors can drag you into QuickBooks error 6155?
You can bump into QuickBooks error code 6155 due to the following factors:
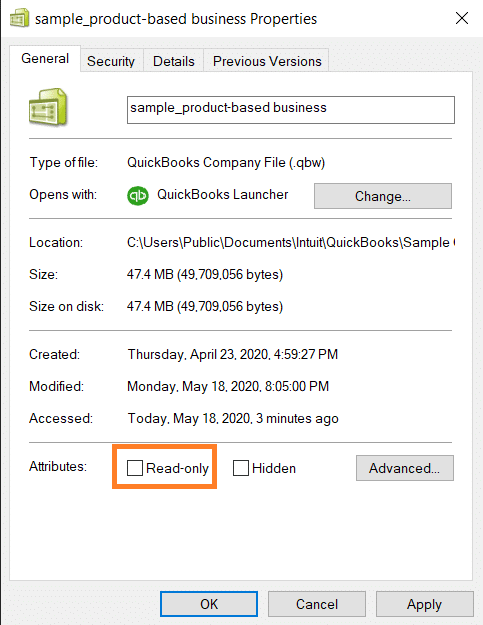
Open the QuickBooks installation directory and right-click on company file.
Within the directory, you need to select the company file (which causing the error).
Then select Properties and unmark the Read-Only checkbox.
Now click on Apply and then hit OK.
Try to open the company file.
Method 4: QuickBooks clean install tool
Another method is to go for clean install tool and further try repairing an corrupt or incomplete installation. Here is how you can use QuickBooks clean install tool to fix error 6155.
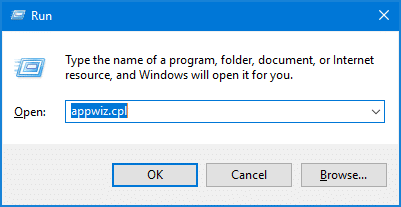
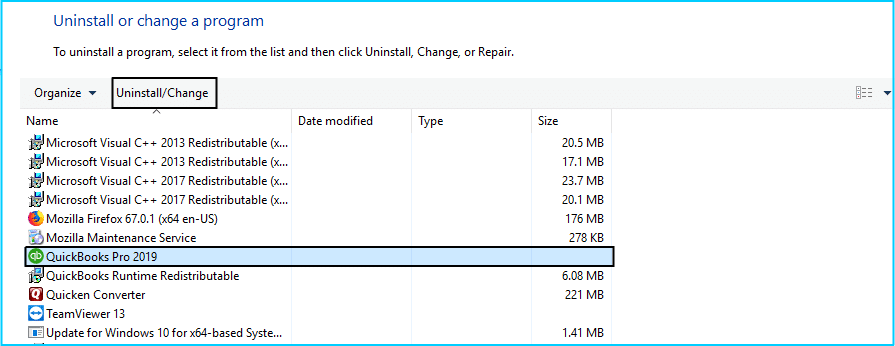
Press Windows + R keys type appwiz.cpl in Run window.
After that, click OK and locate QuickBooks in the list of programs.
This will directly open Programs and Features tab.
Now double-click on QuickBooks and select Uninstall/Change.
Follow the on-screen instructions and remove QuickBooks program.
In the next step, you need to move to QuickBooks directory and rename QuickBooks folder.
Now download clean install tool and further save it to a location where you can go for it easily.
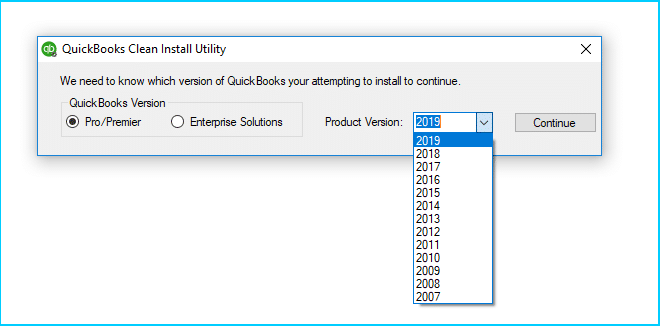
Later, opt for open QuickBooks_clean_install_utility.exe.
Now, go for agree to the license terms and further choose the QuickBooks desktop version.
And then, click on the OK tab.
Also, you will see a warning message stating QuickBooks is now ready for clean install. And then, you need to install it to the default directory.
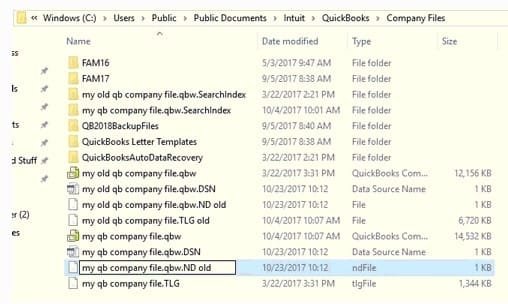
Some extensions like .ND or .TLG can have corrupted files, which can slows down the QuickBooks and encounter error 6155.
Find the location for all .ND and .TLG files on the device.
Then right-click on the file and click on Rename.
Now add .old extension at the end.
Then lastly hit a click on Yes to confirm.
Method 6: Copying the company file to desktop
To start with, you need to right click the desktop and navigate to the New tab.
Once done with that, you need to choose Folder options.
Now, create a New folder.
And further, head to the current company file location.
Later, you need to open new folder and right click and go for Paste.
You are then required to click on Ctrl key.
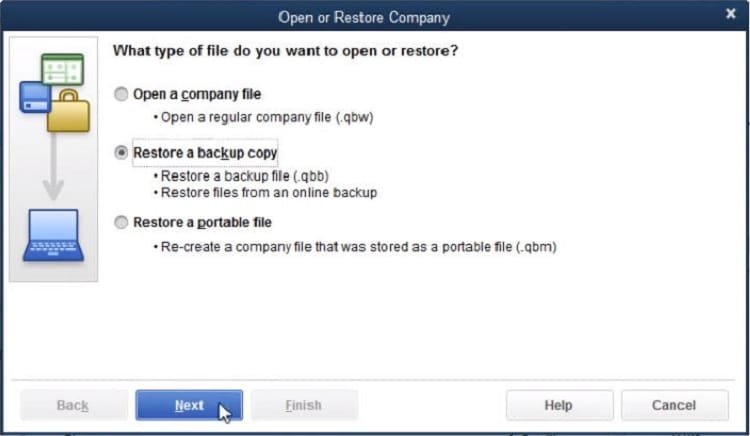
Also, go for the Open or restore existing company.
The next step is to head to the open a company file and further click on Next tab.
And then, browse the desktop file and click on Open tab.
You need to verify if the issue is resolved.
Conclusion!
Found the above discussed steps helpful in fixing QuickBooks error 6155? If not, then you can speak to our independent accounting professionals directly by ringing us up at 1.800.761.1787. And let the XpertBooks Pro experts team help you in permanently fixing the error. Our specialists team understands what it actually takes in permanently fixing such errors in QuickBooks. Feel free to reach us via our helpline or through the Live chat option.
FAQs - QuickBooks Error 6155
What is Error 6155 in QuickBooks?
This error belongs to the family of 6xxx series of error codes that usually appears while opening the company files.
What causes QuickBooks Error code 6155?
If some 3rd party programs running in the background or if there is a mistakenly deleted company file, might lead to such errors.
How can I fix Error 6155?
This error can be fixed by performing the following methods: 1: You need to update QuickBooks desktop to latest. 2: Also try to change the ''Read-only'' attribute of the company file. 3: Using the File Doctor Tool can be savior in such cases.
What tools can troubleshoot Error 6155?
Quick Fix My Program, File doctor tool, or verify & rebuild tool can assist you in fixing these type of errors.
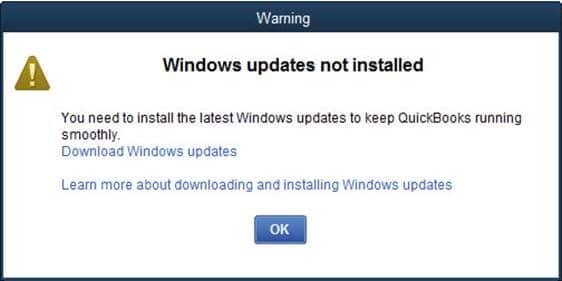
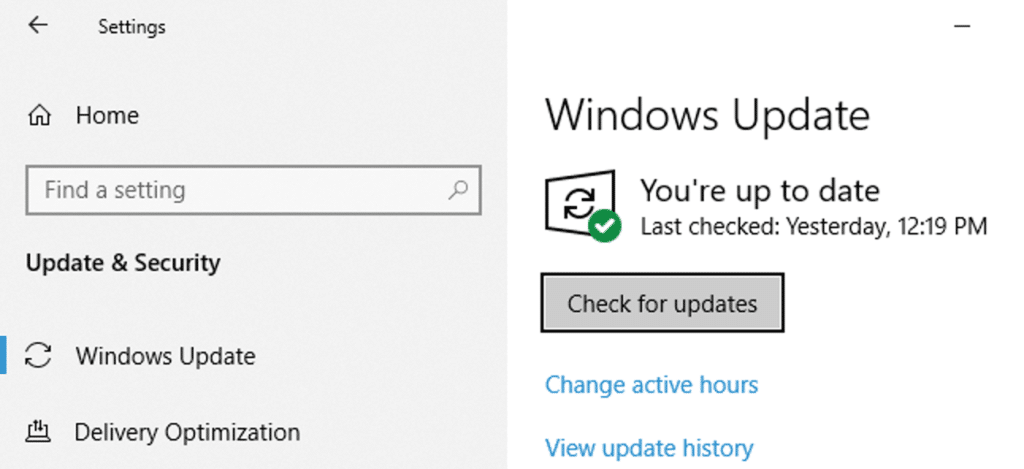
With new updates of QuickBooks rolls new features and functionalities and in order to these functionalities updating the software on a timely basis is a must. Not just that, but updating Windows to the latest release is also something that you need to ensure about. Using an updated Windows operating system is a crucial thing, and when you do not have an updated windows OS, you might get an error stating: You need to install the latest windows updates to keep QuickBooks running smoothly. The error message basically suggests that either some Windows component are missing or the Windows isn’t updated to the latest release an is affecting the QuickBooks operations.
Warning
Windows Updates not Installed. You need to install the latest Windows to keep QuickBooks running smoothly.
While this error might seem simple, fixing it can be a bit confusing, if you aren’t sure about the right solution steps. Thus, to help you with that, here we are with this guide sharing the entire information related to this issue, along with how you can actually fix Windows update not installed warning in QuickBooks.
What reasons can lead you to Windows Updates not installed warning in QuickBooks?
Here are a few reasons that can lead to Windows updates not installed warning in QuickBooks.
One of the core reasons can be if the Windows installer components (C++ , MSXML and the .NET Framework) are missing or damaged.
You can further come across Windows updates not installed warning in QuickBooks, in case the Windows components like Microsoft C++ or MSXML is either damaged or corrupted.
Another reason can be if the Microsoft .Net framework is either damaged or having some issue.
Methods for Fixing Windows Updates not Installed Warning in QuickBooks
Well, QuickBooks Warning Windows Updates not Installed error can be rectified using some basic set of steps, which include the following:
Note: If you face any technical issue while performing the troubleshooting steps, consult with your IT professional.
Method 1: Repair Microsoft .Net framework
To start with, you simply have to open Control panel using the Start menu.
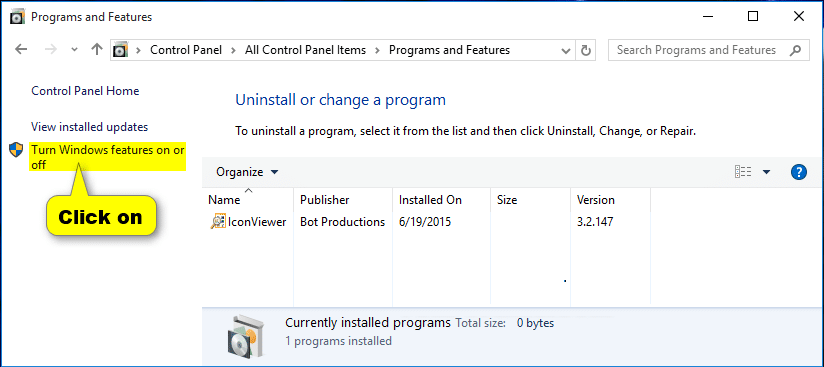
Furthermore, you will have to look for Programs and features and later click on the same.
The next step is to navigate to Turn Windows features on or off.
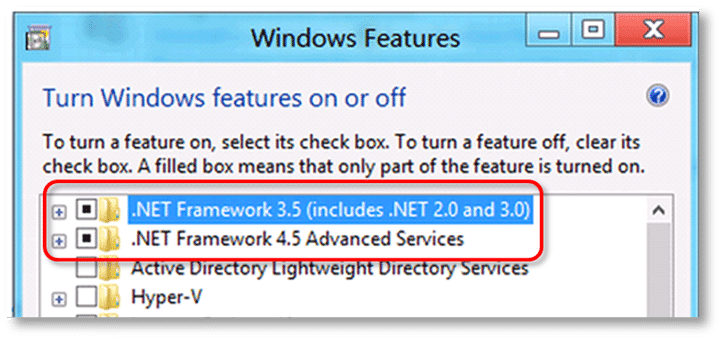
After this, you are supposed to go for .Net framework.
And further, enable .Net Framework 4.5 by clicking on the checkbox.
Later on, enable .Net framework SP1.
Just in case you see these options already tick marked, then you need to turn them OFF and further turn them ON.
Now, go for OK tab.
And you need to reboot the system.
Move to the next solution method, if the error still appears.
Method 2: Repair MSXML component
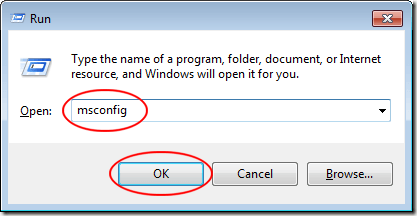
This procedure requires you to press Windows and R tabs to simply navigate to the Run box.
Furthermore, you need to go for Command prompt by entering cmd in the Run box.
Also, click on OK tab.
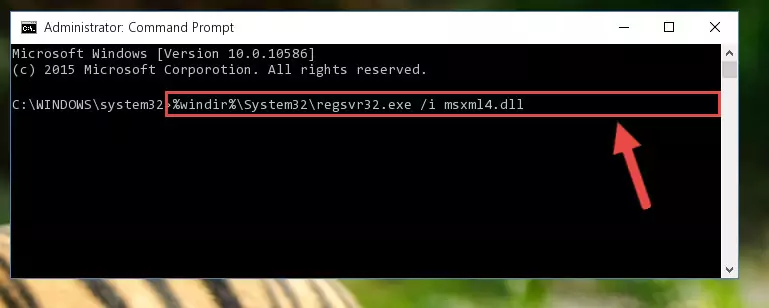
You will see a black screen, and enter regsvr32 MSXML6.dll and go for the Enter tab.
The last step here is to repair the damaged MSXML component.
Note: If you don't have the latest versions of the Microsoft components installed on your system, then make sure to get them installed from the official website of Microsoft.
Were you able to fix Windows updates not installed warning in QuickBooks with the solutions discussed above? Well, if that doesn’t work for you, then you surely need to reach out to our independent accounting professionals at 1.800.761.1787, and our team will ensure that your queries are addressed within no time. Our support professionals will definitely help you with the fixation of Windows updates not installed warning in QuickBooks. We will make sure that all your queries get resolved.
Interrupted by backup error 2277 in QuickBooks desktop? Well, as your company data is crucial, regularly backing it up is essential, so as to safeguard it from any sort of internal or external threat. While you have a lot of options for backing up QuickBooks company file, Intuit Data Protect is considered to be one of the best ways. And in scenarios where the Intuit Data Protect fails to backup the company file, it leads you QuickBooks backup error 2277. Not just that, even if you are facing issue in opening the Intuit Data Protect for some reason, then it would lead you to QuickBooks error 2277. The error message that would show up on your screen would simply state:
Intuit Data Protect Backup Failed. Or Firewall or connection issue.
What is QuickBooks Backup Error 2277?
QuickBooks Backup Error 2277 is a backup related error that usually occurs when QuickBooks desktop fails to create or save a backup of your company file. This error directly indicates that something is blocking the backup process. This can be due to network issues, permission problems or storage path conflicts.
While the error might be a bit complicated for some QuickBooks users, fixing it immediately is very much essential to avoid any sort of data loss. Today, in this piece of writing, we are going to cover the various aspects related to the fixation of payroll error 2277 in QuickBooks. Thus, keep reading this post and get rid of from this error.
What reasons cause QuickBooks Backup Failed Error 2277?
You can land into QuickBooks error code 2277 due to the following reasons:
Any sort of interruption in between the process of backing up the company file can automatically drag you into this annoying error.
If your IDP isn’t installed in a proper manner, then it can definitely lead you to such an error.
If there are any sort of junk files present, which include cache, cookies, and temporary internet files can be another possible reason behind to this error.
Using an outdated QuickBooks or Windows version can further trigger such an error.
Not just that, but you can further end up in QuickBooks backup failed error 2277 in case you haven’t added trusted websites.
Signs and Symptoms of QuickBooks error 2277
Following are set of signs and symptoms that are clearly noticeable.
The system slows down or freezes at regular intervals.
In case the system may shut down repeatedly.
An error message box with an error message pops up on your desktop screen.
The software becomes unresponsive while backing up the company files.
Effective Methods to Fix QuickBooks Error 2277 in Intuit Backup
In order to fix this error, QuickBooks users can checkout the quick methods listed below. So, without wasting much time let's troubleshoot the Intuit Data Protect Backup Failed Error 2277 in QuickBooks:
Solution 1: Use Intuit Data Protect Diagnostic Tool
One of the simplest solutions in this case is to simply use the tool i.e., IDP diagnostic tool. Here is how you can actually use the tool.
To start off with, click on system tray and further right click on the IDP (Intuit Data Protect) icon.
You are then required to select About Intuit Data Protect.
Furthermore press the F2 key and Ctrl key.
Launch the Intuit Data Protect Diagnostic Tool and later click on Run diagnostics.
The tool will further find the issue and perform the necessary steps to fix the issue.
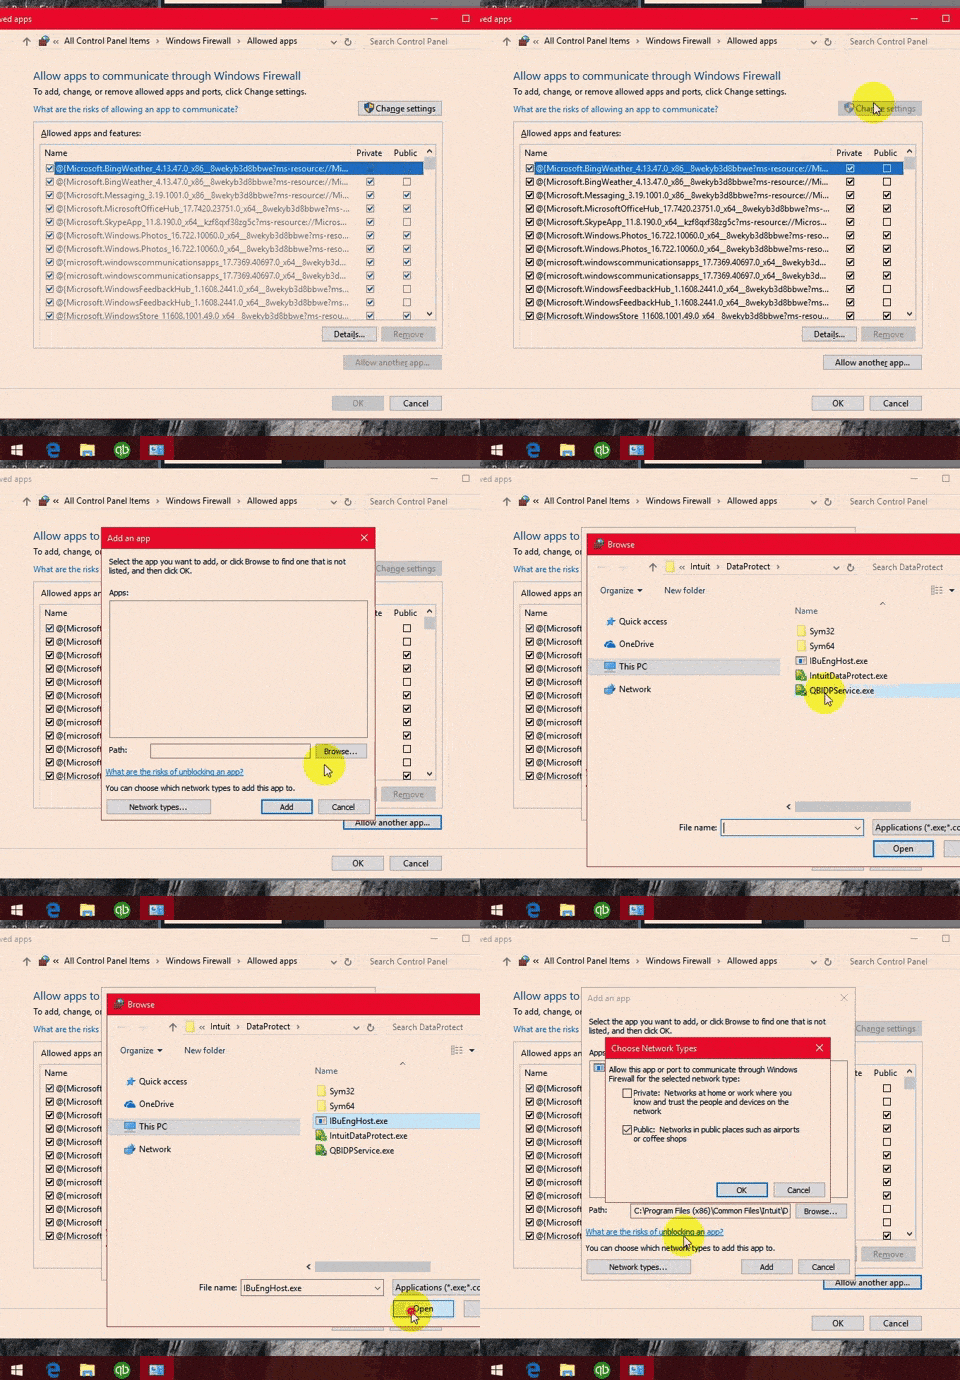
In case you have a third party application, then you are supposed to head to the official website and find out the info as to how you can add the following files to the exception.
Once you have added the files to exception, you simply need to retry backing up and find out whether the error continues to test your patience.
One of the simplest solutions in this case is to simply use the tool i.e., IDP diagnostic tool. Here is how you can actually use the tool.
How to fix issues while using the IDP Diagnostic Tool?
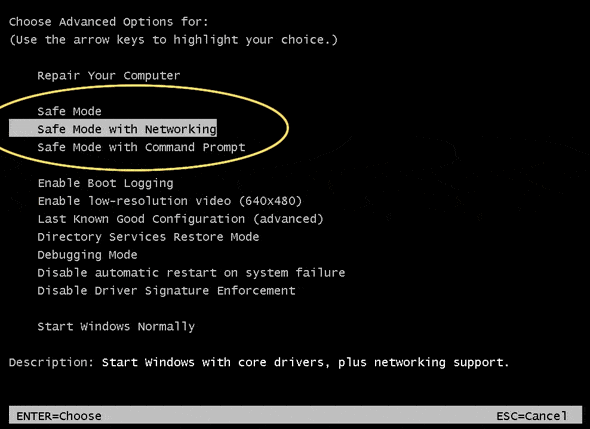
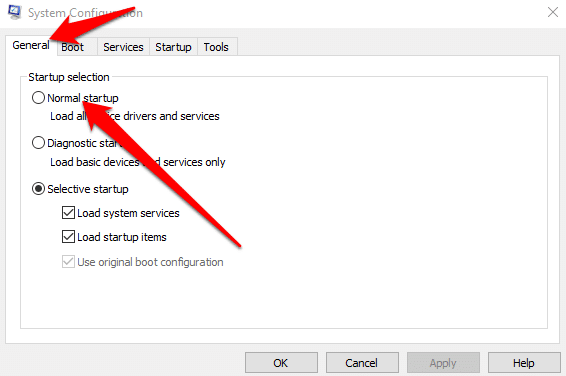
In case of some error or other issues encountered while using the IDP, you should consider incorporating Intuit in the trusted sites list. If even that doesn’t solve the issue, then you can restart your system in the selective startup mode and then attempt to use this tool to diagnose issues to fix the error.
Solution 2: Add Trusted Sites
As we move ahead, you can try adding trusted sites with the help of the steps below, and get done with QuickBooks error message 2277:
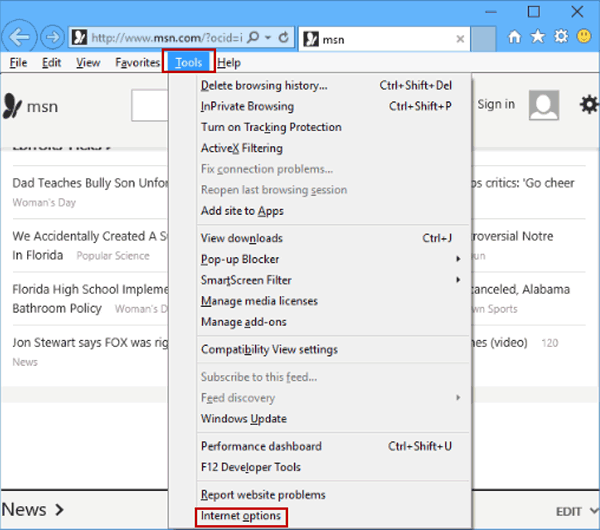
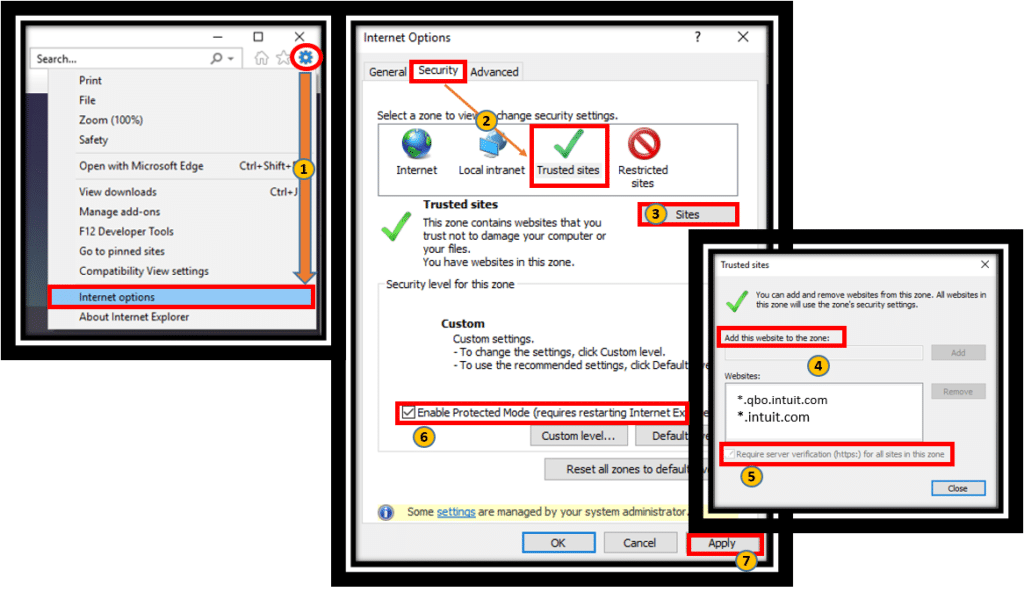
To start off, open Internet explorer and further navigate to the Tools menu.
Once done move to Internet options.
Now search for the Security tab and after this uncheck the enable protected mode box.
The user will then have to choose Trusted sites and further click on Sites.
Next step is to uncheck the require server verification for all the sites in this zone box.
Now add *.backup.com,*Intuit.com* and *.intuit.net, as trusted sites and further click on Close option.
Later on, head to the Privacy tab and choose Sites.
The very next step is to add the websites to the address of website box: ‘*.quickbooks.com and *.intuit.com‘.
You further have to choose Allow tab.
And then, close the process by clicking on OK tab.
Under this solution, press Start button and go to Control Panel.
After that head to System, then Security tab.
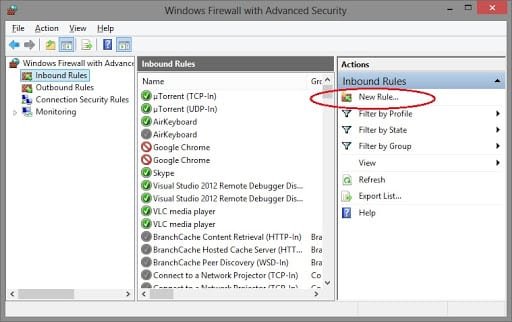
Within security section, go to Windows Firewall.
Now choose Advanced Settings then Inbound Rules.
Hit click on New Rule.
Enter Port as 80 and click on Next.
You now need to follow the same procedure for the Outbound Rules. However, this time add the Outgoing port as 443, 16841.
Solution 4: Clean Junk files and SSL state in Internet Explorer
If the above method didn’t work for you, then simply try cleaning up the junk files and temporary cache. This would surely help you to rectify the error from its root cause.
To begin with, launch Internet explorer and further click on the Tools tab.
Go for the Internet options and in case you aren’t able to find it, then simply press Alt key.
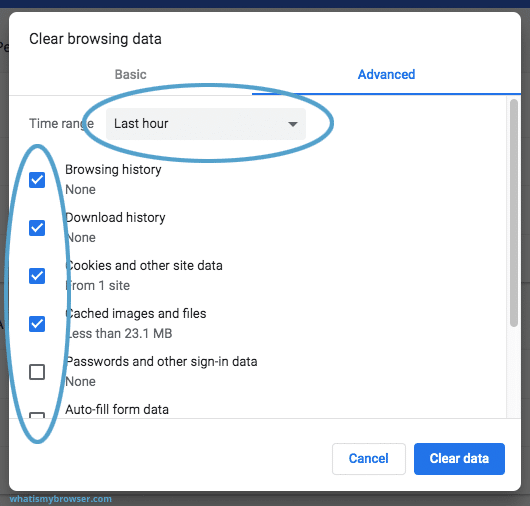
Heading forward, navigate to the General tab and then go for the option stating Delete.
After that, look for Browsing history section.
And then, checkmark the Cookies and website data, temporary files, and other history and data.
Next step is to uncheck the option stating Preserve favorites and website data and further click on Delete tab.
You are now required to head to Content tab and then choose the Clear SSL state tab.
The final step is to hit the OK button and Save the necessary changes.
Backup errors can be extremely challenging and fixing them as soon as possible is very important so as to ensure that your data is safe and secure. Once you fix the storage location, network access or system permissions, the backup process usually works fine again. Hopefully, reading this segment might turn out helpful for you in getting rid of the QuickBooks error 2277 without any technical hindrance. However, if the issue still persists after following the troubleshooting steps, you don't have to deal with it alone. XpertBooks Pro is an independent service provider offering quick technical assistance for accounting software related issues. Our experienced professionals can help diagnose complex problems and guide you toward an appropriate resolution.
Frequently Asked Questions (FAQs)
When does backup error 2277 appears?
Error 2277 might occur while backing up company files in QuickBooks.
How can we fix error code 2277 in QuickBooks?
By using IDP Diagnostic Tool, adding Intuit as a Trusted site and by cleaning the system junk files, you can rectify this error. If handled properly, this error can be resolved quickly without affecting your actual company file data.
Can Error 2277 lead to a permanent company file data loss?
Of Course! This error, if left unresolved, it can result in serious data damage of your important accounting information in company file.