Do you came across with an annoying pop up message stating as “The connection to the company file has been lost. QuickBooks must close immediately. Any unsaved data will need to be re-entered” and don’t know how to deal with it? Well, there can be numerous underlying reasons causing connection issues. These errors can often appear abruptly and hinder the entire process of working with the company file. A difficulty in accessing the company file might lead to such kind of error. Also, in case the system turns to sleep mode, then you can end up in this error or if the internal network card of a system is set to go into sleep mode after a specified period of time, then it might lead to the lost connection issue. In this post, we are going to discuss in detail the causes and quick fixes to this annoying error. So, make sure that you keep reading this post till the end.
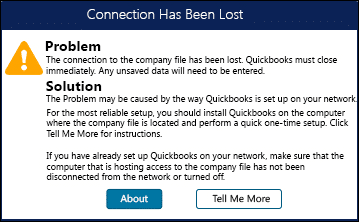
At the time when you are trying to access the company file, you may see the following error message on your screen:
Error
Description
Connection Has Been Lost
The connection to the company file has been lost. QuickBooks must close immediately. Any unsaved data will need to be re-entered.
Brief about Error message: Connection Has Been Lost in QuickBooks
The error name itself indicates what this error is about. It is basically an error that appears when the software loses the connection to the company file. This might end up the software might be forced to close immediately. Moreover, if the data is unsaved, then it might not be recovered, and you might have to re-enter it. This indicates that the software won't be able to access the company file or a particular section of the company file. Connection to QuickBooks company file is lost issue is similar to Abort error, where the software is unable to change or proceed to the company file in the mid of the process. This can also damage the QBWUSER.INI file. There can be various factors causing this issue, which will be discussed later in this article. So, make sure to read further!
What Causes Error: Connection Has Been Lost in QuickBooks?
You may face Error message: Connection Has Been Lost in the following situations:
This error can be caused if the company file is stored on another system or on a portable drive and the connection to the storage device is disrupted.
Another factor causing the issue can be if the power management settings in Windows activated the sleep or hibernation mode on the system having the company file.
You can also face this issue if more than one system on a network is configured to host the QuickBooks company file.
In case the systems in a multi-user installation are running different versions of QuickBooks.
If the data in the company file gets damaged somehow.
If you use a standalone system
There can be a couple of factors causing this issue, out of which we have enlisted some of the common ones below:
Any antivirus blocking the QuickBooks desktop
If the QuickBooks company file got corrupted
You might also face certain issue if the folder where the company file is saved requires some additional permission.
Signs and Symptoms of connection lost problem in QuickBooks desktop
In order to identify the error, the below signs and symptoms would work:
In case the QuickBooks software shows the error while opening or is shutting down often with unrecoverable QuickBooks error, then this error is probable to happen.
If the system is being shut down frequently without receiving any error message.
Or you witness the software getting terminated from Windows 8.
If the software suddenly stops working and an error message pops up on the screen.
Another sign can be if the system is randomly crashing.
Quick steps to perform before the troubleshooting
Before you jump on to the detailed procedures to get rid of the QuickBooks desktop connection lost issue, here we have a few quick tips that could help you to get rid of the error with ease:
You can restart the database server manager
Moving the file to a different folder
Setting the Power Saving option to never
In case you are making use of just one computer, then you can carry out the below steps:
The folder where the company file is stored might require additional permission.
Any 3rd party software like antivirus might contradict QuickBooks accounting software.
In case the QuickBooks company file itself is corrupt.
Methods to Fix the Connection has been Lost Error in QuickBooks
You can try a few methods to fix the QuickBooks connection has been lost error. For best results, you should follow the order in which the solutions are presented. Let's take a closer look at each method:
Method 1: Restarting your system and QuickBooks Desktop
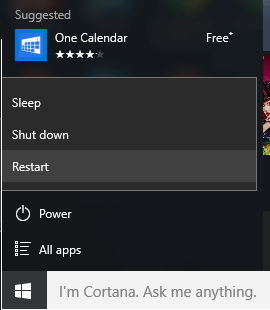
Many times, a mere reboot can work in resolving the issue. So, before implementing huge and tedious solutions, we would recommend you start by restarting the software and check if the error is rectified with this simple process.
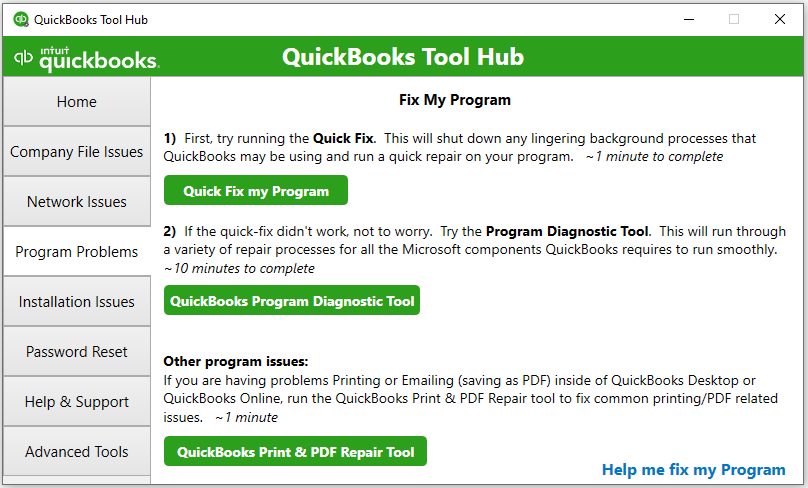
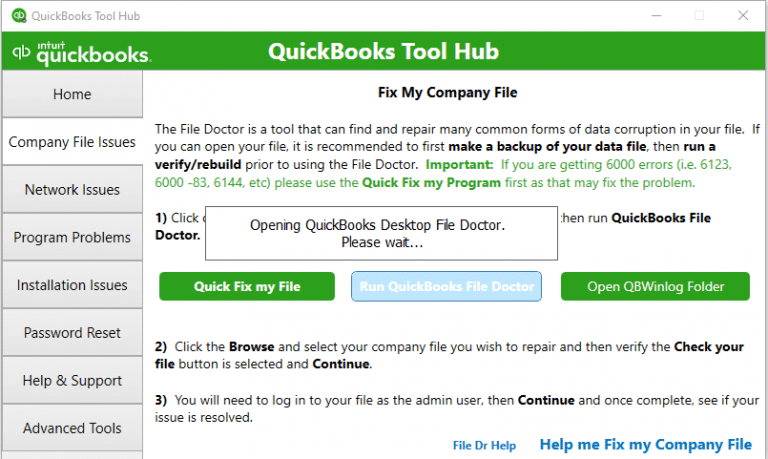
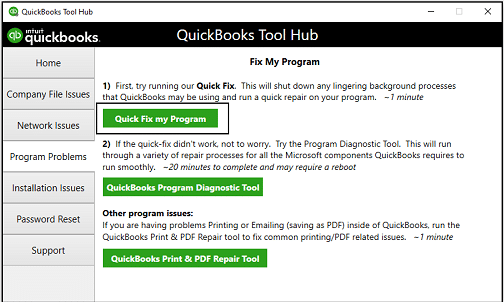
Method 2: Running the Quick Fix My Program and File Doctor Tool from the QuickBooks Tool Hub
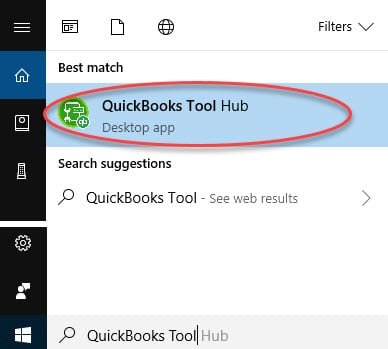
The QuickBooks tool hub is a great tool for fixing various QuickBooks related errors. In order to make use of this tool, you will have to turn off the QB software. The steps involved in this process are as follows:
Step 1: Downloading and installing QuickBooks tools hub
For the ones whose company file is stored on a portable drive, the below steps are applicable:
The company file should be stored on the local drive, and working on the company file till the time it is sitting on a portable drive, such as a flash drive, is not recommended. You can proceed with the steps knowing the risk:
Checking the portable drive
It is supposed to ensure that the portable drive is connected. Or you can make an attempt to:
Disconnect and reconnect it
Spotting the QuickBooks company file on the removable drive from My computer
Or saving other files to the drive to ensure that it continues to work
You are also required to ensure that the drive has plenty of available space. The drive should have at least the space equals to the size of the company file.
In case the system is connected to a network and the data file stored on another system:
The network connection might be unstable
Folder where the file is saved might need additional permission.
Firewall is preventing access to the network
Power saving mode is turned on
The network can be broken in several ways:
You might have seen a Windows error or similar problem on the system
The server or the host might have a similar issue
Or there might some issue in the connection of the systems
It should be noted that the wireless networking is not supported by QuickBooks and is not reliable for information like the company file:
Open or save another file on the server to ensure that have the necessary access.
Create and delete Microsoft excel or WordPad file on that system.
In case you are unable to create and delete a non-QuickBooks file in that folder. You need to set up Windows access permissions required for QuickBooks.
Another point that you should note is that if the network isn’t working or if you are uncomfortable carrying out the steps, then consulting a professional is recommended.
Method 4: Disabling the power management settings on the server
Another method to fix QuickBooks Error Message: Connection Has Been Lost is to disable the power management settings on the server. The steps involved in this process are as follows:
On the system where the company file is stored, open the power management settings in the Windows control panel.
Press the Windows key.
And then type power options, and then select the Power options from the results.
You need to turn off all sleep, standby, and hibernation modes on the host system. Also, you may refer to Windows help and support for any further information about power options.
In case the QuickBooks is installed on the host system, the steps below should be followed:
At first open your QuickBooks.
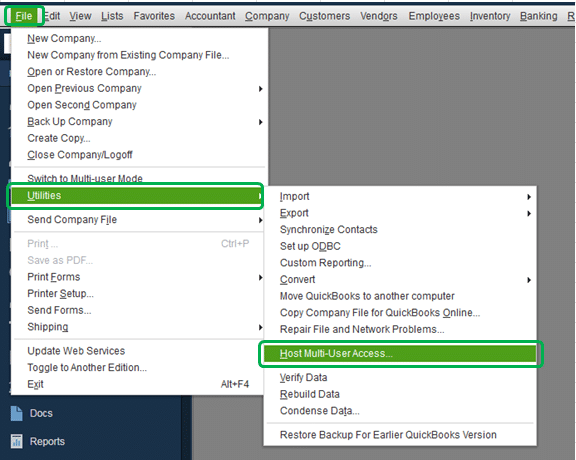
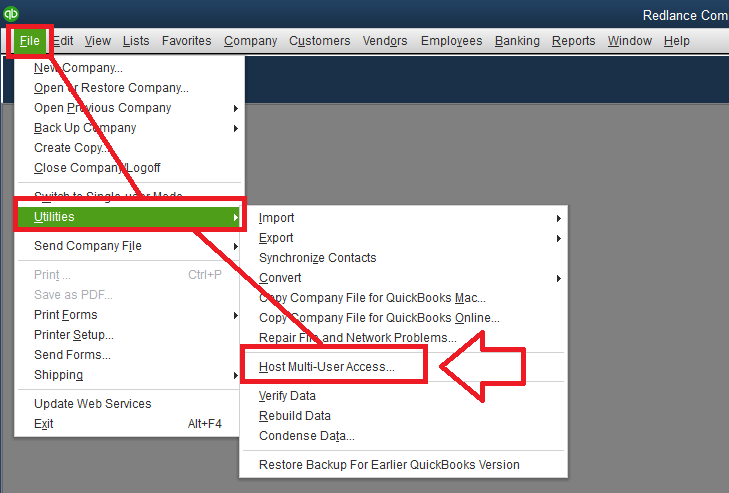
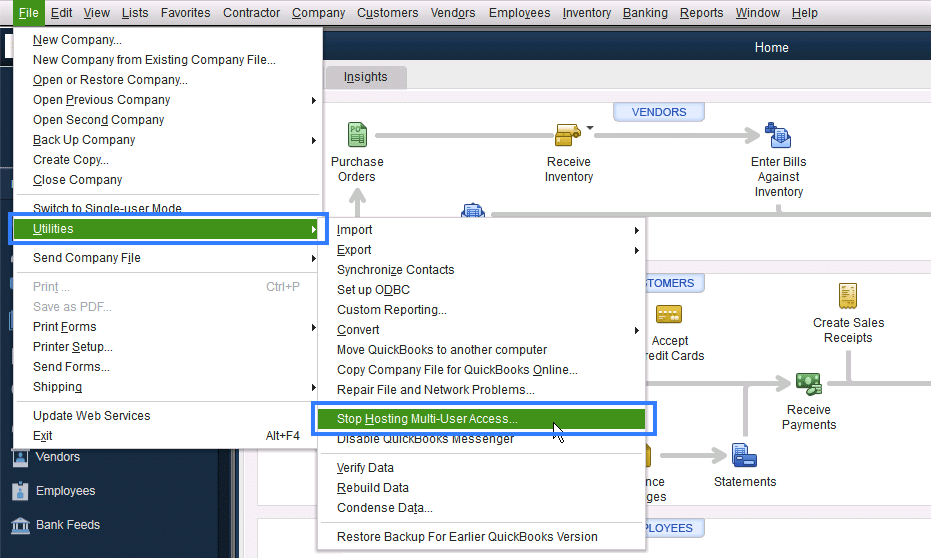
And then select file and utilities option.
In case you finds the stop hosting multi-user access in the menu, then hosting is enabled, and you can proceed to the next step.
In case the host multi-user access is seen, then select it to enable hosting on this system and then move to the steps ahead.
If QuickBooks is installed on the host system:
For this, double click the QuickBooks database server manager icon in the Windows system tray. (You need to select Start > all programs > QuickBooks > QuickBooks database server manager)
After that, hit a click on database server tab.
Also, you need to verify that the company file is visible in the window below currently connected company files and logged in users. In case it is not, then you need to click the scan folders tab and then click on help for the information about adding the company file.
Lastly, close the database server manager window.
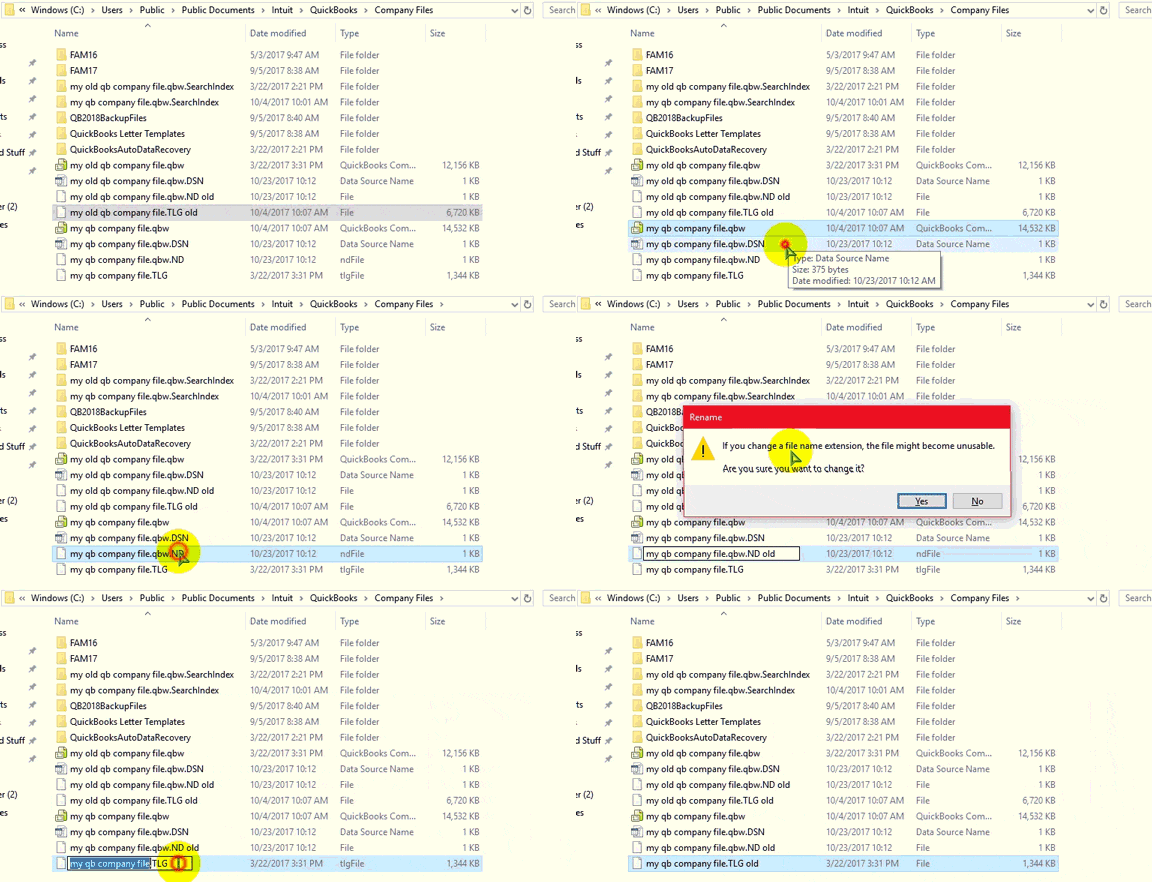
Method 6: Removing and re-creating the .nd file
You need to scan the folder where the company file is situated to create the network descriptor file. The .nd file stores information about the system that is hosting the file. The steps involved in this process are as follows:
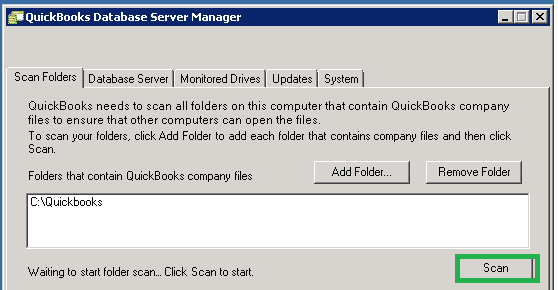
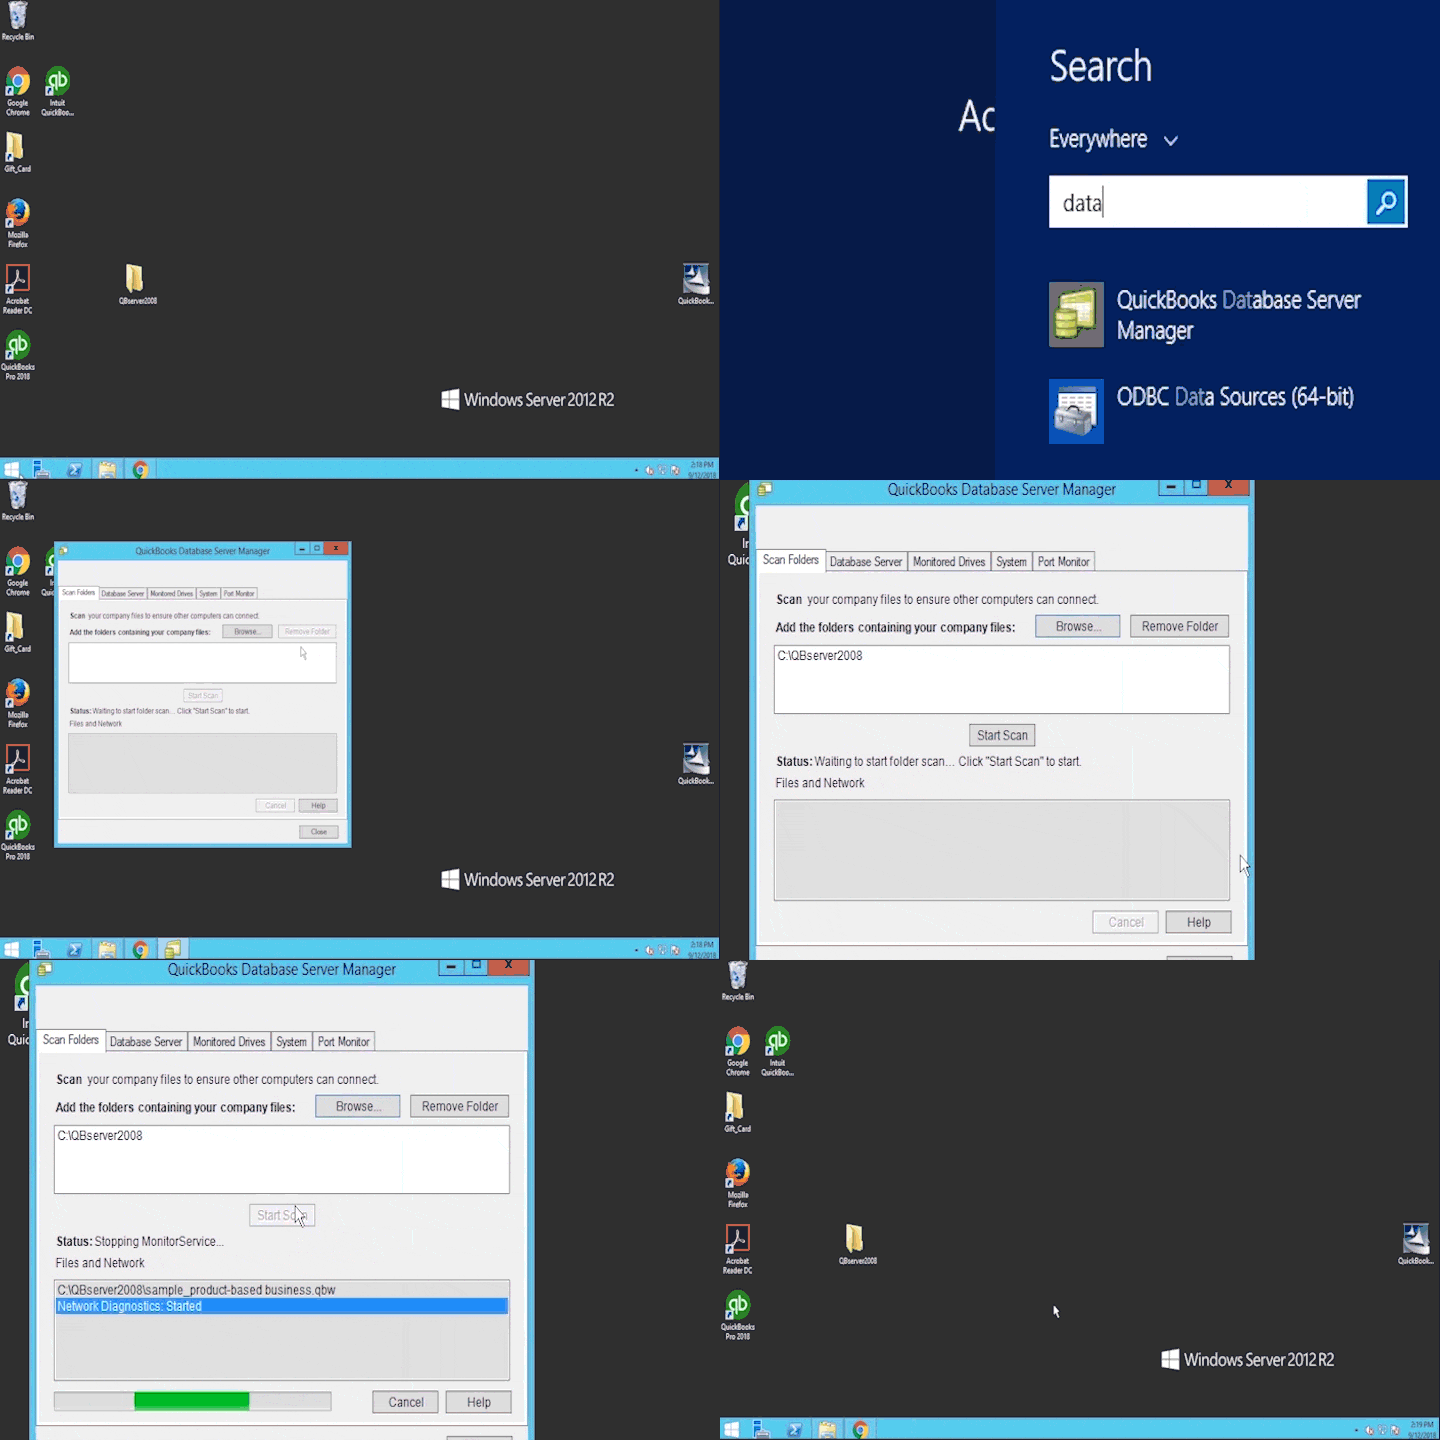
Firstly, press Windows key and then type QuickBooks database server manager.
And then choose the QuickBooks database server manager and then hit a click on the add folder option and spot the folders storing the company files.
Next step is to click on scan after the folders are added.
Now the data files appear under QuickBooks company file and then hit close.
To end the process, browse to the folders containing the company files and make sure that the file band was created for each company data file.
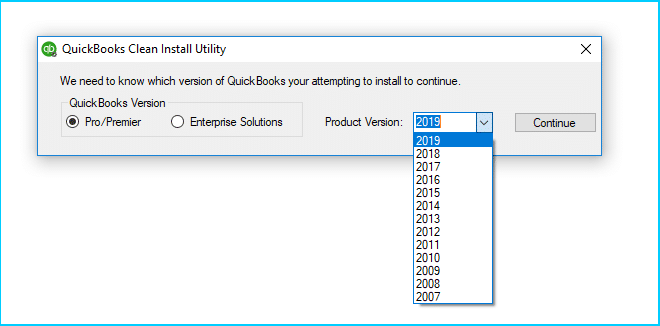
The point too be noted here is that if you are unable to spot the database server manager in the programs list, then it is recommended to uninstall QuickBooks and reinstall selecting the second option.
Workstation tasks
You need to ensure that the hosting is turned off
For this, open QuickBooks desktop.
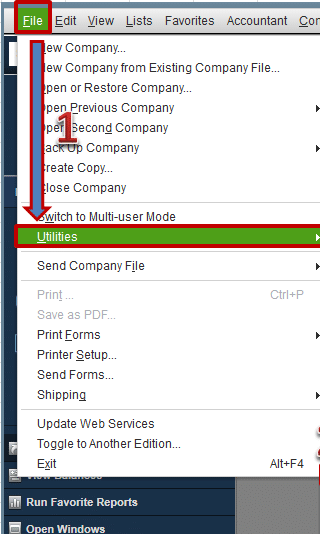
And then select file and utilities tab.
If the stop hosting multi-user access appears, then select it to disable hosting on the system.
In case of host multi-user access appears in the menu, the hosting is already disabled and move ahead.
After that, open the company file using a UNC path.
UNC (Uniform Naming Convention) is basically a common syntax Windows uses to describe the location of a network resource.
An example of a UNC path is \\Computer Name\Shared Folder\. Computer Name in this example would be the name of the server where the company file is hosted.
You can open the company using the UNC path by carrying out the below steps:
Firstly, open QuickBooks desktop.
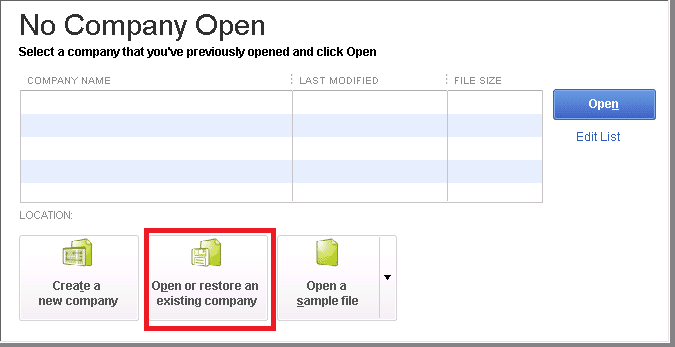
And then choose file and open or restore company.
Next step is to choose open a company file and then click on next.
And further, hit a click on my network places.
And then double click entire network and navigate to the location on the server.
And lastly, choose the company file and hit open.
It is recommended to ensure that you are connected to the network using wired connection configure firewall and then add QuickBooks firewall ports set up folder permissions to share the company files.
In this post, we have tried to cover all the aspects related to the QuickBooks connection has been lost error. Carrying out any of the methods that we have discussed above might be of great help in getting rid of this annoying error. However, if any information is missed out or if any of your queries remained unanswered, then feel free to contact our industries best accounting professionals. You can ask all our doubts to our XpertBooks Pro consulting team anytime 24X7X365.
FAQs
How do I restore a network connection in QuickBooks Desktop?
1. Open QuickBooks as administration and click on File menu. 2. After that select "Open or Restore company". 3. Herein, select "Open a Company file" and click on "Next". 4. Now select "Network Places" and then tap on "Entire Network". 5. Once done, go to the location of the company file. 6. Followed by, select the file and hit on "Open". That's it!
Why is QuickBooks not connecting to the server?
The reasons behind this technical QB error are: 1. Old or incompatible version of QuickBooks 2. Poor internet connection. 3. Furthermore, a chance that the connection is being blocked by the Firewall cannot be overlooked.
Is there any tool to fix QuickBooks connection has been lost error?
Yes! various sub-tools of QuickBooks Tool Hub can be use to fix this error. This tool contains different features, among which the "QuickBooks Connection Diagnostic Tool" and the "File Doctor Tool" can be used for fixing this connection issue in QuickBooks.
Are trying to install QuickBooks desktop and suddenly encounter an installation error? Well, there is no need to panic, as installation related errors are quite common and can occur due multiple reasons. In QB community, many users have already reported installation related errors such as QuickBooks error 1603, 1935, 1904, 1402, 1722 and other setup related issues while installing or updating QuickBooks desktop. These installation errors have always been one of the most significant issues of this software. Thus, Intuit, the company that developed this program, analyzed the installation issues faced by users and introduced the QuickBooks install diagnostic tool and various other tools that could help the users in dealing with the installation problems. In this segment, we'll be discussing several tried and truly tested methods that can assist users in solving QuickBooks desktop install errors.
List of QuickBooks desktop installation errors
If you runs into trouble while installing QuickBooks desktop, or while opening if after the installation, then do not worry we are here to help you. The list of errors that come under this category are:
Well, if you are familiar with any of these errors and are facing any of them, then the below methods can be employed. So, without further ado, let us dive into the procedures.
What can lead to install errors in QuickBooks desktop?
The various causes of installation errors in QuickBooks are:
The system does not meet the minimum system requirements.
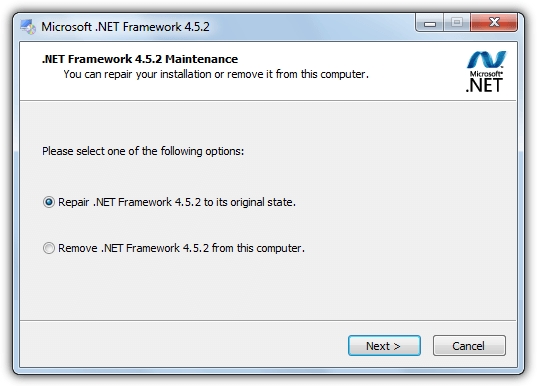
If there is damaged Microsoft .NET Framework.
Conflicting programs are running in the background.
Microsoft components may be damaged or corrupted.
A virus or malware infection has affected the system.
Methods to Fix QuickBooks Desktop Install Errors Like an Expert
Encountering QuickBooks desktop install errors happen in a fraction of a second, but resolving them might take a few steps or methods. So, let us check out tried and tested methods one by one that you can employ to get rid of the annoying install errors.
Method 1: Update Windows OS
Updating Windows can help you in fixing the installation error up to a major extent. The steps involved in this process are:
At first, review how to manually update sections of the Microsoft article and then update the version of Windows.
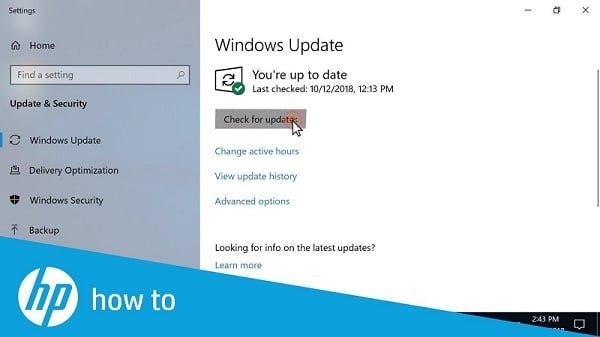
Press Windows button and type Update Windows in search bar.
Hit a click on Windows Update option to option it.
Next step is to tap on Check for updates.
Install all available updates.
After the update completes, restart the system.
Then open QuickBooks and the company file, in case you were able to open the QuickBooks before the error was seen.
In case you weren't able to finish installing QuickBooks, then you would require to install the QuickBooks desktop again.
If you were able to install and open QuickBooks, you would not be troubled by the error anymore.
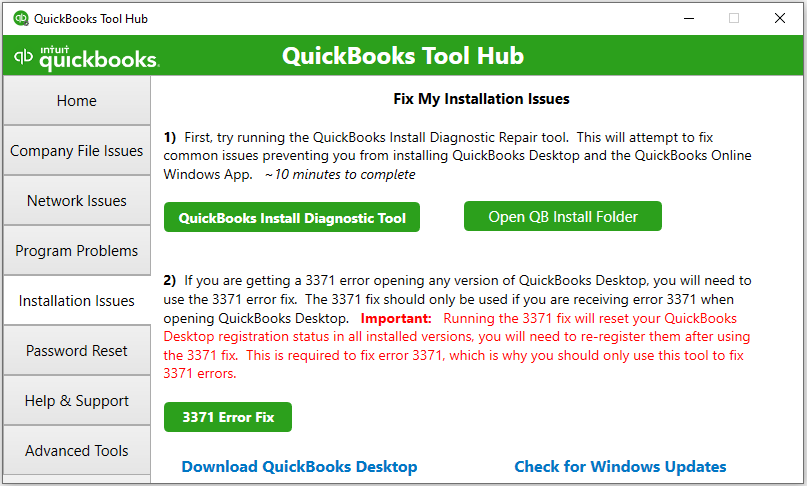
Method 2: Download QuickBooks tool hub and use Install Diagnostic Tool
Earlier, the QuickBooks tool hub program was not in trend, and not many users are aware of it, but this can be a savior for these install errors. You can download and run the tool hub and can use the install diagnostic tool to get rid of the QuickBooks installation errors. The steps involved in this process are as follows:
In case the QuickBooks install diagnostic tool and the update didn’t fix the error, you can repair specific windows components yourself. It should be noted that you should carry out the below processes under the professional assistance.
Press Windows key and go to Control Panel.
After that select Programs and Features option.
Tap on Turn Windows Features On or Off and verify these options:
.NET Framework 3.5
.NET Framework 4.8 (or newer)
If it disabled, enable the framework immediately.
Save all the changes, and restart your system.
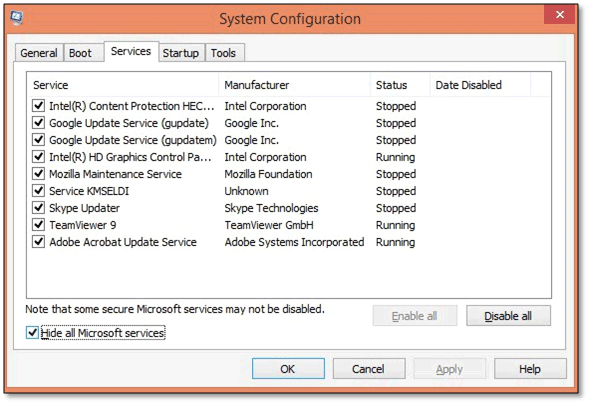
Method 4: Use selective startup mode to install QuickBooks desktop on safe mode
In case none of the above methods worked, you are supposed to install QuickBooks in selective start mode i.e. safe mode, as it might fix the error up to a certain extent. The steps involved in this process are as follows:
The last method can be to delete or remove the temporary files and folders. The steps to be followed here are:
The first step is to click into Windows or Start icon.
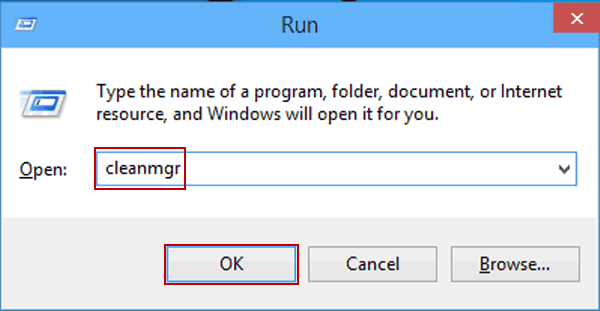
And then open Run command.
You are then required to type in cleanmgr on the box and tap on Enter.
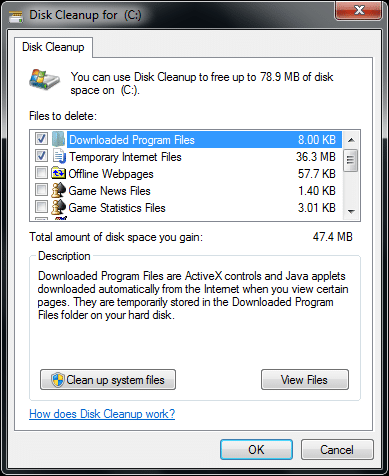
Also, start the Disk cleanup to scan the system. This process will generate a report that will show the junk files size in the system.
The next step is to select the files that are required to be deleted with a click on the checkbox.
Lastly click on OK and reboot the system.
Winding up!
Implementing any of the above strategies can be of great assistance in dealing with QuickBooks desktop install errors. However, a situation might arise when none of the above methods might work. If this happens, do not be concerned just give us a call at our helpline i.e., 1-800-761-1787, and our XpertBooks Pro team will handle the issue. Our experts team is available round the clock to provide the best possible assistance to all users. So, do not hesitate in calling us anytime, we will be happy to help you.
FAQ's
Can QB installation errors be specific to certain operating systems?
Yes! these errors can be specific to specific OS. This is because the particular QuickBooks versions have specific requirements.
Can I install multiple versions of QuickBooks on the same computer?
Yes! You can install multiple versions of QuickBooks Desktop on the same computer. However, each version must be installed separately, and your system should meet the minimum requirements to ensure optimal performance.
We all know that QuickBooks is one of the finest accounting software available for both Windows and Mac versions. After every couple of months or after a certain time period, updates roll in for this software, which ensures optimum user experience. If you are a QuickBooks for Mac user, this article can be of great help to you, as here we will be elaborating about the ways to download and install updates for QuickBooks Mac. The newer update is often released with some great features, so it is important that you make sure that your software is up to date. Read the article ahead to find out how to update the QuickBooks Desktop for Mac.
Well, similar to other updates, the QuickBooks desktop for Mac Plus 2023 also includes some new and fresh features just like reporting module, a new and customizable dashboard, dark mode, electronic invoicing, payment acceptance, bounced check feature, text searchable image uploading, Unlimited customer support, Automatically send statements, Apple silicon processor compatibility, Create customer groups, Choose from multiple email contacts, Improved transaction management, Gmail option for default email, Collapse report columns & rows and many more. The saddest part of this new update is that it doesn’t resolve the issues of those users who were facing problems in earlier versions. The new update significantly enhances the program's operation and resolves the troubling issues. One limitation of this new update is that it does not address the issues that users had with previous versions.
Important
In case you spot "the access to the services in QuickBooks for Mac will expire on date", the access to the services through QuickBooks for Mac will be discontinued. You can check out the information related to the QuickBooks desktop service discontinuation policy. This will mean that you will no longer receive any critical security updates. In case you receive any security update before the mentioned date, then it is recommended to install them using the steps given below.
In case you don't use any of the add-on services, then the product will continue to work for you. But if you wish to continue using them, then you need to upgrade the software to the latest version.
Steps to check if you have the latest release
You can check whether you are having the latest release or not. The steps to be followed for this are:
Steps to Update and Install the QuickBooks Desktop for Mac
So, now that you know why you need to update the software, it is time to learn the process. Well, updating the QuickBooks desktop for Mac software doesn’t involve any rocket science, a few basic steps can work for it. We have jotted down all the steps that one must follow to update QuickBooks desktop for Mac without any issue. So, let us have a look:
In-product update
Talking about the processes, the very first method to update the QuickBooks software is the In-product update. The steps involved in this process are as follows:
Select Check for QuickBooks updates from the QuickBooks drop-down menu.
Go for Install update, if the newer version is available.
Next step is to select install and relaunch options, when asked to.
When all the above steps are carried out properly and the software update is complete, the QuickBooks for Mac will open up automatically.
Manual update
Other than the in-product update method, you also get a manual method option. The steps involved in the manual method option are as follows:
Uninstall QuickBooks for Mac
Close your QuickBooks desktop.
Move to the Finder menu and then choose Go applications.
Next step is to Delete or drag the QuickBooks icon to the trash.
After the software is uninstalled successfully, reinstall the latest version.
Opt for change to select the QuickBooks desktop version.
Select Download and then start the Process to download the installer file to the system.
Moving ahead, you need to double-click the Downloaded .dmg file.
Now, move the QuickBooks desktop icon to the applications folder to install.
After that, you can simply restore the company file in QuickBooks desktop for Mac. However, the most important point here is that for verifying the update and checking the release number, you will have to open QuickBooks and press CMD+ 1 keys.
Steps to restore a file
Initial step requires you to open QuickBooks desktop.
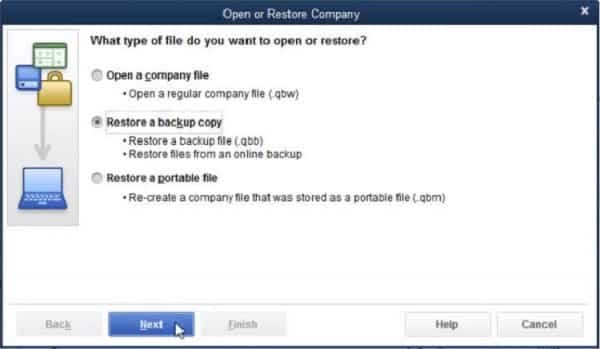
Then, select the File menu, and choose Open or Restore company option.
The next step is to restore the file based on its type.
Windows company file:
Hit on Open a company file and then choose Next tab.
After that, access the Appropriate folder and then choose the Company file.
Once done with that, hit on Open and then Enter the password.
Windows backup file
Windows portable file
Mac company file
Point of sale file-check the Help menu for the updated steps .
Steps for Updating QuickBooks server for Mac
You will also have to update QuickBooks server for Mac, which can be done by carrying out the below-mentioned steps below:
This can be done by Finding the QuickBooks server next to the Apple logo.
Next step is to select the Check for QuickBooks server updates option.
Next, you need to tap on Install Update.
To end the process choose Install and relaunch, and you are good to go.
These were a couple of steps that the QuickBooks desktop for Mac users needs to follow in order to update it to the latest version. We hope that sharing the steps above might be of some help for you in updating QuickBooks desktop for Mac. However, contacting our XpertBooks Pro team of professionals is still the safest option you can go for. Connecting with experts and certified professionals will ensure to provide you with the best possible support services. We work round the clock to resolve each of the queries of the users.
FAQs related to Update QuickBooks Desktop for Mac
Can I set up QuickBooks Desktop for Mac to update automatically?
No! The automatic update feature is not available for QB Desktop for Mac.
Will updating QuickBooks Desktop for Mac affect my company file or data?
The update process does not affect the company files in QuickBooks. However, for data security, it is recommended to secure data by creating a backup of the files.
Are there any system requirements for updating QuickBooks Desktop for Mac?
Yes! QuickBooks Desktop for Mac has certain system requirements that need to be ensured before embarking o the update process.
Can I roll back to a previous version of QuickBooks Desktop for Mac after updating?
Upon updating QuickBooks desktop for Mac to a newer version, users can't revert back to the previous version of the accounting program.
Sometimes, when you try to work with full concentration, it is possible that you might come across with one or more technical snags in your QuickBooks software. As the regular updates are released by Intuit, there are times, when you might have to face bugs and errors. One such error can be if QuickBooks already has a company file open error and it create problems. So as, in order to assist you with dealing this particular issue, we've crafted a step-by-step procedure that will help you to get rid of the error with ease.
Understand all about QuickBooks already has a company file open error
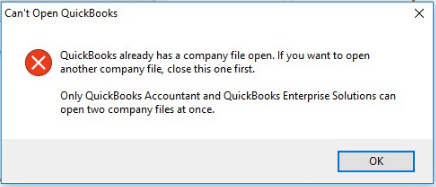
As the name of the error speaks for itself, in this error message, whenever a user tries to open up a company file, they face one of the following error message stating as:
Can't Open QuickBooks
QuickBooks already has a company file open. If you want to open another company file, close this one first.
Problem
Only QuickBooks Accountant and QuickBooks Enterprise Solutions can open two company files at once.
Now, due to this, not only the productivity hampers as you are not able to work efficiently but also without opening a company file no previous data can be recollected. Thus, this small error can cause a lot of trouble if not fixed on a priority basis.
Reasons behind to QuickBooks already has a company file open error message
As this is an issue related to the company file, it is hard to determine the exact reason behind this error, however, following are some of the most common issues which we have come across whenever this error pops up.
9 DIY Steps to Resolve QuickBooks already has a company file open error
In order to ensure that all users will be able to completely fix their system from this error, we have bifurcated the process into several steps. It is essential for all the users facing this issue to follow all the steps in order to fix this error from the system completely. So, let’s get started:
Step 1: Update QuickBooks desktop to latest release
Start with checking whether or not the version of QuickBooks installed is the latest one.
Start QuickBooks on any of the workstations on the network.
After that click on the File menu and check whether or not “Host Multi-User Access” option is available under Utilities. If it appears then the system is not causing any issue.
In case the Stop Hosting Multi-User Access option is popping up, select it.
Repeat the same process on all the workstations on the network.
For server
Open QuickBooks and go to File menu.
After that click on Utilities.
If “Host Multi-User Access” option is appearing then select it.
Now repeat the process and select Stop Host Multi-User Access to reset the multi-user mode.
Again, repeat the steps and select “Host Multi-User Access”.
Locate the company file and search the folder for the file ending with .qbw (there are a lot of file types in the QuickBooks desktop so ensure that you search for .qbw file only).
Manually check whether the .qbw file is opening or not.
If the company file is opening up manually then it is an error otherwise the file itself is corrupted.
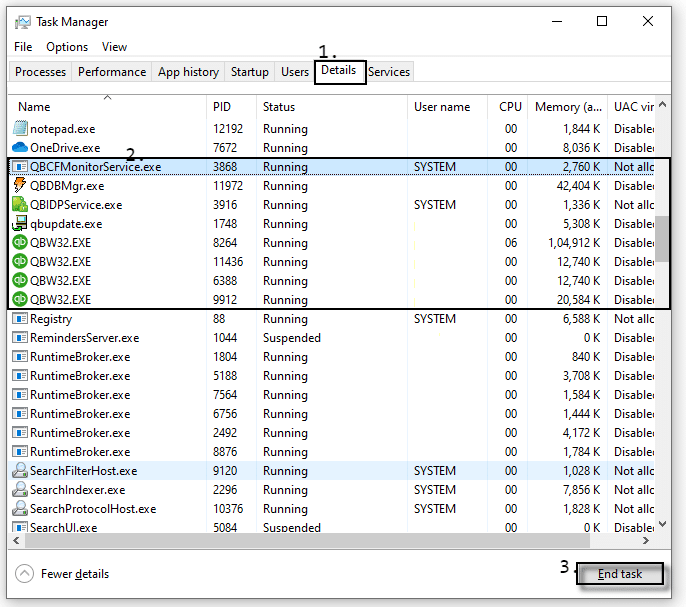
Step 4: Close all QuickBooks processes from task manager
Tip: If you don't want to restart your computer, you can end the appropriate process in Windows Task Manager.
For this, open the computer's task manager, by right clicking the taskbar at the bottom of the system.
You can open the task manager by pressing Ctrl + Shift + Esc keys.
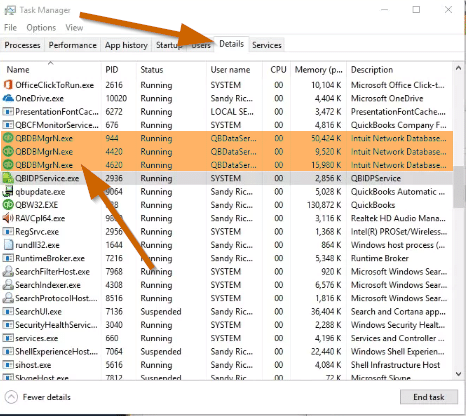
Now, move to the processes or details tab and also look for multiple instances of QuickBooks processes running.
The QBDBMgrN.exe is the culprit in the details tab.
And then hit a right click to close down the processes, while leaving one open.
Lastly, carry out the steps you were performing in the commerce sync connection.
Closing all QuickBooks processes at once
In case you don't want to close your QuickBooks processes separately, then you can follow the below given steps to close them all at once. The QuickBooks might have different name in different Windows system. Closing QuickBooks process all at one time is a bit easy. The steps to be followed here are:
At first, press Ctrl + Shift + Esc keys to open the task manager.
Hit a click on processes tab.
Click on QuickBooks and opt for end task option.
Now reopen QuickBooks and all processes would be closed.
In order to determine whether the company file is damaged or the QuickBooks program is causing an issue, start with opening the Windows START menu.
Search for File Explorer and open it up.
Once the File Explorer is opened up, search for QuickBooks.exe file which will be present in the QuickBooks folder.
Lastly, hold down the CTRL key and then double click on QuickBooks.exe to open it up. Make sure not to release the CTRL key until QuickBooks Desktop is open.
Now, try opening a company file, if it doesn’t open then try one more time with a sample file. In case the sample file also doesn’t load up, there is a problem with the software itself.
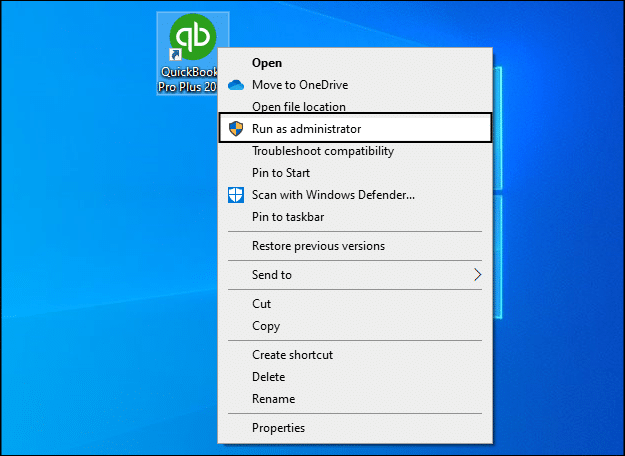
Step 6: Check the file properties
To begin with, hit a right click on the QuickBooks icon or shortcut, and then click on run as admin.
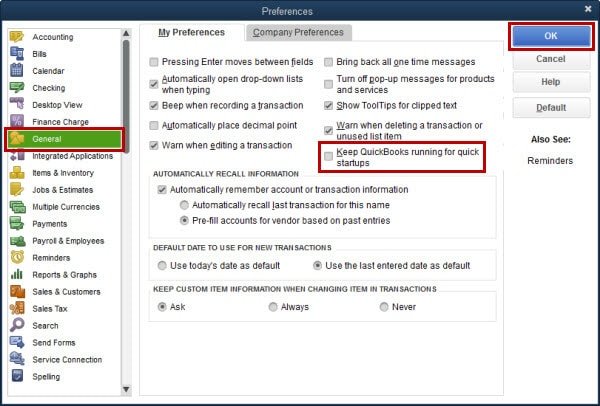
After that click on preferences on the edit menu.
Then hit a click on general in the left pane and then on the My preferences tab, clear the keep QuickBooks running for quick startups checkbox, also click on OK tab.
We hope you find this step by step guide helpful in fixing QuickBooks already has a company file open error. In case, the issue persists or you have any more queries, you can consult XpertBooks Pro team anytime for accounting resolution. Our team of experienced experts is available 24/7 and is able to provide fast and efficient solutions to any accounting-related issues.
Entering accounting transactions incorrectly into the accounting system is one of the common blunders that you can make. When this kind of situation arises, you need to make changes to the transaction even after it is recorded. You can simply perform this by creating a journal entry. In order to adjust or correct transactions and post entries, you can easily make journal entries in QuickBooks Desktop. Creating journal entries is a simple process with a couple of steps. The journal entry process is simple, as we said earlier, but you can only make a journal entry for one customer or vendor at a time. In case you want to correct multiple customer or vendor balances, separate entries are to be posted. Scroll through the post to learn the entire process properly.
Moreover, If you require help with your technical issues at any point in time, then do not think much to giving us a call at our helpline number i.e. 1.800.761.1787, as our XpertBooks Pro team will be there to assist you round the clock. You will get the most relevant answers to all your journal entry in QuickBooks related queries, so get in touch with us today!
Talking about a general journal entry, it is an accounting transaction entered, or posted directly to the general ledger. A company’s general ledger basically acts as its main group of accounts, which is used to record the balance sheet and income statement transactions. In simple words, it is a record of transactions that show the credit and debit balance of the company. Journal entry is regarded to be a very important and essential part of business accounting. So, it is important for you to learn all possible facts related to journal entries, which we will be discussing later in this post. So, read ahead and explore further!
Pointers you can’t miss while creating the journal entry in QuickBooks
It should be noted that QuickBooks Online doesn’t support multi-currency in a single journal entry. This means that each and every currency has its own journal entry.
If in case you create an entry and wish to rectify the transaction, then it can be done by deleting and reversing the journal entry.
You need to view the additional column for the location and class if you are making use of QuickBooks online plus.
To reflect on the sales or expense tab, you are required to ensure that the entry has a line for either A/R or A/P and also the vendor or customer name.
Other important rules to make journal entries:
You are recommended not to make journal entries to inventory or payroll accounts.
The entry to the accounts payable type or the accounts receivable will require a customer or vendor.
Moreover, it is important for you to use the accounts receivable or accounts payable account on the second line of the journal entry.
Along with that, you should include one account receivable or accounts payable type account in every entry.
When to use Journal Entry in QuickBooks online?
You are recommended to make use of the journal entry in QuickBooks online when:
At the time of sending the money between income and expense accounts.
When transferring money from an asset, liability, or an equity account to the income or expense account.
In case you enter the debits and credits in the general journal or the ledger.
Steps to Create or Record Journal Entries in QuickBooks Desktop
Checkout the following steps in order to record journal entries in QuickBooks Desktop:
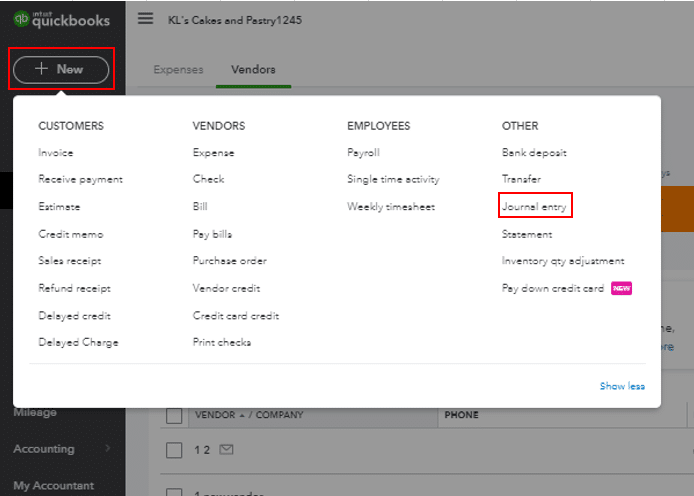
Step 1: Navigate to the Journal entry feature
You need to first required to move to the journal entry feature.
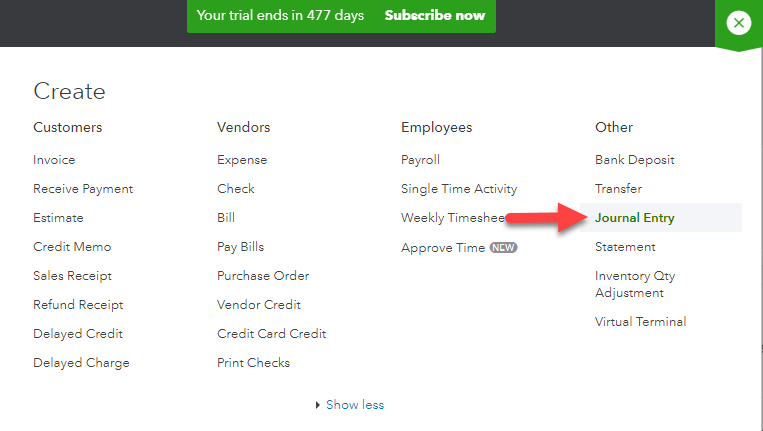
Hit a click on the plus icon at the top right of the file.
This will show up a drop-down menu as Create, which will have the Journal Entry option.
After clicking the option, you will be redirected to the window having the blanks for necessary information.
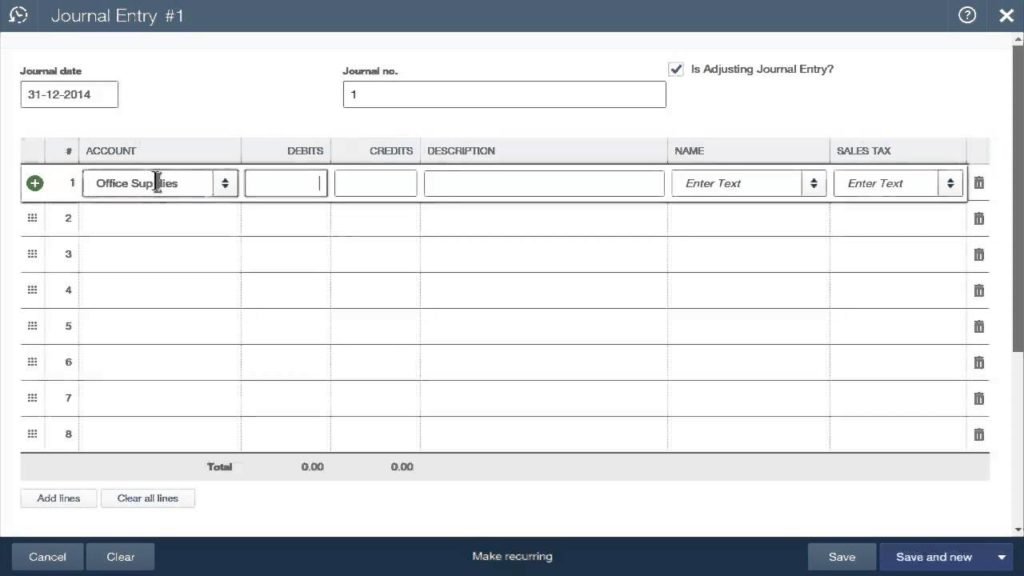
Step 2: Entering date and journal number
It should be noted that the journal entry form in QuickBooks online is not at all complicated.
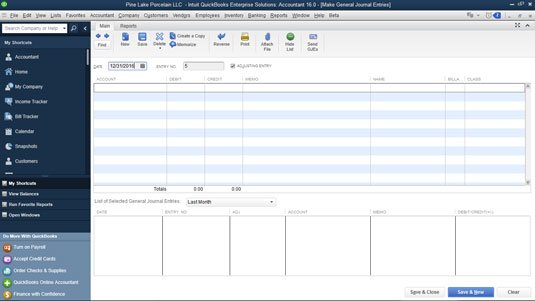
After the form opens up on the screen, you are supposed to edit the journal date, whereas the current date will be automatically entered by QuickBooks.
However, if you are recording any entry from any other date, then ensure to correct the date before moving ahead.
Once the date is corrected, you are supposed to fill in the journal number.
Otherwise, the QuickBooks software will automatically enter the sequential number.
Step 3: Entering the need information
Accounts: It means the accounts in the chart of accounts.
Journal code: The journal code related to the account is the next thing you are supposed to enter. It is very much important to enter the new journal code. Make sure that you use the same journal code, which is related to the transaction for the debit and credit accounts.
Debit and credits: You are supposed to look for the transactions in the recent transaction report and also make a note that the first in line is debits. Another thing is to check out if the debit has changed after the transaction is saved.
Description: Entering a description to check the transaction details on the report is another important step.
Name: Now, you need to choose the customer, employee, or vendor.
If the total of the debit column doesn’t match the sum of the credit column, then it is important to fill in the distribution lined until the total of both tallies.
Step 4: Selecting to make recurring journal entry schedule
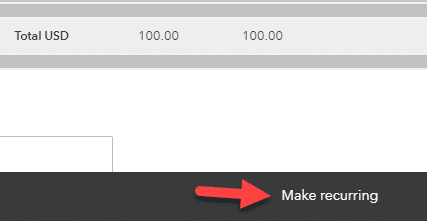
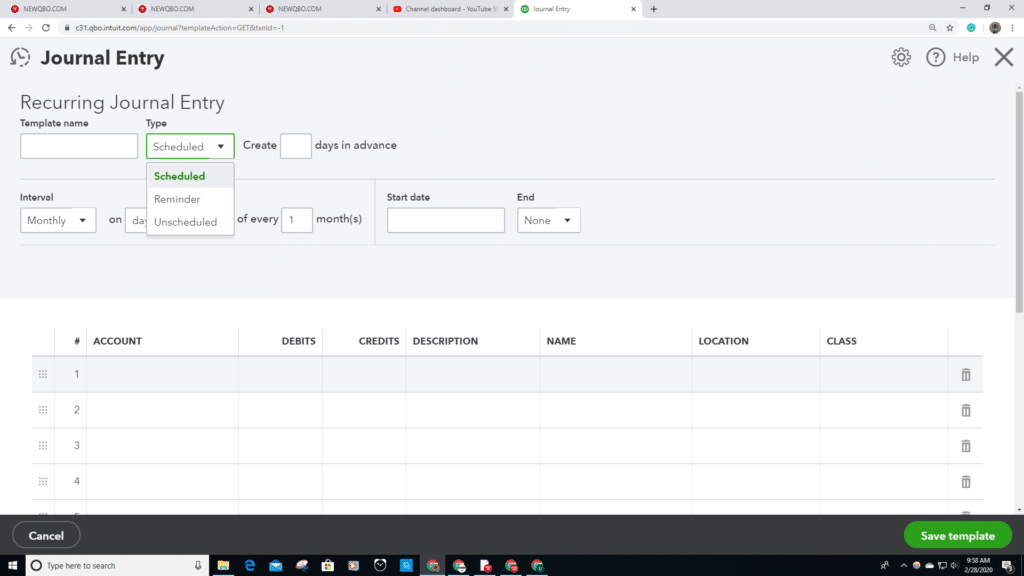
You are required to select the recurring journal entry schedule and then finish the process by saving the transaction.
Editing a journal entry
Now that you know the process to add and create a journal entry, it is time to learn the process to edit a journal entry in QuickBooks. The steps involved in this process are as follows:
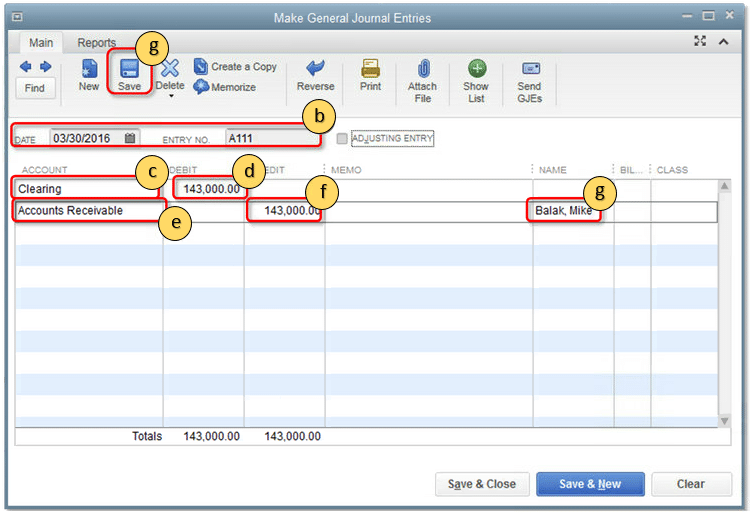
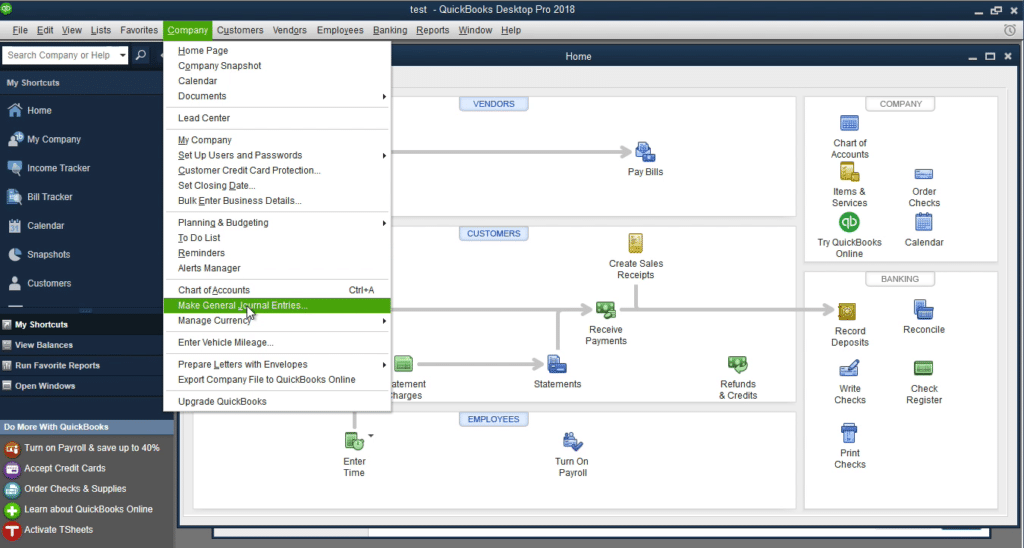
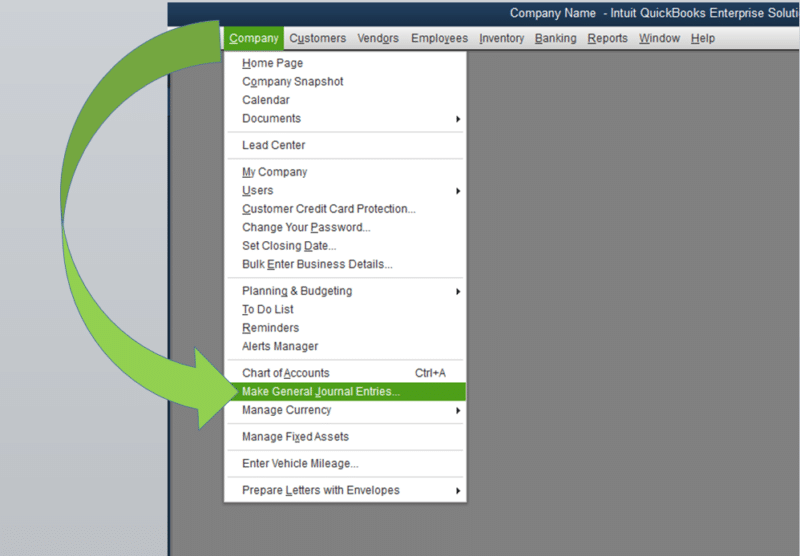
You need to first visit the company menu and then choose the Make general journal entries option.
Choose the find option and then enter the name, date, entry no, or amount, then click on find.
Double-click the journal entry and then make the updates. Once done, choose save and close.
Lastly, in order to record changes, hit the Yes option.
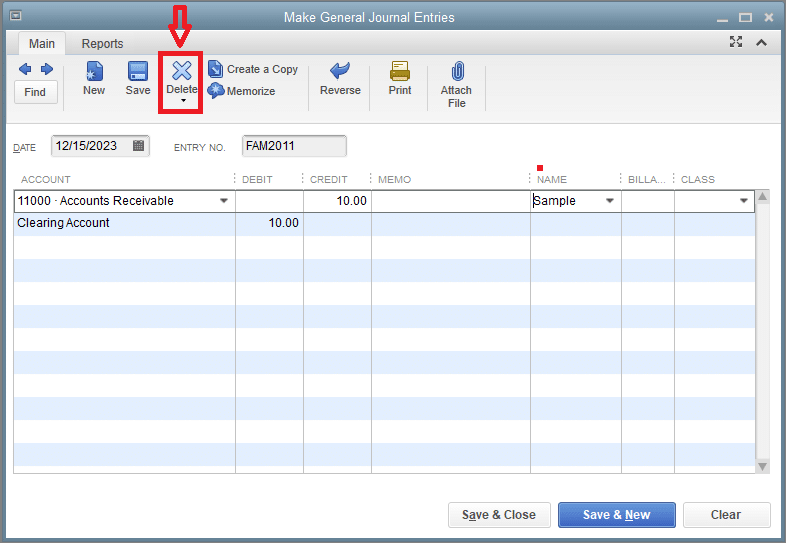
Deleting a journal entry
In case you are required to delete or void a journal entry, the below steps need to be carried out.
You are supposed to first visit the company menu and then choose the make general journal entries.
Choose the find option and then enter the name, date, entry no., and other required info. And then choose to find.
Now double-click the journal entry and then, choose the delete or void option and hit the OK button.
To end the process, choose save and close.
Reverse a Journal Entry
You can reverse a journal entry by performing the below steps:
Move to the company menu and then choose the Make general journal entries option.
Look for and select the journal entry that is to be reversed.
In QuickBooks for Windows, you are supposed to choose find and then enter the name, date, entry no. or amount and then choose the find tab.
In QuickBooks for Mac, you will have to look for and choose the journal entry that is to be reversed on the left side of the Make general journal entries window.
Now choose reverse.
Followed by selecting the save or save & close tab.
The reversed journal entry has an "R" next to the entry number, and any debit and credit amounts are reversed. The new entry is dated the first day of the next month, following the original transaction date.
We believe that making journal entries in QuickBooks desktop becomes easy with the steps scribbled above. Moreover, if you wish to make journal entries that affect a particular customer’s account receivable or a vendor’s accounts payable, then for that, you require to put the customer or the vendor on the first line of the entry. We have tried our best to provide the steps to create journal entries in QuickBooks. However, if you feel the need of expert assistance, then contact our team of QB specialists anytime. We ensure immediate assistance and customized support services to all our clients across the globe.
FAQs
What is a journal entry in QuickBooks Desktop?
Journal entry is a process of recording financial transactions manually. It allows users to adjust account balances, record transfers between accounts, allocate expenses, record depreciation, and process other accounting entries and operations.
Can I modify a journal entry after it has been saved?
Yes! You can modify a journal entry in QuickBooks Desktop. The steps to modify a journal entry are: Step 1: The initial step requires locating the journal entry by using the Find feature. A substitute method is to head to Reports, followed by Accountant & Taxes, and finally click on Journal. Step 2: Follow up by opening the journal entry and making the necessary changes. Step 3: Finally, save the modified entry.
How can I delete a journal entry in
The steps to delete the journal entry are: Step 1: Go to the Edit menu. Step 2: Click on the Delete General Journal Entry option and confirm the same.
Can I create a recurring journal entry in QuickBooks Desktop?
No! QuickBooks Desktop does not have a built-in feature to create recurring journal entries.