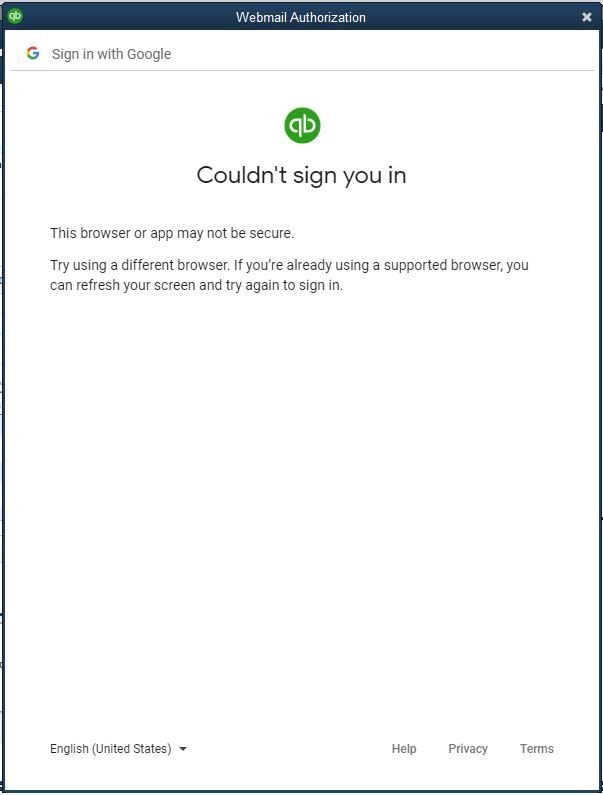
Want to learn the process to sign in to Gmail through QuickBooks desktop, especially if you see 'Couldn’t Sign in' issue? It can be common to face trouble in signing in to Gmail from QuickBooks desktop. The major factor behind this can be if Google made an update for added security. If you are using Gmail, then you will have to reconnect your account. We have tried to summarize the entire process to fix the issue and sign in Gmail from QuickBooks successfully. Let us dive in together!
Ways to Troubleshoot Gmail Not Working Issue in QuickBooks Desktop
You can implement the below solution steps and try to eliminate the Gmail couldn’t sign you in from QuickBooks error problem:
Solution 1: Using 2-step verification for Google
Just in case you have already used 2 step verification for Google, then you can skip this solution.
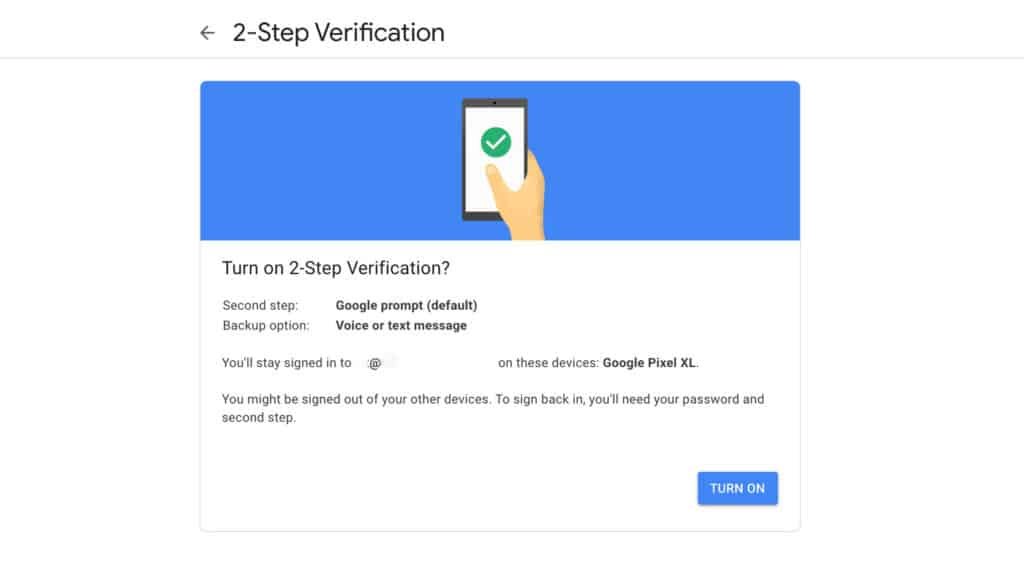
First, Turn on 2 step verification for Google account.
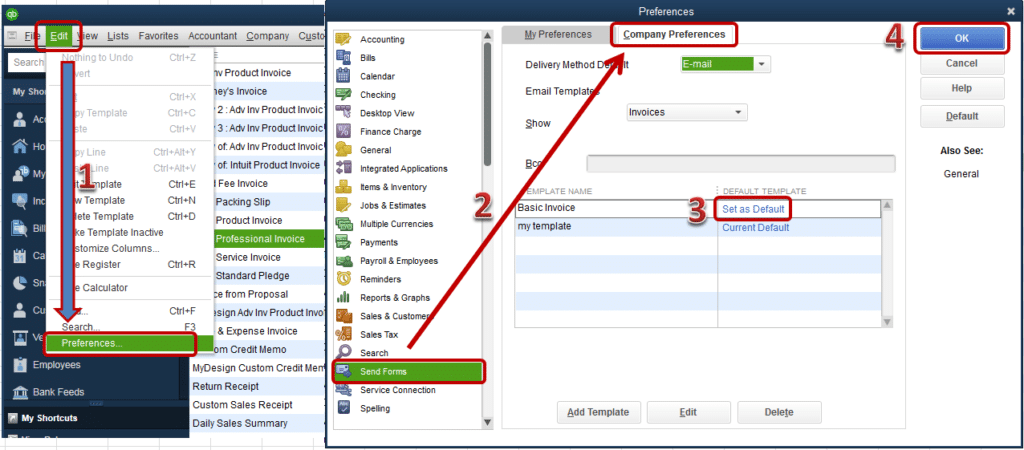
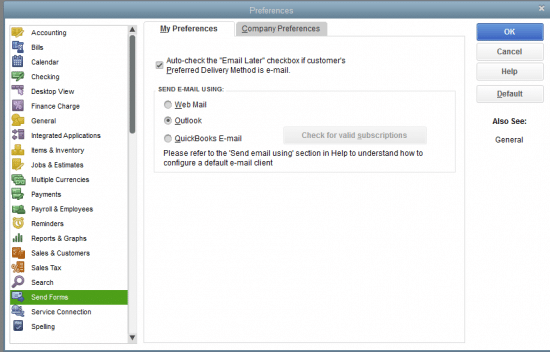
Then move to QuickBooks edit menu and choose Preferences.
Choose Send forms then pick the Web mail and Add option.
Fill in the Add email info section and hit OK tab.
Solution 2: Turning on less secure app access in Google
If you skip the first method or if the first method didn’t work for you, then opting for this method is suggested:
You are supposed to Turn off 2 step verification for Google account.
Moreover, turn on less secure app access in Google.
Ensure to read the Google security standards to under in what way this might affect the account.
Once done, choose QuickBooks edit menu and also select Preferences tab.
Now move to Send forms tab and then pick Web mail and Add.
Fill in the Add email info section and hit OK tab.
To conclude the process, click OK to save your changes.
Solution 3: Changing the enhanced security setting in QuickBooks
Just in case you have configured Gmail to use enhanced security, then you will be asked to Authorize QuickBooks desktop when sending a transaction or report. However, if you aren’t able to authorize QuickBooks, then you will have to reconnect the Gmail account to QuickBooks and clear the option to use enhanced security.
This was all you needed to fix QuickBooks Gmail Not Working Issue or Gmail couldn’t sign you in from QuickBooks desktop. However, if by any chance this issue continues to trouble you then do not hesitate in speaking to our accounting consultants and we will be happy to help you. Our team can help identify the root cause and guide you through the appropriate troubleshooting process.
QuickBooks has proved its' viability in the accounting world through the wide range of services that it has on offer for accountants. However, at times, when you try to perform some important activity on your QuickBooks software, an error might pop up and irritate you. One such error that we will be discussing about is QuickBooks error code 15227. Just in case you are a victim of an similar error, then this piece of writing can be a savior for you. Scroll through this space and get the fixes for this payroll error on your tips.
What is QuickBooks Payroll Error 15227?
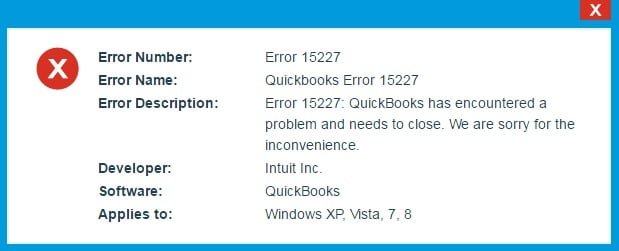
QuickBooks payroll error 15227 generally appears when the accounting software fails to complete an update or install a payroll release properly. This error mainly occurs because of damaged Windows system files, incomplete QuickBooks installation. You might come across this error when the device shuts down and adhered to a certain degree, during a program update or when Windows starts or turns off, another situation can be during Windows installation. Furthermore, you might bump into this bug with a warning message that says:
Error
Description
Error 15227:
QuickBooks has encountered a problem and needs to close. We are sorry for the inconvenience.
Payroll update did not complete successfully
The update program is damaged
Side effects of QuickBooks error 15227
Every error comes with certain repercussions, and same is the case with QuickBooks payroll error 15227. To get a better brief, check the effects of this error below:
The error message appears on the screen and blocks the process.
The current program might shut down inappropriately.
This technical error may affect the speed of the system.
Another effect can be that the device might not accept the given commands in a proper manner.
You might also face certain issues with the apps that are related to security.
And you might also not be able to spot the taskbar.
What basically causes QuickBooks error 15227?
Following factors can be decent triggers to QuickBooks error code 15227. Let us explore in further:
Just in case you have any corruption or damage in QuickBooks downloaded file, the error 15227 may show up.
In case of an incomplete or partial installation.
Another trigger can be if there is any virus or malware attack.
If another program mistakenly deletes necessary QuickBooks related files, you might get this error.
Incorrect Internet Explorer or SSL settings can also lead to such an error.
If the software package modifications related to QuickBooks lead to corruption in Windows registry.
Effective Steps to Resolve QuickBooks Payroll Error 15227
If you follow the steps given below carefully, getting rid of the QuickBooks payroll error 15227 will be a little easier. Follow each solution we have tried to mention below and check if the issue got rectified. Check them out:
Step 1: Reinstalling QuickBooks update
You would have to reboot the system initially.
Open the QuickBooks desktop as Admin.
Install the updates if it is indicated to you. In case the update isn’t installed, then you can head to C:\Documents and Settings\All Users\ Application Data\Intuit\QuickBooks <versionXX> \ Components (where xx denotes the QuickBooks version) and Delete the file.
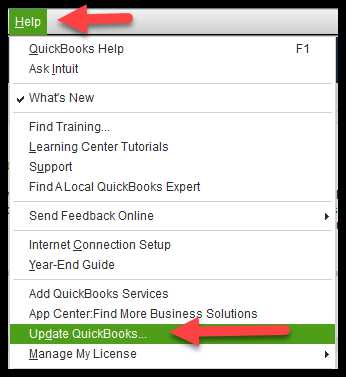
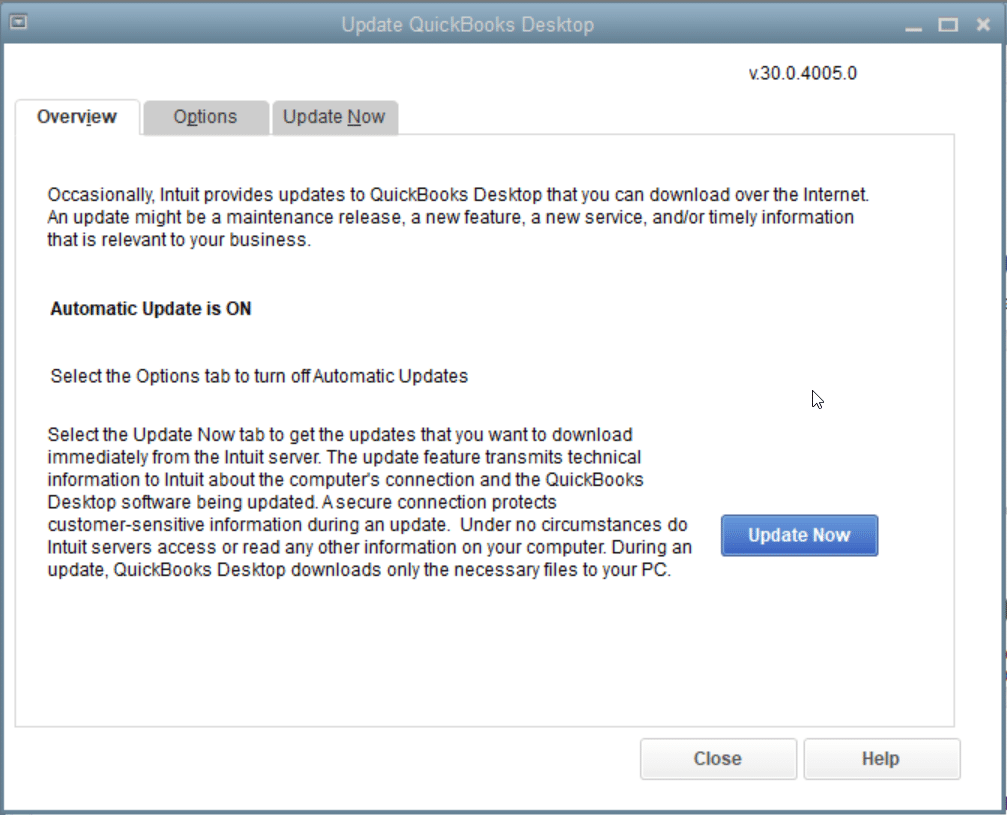
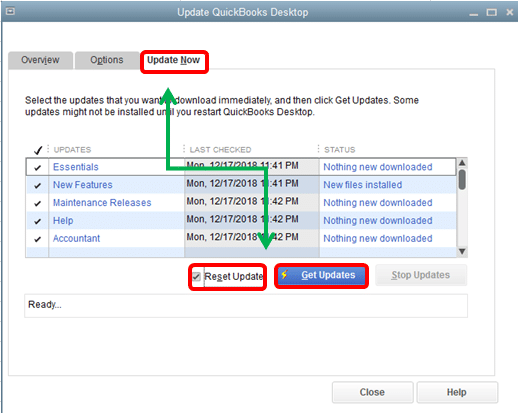
Relaunch the QuickBooks and select Update QuickBooks option from the Help menu.
Now download the updates again and launch the QuickBooks software.
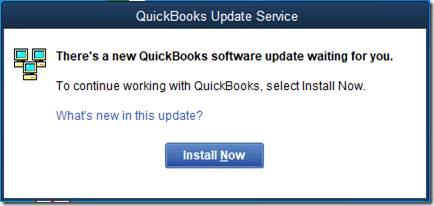
Last step is to hit a click on Install now when the QuickBooks desktop update services show up.
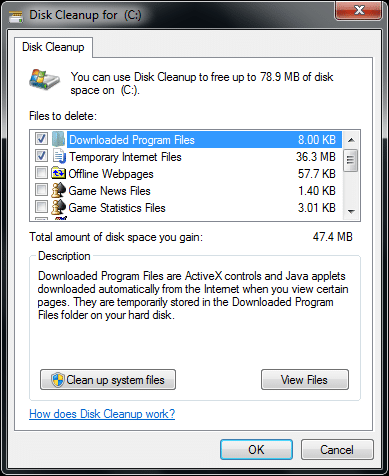
Step 2: Perform a disc clean up
Start a Disk cleanup along with a Complete scan for viruses and malware for the system files.
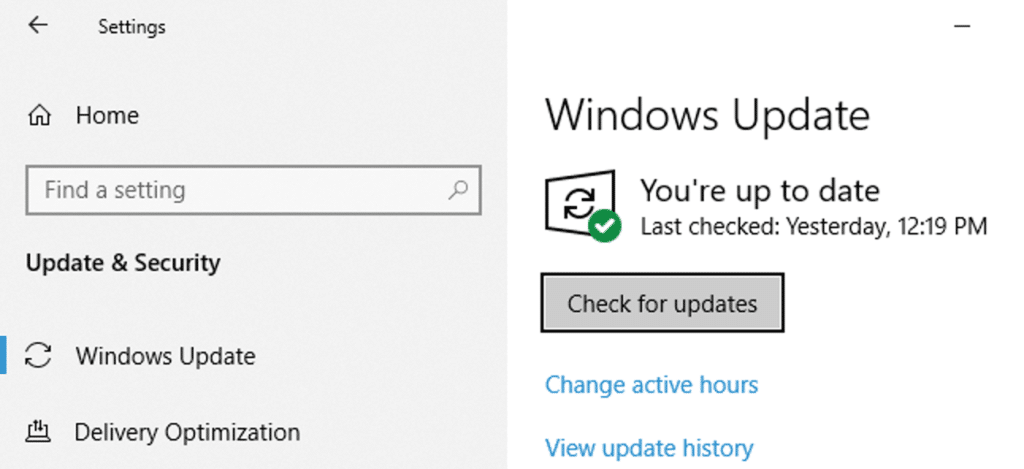
Head back to the Recent updates and check if you see any issues.
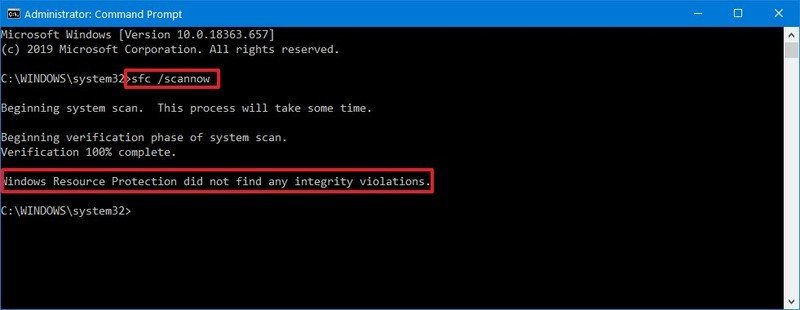
The system file checker tool can be quite effective to identify and repair any files on the system.
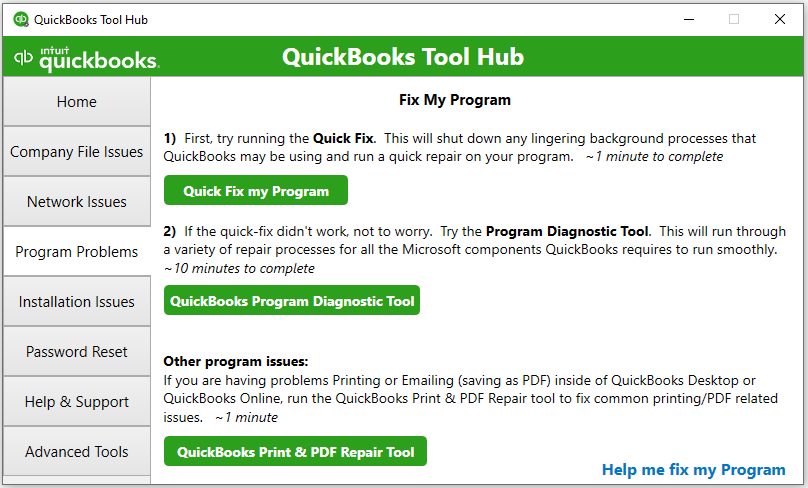
Now go to Program Problems tab and select Quick Fix My Program.
Let the tool detect and rectify the issue.
Concluding lines!
This piece of writing might have briefed you with the right steps to implement and troubleshoot QuickBooks error 15227. However, if you don't have much time to spend on fixing this issue, or face any other technical issue while performing the steps, then you can simply get in touch with our XpertBooks Pro experts at 1.800.761.1787.
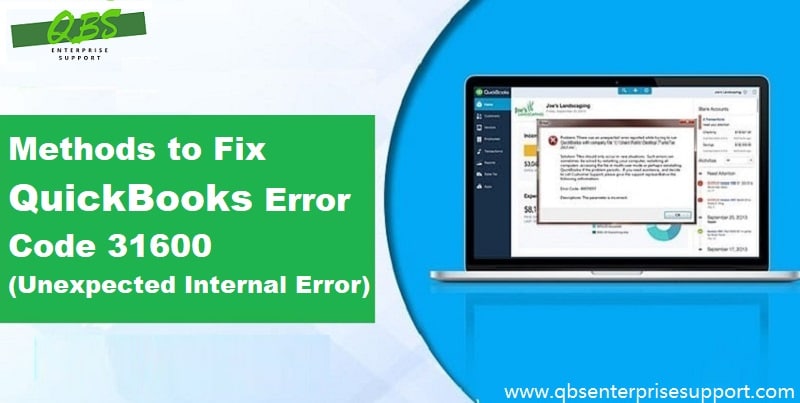
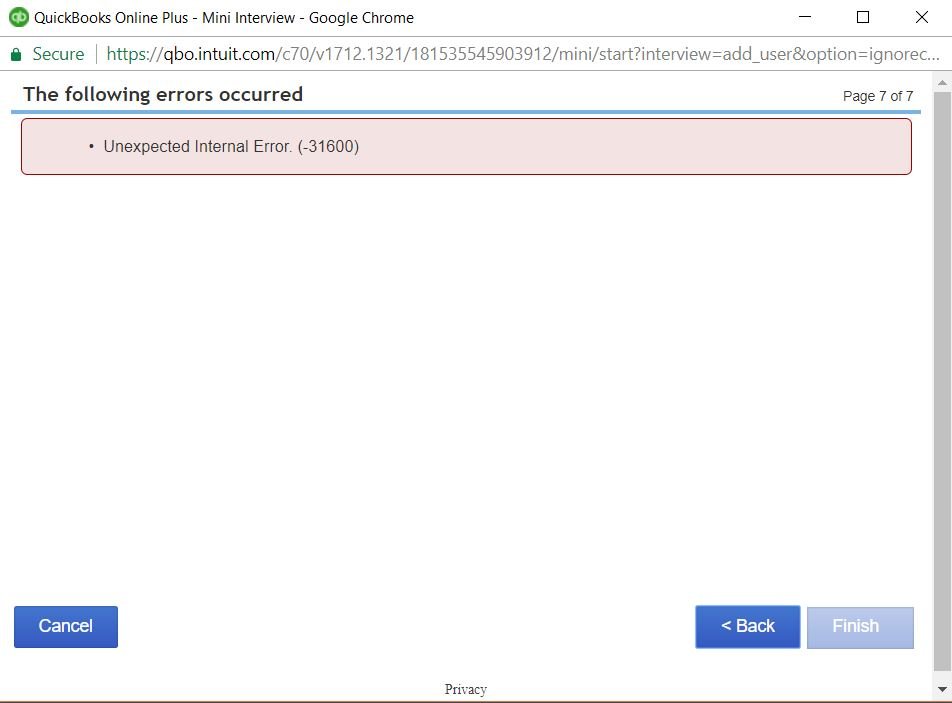
QuickBooks Desktop is financial application software that helps in the proper organization of business transactions. It also helps in monitoring and keeping track of all the business transactions. It is accounting software that provides every feature related to a business, such as creating pay slips, tax returns, etc. This software is highly secure and allows the business organization to protect its banking details and financial credentials safely. However, sometimes when you are removing different accountants for the transaction history of the QuickBooks desktop, you can fix QuickBooks error code 31600. This will cause the QuickBooks window to collapse and hurt the workflow.
What is QuickBooks Error Code 31600?
QuickBooks error 31600 issue can occur due to several reasons. Some of them are when you are creating portable files or backups, at the time of sending payrolls, saving new transactions, and many more. And they will affect the workflow of your business. However, you can easily fix these errors by following the steps discussed further, and a team of experts will help you immediately in fixing the error.
Steps to Fix QuickBooks Error Code 31600
If you have a general understanding of computer systems and you can easily follow a set of steps, you can easily QuickBooks error code 31600 by yourself. Hence, let us look at the steps.
Step 1: Make sure the number of users is within the limit
One of the reasons which may lead to error code 31600 in QuickBooks desktop is the change in numbers. Follow the steps below to monitor and fix this error.
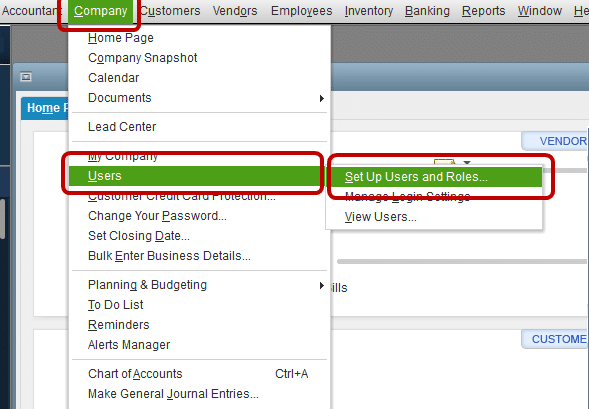
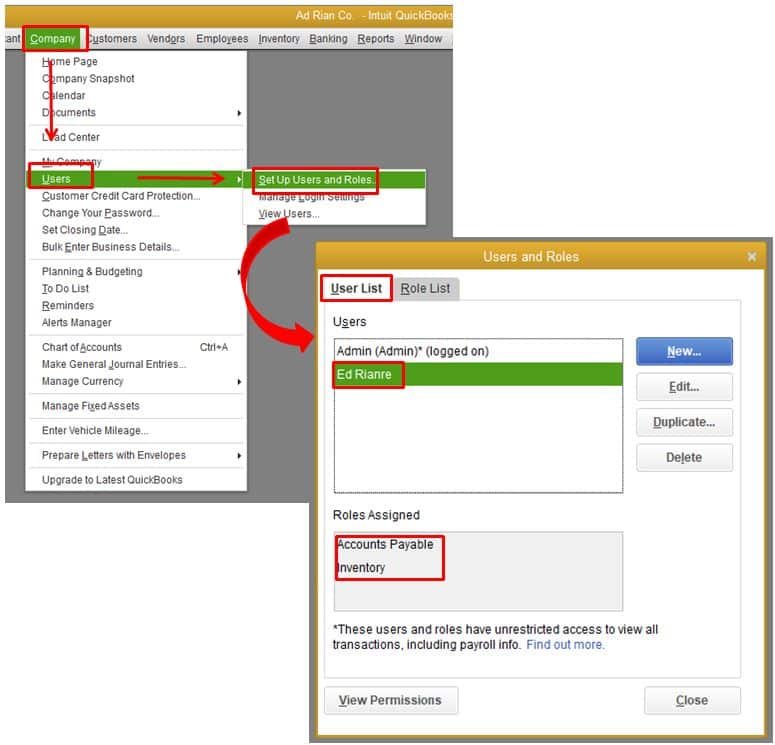
Open your QuickBooks Desktop, and go to Company.
Now select the User number and password.
On the Enterprise version, select Company section and select Users.
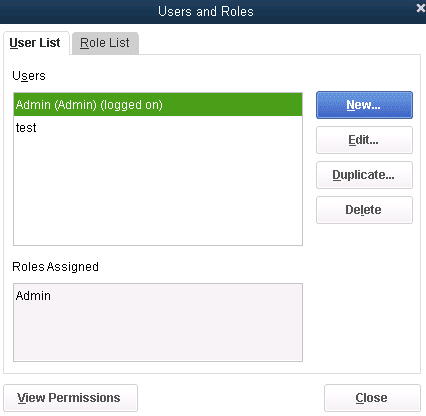
On the Select Option, select Set Up Users and Roles.
Now click on Add user, and fill in all the details. Click on Next.
You can customize the account accordingly. Select Finish.
Step 2: Creating an administrator
The steps to create a new administrator user are given as under:
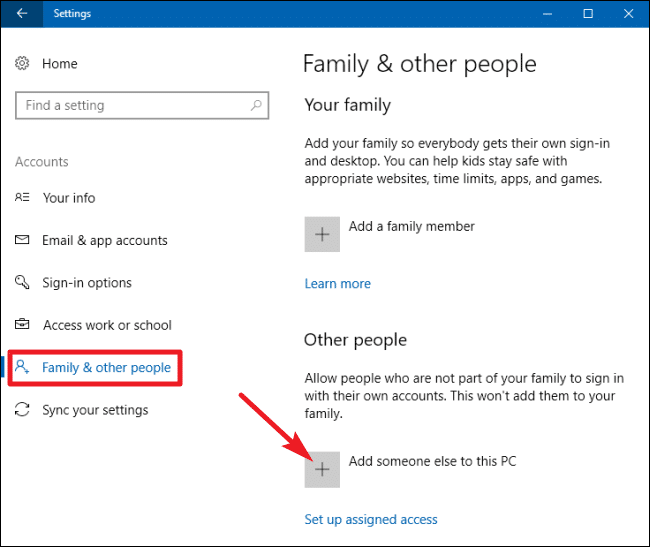
On the Start menu, select Settings.
After that go to Account, and then select Family and Other Users.
From other users, select Add someone else to the PC.
Then select I do not have this sign-in information, and then select Add a user and exclude the Microsoft Account.
Provide a name, and then select Finish.
Now click on the Newly created account, and assign its type.
Lastly, select Admin, and right-click on it.
Step 3: Creating a new server
Open the QuickBooks Desktop, and then select Service Manager.
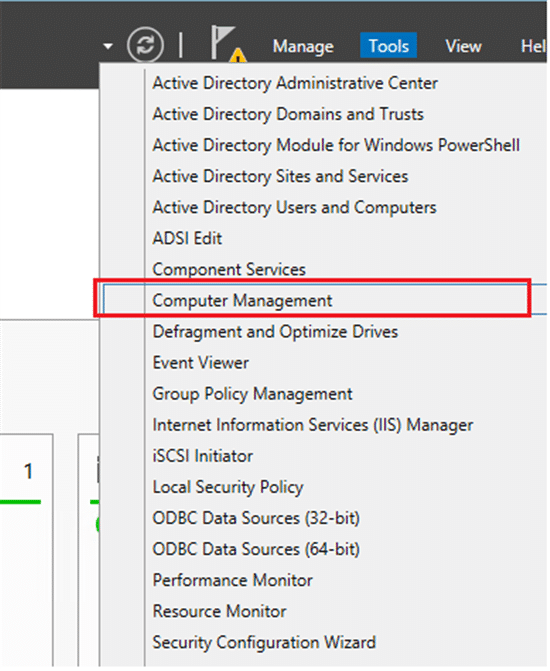
Now go to Computer Management.
On the computer management, select Expand local groups and users.
A window will appear; select the Groups according to your requirement.
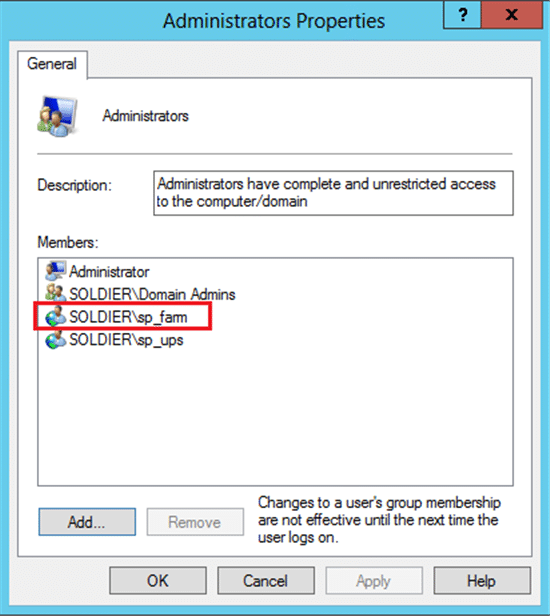
Now you would have to Change the properties. Double-click on Admin Properties and open it.
Now open the Administrator group by double-clicking on them.
The Administrator group window will appear, select Add.
Now click on computer, and go to Service account or select Group window.
A window will appear; in it, select the User number.
Now assign a type to the account, which has to be added to the groups of administrators.
Finally select OK.
Step 4: Browser Inspection
If you are using QuickBooks Online, use the updated version of any of the search engines, such as Mozilla Firefox or Google Chrome.
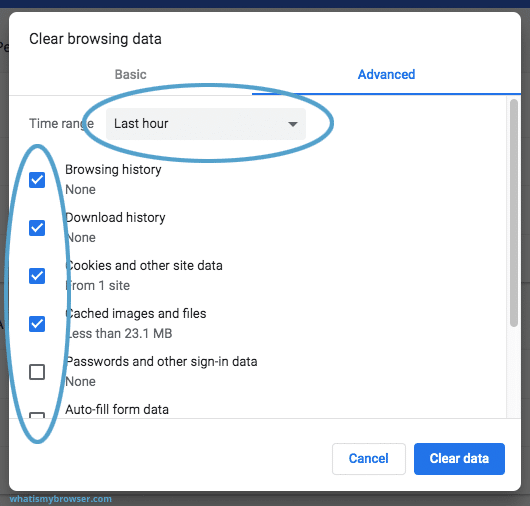
After you have checked the Browser version, clear all your Search history. Along with the History, remove the cache.
Later on close the Browser, and log in again.
Followed by press the CTRL+SHIFT+DEL keys together while the browser is open. The history window of QuickBooks will appear. Select all the boxes.
If you are using Google Chrome, set the timing to “The beginning of time” and if you are using Firefox, select “Everything”. Your entire search history will be cleared.
Step 5: Check the affected user
On the QuickBooks desktop, open Menu of the company. Select Set up Users, and then select Password.
After that choose Set Up Users.
And then, go to the Company and then select Users.
Find Set Up Users and Roles, and select it.
Now hit a click on Add Users and provide the necessary details.
Later head towards, select the Next option and if you want to customize the user, make Necessary changes.
Last step is to select Finish and then log in again with the new credentials.
What are the prerequisites to fix QuickBooks error 31600?
To fix QuickBooks error 31600, follow these important steps:
Ensure a reliable and stable internet connection.
You must have administrative rights to make necessary changes.
Create a backup of your company file before performing any steps to prevent any data loss.
make sure that your system meets the minimum system requirements to run QuickBooks.
Download and install QuickBooks File Doctor or other diagnostic tools within tools hub program.
How to prevent QuickBooks desktop error 31600?
Prevent this error by:
Updating your QuickBooks and operating system regularly.
Configuring your firewall or antivirus software to allow QuickBooks access.
Avoid running conflicting programs that could disrupt QuickBooks operations.
Performing routine system checks and maintenance to keep running your computer smoothly.
Conclusion
It is possible that the QuickBooks desktop error code 31600 is fixed after you’ve successfully completed all the steps mentioned above. If you are still having issues, call XpertBooks Pro team of professionals who specialize in the area of QuickBooks can assist you right away.
FAQs
What is QuickBooks Error 31600?
This error is usually occurs when there is a problem with the database connectivity in QuickBooks. It obstructs the user from accessing the company files.
What is the error message associated with QB Error 31600?
It may be appear by an error message stating, "We're sorry. QuickBooks encountered a problem. Error message: 31600."
Can a firewall or security software block QuickBooks connectivity and trigger Error 31600?
Yes! Misconfigurations of the Firewall or the security software can block the network connectivity required by the software and trigger such errors.
Scheduled an automatic backup and it failed? Well, this is a common problem that many of you might be facing in the recent times. Scheduling an automatic backup is one of the most effective and effortless way to prevent the data from any sudden loss. Under this particular functionality in QuickBooks, one can schedule the backup like, at what time or what date you wish to take the data backup. At times, unfortunately, the service didn’t work, which can be disastrous.
Keeping in mind the importance of scheduled backup, we have crafted this segment, where we will be having an in-depth analysis of scheduled backup not working issue in QuickBooks, along with the steps that you can implement, so as to tackle out the error successfully. Let us dive in further!
What leads to scheduled backup not working issue in QuickBooks?
Well, this can be a serious error at times, and can be instigated due to the following reasons:
Just in case, you are making use of an outdated desktop application.
If QuickBooks is set to run a for a different version of Windows. Simply said, if you are using Windows 10 and QuickBooks is configured for Windows XP or any other windows version, then this error is most probable to occur.
Troubleshooting methods for QuickBooks backup not working on Windows 10 snag
Similar to other errors, even the QuickBooks unable to backup company file issue can be resolved with much ease. Here are some of the top procedures that you can follow, so as to tackle out the issue without any further hassle.
Process 1: Check scheduled automatic backup settings in QuickBooks
At first, open QuickBooks and choose file menu, where you need to select save copy or backup. This will open up the workflow.
Next, choose backup copy and click on next.
If in case you haven’t set the backup defaults, then we suggest you to click on options to set the backup defaults and click on next tab.
It is hardly recommended to select change location or make use of the location as per the preference. Click on next tab once again.
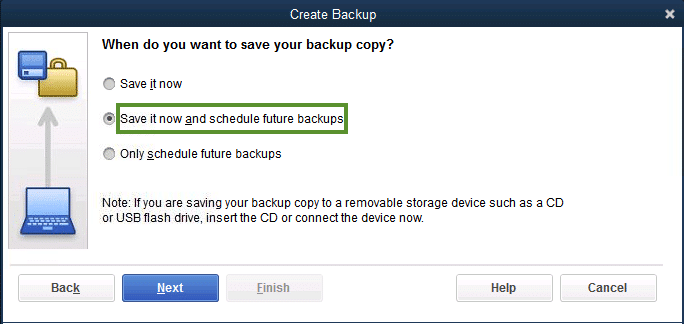
You are then required to click on options tab stating save it now and schedule future backups or only schedule future backups and tap on the next tab.
Lastly, make use of the save backup copy automatically when I close my company file every time option. And also enter the number in the number field and hit finish tab.
Process 2: Making use of the QuickBooks verify and rebuild data utility
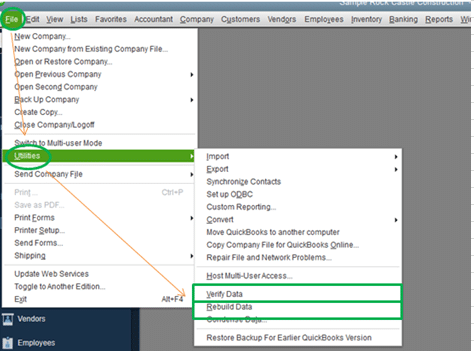
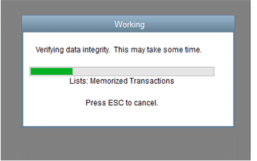
Under this process, you are required to open the QuickBooks software. Move to the File tab and choose Utilities tab. Further click on verify data option.
Move ahead, head to the Option that states QB scan all the company files and data and look for the Damage.
Later on, you might get a pop up stating your Data has lost integrity. Close the message and click on the File tab again.
Select the Backup company data popup window and get a backup of the data on the desktop and click on OK tab.
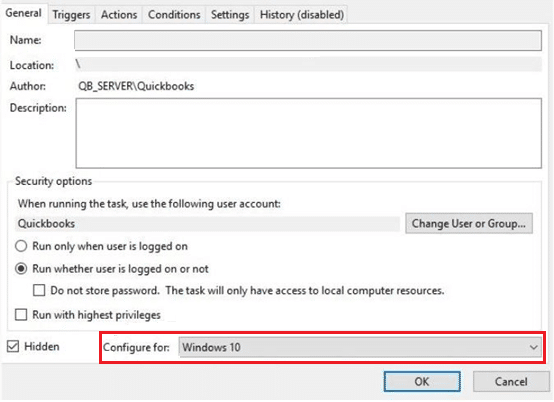
The most efficient and effective solution to the "Automatic backup not working' problem is to make sure you've changed your "Configure To" field to "Windows 10". For this take these steps:
At first, open the Task Scheduler in Windows 10.
After that hit a click on Task Scheduler Library, in the "Task Scheduler" Dialog box
Now scroll down until you reach QuickBooks Backup task and hit a right-click on it to choose the Properties. Now you can access the task Properties.
Look for the Configure for option in the section General.
In the Configure for: drop-down list, choose Windows 10.
It is important to note that some users have reported that even after changing their "Configure to:" setting to "Windows 10," experience failing backups. In addition, they encounter the following error message QBBackup.log file:
QuickBooks encountered a problem attempting to backup C:\DATABASES\QB_XXXXXXX\XXXXXXX.qbw - Drive specified could not be accessed. Error ID 202: Last System Error: The computer cannot locate the specified path.
This error can be fixed by choosing the following option "Run only when user is logged in" option under the QuickBooks.
Final Note..!
That was all you need to know about QuickBooks desktop scheduled backup not working issue. But still, if you are facing any of the error then please connect with our independent accounting consultants to get the feasible solution. Our accounting professionals have the latest edge cutting tools and technology to fix your problems utmost.
FAQ's
How do I backup my QuickBooks company file?
To backup a company file in QB, use the built-in backup feature: 1: Open QuickBooks. 2: Go to File Menu > Choose Backup Company > Tap on Create Local Backup. 3: Now you need to follow the on-screen prompts to choose backup options and save the file to a secure location.
QuickBooks Backup Failed - What to do now?
If QuickBooks backup fails, try these steps: 1. Check for sufficient storage space. 2. Verify file location and filename length. 3. Try to repair QuickBooks installation. 4. Use QuickBooks File Doctor tool through tool hub program.
How do I repair a QuickBooks backup file?
To repair a backup file, follow the given steps: 1. Open your QuickBooks program. 2. After that, go to File and then choose Open or Restore Company option. 3. Now choose Restore a backup copy option and follow the on-screen instructions to find and repair the file.
Mapping network drive will help you in accessing the QuickBooks files on another server, system or drive over the network. It also makes it easy for you to access QuickBooks company file from the shared storage. At times, you might come across with QuickBooks not seeing mapped device problem. In this segment, you would get all possible solutions so as to figure out the QuickBooks not showing mapped drives issue. Make sure to scroll through the post carefully.
Important tips to remember
It should be noted that you can just guide a particular shared folder. Just in case, the client on PC 2 has shared the C: drive with the PC, then you can easily guide that particular C: drive but ensure not to opt for the sub folders. Further, you would have to right-click the company file folder, and just in case you are unable to discover the mapped network drive alternative, and then you should scroll upwards and investigate the more significant level folders for mapping choice. If you are a QuickBooks hosting user, then you would have to check with the cloud admin to sort out the map drive issue.
In such a scenario, the company file is available on a similar PC where you have been using QuickBooks and make a new mapping network drive. You should consider opening the record from the information document’s drive. Also, explore the appropriate document area to open the company record, where you have planned it while appointing the unused drive area.
Steps to fix the QuickBooks not showing mapped drives problem
We have jotted down the measures that you can take, so as to fix the QuickBooks not showing mapped drives problem. Let us explore the steps one by one:
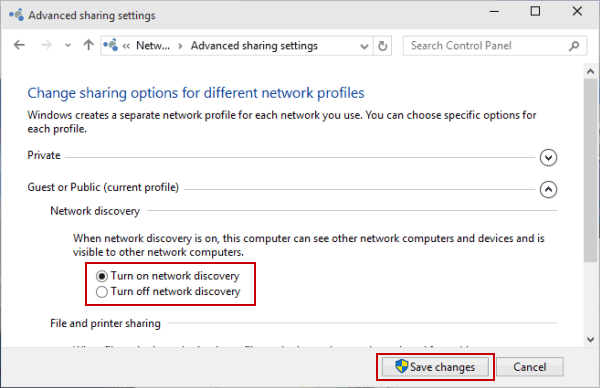
Process 1: View the mapping drives, turn on network discovery
You need to first head to the Search bar and write the Settings and then click on it.
After that, choose the Sharing tab.
Head forward and click on Private network.
You are then required to ensure about the choices that you have opted for from Turn on network discovery and turn on Automatic set up.
Further, click on SaveChanges and hit the Next tab.
Process 2: Map a network drive in Windows
Windows 7
Herein, you need to locate the Windows key and press it.
Further, a list will appear on the screen, and choose the System tab.
Once done with that, head to the Menu bar and click on Tools tab.
And then, choose the Map network drive.
A new window will pop up on the screen.
Now hit a click on box Adjacent to drive.
From the drop-down menu and select the Unused drive.
You are further required to click on Browse and then Navigate the network location.
Track the Network location where your QuickBooks files stored.
Another alternate for the same can be to do mapping with a Server IP address if in any case, UNC path is not working.
You need to click on the Finish tab.
You can get access to find a new driver which will become a network drive.
Windows 8 or 10
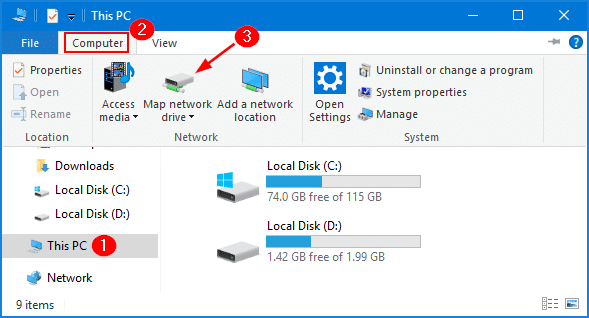
Head to the Search bar and write on the system.
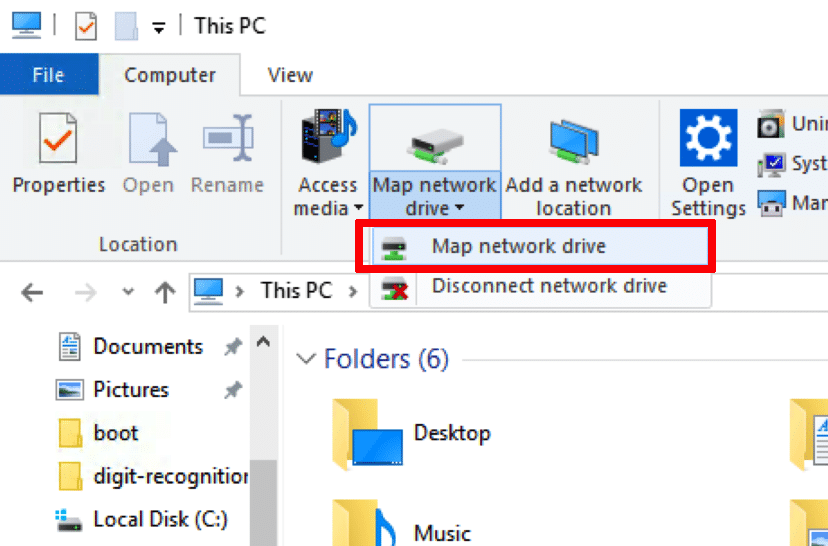
Hit a click on THIS PC from the list of result.
And right-click on the Map a network drive.
Moreover, select the Map network drive.
You would have to click on the box in front of the drive and select the unused drive from the available Preferences.
Later on, choose the Browse tab, and you need to know the location where your QB file is already stored.
You now have to click on the OK tab and Finish tab.
And try opening QuickBooks with a newly mapped drive.
Process 3: Repairing the issue by obtaining IP and DNS address
You might go for the option to obtain the IP address and DNS manually, due to which the outcomes in QuickBooks do not show mapped drives. The steps involved in here are:
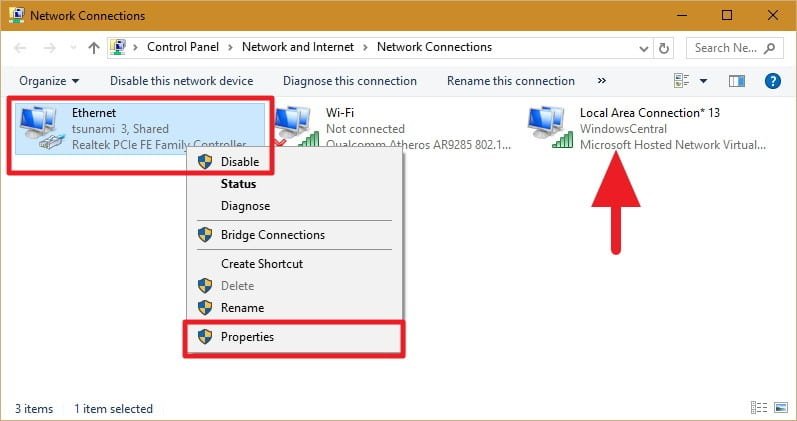
You would have to first open the Settings tab and then select Change adapter option.
And open the Network connection window.
You are then required to enter the next tab and right click the Ethernet and select Properties from the available list.
Further, mark a click on the Networking tab.
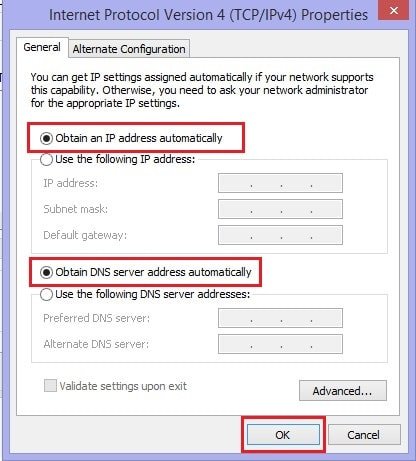
Now click on the Internet protocol version 4. In case you found it, tick marked, then uncheck and reach the box.
Then hit on Properties tab.
From the IPV 4 properties window, select the options Obtain an IP address automatically and Obtain DNS server address automatically.
End the process by clicking on the OK tab, and you are done with the process.
That was all that you need to know about fixing the QuickBooks mapped drives not showing issue. Get instant help and answers from our XpertBooks Pro accounting consultants by dialing 1.800.761.1787. Our independent accounting professionals are ready to help You 24/7, 365 days a year!
FAQ's
What is the QuickBooks not showing mapped drives problem?
The mapped drive error generally pops up on the screen when the software is unable to recognize the mapped drives.
What causes QuickBooks not showing mapped drives problem?
Some of the common causes behind the mapped drive error are: 1. The user can experience this issue if the Firewall or antivirus are blocking the network. 2. Another possible trigger if the network settings are misconfigured.
How can I access my company files if QuickBooks is not showing mapped drives?
Following steps can be adapted to open the company files in case of a mapped drive error: 1. Employing the UNC path for opening the company file. 2. Opening the company file after transferring it to the hard drive. 3. Make use of QBO Backup for the creation of a backup of the company file. Also, restore the backup to some new location.