As we all know that, QuickBooks desktop is one of the popular and most-used accounting software in the world and has a global user base. To ensure that the you get the best experience of the software, Intuit, the makers of this software, provides regular updates as well as bug fixes. Though, despite these updates, you might experience some errors from time to time while working with the software. One of these commonly found errors that they may experience are as 'QuickBooks has stopped working' or 'QuickBooks Won't Open' or 'QuickBooks not responding'.
This error can be a result of a plethora of factors and that is why it gets difficult to fix it. But, through this article, we have discussed all the possible causes, symptoms, as well as the best possible methods to fix the QuickBooks has stopped working error. So, without any delay, let's get started.
But if in case, you are short of time or you are seeking for expert assistance, they don't need to worry as our US based error support professionals team is there to rescue you. Our qualified team of experts will ensure to solve the issues for you in the least possible time and save your serious money and efforts.
Why error message: QuickBooks has stopped working or not responding appears?
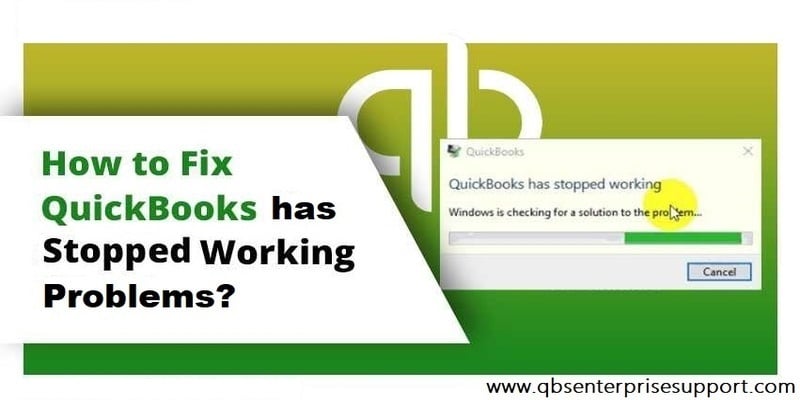
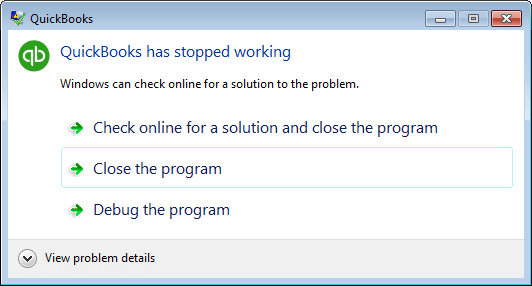
At times, while working on the software, you might hit the issue when the QuickBooks program quits unexpectedly. You might see an error message stating QuickBooks has stopped working. A Windows-generated error message pops up, stating:
Error
Description
Warning
A problem caused the program to stop working correctly or Windows is checking for a solution to the problem
This type of error can be quite irritating for users to handle, as it hinders the smooth process and at times it might also end up in the losing the unsaved data.
Other causes that may lead to QuickBooks stopped working issue
As we have mentioned in the introduction, there are a handful of causes that can result in this error. Now, here are some of the most common factors that might result in this issue:
The QBWUSER.INI file present on the device or the network is either disintegrated or corrupted.
If the program's installation files or company data files are damaged or corrupted.
A hard drive attached to the device is damaged and is not completely accessible.
This error may also occur, if the Windows operating system has some of the files damaged.
Symptoms of QuickBooks is not working issue
It is important that you are able to identify the symptoms of the problem, as it can help them to get the issue fixed quickly. So, if you come across any of these symptoms mentioned below while using the software, then make sure you follow the troubleshooting methods that we have discussed in the article further below:
QuickBooks Desktop does not open.
The device freezes regularly and does not respond to the input commands.
The operating system shuts down without any reason whatsoever.
QuickBooks Desktop program stops working and crashes while using it.
You will get QuickBooks has stopped working error message repeatedly.
QuickBooks Pro will not open after downloading the Windows 10
QuickBooks Desktop is unresponsive
QuickBooks payroll has stopped working
QuickBooks crashes on startup
QuickBooks closes after login
QuickBooks starts to open then closes
QuickBooks not responding in windows 10
QuickBooks has stopped working in windows 7
QuickBooks freezes when creating invoice
QuickBooks freezes when opening company file
QuickBooks company file is not responding while opening
Methods to resolve QuickBooks not responding error when opening company file
As there are multiple factors that can lead to this error, likewise, there are several methods to fix it. We need to make sure that we use a couple of methods to fix it. Following to these methods will ensure that the software is completely fixed from the QuickBooks has stopped working or not responding error. You have to follow the given instruction to get rid of this sort of QuickBooks error.
Initially, you have to restart your computer.
Open the QuickBooks accounting software.
Using Shortcut keys for opening the QuickBooks software
Hit a click on Start tab, and also click on All Programs tab.
Then hit a right-click on QuickBooks.
Once done, press the Ctrl key and then open up the QuickBooks software.
Method 1: Disable the anti-virus software temporarily
Initiate the method with restarting the system.
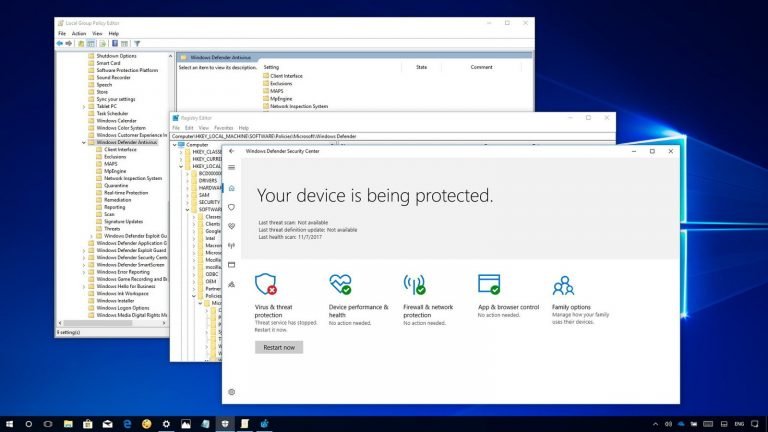
In case the error still pops up, turn off the anti-virus program along with the Windows defender.
Restart the device again to complete the process and then check if the error got fixed. If not, then go with the next solution.
Method 2: By using QuickBooks System Repair tool
The steps to use the System Repair Tool for fixing such errors are given below:
Start the process by downloading QuickBooks System Repair Tool on your device.
After that, save the downloaded file on a new location from where you can be browse it later without any issues. (We recommend storing the files on the desktop.).
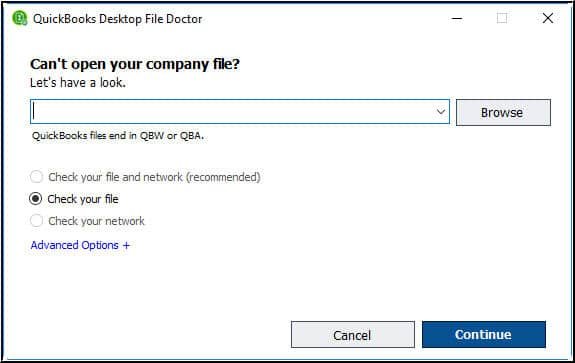
Close all the existing programs that are running in background. Once done, run the program and install QuickBooks file doctor tool.
After the installation is completed, browse the company file and click on Continue to initiate the process.
This process will take about 20 minutes. Once the scanning is complete, restart the computer to complete the process.
If the two solutions did not fixed your QuickBooks has stopped working issue, then we recommend you to proceed to the method 3,
Method 3: Accessing the file from a new folder location on the device
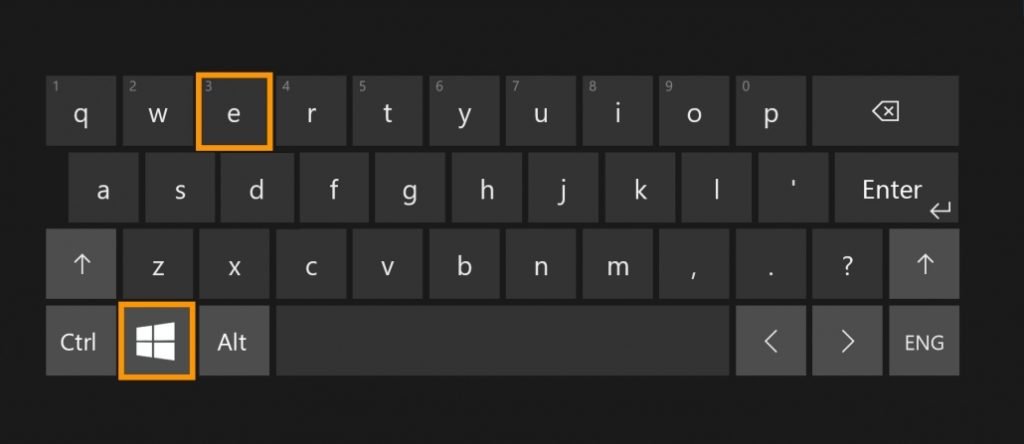
Start by pressing the Windows + E keys together on your keyboard, this will open a new window.
Here, locate the data file which will have the .qbw extension.
In the next step, Right-click on it and click on Copy and then go to C: drive and Create a new folder there.
Now, name this newly created folder as ‘QBTEST’.
Enter this QBTEST Folder and then paste the data file in it by hitting the Ctrl + V keys together
Once done file is pasted in the folder open QuickBooks by holding on the CTRL key.
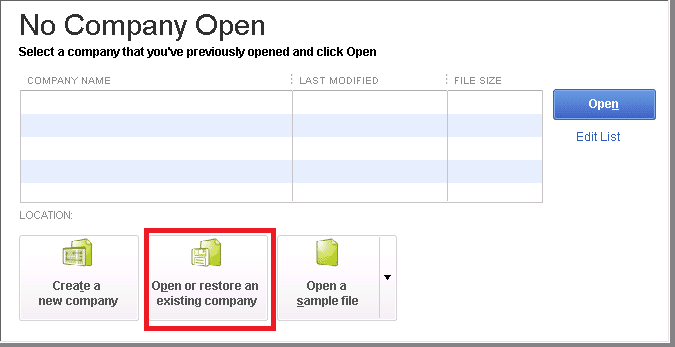
After that, hit a click on Open or Restore an Existing Company and select QBTEST folder to complete the process.
Method 4: Renaming the 'QB.INI' file
As renaming the .ini file deletes all the rundown records, it is essential to physically re-open the organization file and then altering the file name.
Alter the name of the Entitlement file which is DataStore.ecml.
Now restart the system and try opening QuickBooks Desktop again.
If the problem still persists, move to the next solution.
Moving ahead, you need to find and open the downloaded file and double-click on it to run the program.
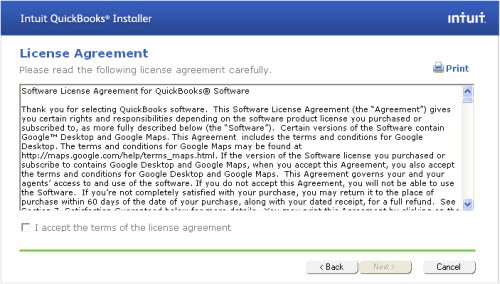
Carry out the onscreen instructions for installing and Agreeing to the terms and conditions.
Followed by double clicking the Icon on the windows desktop to open the tool hub after the install process ends.
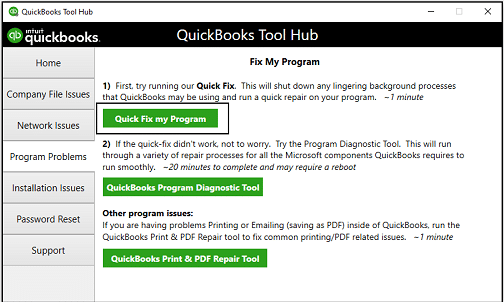
Step 2: Run the Quick Fix My Program from the QuickBooks Tool Hub
The point to be noted here is that if there are any open background processes the software uses, the quick fix will shut down all of them automatically. This tool will also run a quick repair on the program.
Talking about this process, you will have to select the Program problems in tool hub program.
After that, choose Quick Fix My Program option, from the available tools list.
Now open QuickBooks desktop, along with the company file.
Method 6: Use Clean Install Tool and QuickBooks install diagnostic tool from Tools Hub
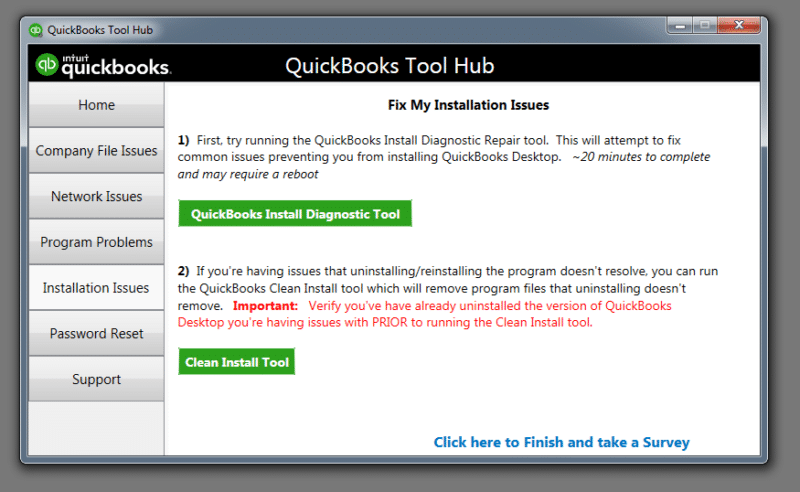
Step 1: Run the QuickBooks clean install tool first
The clean install tool automatically renames the old install folders. This permits the software, to add new install files at the time of re-install:
You need to open the tool hub, if not opened already.
In the QuickBooks tool hub, you need to choose the Installation issues.
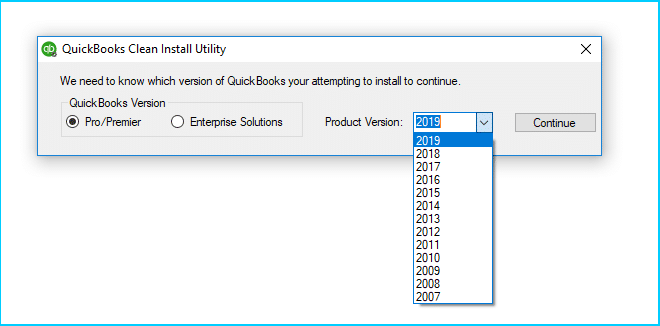
Now click on the Clean install tool, followed by selecting OK option.
Now select OK option, when the message stating "Please install the copy of QuickBooks to the default location" gets displayed on the screen.
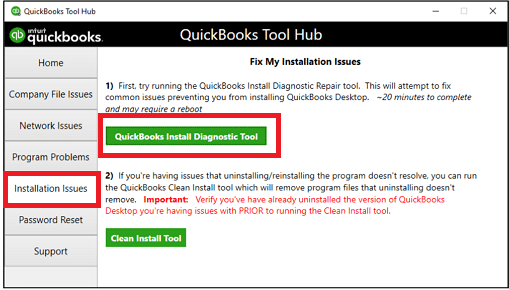
Step 2: Run QuickBooks Install Diagnostic Tool
Downloading and running QuickBooks install diagnostic tool can fix the issue automatically with a few simple steps. The steps to be followed in this process are as follows:
At first, open QuickBooks tools hub program on the system.
And then, go to the Installation issues tab and select QuickBooks Install diagnostic tool option.
Once done with that, you need to wait for at least 20 mins, as this process might be a bit time-consuming.
After the Scan process ends, the tool will diagnose and fix the issue on its own.
You can create a new windows admin user, in case the windows installation is damaged. The steps involved in this process are as follows:
At first, press the Start tab and then open Control panel.
After that, Hit Add or Remove user accounts link.
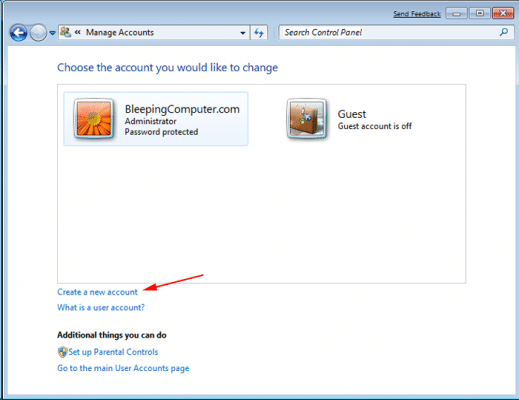
Once done with that, you will see the Manage accounts dialog box.
Here you need to click on Create a new account option.
Type in the Account name and then select Create admin account.
Now select Create Account tab.
Open the company file using New admin account created, and check whether the QuickBooks not working or not responding error still persists in your software or has solved now.
Method 8: Download and run the QuickBooks Refresher tool
In this method, you will have to close the QuickBooks software.
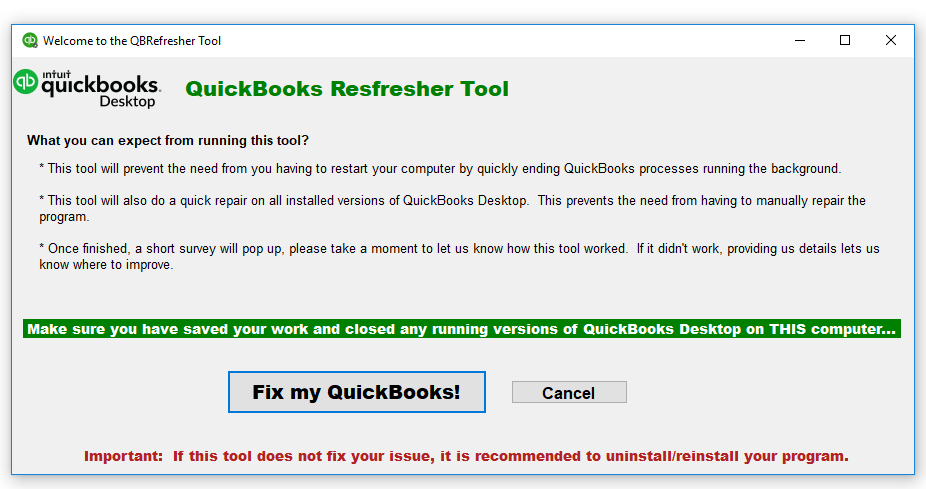
After that, download the QuickBooks refresher tool and save the file on system.
Now hit Run option, when the download process completes, execute the QBRefresher tool.
Click on Fix My QuickBooks option. Now, the tool will automatically diagnose the issue and will fix it on its own.
Lastly, open the QuickBooks and verify the issue.
How to Fix QuickBooks Stopped Working After the Windows 10 Update?
If you have ended up in QuickBooks stopped working issues after the installation of the Windows 10 update, then the steps below can help you out:
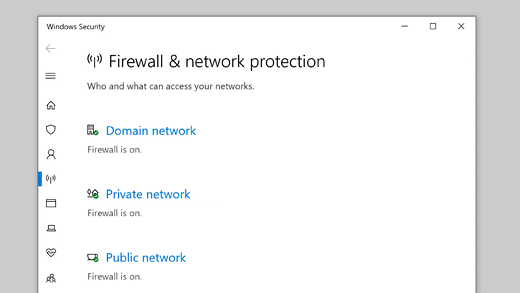
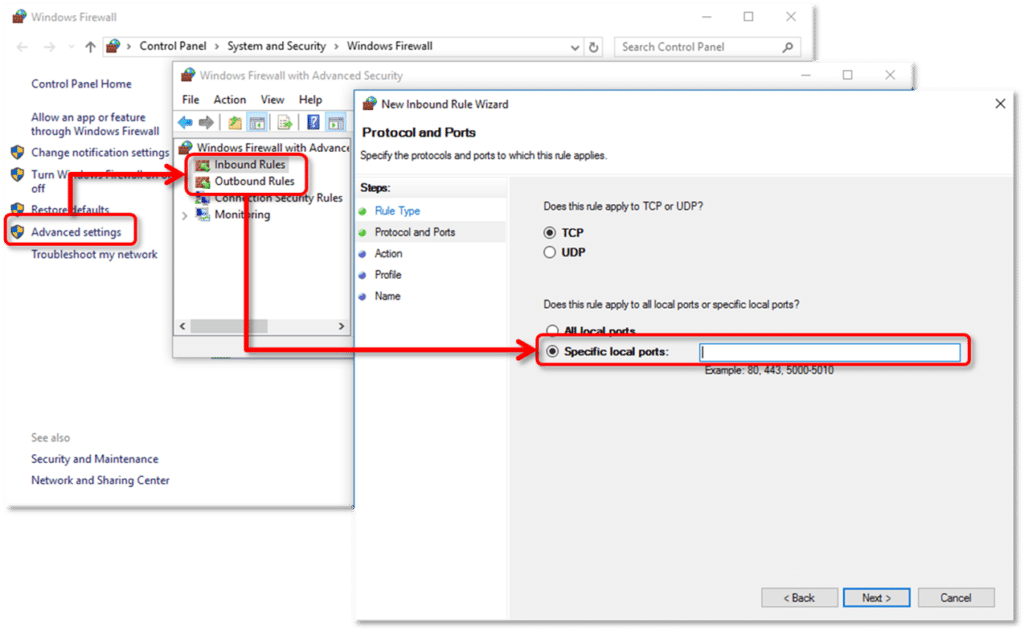
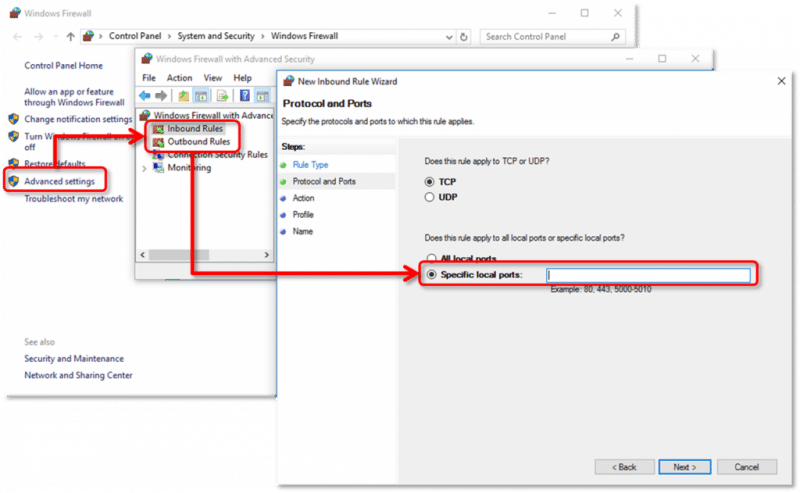
Move to Control panel and then select Windows firewall.
After that select Advanced settings opt and also choose the Outbound rules.
Moving ahead, click on the New rule tab and also select Program checkbox.
You select Next.
Also, check this Program path option and then copy the location of QuickBooks.
You should also select the Block the connection option and then click on the Public, private, or domain checkbox.
Towards the end, Rename itand click on Finish tab.
These are all the information that you should know in order to get your way around QuickBooks not responding or working issue. Make sure all these methods are to be followed in the given sequence. However, in case you still encounter the same issue even after trying out all the fixes, then in that case, please contact our certified XpertBooks Pro team for further assistance. Our team of experts will ensure that all accounting related queries get addressed. Our U.S based support team is easily available 24X7 via the support line: 1-800-761-1787, or you can also directly chat with our executives. Feel free to reach us today, and we will ensure the best support services. We will provide the best support possible.
Switched to Windows 10? Thinking whether your QuickBooks software is compatible with your new windows version? Well, compatibility issues are often seen in QuickBooks, and it is very much important to get sorted with the compatibility of the version of QuickBooks you are using with the Windows version. Compatibility issues can lead to a huge nuisance, which makes it important to find out whether your software needs to be updated or not.
An Operating system plays a great role in the overall experience of the QuickBooks application. It not only has a role in the number of features and updates you can get but also somewhat plays a part in the overall productivity. Windows 10 is currently one of the latest versions of the Operating system, which is also being used by a huge user base. Also, to ensure that you can get the best experience, the makers of QuickBooks desktop have optimized their software to work well for all the available versions of Windows.
Considering the need for your software to be compatible with your Windows operating system, we have come up with this piece of article, where we will be discussing about QuickBooks desktop compatibility with Windows 10. So, stay hooked to learn how compatible is your accounting software. Whereas, if you are hunting for any type of help or want to talk with an accounting expert then contact our professionals team with the help of our dedicated helpline: 1-800-761-1787.
If you aren't aware of what all new features and updates can be experienced with windows 10 in terms of look, feel, and features, then you can check the entire list below:
The new start menu seems to be similar to the start menu of windows 7.
Newer versions bring more control over optional updates.
Windows 10 consists of a virtual desktop known as the task switcher.
The cloud download for reinstalling windows.
Renaming virtual desktops.
Disk type and GPU temperature in the task manager.
One of the most compelling features of Windows 10 is that it includes the latest version of .Net Framework (4.6).
It features a virtual desktop, named as the task switcher.
The start menu in this versions of Windows looks similar to that of windows 7 OS.
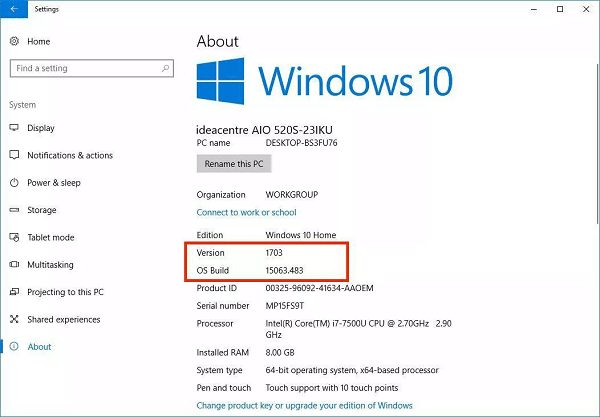
Before you move ahead with the process to check the compatibility of your QuickBooks software with windows 10. It is very much essential to learn which version of windows 10 you are using currently. This is the very initial fact of information that you need to know in order to move forward. Now, here are the steps that you need to go through in order to check your Windows 10 version:
Start by clicking on Start menu and then type “About your PC” in the search box that reads type here to search.
Now, from all the options that pop-up, select About your PC.
Once the new screen comes up on the display, scroll down the page and you will find the version number.
Go online and check for the latest version of Windows 10, it will show you all the list of Windows 10 versions and then you can match yours with the list.
Windows 10 versions that are Supported with QuickBooks Desktop Pro, Premier and Enterprise
As there is already quite a handful of Windows 10 versions in the market, some of the versions of QuickBooks desktop compatible with Windows 10. So, here are some of the versions that support this QuickBooks accounting software without any error whatsoever:
Windows 10 version 1809 (latest):
Being the latest version of Win 10, version 1809 is certified to work perfectly with QuickBooks Desktop 2021 and QuickBooks Desktop 2022. We have yet to certify QB 2017-19 versions but as far as we have tested, no such errors have come up. So, you should not come across any trouble while using it in version 1809.
Windows 10 Version 1803:
This is the second-most latest version of Win 10. Version 1803 supports all the QuickBooks Desktop from 2017 onward. All these versions are fully certified to be working properly in Version 1803.
Windows 10 Version 1709:
This version of Windows 10 supports all the versions of QuickBooks Desktop from 2017 to 2020. All these versions are fully certified to be working properly in Version 1709.
Windows 10 Version 1507, 1511, 1607 and 1703:
In case you are using any one of these versions that you should update to the latest version of Windows 10. Firstly, the QuickBooks Desktop will not offer a great experience in these versions of operating systems. Also, Microsoft has already discontinued its support for these versions which means that you are missing out on a lot of features that you can experience just by updating to the latest version of Windows, which currently is Version 1809.
It should be noted that if you need to rollback a recent upgrade of Windows 10, you can follow the steps on the process to recover or restore the previous version of Windows using Rollback feature from Microsoft Help. You can take assistance from IT or computer professional before making any changes to your windows operating system.
Versions of QuickBooks Desktop Supported with Windows 10 (QuickBooks 2016 R7 and Later)
Now that you have explored the Windows 10 versions, it is recommended to check whether your QuickBooks version is supported by Windows 10 or not, as not all versions are supported. Thus, find out whether you need to update your QuickBooks desktop or will it be compatible with your operating system. A list of versions of QuickBooks desktop supported with Windows 10 is given below:
If you are a QuickBooks 2016 R7 and later user, then need not to worry you can switch to Windows 10, as these versions are compatible with Windows 10. The QuickBooks 2016 R7 and later version user should not bother, as they will not face any kind of compatibility issue with Windows 10.
QuickBooks Desktop 2015 & 2016 (Release 1-6)
Talking about the compatibility of QuickBooks Desktop 2015 & 2016 (R 1-6) with Windows 10, they are compatible only with a condition that .Net Framework 3.5 is enabled on the system, or else you might encounter certain issues.
QuickBooks Desktop 2014 and earlier
Now comes the QuickBooks desktop 2014 and earlier versions. Well, if you are a QuickBooks Desktop 2014 and earlier version, then it is high time to update your accounting software to the latest version, as these versions are not compatible with windows 10. If you are still using the earlier versions of QuickBooks software, then you are more likely to receive errors and issues. You might bump into different technical snags and compatibility issues, which might lead to serious problems related to your data and other activities with QuickBooks. Thus, make sure to update the software as soon as possible.
How to ensure optimal performance with QuickBooks desktop?
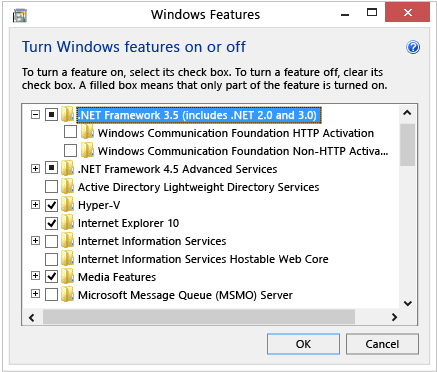
Despite the version of Windows 10 that you are using, there can be instances where you do not have .NET 3.5 Framework enabled. In such cases, you will lack a lot in terms of user experience. So, what you can do is to enable this function as it will offer you the smoothest experience possible of QuickBooks desktop on Windows 10.
Enabling the .NET Framework 3.5 to ensure optimal compatibility with QuickBooks
Here are the steps that you need to follow in order to enable .NET Framework 3.5 to ensure optimal compatibility with QuickBooks Desktop:
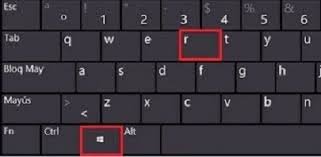
Press ‘Windows + R’ keys on your keyboard, it will open up the Run Window.
After that type Control Panel and then click on the OK button.
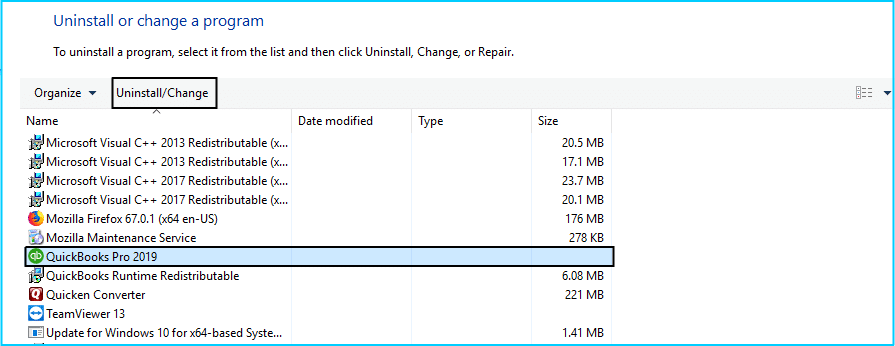
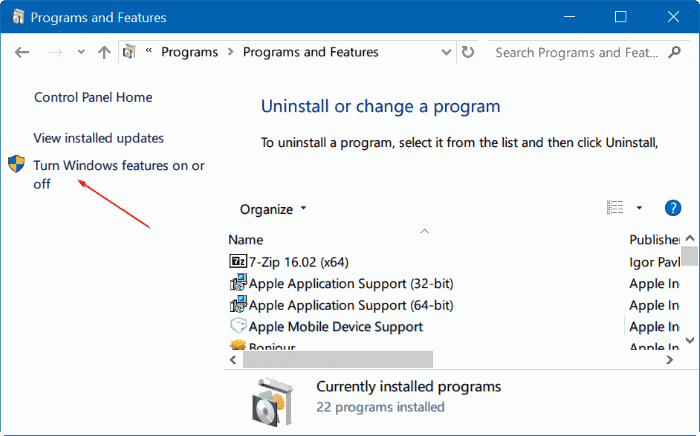
Here select the Uninstall a Program option.
Now hit a click on Turn Windows features on or off.
If you see the box in front of .NET Framework 3.5 enabled (checked) and .NET Framework 4.5 as well, then you are good to go.
If it is not, then check both of the boxes and select OK.
If both the boxes are checked, then select Cancel.
These are all the versions of Windows 10 in which you can run different versions of QuickBooks Desktop. In case you are facing issues running the software on one of the versions which are tested to be working fine – you can contact our 24/7 XpertBooks Pro support team by getting on the line using our dedicated support line i.e. 1(800)761-1787. We will help you to get your software running and will also take care of any other queries in the best manner.
Have you recently purchased a fresh copy of QuickBooks desktop software and are seeking a quick way to install it? Well, there is no need to go anywhere as this article contains all the necessary steps to help you in the process of installing the QuickBooks on your system. For some users who has never used QuickBooks desktop, it might seem as a tough task when it comes to download, install and setup QuickBooks desktop on their system. An incomplete or improper installation can lead to activation, update, company file related problems or performance related issues later on. But the good news is that downloading and installing QuickBooks desktop is not that difficult as it may seem.
Thus with the help of this article, we are going to share all the necessary steps to install QuickBooks desktop by you own. Make sure to read this article post carefully till the end. However, there is an option for you to get in touch with our XpertBooks Pro support team and get answers to all your queries instantly.
Important things to keep ready before Installing QuickBooks
Before starting the installation process, you are required the following things available:
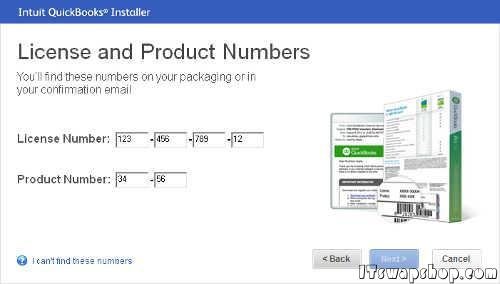
Must have QuickBooks License number and Product Code.
A stable Internet connection
Windows Administrator Credentials (You should login as System admin)
QuickBooks desktop installation file.
Important: You can find your license number and product code in behind the product packing or in the email you have provided at the time of purchasing the software.
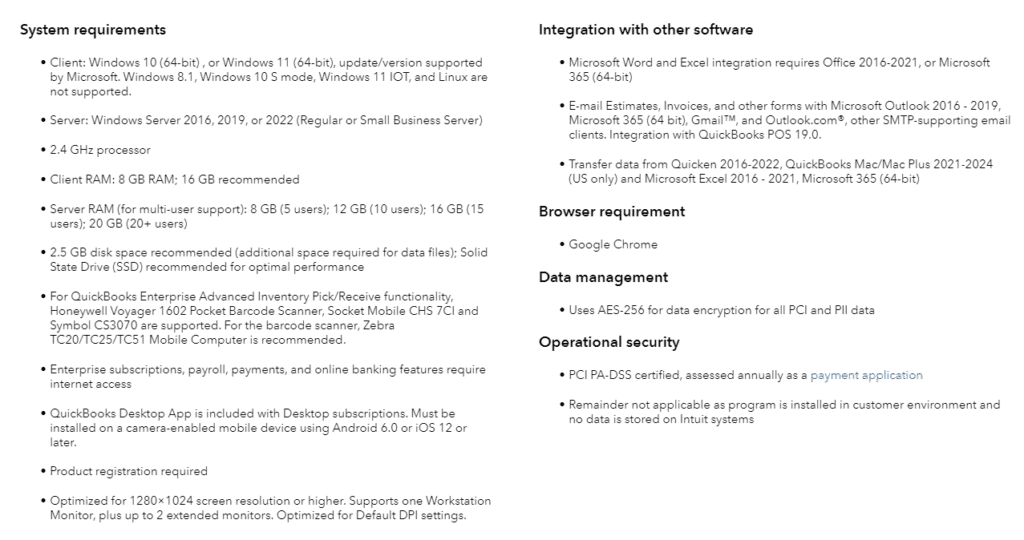
Check QuickBooks Desktop System Requirements
In order to install the QuickBooks Desktop you need to make sure about the minimum system requirements of your computer. Check the system requirements first to run your software smoothly in your system:
Steps to Install QuickBooks Desktop for the First Time
Below are the detailed explanation for Installing the QuickBooks desktop on your computer. These steps are supposed to be followed only after you have pre downloaded all the necessary files related to QuickBooks. So, let’s get started:
Step 1: Download QuickBooks Desktop
Follow these steps to download the latest version of QuickBooks desktop:
Download the appropriate installation file for the product and then jump onto the next step.
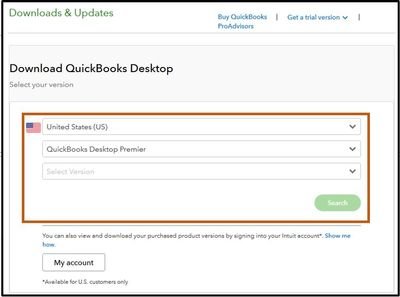
Visit Downloads & updates page to get the download link for the version of QuickBooks purchased earlier.
Whereas, the accountants are supposed to log into CAMPS to download the software.
In order to download the installation file, the steps to be followed are as follows:
Download QuickBooks for Intuit website
Pick the Country, product, and version from theDownloads and updates page. If you are unaware of the version you are currently using, read the related article.
Hit a click on the Download option.
Save the installation file in an easily accessible location.
Download QuickBooks via CD
Eject the CD drive and place the QuickBooks software CD into it.
After the CD has been inserted, then the QuickBooks installer will automatically open up.
A dialog box will appear on the screen with a Start tab, and then right click on it and select the Explorer tab.
Move to the Folder list in the explorer screen and select QuickBooks CD.
Launch the QuickBooks installer, and hit the Setup.exe file.
Step 2: Prepare the system for Installation
Ensure that the device you are going to Install QuickBooks Desktop on meets all the System requirements.
Make sure you have the Product key and License number details.
Need assistance in spotting the product and license number?
In case you have bought QuickBooks directly from the website, you can spot the info in the original purchase email.
If you have purchased it from a retail store, then you are required to look for the label in the original package.
If you are reinstalling it, you can look for the information from the customer account management portal.
In case you have lost the license or product number, then you can take assistance from a professional.
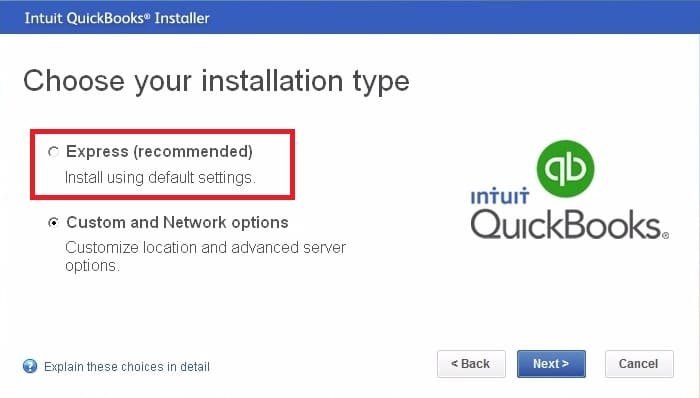
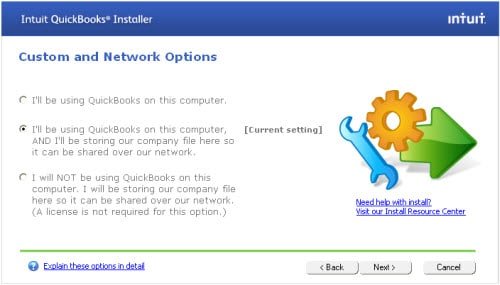
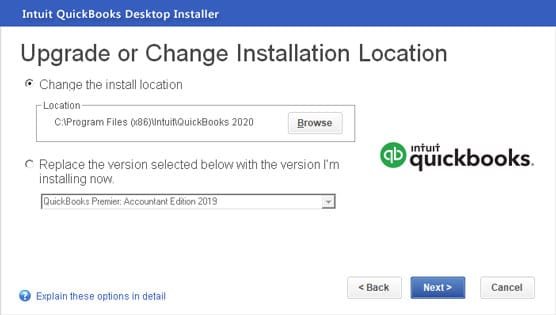
There are 2 Installation options from which you will have to choose the one which fits your needs perfectly. Following are the options and the functions that they are useful for:
1. Express Installation
This method of installation is suitable for users that are:
First time users of QuickBooks desktop.
Users who are reinstalling QuickBooks.
Users who are going to use the software on just this computer and will not be a part of any network.
Installation method
Hit a click on Express option and then follow it by clicking on Next tab.
Now select Install.
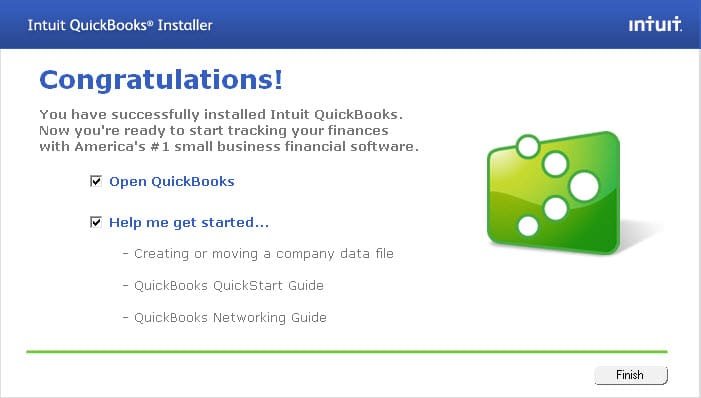
Once the installation is finished, select Open QuickBooks to get started.
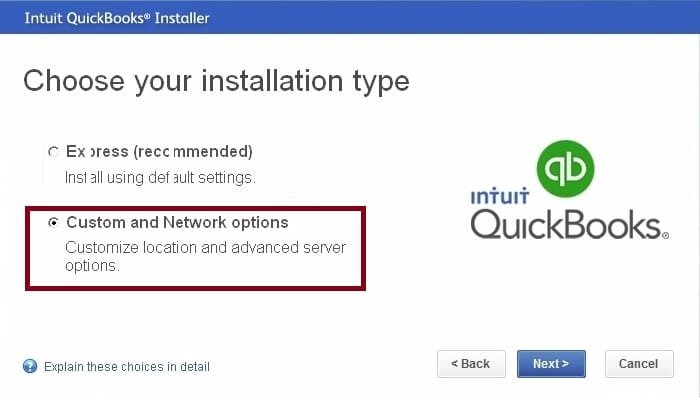
2. Custom and Network Install
This method of Installation is suitable for users belonging to the following category:
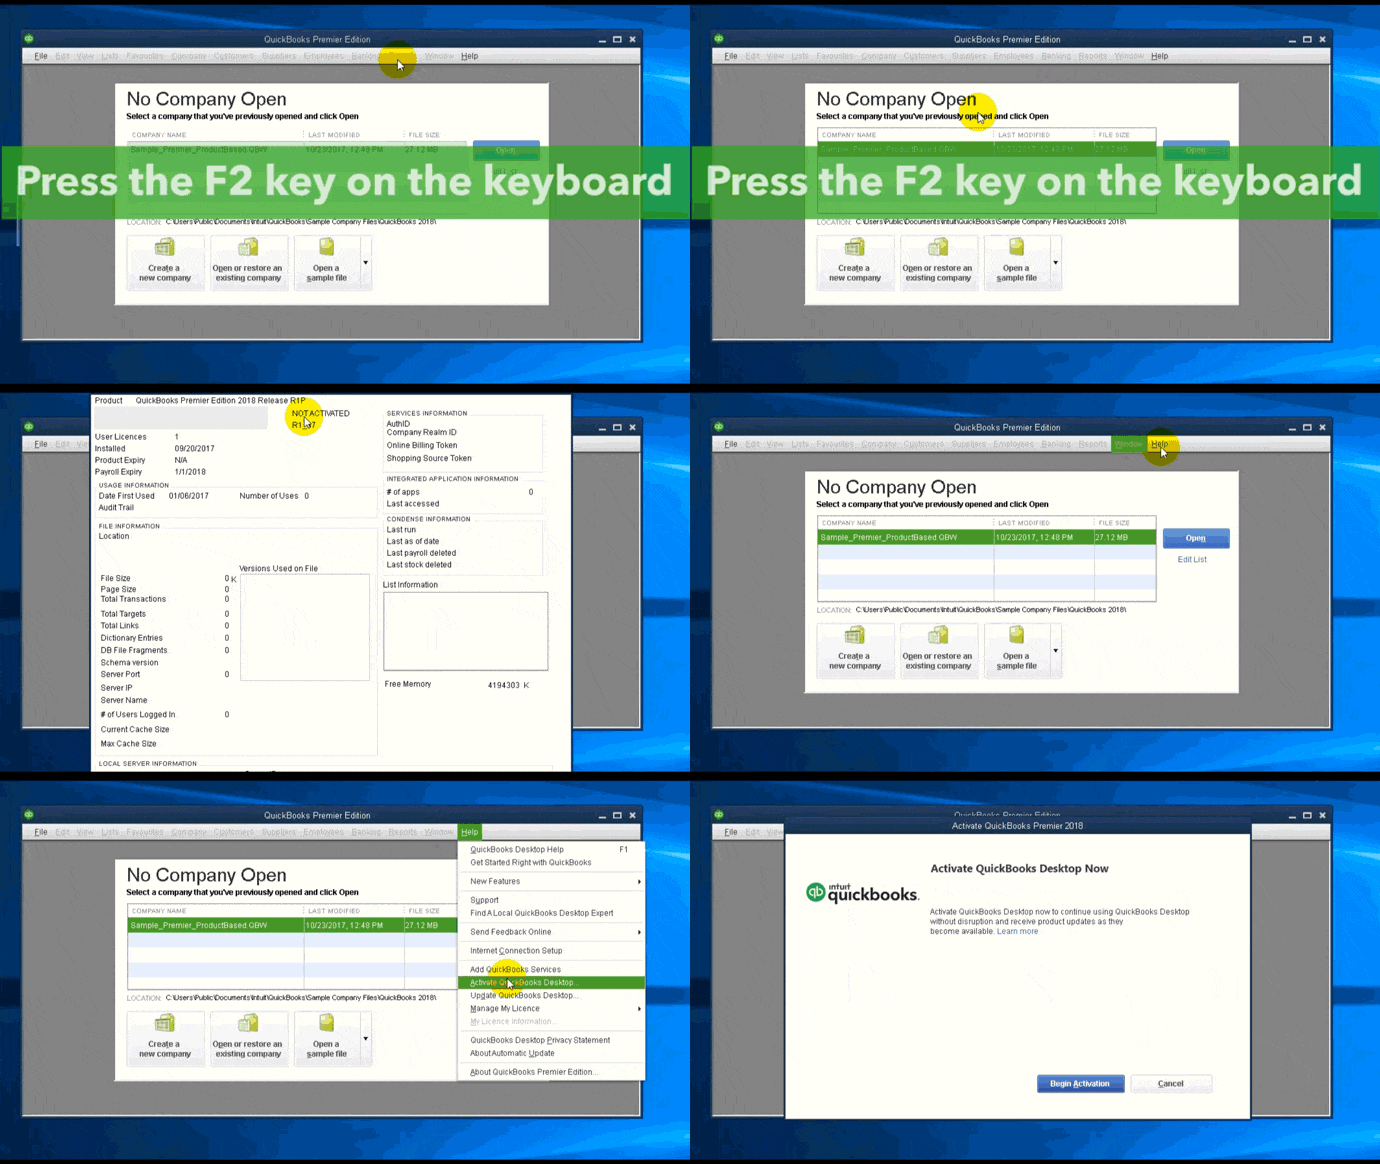
Once you have successfully installed QuickBooks desktop, you should activate it before getting started. QuickBooks will prompt you to activate, but you can also activate it manually with these steps.
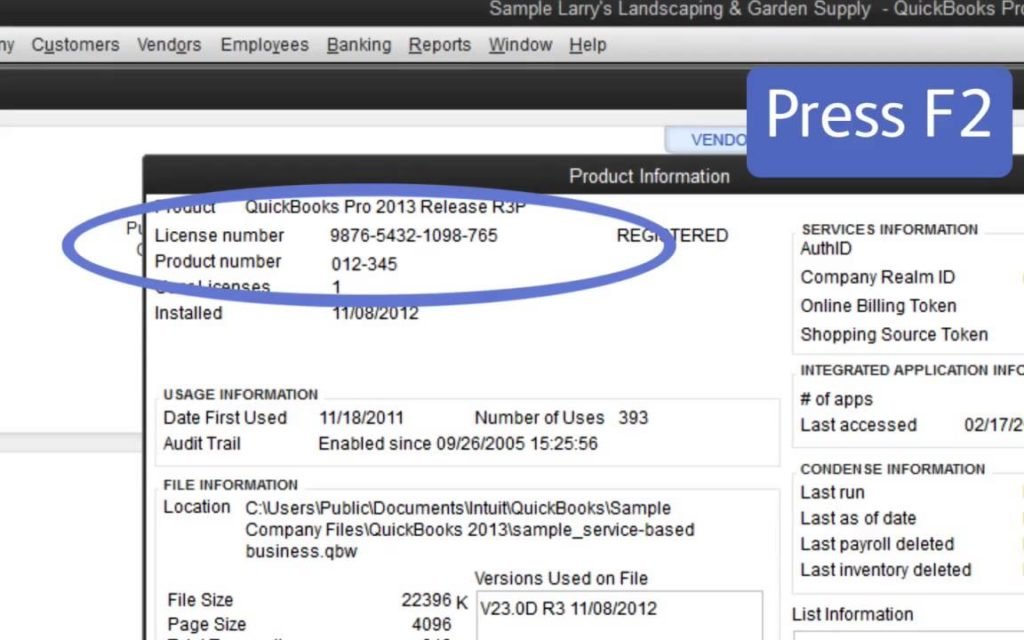
Open QuickBooks desktop and press the F2 key on the keyboard.
Once you successfully complete all the steps mentioned above, you will be able to use QuickBooks desktop on your device. It is important for you to make sure that you follow the steps in an orderly fashion to ensure that the installation process does not crash mid-way. In any case, you are facing any problem or any error regarding the installation of QuickBooks desktop even after following these steps in the right order, then you can contact our 24/7 XpertBooks Pro error support team at 1-800-761-1787. We will provide you with complete assistance regarding whatever issue you are facing.
FAQ's
What is QuickBooks Desktop?
Accounting tools are the spine of any organization nowadays, as they offer great aid and freedom in terms of managing the data. QuickBooks Desktop is one of the most popular accounting software that offers a cloud-based subscription service. This means you can access the entire database from anywhere and anytime without any hassle whatsoever. The best part of QuickBooks is that it is a one-time purchase software, which makes it highly productive and a great return on investment.
What are the latest features offered by QuickBooks desktop 2024?
The latest QuickBooks desktop offers some great features, which include the following: Cash toggle on reports: This feature allows you to toggle displayed reports between cash or accrual basis.
Search chart of accounts: This new feature allows you to find and choose a chart of account or sub-account by typing an account number and the account name or partial words of an account name.
Updated email security: QuickBooks desktop now includes securely sending emails from Gmail, Outlook, and Windows Live accounts through QuickBooks, using improved multi-factor authentication. Security here includes signing in with the Intuit ID account. Once you set it up, you don't need to enter your webmail password again when emailing from within QuickBooks.
Inventory report customization: Inventory reports like the Inventory valuation summary or detail, Inventory stock status by item, and assembly shortage by item have an option to customize display.
Sales order fulfillment workflow: You get an access to picklist details on a mobile device that is connected wirelessly to a QuickBooks Enterprise file with advanced inventory. Moreover, with this software you get real time access to the status of sales order fulfillment in QuickBooks enterprise. Mobile inventory scanning: You can now pick quantities at the warehouse using a barcode on a device or Android phone to record inventory.
Multi monitor support: Another new feature added here is multi-monitor support, using which you can connect up to three monitors from the menu bar in QuickBooks. Move to view and choose the multi-monitor mode.
Payroll liability and payment reminder: This particular feature of QuickBooks desktop ascertain that you and your clients reminded of upcoming payroll liabilities payments.
Past due stamps on QuickBooks: This feature gives a visual confirmation that a customer's invoice is past due displays on the screen when an invoice has a past due balance.
Merge vendor record: This particular feature provides a consolidated window to identify and combine duplicated vendor records efficiently.
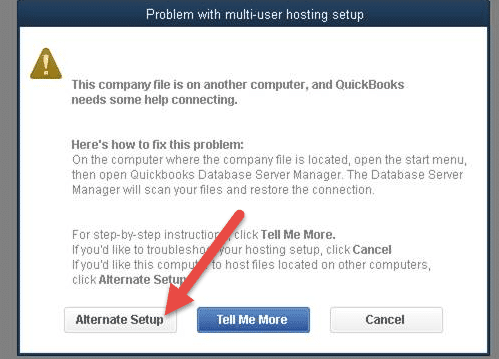
QuickBooks multi-user mode allows multiple users to work on a QuickBooks company file simultaneously. But, switching from single-user mode to multi-user mode can cause technical issues sometimes. Users might not be able to use of the software at all in the multi-user mode, or errors like QuickBooks Error Code H202, -6000 series errors, etc. could show up on their computer screens. Not just that, such errors could also may be transferred to your server computer without showing up on your system. If that occurs, you might encounter the warning notice " QBDBMgrN was not running on this system." This issue relating to multi-user mode may slow down your productivity, keep you behind your business goals and cause monetary losses.
So, here question raise that what will you do while using your systems in multi-user mode and multi-user-related issues occur? Well, go through this article until the end to find the solutions to any QuickBooks multi-user mode issues that may pop up and stall your work. However, in case you are in a hurry, you can also call our XpertBooks Pro team, and sit back while we provide you with quick and precise solutions.
What is QuickBooks Multi-User Mode Not Working Error?
A compelling feature offered to QuickBooks users, multi-user mode allows more than one user to work on the same company file at the same time. In order to make use of this software, each user must have the QuickBooks license on the workstation. Some technical glitches and having problems with the multi user mode error at times may not allow users to access company files simultaneously in multi-user mode. This error generally occurs when users try to launch a company file that is stored on a server. Another common issue faced by users is that QuickBooks continues to work in a single-user mode.
Troubleshooting Steps for QuickBooks Multi-User Mode Not Working Error
It is the most frequently encountered error you will face when switching between single-user and multi-user modes, including H101, H202, H303, and H505. Here are 10 practical advanced steps recommended by our experts to assist you in getting rid of the QuickBooks multi-user mode not working issue or QuickBooks cannot switch to multi-user mode.
Solution 1: Download and run QuickBooks tools hub program
Open the downloaded file names with QuickBooksToolHub.exe.
Now follow the on-screen commands to install & agree the Terms and Conditions of the tool.
Once the installation done, you need to double-click the QuickBooks tool hub icon to open the tool hub program.
Step 1: Install and Run QuickBooks File Doctor tool
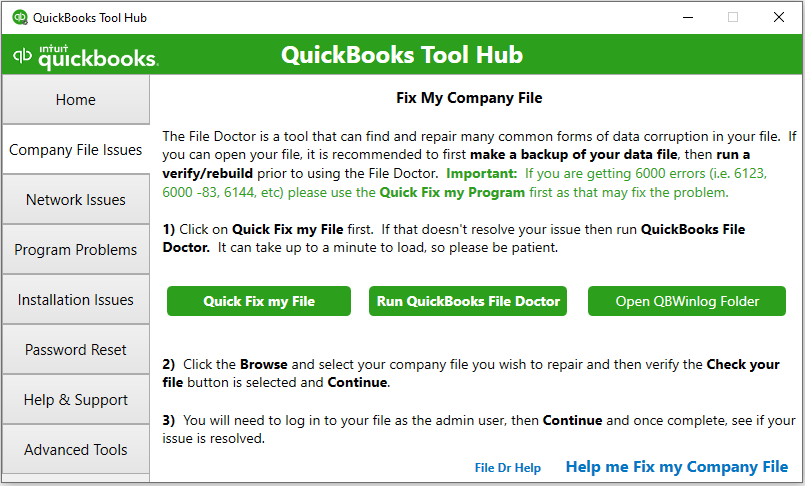
This is one of those steps that you can resort to upon receiving most of the QuickBooks issues. Once the tool hub program successfully installed and open, run the QuickBooks file doctor tool and see if the problem has been resolved.
Open the tool hub program and navigate to Company file issues.
After that choose Run QuickBooks File Doctor option form the listed options.
It will take some time to download and run on your system.
Note: You can directly download the QB File Doctor tool (if not integrated with your QuickBooks) from the official website of Intuit. It will help you analyze if your computer system is aptly set-up for using QuickBooks multi-user mode.
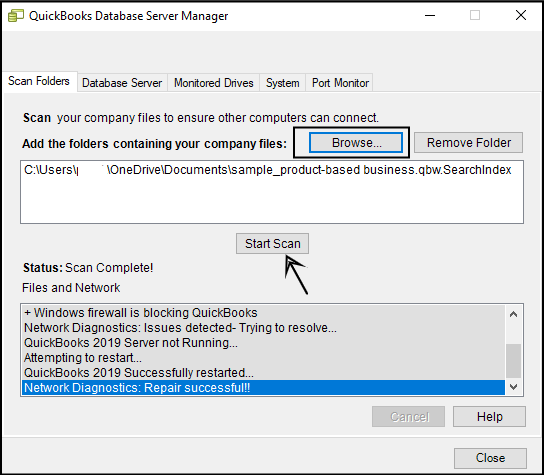
Step 2: Use the QuickBooks Database Server Manager
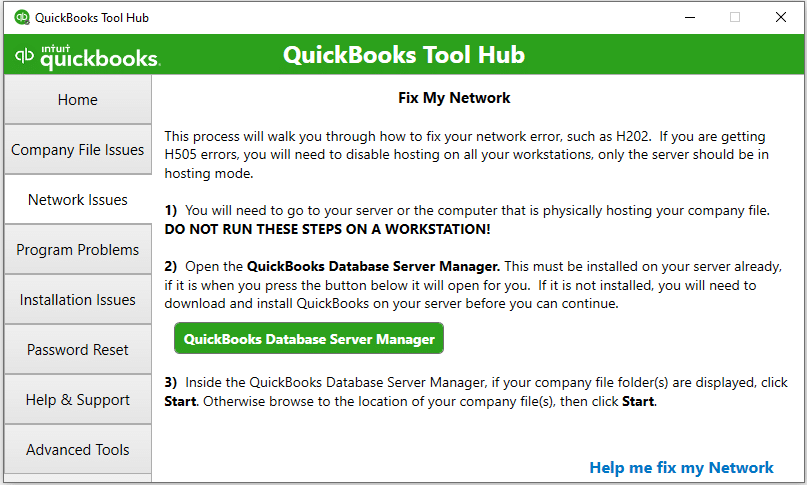
Open tool hub program and navigate to Network Issues tab.
After that select QuickBooks database server manager option.
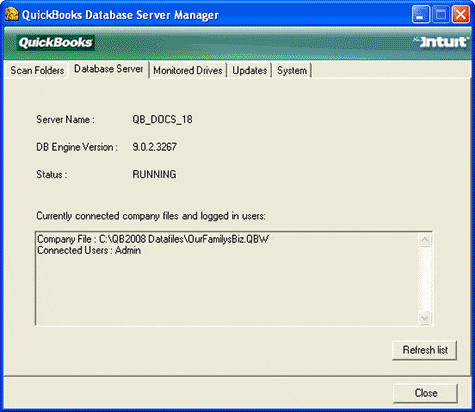
In the next step, go to QuickBooks Database Server Manager on the server by typing the database in the Start menu.
If you cannot locate folder locations, use Browse to find the folder where company file/files reside.
Now tap on OK and select Start Scan button.
These steps should fix firewall permissions. Now, double-check if the multi-user mode not working issue resolved in QuickBooks.
Solution 2: Verify host mode on all user computers
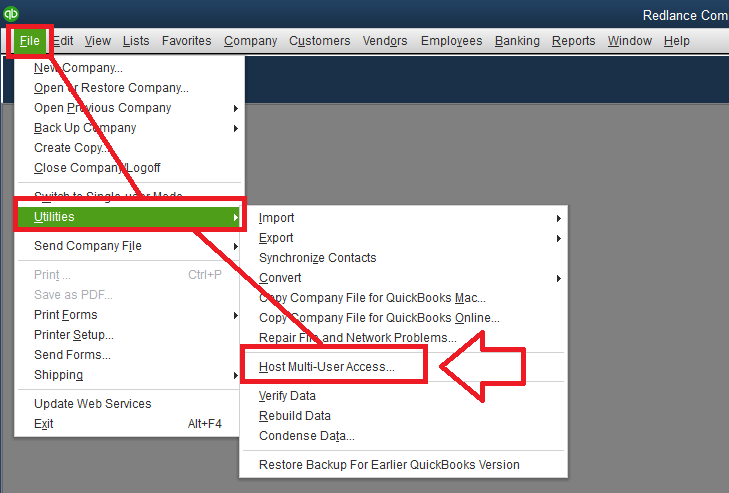
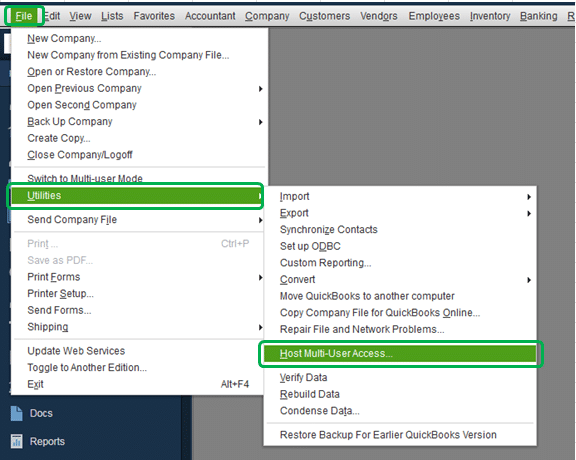
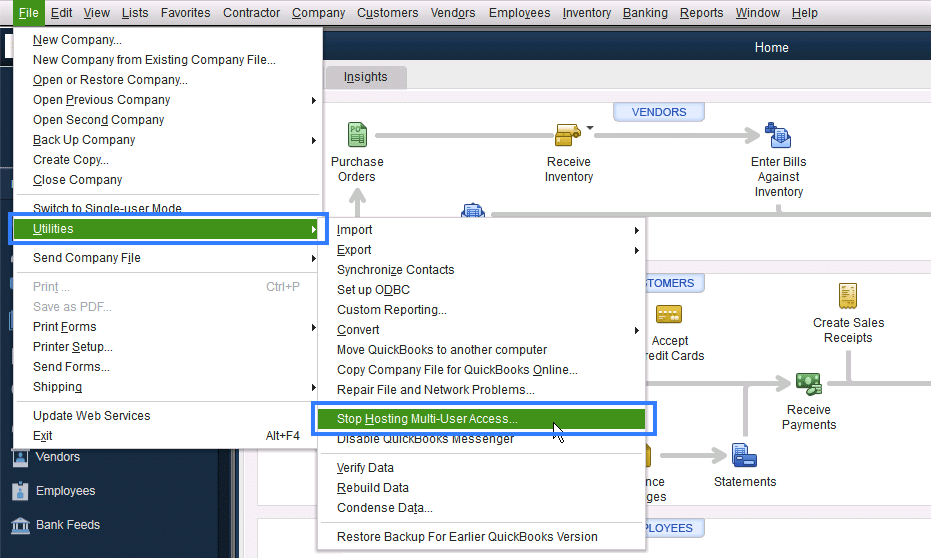
Open QuickBooks and go to QuickBooks File menu.
And then hover to Utilities. If you find Host Multi-User Access on the list, go to a different computer.
If you spot Stop Hosting Multi-User Access on the list, choose that and Disable hosting to enable QuickBooks single-user mode.
After it’s certain that the hosting mode is turned off on all user computers, check if the multi-user mode not working error has been fixed.
Solution 3: Ensure that the QuickBooks services are running properly
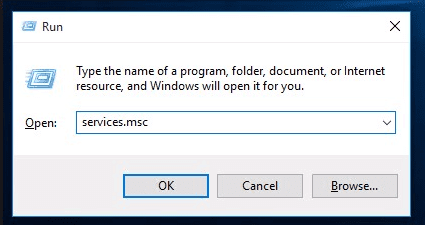
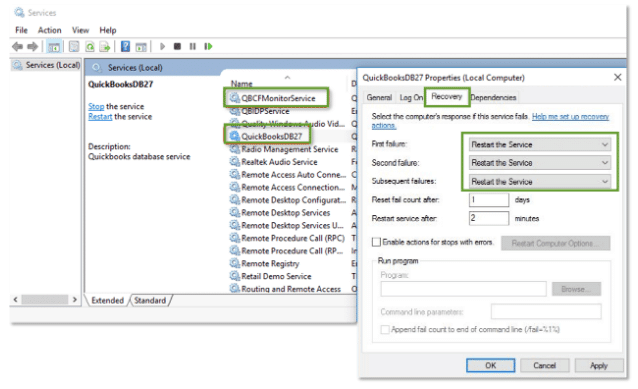
To utilize QuickBooks with multi-user mode, the services offered by the software, such as QuickBooksDBYY (YY is the year of QuickBooks) along with QBCFMonitorService, must have been running on the server computer.
Under this methods, go to Windows search bar and search for Service. msc.
After that, check if QuickBooksDBXX service is in the Services window list. If the service is unavailable, follow these steps –
If you use the Database Server Manager, ensure that it is installed on the server. QuickBooks Desktop (for different years) installed on the computer- different corresponding Database Server Manager should be installed.
If the complete program is run on the system, hosting must be enabled on the server.
Next, double-click QuickBooksDBXX service, and the value should appear Automatic within the Startup type on the screen. Service started can be running or Start button.
Now select restart the QuickBooksDBXX service for the first, second, and following failures under the Recovery tab.
Perform the same steps from 1 to 4 for the QBCFMonitorService.
Now, you need to open your computer and launch QuickBooks with multi-user mode and then determine if QuickBooks multi-user mode is not working error is resolved. If the issue is still there, then check the QuickBooksDBXX service. It must be a part in the administrator group. Also, it must have to contain all the necessary permissions.
Solution 4: Check that QuickBooks must be able to send data
Perform the following two-steps solution to fix multi-user mode problem:
Step 1: Change the settings of firewall and antivirus
Firewall or antivirus may be the main cause of QuickBooks multi-user mode not working error. In case the issue is born out of firewall setting, you can set-up exceptions in the settings and allow QuickBooks for transmitting data. If your antivirus is causing the issue, configure it to fix the error.
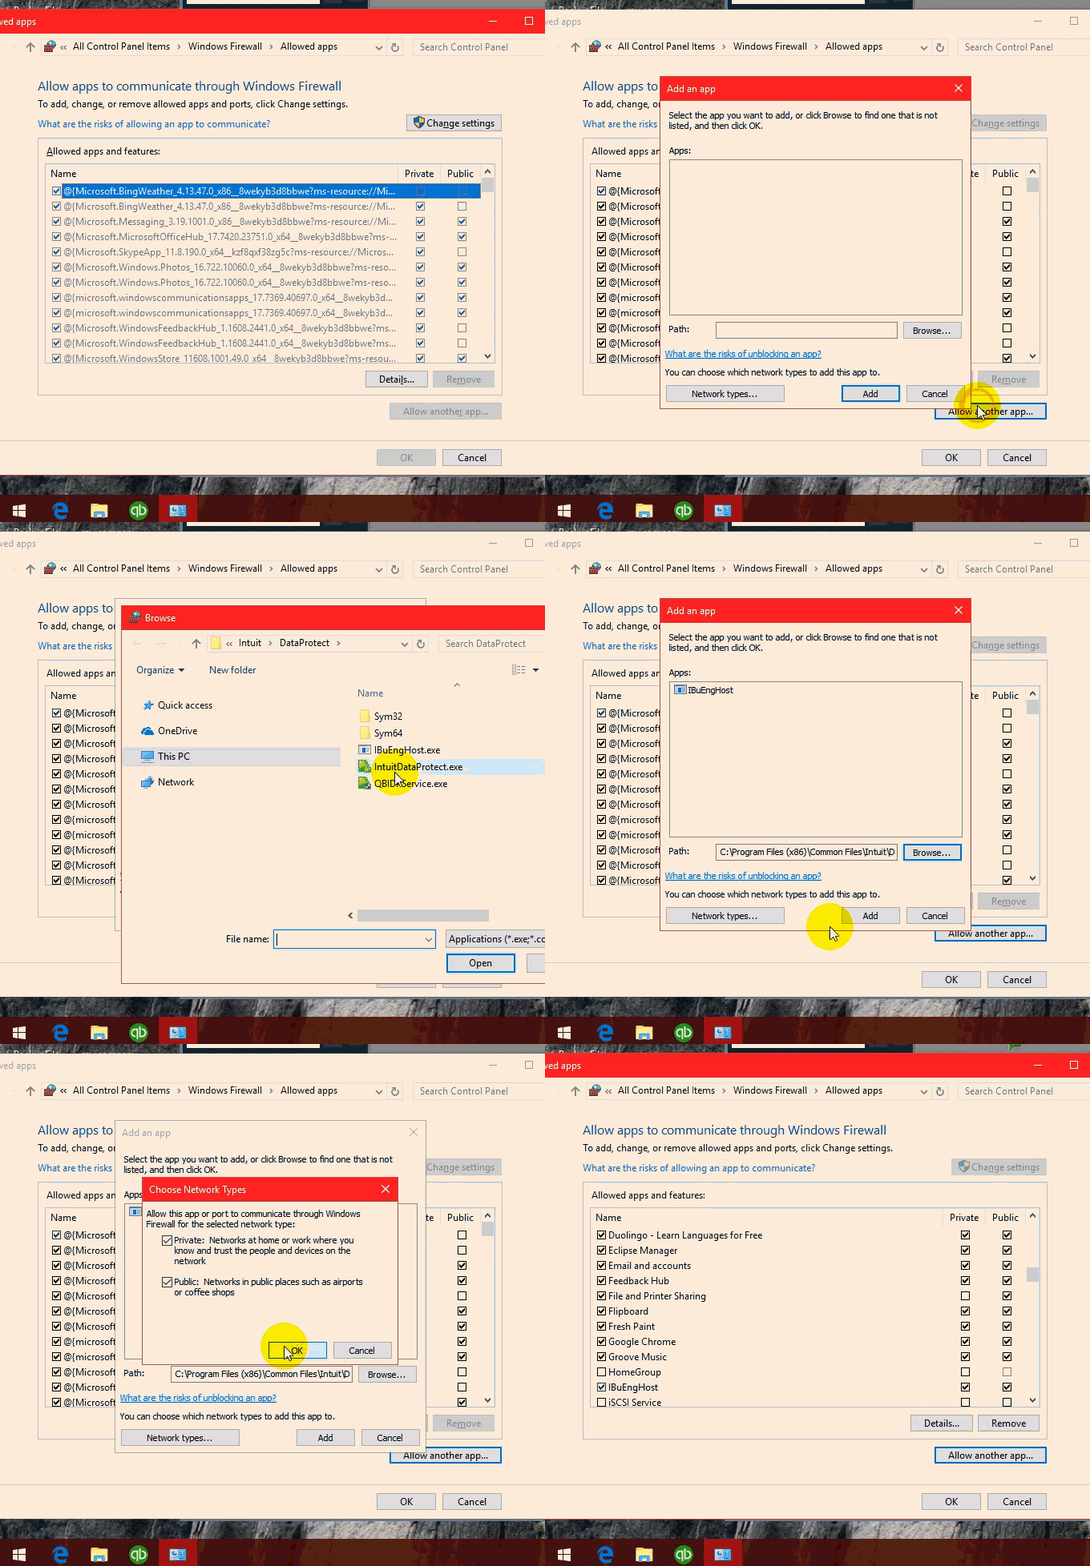
Hit a click on Windows key and then move to Control panel.
Find and click on the Windows firewall option.
Next, click on the prompt to allow “An app through Windows firewall option.”
Now tap on Change settings and then click on checkbox under the public list for the QuickBooks application.
Next, press OK and click on Public for the application.
Finally, run the QuickBooks in the multi-user mode to check if the snag is fixed.
Step 2: Test path and ensure QuickBooks can communicate with the server
This step will require you to turn on Network Discovery.
Press the Windows button and R key (Windows +R keys) to open the Run command.
After this, type ping [servername] and hit on Enter key.
On your computer, use UNC (Universal Naming Convention) to reach the shared folder in the server.
Lastly, use UNC path to switch back to the company file of QuickBooks.
Step 3: Go to the company file following the UNC path
Step 4: Create a new company file folder
Herein, you are supposed to Create a new folder for the company file. Ascertain to make it on the Host system.
Then you need to Set up the folder and allow for Windows to access permissions for the new folder.
It should be kept in mind that the company files can be shared across systems.
You are now recommended to copy the .qbw file to the new folder and also check if the company file is in multi-user mode opening. If it opens up correctly, then the issue has now been resolved.
Final Step: Configure Firewall exception for QuickBooks Program and Port
Hit on Windows button and move to search box.
After that type Windows Firewall to open Windows firewall setting.
Now select the Firewall advanced options.
In the Advanced settings page you'll find the inbound and outbound rules.
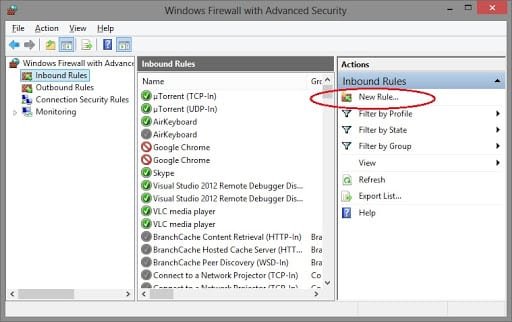
Later on, select Inbound rule and then click on New Rule.
Then click on Port and select TCP.
Here you need to add the Port based on the version of QuickBooks you are using.
For QuickBooks Desktop 2019, enter 8019, XXXX.
For QuickBooks Desktop 2020, enter 8019, XXXX.
Type port Numbers 8019, 56728, and 55378–55382 for QuickBooks Desktop 2018.
Type port Numbers 8019, 56727, and 55373-55377 for QuickBooks Desktop 2017.
Add QuickBooks to the Firewall.
Now you need to opt for New Rule from the Advanced firewall configuration.
This time around, select the application, then move to the directory where the software's executable file is located.
Add each of the above-mentioned files to the Inbound Rules.
Following that, follow the same steps to apply the outbound Rules.
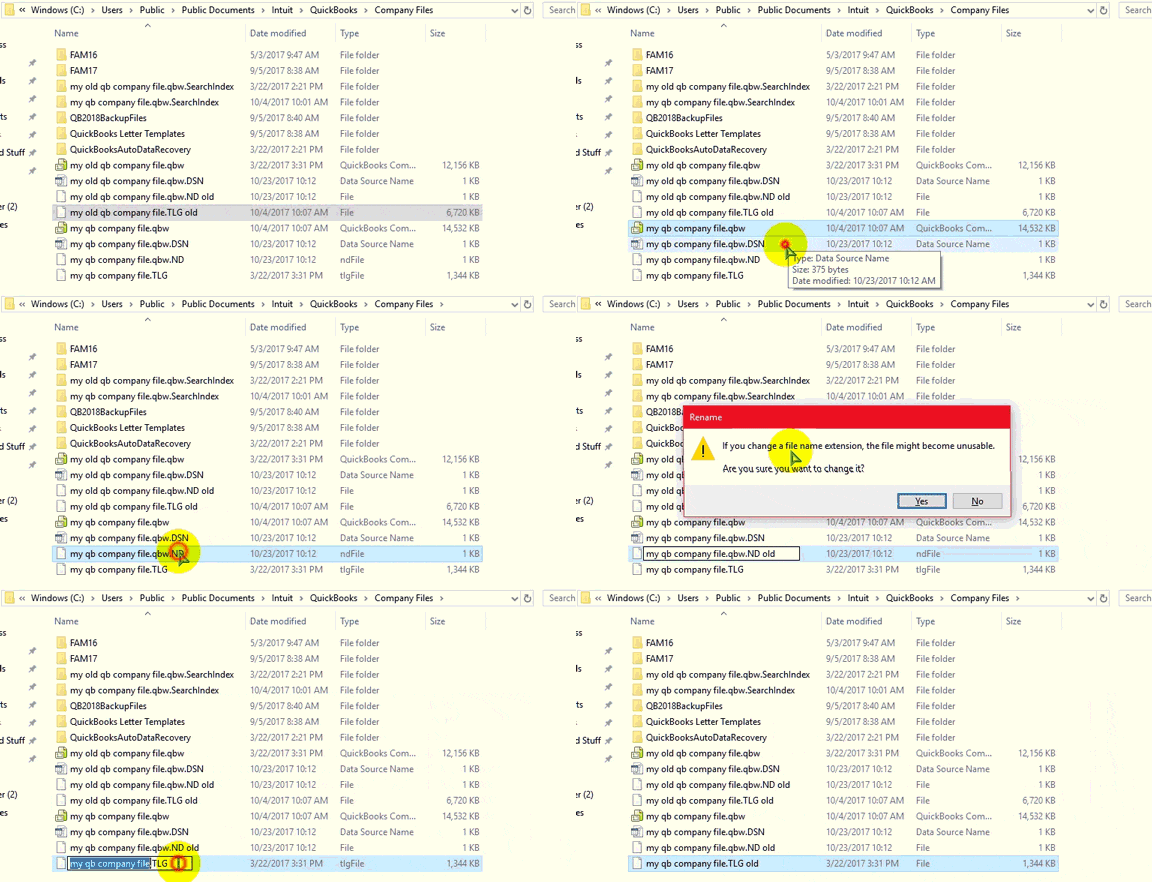
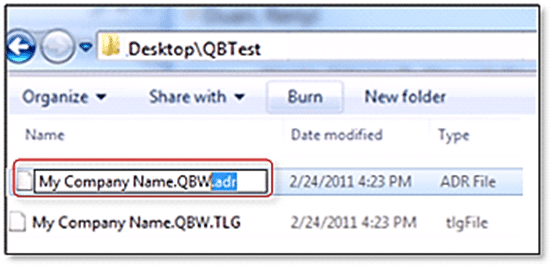
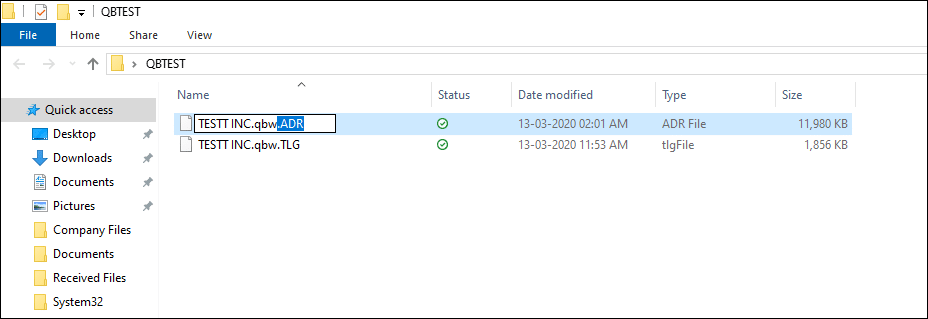
Solution 5: Rename .QBW, .TLG and .QBW.ND
In this method, you need to open the QuickBooks desktop company file.
And then, press the F2 key.
The product information window appears on the screen. And then, under the file information, you can spot the location of the company file. Also, the .TLG and .QBW.ND files can be located in the same folder.
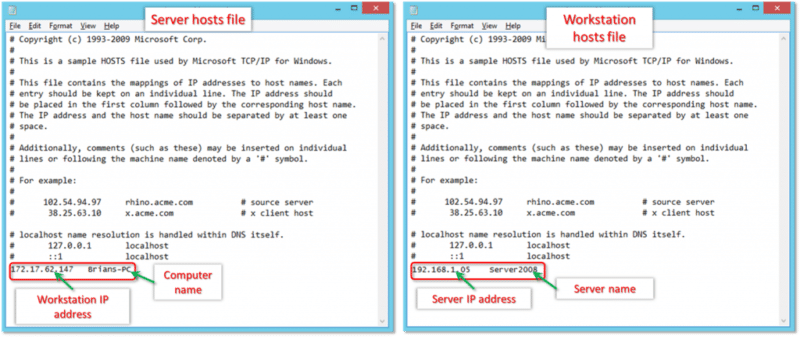
For this method, press the Start button on the server and workstations encountering the error.
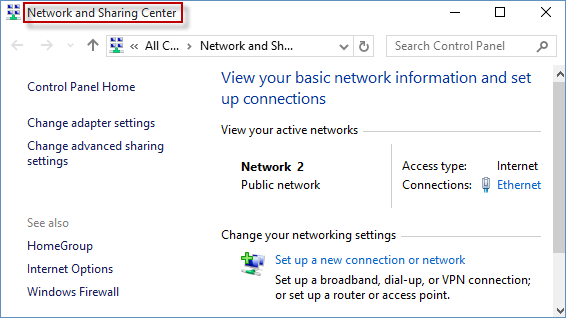
Now type in Network and then open Network and sharing center.
It is supposed to click on Change advanced sharing, and from there, you should Turn on network discovery and file and printer sharing.
The next step in the process is to get the name of the server.
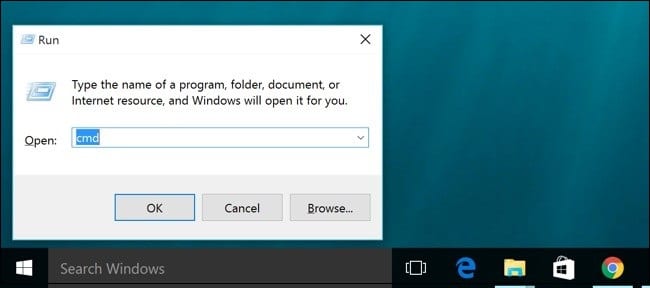
Moving ahead, type CMD in the Run window and then hit Enter key.
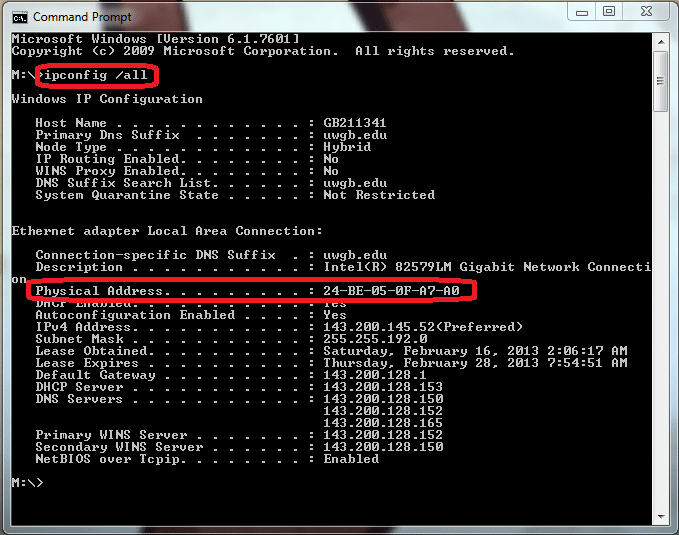
In the CMD window, you need to enter Ipconfig/all text and hit Enter key.
Now you will see the server name next to the Hostname on the screen.
Next step is to note down the Hostname and keep it safetly.
In order to test the server, you need to move to the workstations.
After that, click on Start menu and then open up the Run command window.
Followed by, typing in the CMD in the Run window.
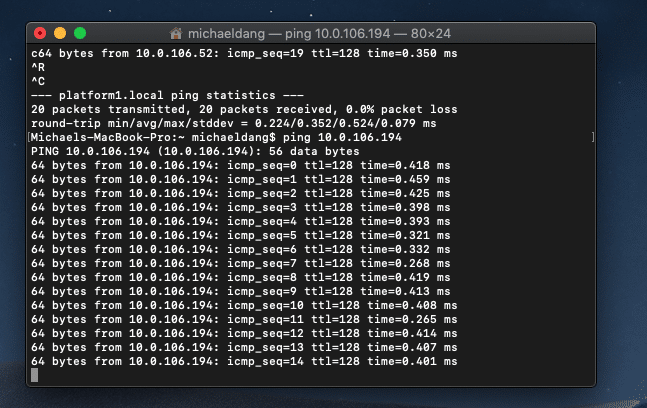
Last step in the process is to type "ping_[your server name]" and then hit Enter key. And then type in the Server name without the brackets.
To store the company file, you must create a new folder on the hosting system. In addition, you'll need a folder and Windows access to share the company files. Now, you need to create an additional folder, then copy or transfer your .qbw file into the newly created location for storage. Try making use of QuickBooks in a multi-user to check if the issue has been solved.
Solution 9: Configuring the default setting
You can configure the default setting and can fix the issue. This will resolve the multi-user mode not working error. The steps to be followed over here are as follows:
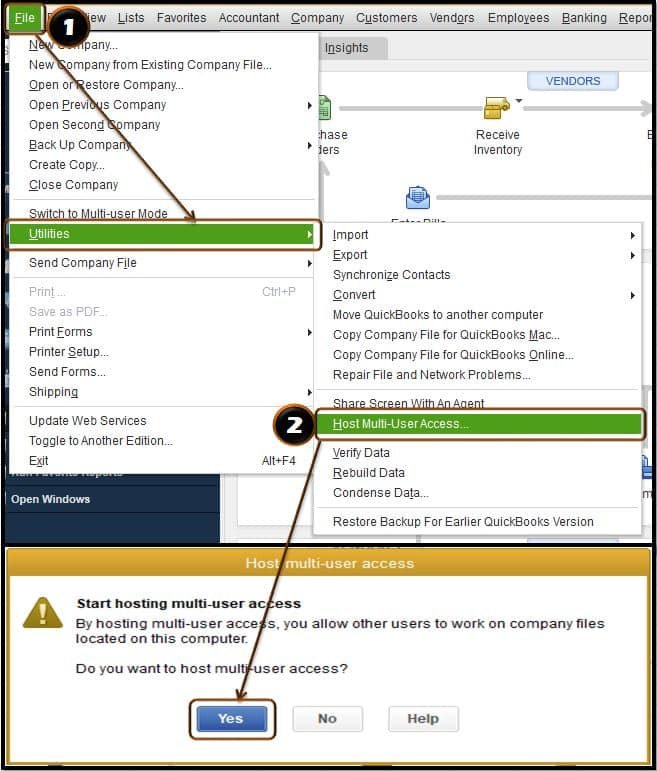
Initially, you need to open QuickBooks and click on File tab.
After that, click on Utilities and also select Host multi-user access option.
Now add the desired number of users with the company file.
Followed by clicking on Cancel, if in case the Multi-user mode is already enabled, then then you will be asked to disable it.
The final step is to create different login credentials for different users, and then then setup is complete to be used.
Solution 10: Reinstalling the QuickBooks software
You can reinstall QuickBooks software to fix the ongoing issue. The steps to be followed for this process are as follows:
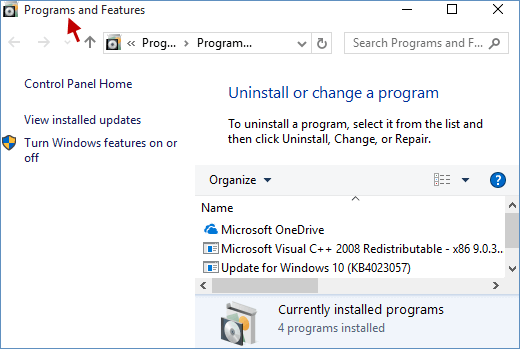
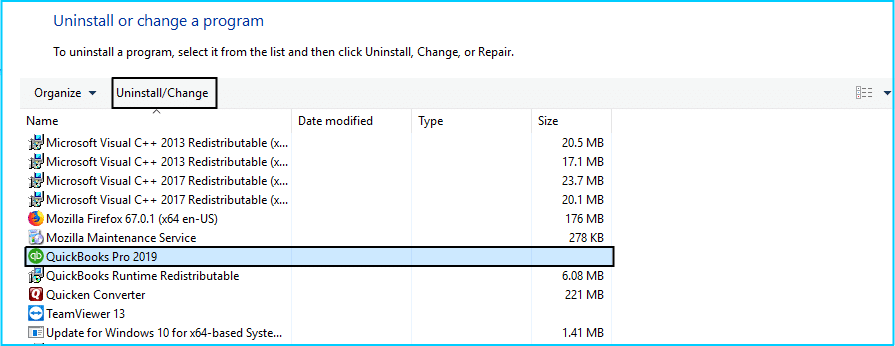
Firstly you should hit a click on the Start tab and then move to the Control panel.
After that, look for QuickBooks from Programs and features.
Now you are required to, hit a click on QuickBooks and carry out the un-installation process.
Once done with that, move to the official website of Intuit and then download the required version of QuickBooks.
Finally, hit a click on Multi-user mode hosting and switch to it.
We have written this article after consulting with our independent accounting professionals. Most of the procedures described herein are 10 DIY solutions, you should have no trouble performing them on your own. Nevertheless, if you require assistance with QuickBooks multi-user mode not working error, or the issue persists even after performing the troubleshooting instructions given above in this article, or the issue reoccurs repeatedly, then feel free to contact our 24x7 active assistance helpline. We'll happy to help you.
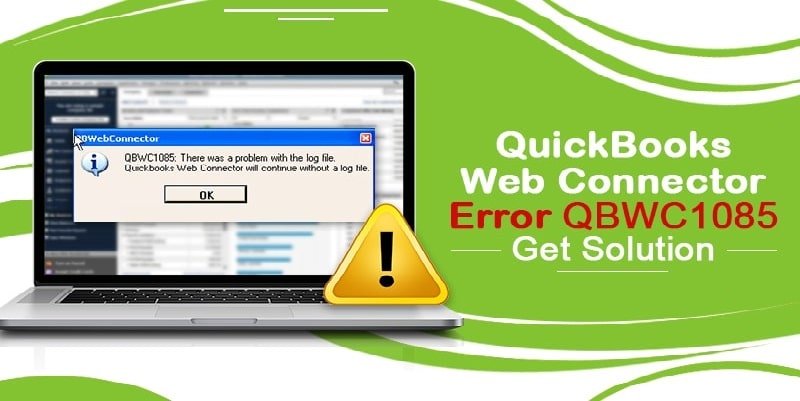
QuickBooks, in the last couple of years, has gained immense popularity among small and medium-sized businesses. It is widely considered to the top accounting software with features like monitoring cash flow monitoring cash flow, preparing taxes, and tracking productivity that ensures smooth functioning of any sort of organization. But despite being and innovative and robust accounting application, QuickBooks still receives some inevitable technical errors. While certain issues can be fixed by simply following the prompts on the screen, some may be complex and require the intervention of an expert. We are committed to offer you some functional and foolproof solutions of the QuickBooks Web Connector Error QBWC1085 issue that you may not be able to fix on your own.
In this blog post, we are going to discuss QuickBooks error QBWC1085. This sort of error usually occurs when you launch your QuickBooks desktop. Apart from providing you with troubleshooting ways to fix this issue, we are also going to tell you about the causes and tips to avoid it. So, read this article till the end. However, if you have any queries, then you can discuss it with our professionals by calling us at 1-800-761-1787 (toll-free). Our enterprise support experts and certified professionals will fix the bug for you in no time.
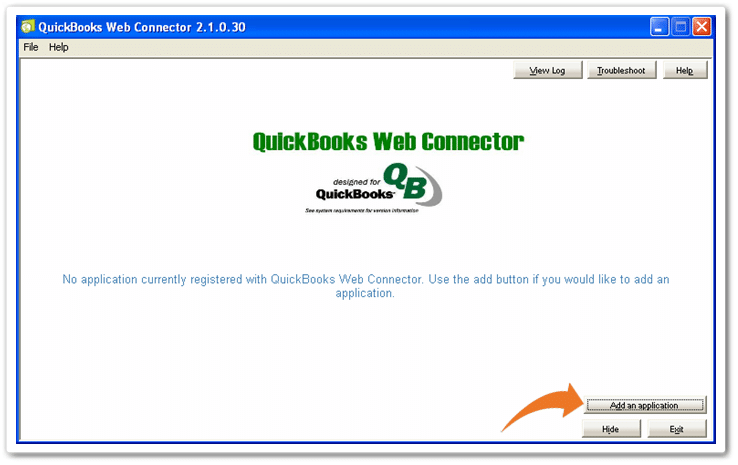
What is QuickBooks Web Connector?
We reckon that it will be ideal for you to learn a little about QuickBooks web connector before performing the troubleshooting steps for QuickBooks error QBWC1085. The Web Connector is basically an application developed by Microsoft that enables data sharing between QuickBooks desktop and QBO hosted on the web fast and seamless. The web connector, like any other software, can receive bugs and errors.
This web connector is a web-based application for Windows users that also allows web services to exchange data with QuickBooks desktop products. Web connector and QuickBooks desktop use the same local network, and qbXML and qbposXML are allowed to pass between QB financial software or QuickBooks point of sale (POS) and web-based application. This error usually occurs when the log file named QWCLOG.TXT gets corrupted or damaged.
How to add new web service with QuickBooks web connector?
Well, the process to add a new web service with QuickBooks web connector doesn't involve any rocket science. .QWC extension files open on their own with QBWC, and they are the XML files. It should be noted that the web connector works with all QB desktop software that is supported by the QuickBooks SDK or the QBPOS SDK.
U.S. editions of QuickBooks financial software
Enterprise solutions
Premier 2002 and later versions
Pro 2002 and later versions
QuickBooks point of sale
Canadian editions of QuickBooks pro, premier, and enterprise
Also, the UK editions of Pro and the accounting edition of QuickBooks
Why QuickBooks Web connector error QBWC1085 occurs
The QuickBooks web connector error QBWC1085 is one of the most common errors that is reported in QuickBooks community by the users. The error happens when the log file named QWCLOG.TXT gets damaged or is by chance corrupted. In our blog, we will in details discuss about the various causes and solutions to this error. The error code QBWX1085 comes up with error codes stating as:
Error
Description
QBWC1085:
QuickBooks was unable to write to the log file. QuickBooks will open without writing to log file.
QBWC1085:
There was a problem with the log file. QuickBooks Web Connector will continue without the log file.
Exception TypeError:
Unknown name
Let's understand the possible causes and ways to fix QuickBooks Web Connector Error QBWC1085 or Exception TypeError: Unknown name below in this article.
What may lead to QBWC1085 error in QuickBooks Desktop?
This error is mainly caused due the reasons that are mentioned below:
When the QBWCLOG.TXT file of the web connector gets damaged because of some reason.
When you are unable to access the QBWCLOG.TXT file of the web connector.
This kind of error can occur if QuickBooks is not able to write the web connector log file.
In case you didn’t connect to the third party programs with QuickBooks, then this kind of error could be seen.
Any kind of damages to the components of the QB web connector might end up in this kind of error.
Symptoms of QuickBooks Web Connector Error QBWC1085 or Exception TypeError: Unknown name
Users can encounter the below-listed signs and symptoms along with the QB Error QBWC1085.
If the functions of the web connector program are not working accordingly.
Ways to Resolve the QuickBooks Error QBWC1085 or Exception TypeError: Unknown name
Users often find it very difficult to resolve the QuickBooks Web Connector Error QBWC1085 or the Exception Type Error: Unknown Name. However, by following the below-mentioned methods, they can easily troubleshoot the issue very easily and if not, then our error support team is always available for help.
Solution 1: Make sure to connect the company file to the third party program
The manual process that one can opt for is to ensure to connect the company file to the third-party program. For this, the below steps would work:
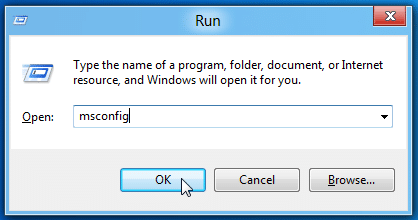
The first thing to do is to click on the Windows + R keys simultaneously.
After that, Run window will pop up on the screen.
After this, type MSConfig and then hit the OK button.
Next, you have to hit a click on Startup tab.
Once done with that, now search and mark the Checkbox for QuickBooks web connector.
After that, click on the Apply option and then also tap on OK button.
The final step is to Restart the computer and also check out if the web connector error gets fixed or not.
Solution 2: Change the name of QWCLOG.TXT file
Another solution that you can opt for is to rename the QWCLOG.TXT file. The steps involved in this are as follows:
The first and foremost thing to do is to open the taskbar and then right-click on QuickBooks Web Connector icon.
After that, click on the Exit option followed by opening the Windows File Manager.
Once done, visit the C:\Program Data\Intuit\QBWebConnector\log folder.
Now hit a right-click on the QWCLOG.TXT file and then opt for the Rename option.
After this, change the name to QWCLOGOLD.TXT and hit on Save option.
Once you are done with that you have to reboot the we connector program.
The final step in this method is to reboot the computer and the reopen the software.
Solution 3: Remove web connector from the start-up menu
If you are not connected to QuickBooks to any 3rd Programs, then you can remove the Web Connector from the Start up menu. Below are the steps to do it.
The first thing to do is login on your computer as the Windows Administrator.
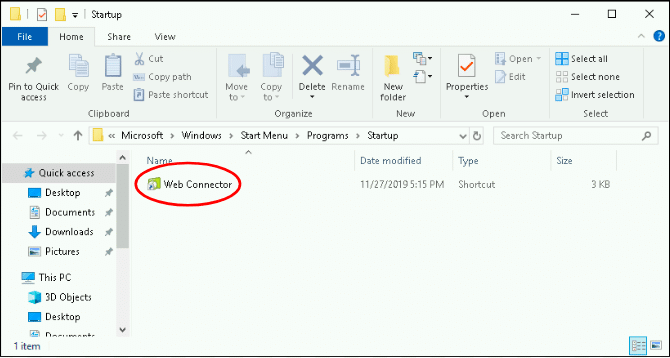
Once done, you have to navigate to following command C:\Progam Data\Microsoft \Windows\ Start Menu\ Program \ Start Up.
For Windows XP: You need to follow the path: Documents and Settings All Users/ Start Menu/ Program / Startup.
Now you have to delete the QuickBooks Web Connector File.
Once done, reboot your system and then open the QuickBooks program.
Solution 4: Manually Rename QWCLOG.TXT File
Use this step if your company data was connected with the third-party application through Web Connector.
Close QuickBooks accounting software ad Web Connector.
Go to the C://Program Data/Intuit and choose QBWebConnector on the next screen.
And then click on Log and rename the QWCLOG.TXT to QWCLOGOLD.TXT.
Also, reopen the Web Connector.
In the last step, restart your computer and check if the issue has been fixed.
We hope that you find the information provided in this post helpful. The above-mentioned 4 solutions can be easily performed by anyone for solving the QuickBooks Web Connector QBWC1085 error, even if one doesn't have sound knowledge of computers and QuickBooks program. In an unlikely chance, if the issue still persists after performing the solutions provided herein, then you should get in touch with our U.S based Enterprise Customer Support team. Our experienced and well-trained experts can solve any QuickBooks related issues using their advanced tools and technology. Dial our 24x7 toll-free number i.e. 1-800-761-1787, and connect with our executives, who will assist you with your issues in the least possible time.







![type ping [servername] - Screenshot](https://xpertbookspro.com/wp-content/uploads/2020/01/type-ping-servername-Screenshot.jpg)