Creating a QuickBooks desktop company file might seem to be a daunting task for users and also one of the most technical ones at the same time. As the company file carries all the financial information of the company, entrepreneurs and newbie QuickBooks users are a bit dicey with the decision to create a company file in QuickBooks desktop on their own. The company file stores all the financial information and continues to grow. QuickBooks desktop software allows or permits the users to save multiple company files for multiple businesses, as a separate company file is a must for every business.
The procedure for creating a company file doesn’t involve any rocket science or does not require any technical expertise, the only thing you require is an understanding of the procedure that we’ll provide you within this article. However, if you still feel the need of a professional, then we would recommend you not to risk your data, and immediately to an expert who has a deep knowledge of this accounting software with excellence. No need to go far in search to locate an experienced team of certified professionals. Simply call at 1-800-761-1787, and our technical experts will be available there to assist you.
Reminder: Well, if you are a newbie, or using QuickBooks for the very first time, then we would recommend you playing around sample company file in order to experiment and get familiarized with the program. So, now you are aware of all necessary things, it is time for us to begin with the process.
Steps to Create a New QuickBooks Company File from scratch
Before you begin with the process, keep in mind that if you are creating a new QuickBooks company file and if another old company file is saved on your system, then ensure to use different name for the new one, in order to avoid any sort of confusion. Using the same name for the new company file will override the current company file and the data in the current file will be lost. The steps involved in the process to create a new company file that too from scratch are as follows:
You are required to open your QuickBooks desktop.
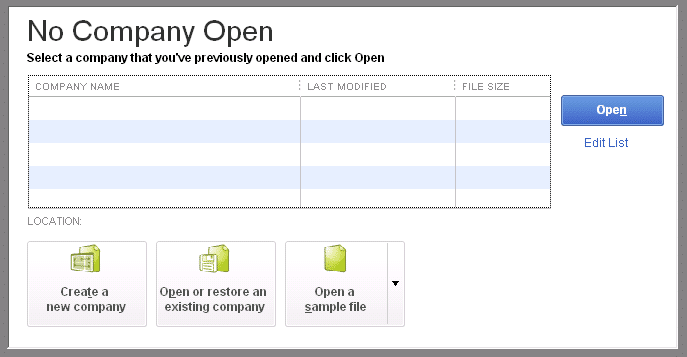
In the No company open window, opt for the Create a new company option.
You will now have two setup options:
Option 1: Choose the express start
The first option is to select the Express start, for getting it started right away. You will have to enter only the business name, industry, and business type in order to create a company file. You can also enter the info later on.
For this, open QuickBooks desktop.
And then, hit click on Create a new company on the No company open window.
Moving ahead, hit a click on Express start option.
Filling out the required information in the QuickBooks setup. The point to remember here is that to click the Help me choose option to see a description for every business type and the chart of accounts that QuickBooks will create for you per industry.
Next step is to hit a click on Create company option.
You can start creating the chart of accounts, customers and services after creating the company file, or you can also do it later by selecting the Start working.
Option 2: Choose a Detailed Start
Selecting a detailed start is recommended if you wish to go for a complete setup, where you will have to enter all of the info from the start.
The first step is to open your QuickBooks Desktop.
On the no company window, select the Create a new company option.
Then hit a click on the Detailed start.
Fill out the easy-step interview screen and hit next.
Moving ahead, choose the industry type and hit Next.
Once done with that, identify the type of business entity and then hit Next again.
Now set the Fiscal year for which you want to create a company file and then hit Next.
It is required to Setup the QuickBooks admin password and then hit click on Next tab.
Followed by selecting the Location to save the company file and clicking on Save.
The final step is to customize the QuickBooks by clicking Next or do it later by selecting Leave.
After picking any of the above options, you will have to carry out the on-screen steps to complete the setup. Make sure to keep the earlier mentioned point in mind, i.e., giving the file a unique name.
Ending this process permits you to begin working on QuickBooks desktop.
QuickBooks lets you create a new company file at the end of the year, so that there is no need to enter the data which is required in every initial company file setup. Even though closing the company file at the end of every year is not compulsory, but a few customers prefer it that way. Users select the option to close their company file so that if they do not close, there will be a stockpile of transactions over the course of years that result in larger data files and hamper the system's performance.
How beneficial is to create a new company file at the year-end?
The first benefit is that the performance of the system will not be deteriorated due to large data files.
It will also provide a layer of extra security against accidental data tempering i.e. it prevent any changes in the previous year’s tax reporting data.
You can use this feature to restructure and clean up the current data by removing the unused items, accounts, and names. (It should be noted that instead of creating the new company file you can also clean up the current data).
It should be noted that before moving ahead, it is important to make sure that you are having an active subscription for any one from the standard, basic, or enhanced payroll.
Things to do before starting a new company file
You will have to print the reports mentioned below on December 31st of the closing year. These reports will be needed when you will recreate the year-end balances of the account receivables and account payable in the new company file. Moreover, these reports will be required when you are recording the opening balances for all the balance sheet accounts. Other than this, you might require to manually enter the outstanding banking transactions, stock status, and inventory values.
Customer balance detail report
Under this, move to the Reports menu.
And then, navigate to the Customers and receivables option and also choose the Customer balance details option.
Vendor balance detail report
For this, move to the Reports menu.
Afterward, select the Vendors and payables and also choose the Vendor balance details option.
Standard balance sheets
For standard balance sheets, navigate to the Reports menu.
Also, select the Company and financials and choose the Balance sheet standard option.
Steps to create a new company file in QuickBooks Pro and Premier
The set of steps to create a new company file QuickBooks Pro and premier might vary from that of QuickBooks desktop. So, here is a complete guide to set up company file in Pro and premier.
First of all, move to the File menu and opt for the Utilities option and then click on the Condense data.
The next step is to Rebuild allthe outstanding balances in the accounts receivable either by recreating individual invoices or you can also Create balance forward invoice for a lump sum customer balance.
Now, from the Vendors menu, Create all vendor balances along with the Enter bills option.
The bills will be directly charged to the un-categorized expense account, as opposed to individual expense accounts.
It should be noted that the payroll users can not avail of this feature due to critical payroll information in the payroll files.
Also, the same feature is not available for QuickBooks online banking users due to the security and time-related data from the financial institution.
Some more steps to be followed:
It is supposed to click on File menu and select New company option.
And then, choose the Start interview option in the window of the easy step interview.
Followed by carrying out the on-screen instructions and entering the information for the new company file.
As we've already said before, creating a QuickBooks desktop company file does not require any complicated math, and performing exact steps can create the company file without any sort of hassle. However, in case of any difficulty, do not hesitate to connect with our accounting and bookkeeping professionals. Listening to your issues, will help our experts in providing you with the best and customized assistance.
Frequently Asked Questions
What is a QBB and QBW file?
QBB and QBW are QuickBooks company file extensions. While QBB is the extension for the QuickBooks Backup File and QBW is the general extension of the company file.
How big is a QuickBooks company file?
The company file limit in QB Enterprise is 1.5 GB. On the contrary, the company file size in QuickBooks Pro and Premier is 250 MB.
How do I reduce the size of a QuickBooks company file?
The steps to reduce the size of the QuickBooks company file are: 1. Head to the File menu, 2. Click on Utilities and click on Condense Data. 3. Now follow the onscreen instructions and then hit on the option to Begin Condense. 4. A backup of the company file shall be created before the start of the Condense process.
Where should QuickBooks company files be stored?
The QB Company file are stored in the following path:
Every time you install QuickBooks desktop on the system, it demands registering and activating. In case of multiple copies of QB desktop, then you need to register or activate each of them. QuickBooks will itself prompt you to activate it, also you can activate it manually. When you activates the QuickBooks desktop, a window appears on the screen stating, “Set up your Intuit Account”. You can log in to the Intuit account when activating the QuickBooks desktop to link the existing account information directly.
The Intuit account login can be used to log into various websites. Once you sign in to your Intuit accounts, users will be able to buy and browse products and services, as well as download or activate the products you've purchased previously. If you're also seeking to register and activate QuickBooks desktop, thenthis post will be of great assistance to you. Moreover, if you don't want to risk the activation process by doing it manually, then feel free to reach out to XpertBooks Pro team using our helpline i.e., 1-800-761-1787. Our accounting professionals will assist you to register or activate QuickBooks desktop for you.
Important Points to note before you register or activate QuickBooks
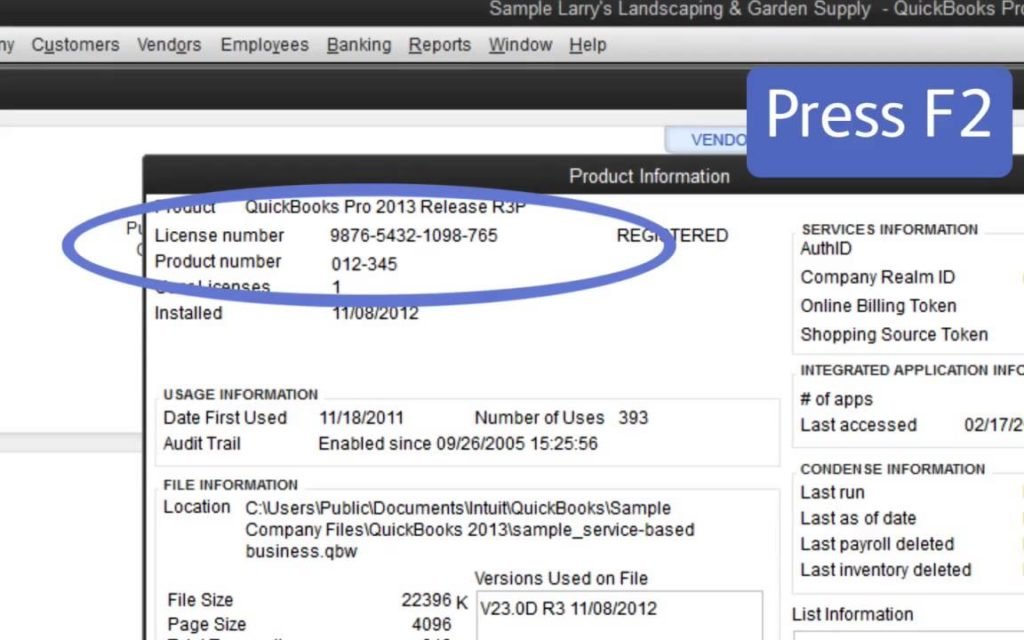
The most important point is to always verify that the QuickBooks software is activated or NOT, for this, click on F2 key OR press and hold the CTRL + 1 keys.
If you see that QuickBooks is ACTIVATED, then set the same. If not, you need to move ahead with the steps to activate.
If, at the time of activation, you receives the error "The validation code is wrong", then verify the things below:
The validation code is right.
Also, ensure that the license and product number are correct. If the product number doesn't match the license number, then change the product number first before moving forward with the activation.
Steps to Registering QuickBooks Desktop 2016 or newer versions
In order to register QuickBooks Desktop 2016 or newer versions, you can carry out the below steps:
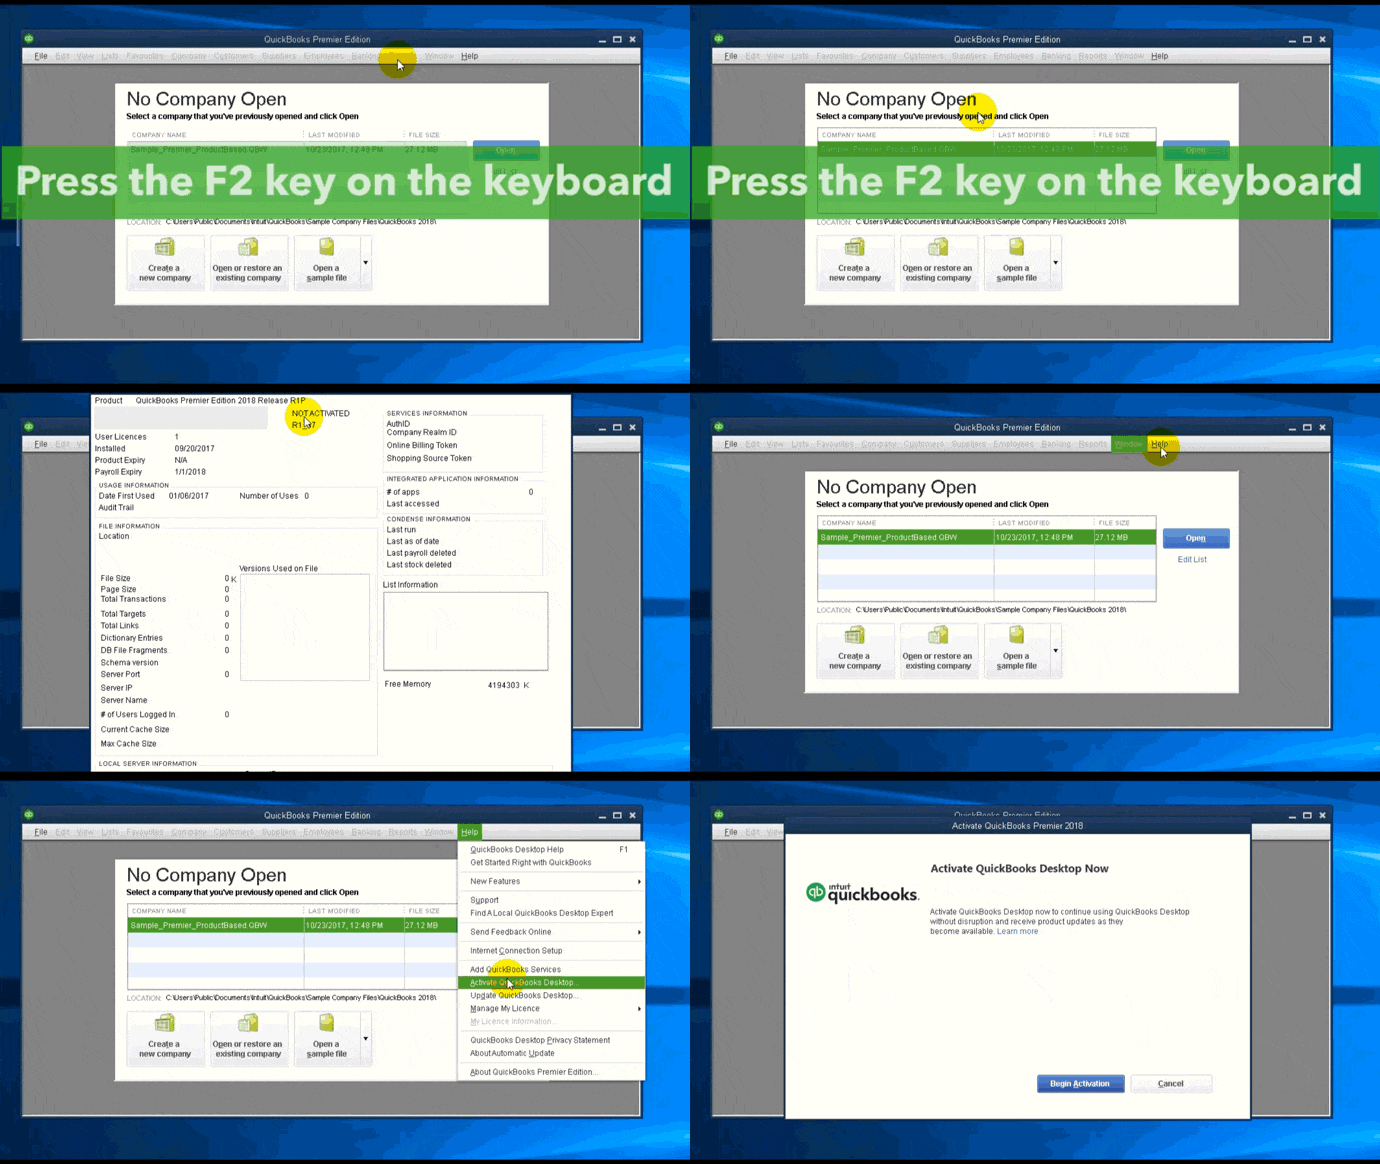
Launch the QuickBooks software and press F2 key on the keyboard.
Check the registration status on the Product information window on the right side of the License number.
In case the status is Activated, then you need not do anything.
In case it is not activated, then carry out the steps below:
You will have to select OK to close the product information window.
Visit the help menu and then choose to Activate QuickBooks. But for the 2015 version select Register QuickBooks.
Now, carry out the onscreen prompts and verify the information. Followed by completing the activation process.
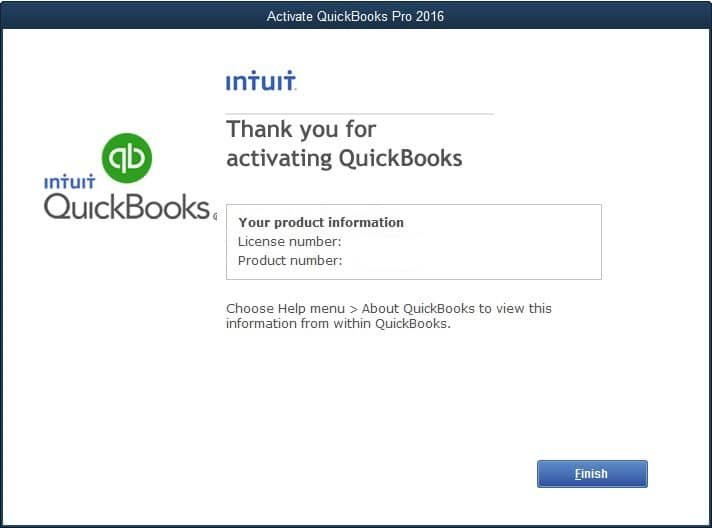
You will get a thank you message once the activation process completes.
QuickBooks Desktop for Mac
If you are a QuickBooks Desktop for Mac user, then you need to carry out the steps below to register and activate it:
Initially, visit the File Menu and then choose Register QuickBooks.
After that, enter the License number and product number and also choose Next.
Now, select Register online tab.
Pay heed to the on-screen instructions and complete the registration. In case, you do not find any register option, then this indicates that the software is already registered.
For Older versions
In older versions, discontinued products cannot get registered for the first time. You will have to re-register the discontinued products. You can re-register discontinued products of an older version if you have registered it before and are just reinstalling it. However, you can contact the customer service provider for the validation code, but assisted support for discontinued products is no longer available.
Steps to Activate QuickBooks Desktop with your Intuit Account
The activation screen in QuickBooks offers an option to users to either activate using an existing Intuit account or create a new one. If you are not having an Intuit account, then you will be required to fill in the necessary information in create your user ID section and complete the activation process. It should be noted that the on the registration form that follows, the phone number and ZIP code are pre-filled depending upon the company file you had opened up.
In case you opt for creating the account, then you will continue to discover the message when opening QuickBooks. In case you have an existing Intuit Account, then merely entering the user ID and password will start the activation process. However, if you have lost your user ID or password, then you can carry out the below steps to retrieve them:
Enter the Registered email, phone number, or User ID.
Also, provide the code received.
Once done with that, you will see the User ID and can then Reset the password.
To end the process, log in again.
Issues while you register or activate QuickBooks Desktop
In case you finds that the information entered is not accepted, then you can ensure it is the same information that was given at the time of purchase.
Also, in case you find any technical glitches, such as noticing a blank screen or error messages, then it is recommended to temporarily disable the antivirus software.
Checkpoints before fixing the issue
Before trying to fix this issue, you need to check out the points below:
You are recommended to verify if QuickBooks is activated and also verify the license number and product code. Match the one on the sticker on the QuickBooks product package.
And for downloaded commodities, view the purchase confirmation email that is received from Intuit.
In case you purchased QuickBooks on CD, then one can see the brightly coloured sticker on the original CD envelope.
Winding up! Still, impeded by doubts? Talk to our experts.
This drags us towards the end of this post, where we expect that the information we have shared above might be of some help to registering or activating QuickBooks desktop successfully. However, if you are still confused, then give us a call at our helpline: -800-761-1787, and speak to our team of QB specialists. Our certified experts and accounting professionals can assist you with the registration process without any technical issues, which are done in the shortest possible time. Therefore, don't hesitate to call us anytime.
FAQs
What information do I need to register for QuickBooks desktop?
The following information is required when registering for QuickBooks Desktop: 1. License and Product Numbers 2. Contact Information 3. Company name, Address, Industry type, etc.
What should I do if I don't have a license number or product number?
You should check your email inbox and the documentation that came with the purchase. These contains the license and product keys.
Can I register QuickBooks Desktop without an internet connection?
Yes! QuickBooks can be registered offline by using a phone. The user should choose the option "Register by phone".
How do I fix errors during the registration process?
You should conform to the below-given steps to exterminate registration errors: 1. Enter the correct license and product keys. 2. Check the internet connection. If it is slow, restart the router. 3. Turn off the antivirus and the firewall during the registration process. 4. Restart the system.
Well, perks of incorporating QuickBooks desktop are not hidden from all of us. This particular software rolls in with tons of features an functionalities. So, if you have finally decided to incorporate QuickBooks desktop enterprise, then it is a beginning to a better organization of day to day accounting and bookkeeping activities. The decision of incorporating QuickBooks comes with lots of queries. As a newbie, you might not be knowing the installation or upgrading process. QuickBooks enterprise is an advanced accounting software that assists countless business owners to manage the accounting activities. If you are also looking for a comprehensive guide to install and setup, then today’s segment can be pretty much helpful to you. So, make sure to read this segment till the end.
Whereas, if you know nothing about QuickBooks and don’t want to experiment with the software, then make sure to contact some professionals will renowned experience in dealing with such tasks. You can also consult with XpertBooks Pro team and ask clear your clouds of confusion related to your accounting software. Our industries best accounting experts will be happy to install and setup the QuickBooks desktop enterprise for you that too without any technical issue.
What is QuickBooks Enterprise Solutions?
Before you dig in deep and learn the process of installing and setting up QuickBooks desktop enterprise, let us first take a glance on this software. QuickBooks desktop enterprise is basically an accounting software, known worldwide for its efficiency, easy to use interface, and productivity. Entrepreneurs all over the world, prefer this accounting software and rely on it for all sorts of accounting and bookkeeping activities. It is an advanced accounting software that assists in managing all sorts of accounting activities in an efficient way and that too with least possible time. It is developed by Intuit and includes lots of features and functionalities. Now that you know a little bit about the software, it is time to begin with the installation process.
Important points to remember
You should ensure that while installing and configuring QuickBooks enterprise accounting software, you are having the system's admin authority. It is also important so as to set up file sharing and network in a proper manner.
Moreover, you should have a good knowledge of company financials. Learn the process to set up the company files and whom the access is to be provided.
Another important thing is to backup all financial and bookkeeping data from the previous accounting software. Also, as per the IRS guidelines, you should hold this data for 10 years.
In case you are going to use QuickBooks enterprise in multi-user mode, then test the network bandwidth. If you are not going to make use of the file sharing option, then this step can be avoided. You will have to confirm that the network connection is fast enough to use the Enterprise on every workstation.
Under this, choose a large sized file for selecting.
And also, note the size of the file.
Share the file over the network. And also note that this might take some time.
In this post, we will be exploring each of the steps in detail, so let us begin:
Step 1: Preparing and testing the network
Well, before installing the QuickBooks, the most important things to know are networking, file sharing, and permission. You are supposed to take all backup of the accounting system and then configure it. After that set up the network, via the three options listed below:
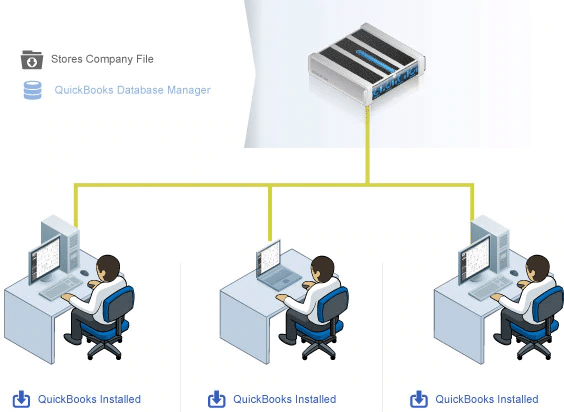
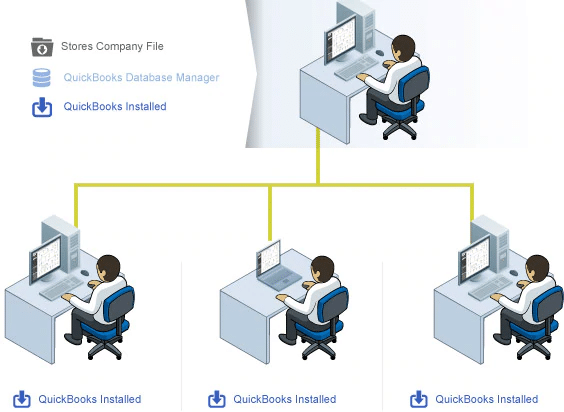
Next option involves downloading and installing QuickBooks enterprise on every workplace or any computer system. One of the systems will be used to store the company file, whereas the other users can easily access files on the network.
Remote desktop services:
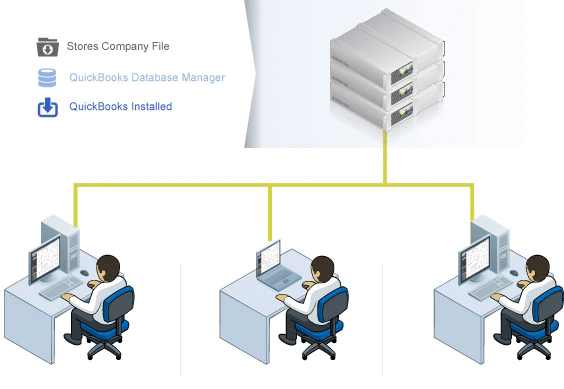
The last and the third option shows that the QuickBooks enterprise software is already installed on the central server. In this method, others will not be able to access the QB application or open the company file.
Now you are supposed to install QuickBooks enterprise version, for which the steps below can be implemented:
Close the tabs consisting anti-virus program in the system.
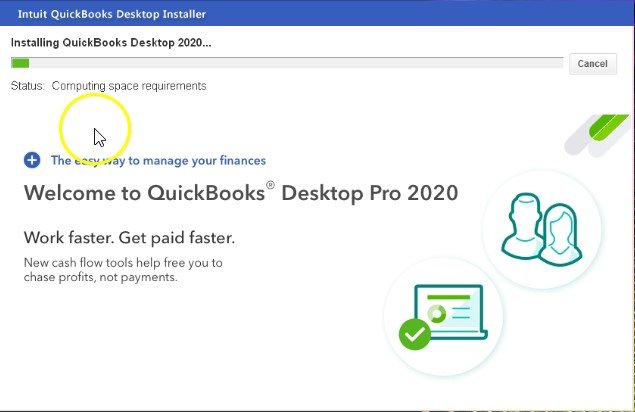
Hit a click on the downloaded file to download latest version of QuickBooks enterprise.
Install the software by carrying out the on-screen instructions that display on the desktop.
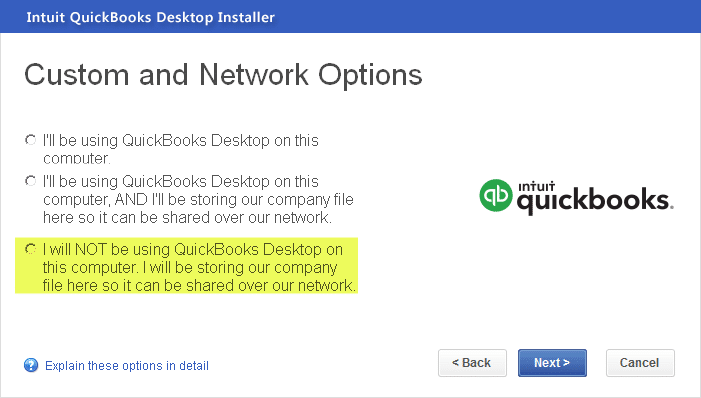
You will then be required to select any of the three options appearing on the screen.
Once the configuration process completes, make sure to carry out the on-screen prompts.
Once the above steps complete, jump on to the steps below:
Step 3: Setting up multi-user hosting
Multi-user hosting basically allows 1 PC to host multiple user access. In case you have installed the QuickBooks database server manager, then there is no need to empower multi-user hosting to access the server.
The multi-user hosting will be ON in the server and OFF in workstation in central server.
Also, the multi-user hosting will be ON in server and not applicable on the workstation in the remote desktop server.
The multi-user hosting will be ON in server and off in the workstation in peer to peer option .
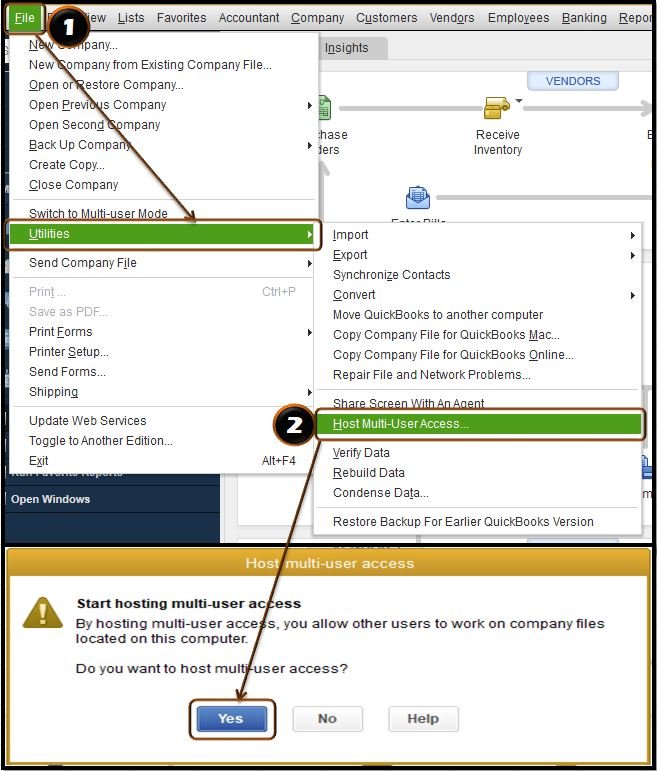
The steps involved in setting up multi-user hosting are as follows:
It should be noted that only one single user can host a multi-user access.
Check the multi-user host and enable it on the server.
Open the QuickBooks desktop software on a server.
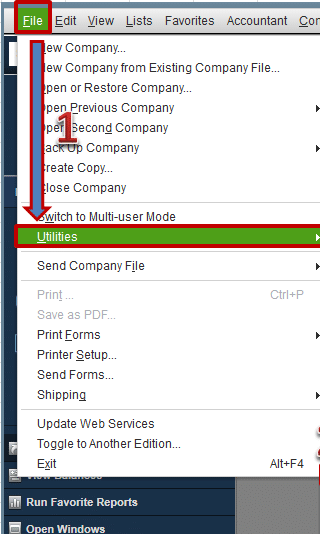
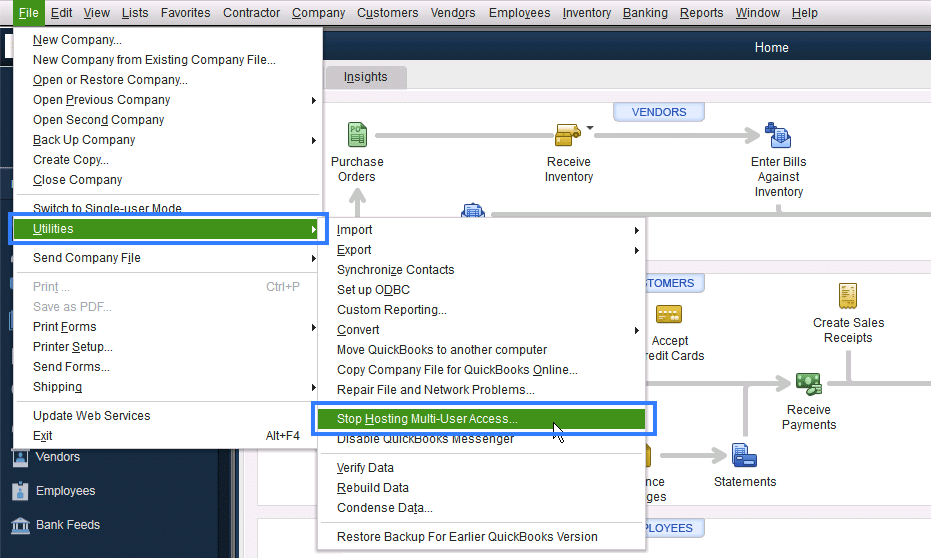
Select the file and click on the utilities option.
Check that stop hosting multi access is displayed in the utilities option.
If the option appears on the screen, carry out the instructions below:
Select the file and then choose the utilities tab.
Hit a click on Yes, when it starts to confirm the multi-user access.
Close when prompted and then re-open the company file. Click on yes and move ahead.
Step 4: Configuring the QuickBooks enterprise for business
Setting up QuickBooks enterprise is very simple, all you need to do is carry out some basic instructions and then click the start tab.
Quick start center:
This is basically used to create invoices, bills and checks, and sales receipts, etc. With this, you can also view customer and vendor account balance. This helps in maintaining entries in QuickBooks the QuickBooks software, this makes too easy to view all the details of any client or vendors details with pending payment.
Reviewing the chart of accounts:
QuickBooks creates the chart of accounts depending upon the business during the setup procedure. You are supposed to review and check it, which will help in editing the desired thing with much ease. Back up all the company data files. The best way to take a backup of the company file is online. It is a part of the active subscription, and it works in a safe mode.
Payroll:
If you subscribe to this service, then you would have to add a year to date payroll information. In case it is not present, then the payroll tax information might be erroneous.
Backing up the company file:
Online service is considered to be the best for backup company file. It is basically the part of the active subscription and works very safely.
Step 5: Creating users and rules
This step is a part of the fourth step, where you will have to create rules and users in QuickBooks enterprise solution. The steps involved in this process are as follows:
Setting up a role:
Start the QuickBooks desktop enterprise.
Move to the company menu, and click users, along with that click on the set-up users. Also, click the roles.
Hit a click the role list tab.
Along with that click on the new tab.
Type in the name of the rule in the rule name field and then select an existing rule.
Provide access levels to the activities.
Click on OK tab.
Setting up a user:
In order to set up a user list tab.
Hit a click on a new tab.
Next step is to fill the name of the user in the user name field.
Type in the password in the password field and confirm the password fields.
At the end of this post, we expect that the information shared in above might help you in successfully installing and setting up the QuickBooks desktop enterprise. However, in case of any difficulty or any query, you can feel free to call us at 1.800.761.1787. Our XpertBooks Pro team works day and night to provide the best possible services to you. Thus, do not hesitate to contact us, our experts and certified professionals will be happy to help you.
FAQs
1. What should I do If I’m having trouble installing QuickBooks Desktop Enterprise?
Encountering issues in installing QuickBooks desktop enterprise has become pretty common these days. The basic troubleshooting steps to get rid of this issue includes the following: 1. To begin with, verify that the system meets the basic requirements. 2. You need to now restart the system. 3. Close all open programs, which includes antivirus program and windows task manager. Hit a click on the applications tab and then close all open programs. 4. Lastly, try to install QuickBooks desktop enterprise again.
2: What if I can’t find my license number or product number?
While some one purchases the QuickBooks desktop enterprise, you gets an email containing the license and product numbers. In case this information can’t be accessed, then in that case a couple of steps could be followed.
For the ones who have purchased QuickBooks desktop enterprise via CD, they can have a look at the sticker on the CD folder. In case you can’t find it, but you have the software installed on another system, then you can spot the license number product number easily by following the steps below: 1. Open QuickBooks desktop enterprise on another system, where it is installed. 2. Press F2 and Ctrl + 1 keys, in order to open the product information screen. 3. End the process by writing down the license and product number and hit OK button.
3: How to download and install an update or patch?
In order to download and install an update or patch, you need to visit the Enterprise customer resource center downloads page and then install the latest version. You can carry out the onscreen instructions to install the update or can consult a professional.
4: How do I restore the company file?
In order to restore the company file, you can carry out the steps below: 1. Visit the file menu and then click on open or restore company. 2. Next step is to choose the restore a backup copy and then click on next and then follow the on-screen prompts. 3. In order to view the detailed instructions for each backup and restore option and then hit click on help menu.
5: What should I do if I forget my password?
If you saw the error message stating “The password you typed is incorrect”, then your password might include mixed case characters. QuickBooks supports case sensitive passwords. You can carry out the steps below: 1. Make an attempt to log in by entering the login name of Admin and then click on OK without typing a password. 2. Enter the password with Caps lock or Num lock turned off. 3. Type in the password in a text editor to confirm that the keyboard is functioning properly. 4. Enter the password variations using the upper- and lower-case characters together. 5. In last, enter the password without a space before or after the password. Or you can also click on I forgot my password link and carry out the onscreen instructions.
6: Can I install different versions of QuickBooks desktop enterprise?
The answer to this question is definitely “YES”. You can install multiple versions of QuickBooks desktop enterprise on the same system. The point that matters over here is that all the users of a company file must be using the same version of QuickBooks, in order to avoid any further mess. Different versions can be open at the same time, whereas different editions must be opened one at a time.
7: How to I purchase additional user licenses?
QuickBooks desktop enterprise permit's more than one user to access the company file at the same time. You can purchase additional licenses, if needed, instead of buying additional copied of QuickBooks desktop Enterprise. This can be done by visit the help menu and then hit a click on the manage my license and then click on the buy additional user license, and then follow the on-screen instructions.
8: What if I don’t have internet explorer on my system?
Well, Microsoft Internet Explorer 7.0 or later installed in the system is mandatory in order to use the QuickBooks desktop Enterprise. In case you are not having any version installed of Internet Explorer, then download the latest version from the official Microsoft website.
Did you come across QuickBooks Error 1646 and feel confused about what caused it or how to fix it? You're not alone. This error is a common error that usually appears with the message: "Error 1646 installing QuickBooks.msi. Uninstallation of the update package is not supported". It usually encounters, when a user try to install QuickBooks desktop premier on a system that is having QuickBooks desktop pro of the same year already installed. Not only this, but this sort of error can also be encountered while installing QuickBooks accountant on a system that already has a premier version installed that too of the same year. As the error message itself sounds pretty annoying, so is the error:
Warning
Error 1646 installing quickbooks.msi uninstallation of the update package is not supported
Error 1646 installing quickbooks.msi uninstallation of the update package is not supported
So, here we are with the most relevant solution to QuickBooks error code 1646. Make sure that you read this thread till the end. Or else, if you are short of time, you can simply get on a call with our experts team, and ask them to fix the error on your behalf. Our experts team will be happy to help you.
What are the common reasons behind QuickBooks Error 1646?
Some of the common reasons related to QuickBooks error 1646 are:
Some of the important QuickBooks files might be damaged.
If the Microsoft NET 1.1 SP1 installer is installed inappropriately.
Damaged Microsoft C++ and MSXML components can be another sign of the same.
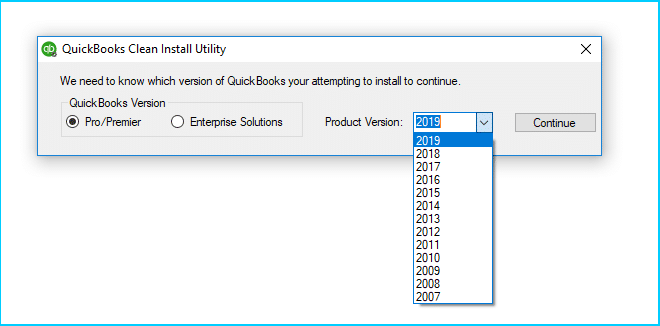
You can simply carry out the clean install tool to resolve the QuickBooks error code 1646. A clean install won’t affect the accounting data since the company file and everything it holds aren’t involved at all. The steps involved in clean install tool are as follows:
Step 1: Check the product information in QuickBooks desktop
Launch the QuickBooks Desktop software.
Press the F2 key on the keyboard to show the Product Information Window on the screen.
The Window contains all the necessary product-related information.
Note down all the important details somewhere including License Number and the Product key.
You need to remove QuickBooks by opening the Start menu and then looking for Control panel and opening the same.
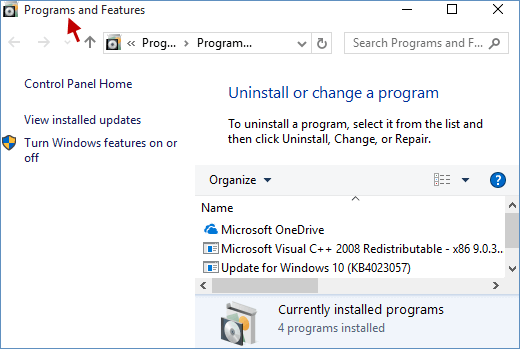
Choose Programs and Features tab.
Then hit on Uninstall a program option.
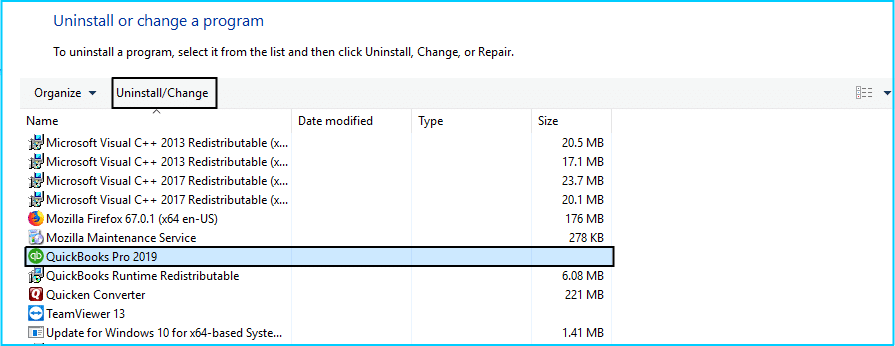
Select the version of QuickBooks desktop you are having issues with.
Moving ahead, you need to select the uninstall or change and then remove and also hit next.
Now select the Remove option and finally hit on Next.
Step 3: Manually rename the installation folders
The next step is to manually rename the folders, to reflect the hidden files after that rename the folder location. This can be done by adding .Old at the end of the folder names and that’s it. This action will permit you to avoid QuickBooks from recognizing the folder at the time when you will make the new one. Now, move to the last step.
It is an effective way of getting rid of QuickBooks install error 1646. However, if this step doesn't rectify the error, it is highly recommended that you proceed with the re-installing of the QuickBooks software in the following step.
Once the above steps are complete, you are supposed to reinstall the QuickBooks software and check if the error persists.
From the Start menu, search for Control and double-click on the Control panel.
Select the Programs and Features tab.
Then choose QuickBooks from the list of installed software.
In the next step, click on Uninstall/Change and click on Uninstall.
Wait for the process to finish.
Once the process completes, reboot the PC.
Step 5: Uninstall QuickBooks and manually rename the installation folders (Optional)
At first, you need to uninstall QuickBooks.
Follow the steps to display hidden files.
Open the windows start menu. You are required to look for “File explorer” and open the same.
You will then have to spot and open the folder that holds QuickBooks company files. This will be the QuickBooks folder in normal cases. You can find this in any of the below mentioned paths:
64-bit version C:\Program Files (x86)\Intuit\QuickBooks (year)
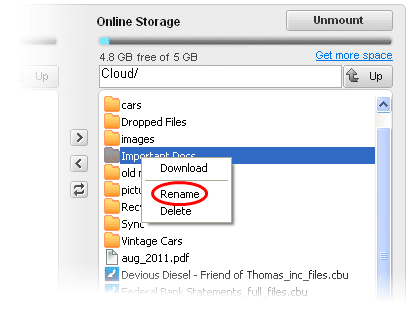
Now, hit right-click on the Folder and choose Rename option.
Next step is to add the word "old" at the end of the folder name. This will prevent the QuickBooks software from trying to open it when you reinstall.
Lastly, reinstall the QuickBooks desktop.
In case you identify an access error message while trying to rename the folder, then the below-mentioned steps could assist you:
Initially, you need to right click the Windows task bar, and also choose the task manager.
Once done with that, move to the processes tab.
Followed by opting for name column header to sort the list.
Next step is to select the following processes and then end process for each: QBDBMgrN.exe, QBDBMgr.exe, QBCFMonitorService.exe, Qbw32.exe.
Towards the end, you are supposed to select yes, in case an error message is seen stating “WARNING: Terminating a process can cause undesired results..“.
Well, carrying out the above clean install process might help you in getting rid of QuickBooks error 1646. However, If the error continues after following all the troubleshooting steps, advanced technical assistance may be required to complete the installation successfully. We, XpertBooks Pro are a leading accounting and bookkeeping firm who can assist you to resolve various accounting errors. Thus, do not waste much time and just call our helpline 1.800.761.1787, and ask all your queries to our team of QB specialists. Help is available round the clock!
FAQs
Q.1. What is Error 1646 in QuickBooks?
A.1. QuickBooks users may face up with Error 1646 when trying to install the updates for QuickBooks.
Q.3. What error message can be seen when the error occurs?
You might see the following error message on your desktop screen:
Error message: cannot find the .msi installation package to complete the installation or Error 1646 installing quickbooks.msi uninstallation of the update package is not supported
What are the signs of QuickBooks error 1603?
Check out the following symptoms that users usually witness when QuickBooks error 1646 occurs: 1. If the Microsoft NET 1.1 SP1 installer is installed inappropriately. 2. You can identify the error when the company file is locked. 3. In case you are using an outdated version of OS. 4. Damaged Microsoft C++ and MSXML components can be another sign for the same. 5. Your temp Windows temporary folders might be full. 6. The installation process might not be getting permissions.
QuickBooks desktop won’t open or doesn’t start problem is one of the most annoying error that leaves you in an unexpected state. It is a technical error that is often seen while opening the QuickBooks software. This error usually occurs due to any corrupted program files, damaged installation or confliction with system components. In some cases, QuickBooks is already running in the background, which prevents the software from opening again. If you are facing any such issue, then this segment might be helpful to you. In this post we have briefed you with the causes and fixes to QuickBooks won’t open issue.
Moreover, if you don’t have much time to spend on fixingthis error, then you can get in touch with our professionals. Our certified professionals will be there to assist you in fixing this error with ease.
What is QuickBooks won’t open issue and why it occurs?
Well, before learning the causes and fixes to this technical snag, it is important for you to understand the basic facts about this error. This error is usually seen when a user tries to open the QuickBooks desktop or a company file but failed to do. It comes up with an error message stating "QuickBooks Won’t Open" or "Doesn’t Start". However, in some situations no error might appear on the screen, but the system freezes suddenly. As a consequence of this error, you might face issues with the system as well. It might also affect the company file and it’s data. There are several possible triggers to this error, which we will be discussing later in this post.
Methods to resolve QuickBooks Desktop doesn’t start or won’t open issue
Now that you know what factors might cause the issue, signs and symptoms, and various other facts related to this error. It is the right time to start with the fixation procedures.
Important tips before troubleshooting
You can perform these steps before proceeding to the fixation methods:
Repair the QuickBooks desktop software installed on your PC.
Now check out the methods that can help users in resolving the QuickBooks won’t open error:
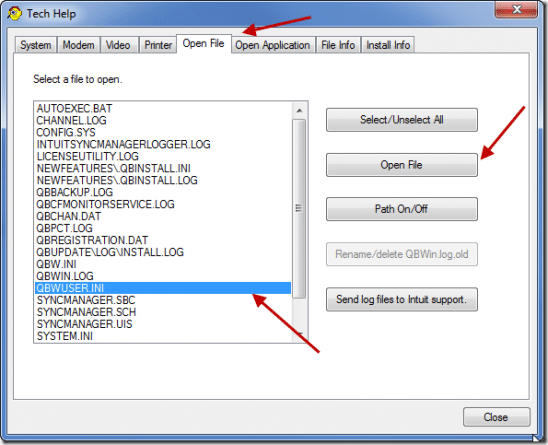
Method 1: Rename the QBWUSER.INI file
The steps to rename the QBWUSER.ini file are given as under:
Initially, you need to access the folder housing the Ini file.
Click on the QBWUSER.INI file and also select the Rename option.
Type in Insert.old in the last file name and change the name of the Ecml file.
Check if the error persists.
Method 2: Suppress the QuickBooks desktop installation
For this, you will have to right click the QuickBooks desktop icon.
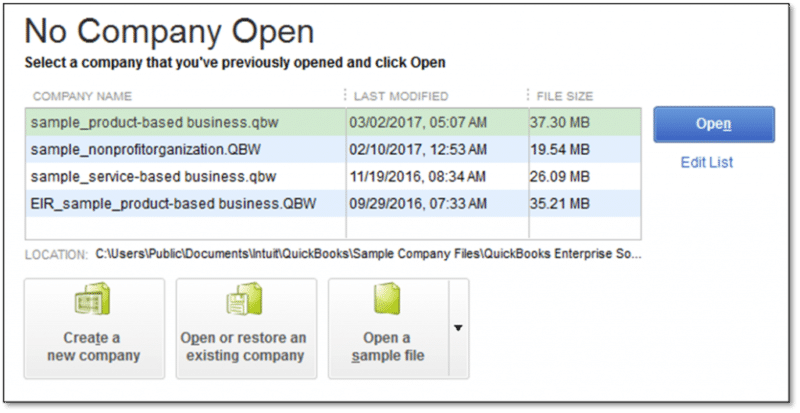
Hit the Ctrl key and choose the open tab. Hold Ctrl key till the No company open window appears.
Open the QuickBooks software to cross-check whether the error got stemmed out.
Method 3: Access the company file from different folder location
Many times, the location of the company file might get damaged or corrupted, which ultimately lead to this error. The steps involved in this process are as follows:
Press the Windows + E keys together to open the Windows explorer.
Search for the file with .qbw file extension. When you look for a file location on a network server, that needs to be done in the Network drive on which the data file is located.
Next step is to right-click the file and select Copy.
Locate the C: drive and make a New folder there and after that name that as QBTEST.
Open the new QBTEST folder and paste the company file.
Also open QuickBooks while holding the CTRL key.
In the last step, you need to click on Open or restore an existing company option and examine the C:\QBTEST folder created earlier.
Lastly, open the Company file copied in the QBTEST Folder.
Method 4: Perform a clean installation of QuickBooks
Many times, Clean installation of QuickBooks rectifies a lot of errors. As such, it is recommended to uninstall and reinstall the QuickBooks desktop to fix the QuickBooks won't open error. However, if it doesn’t work, you can check out the other available options as well.
Method 5: Rebooting your system
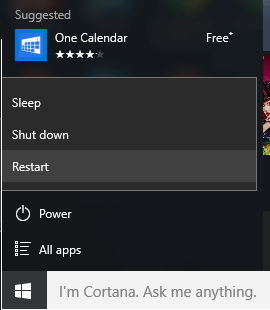
There can be certain errors that can be fixed by merely restarting the system. Hence, you are suggested to open the Start menu and then hit a click on the Power tab, followed by selecting the restart option. After the restart is done, you can open QuickBooks desktop and check if the error persists.
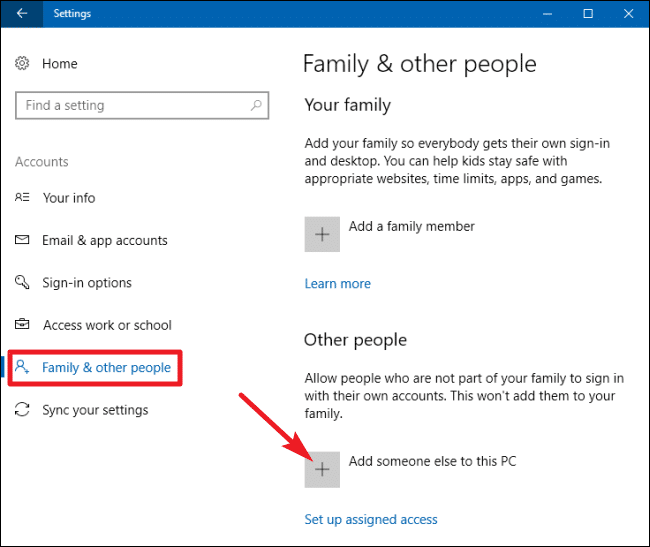
Method 6: Creating a new Windows admin user
In this process, you need to click the Control panel and then navigate through it.
Then, double-click the User account option, followed by choosing the Manage user tab.
Also, click the Add tab.
Once done with that, you need to enter the name as well as domain of the admin and hit OK button.
Now choose Administrator if you are using Windows 10.
Last step is to click on Finish, which will direct to the user accounts dialog box and also hit OK and you are good to go.
What triggers to QuickBooks Desktop doesn't start or won't open error?
Talking about the factoring causing or triggering this issue, the list is not huge. There can be a couple of factors that can end up in QuickBooks doesn’t start issue. Let us have a look at some of the most common factors:
There might be a corrupted hard disk on your system.
Extremely long company file name.
QuickBooks desktop has certain system requirements.
Few are the services running on your system that are conflicting with QuickBooks and prevent it from opening.
You might also encounter this issue if the Windows run slowly.
If the system hangs every now and then.
If the system responds slowly to keyboard or mouse inputs.
You can't able to open your QuickBooks.
Conclusion!
Implementing any of the above-stated methods can work in fixing the QuickBooks won't open issue. However, if a situation arises when none of the above methods works, then in that case, we recommend you get in touch with our team of experts and certified professionals who can handle the situation for you. Our dedicated support team will ensure to provide you with the best possible support services.
FAQs
What should I do if QuickBooks does not open?
You can rename QBUSER.ini file, suppress QuickBooks desktop, use the QuickBooks tool hub and perform a clean installation of QuickBooks in order to fix this issue.
Why QuickBooks does not open?
The reasons can be missing or damaged QBWUSER.INI file, long company file name, use of outdated operating system, incorrect installation of QuickBooks desktop or corrupted hard drive.
How should I update QuickBooks when it is does not run?
Download the updates for QuickBooks desktop manually from Intuit. Provide correct product details, then install the updates.
What Tool Hub utilities are best for fixing “QuickBooks won’t open”?
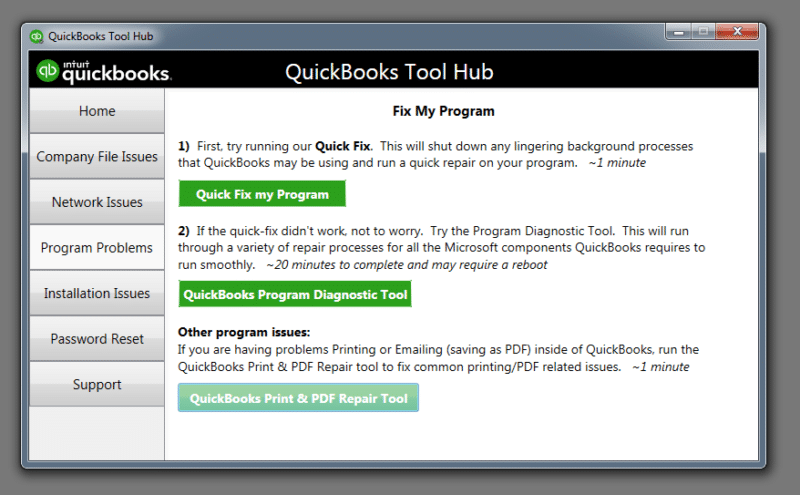
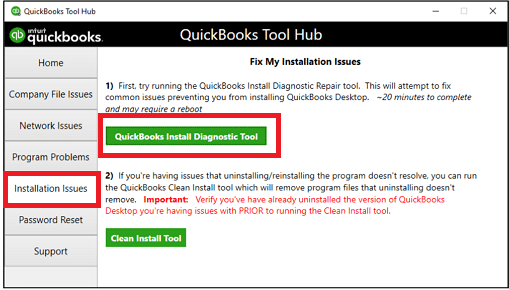
You need to tun Program Problems > Quick Fix my Program to close stuck processes and repair the app. Then move to Installation Issues > QuickBooks Install Diagnostic Tool to repair .NET/MSXML/VC++ dependencies. You should update your Tool Hub to the latest version first.
What if QuickBooks shows “needs a subscription” and won’t open?
That message indicates an unsupported/expired desktop subscription. You need to install a supported version or renew/verify the license in the account portal before retrying.