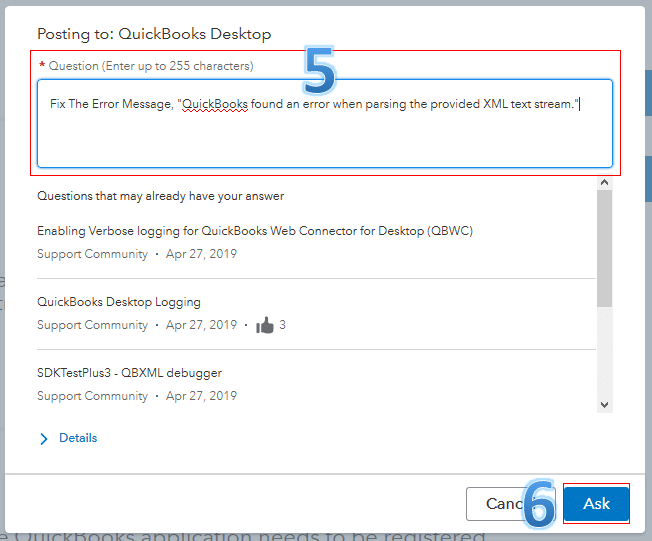
XML errors are pretty much common errors that might create issues when working with QuickBooks point of sale. You might come across an error message that states “Error: Process could not access file C:ProgramDataIntuitEntitlement Clientv(x)SessionData.xml because it is being used by another process”. Or “There is an error in XML document”. This error message is seen when you opens up QuickBooks desktop point of sale. Similar to other software, QuickBooks also uses XML files to store data.
These files generally store data in plain text format and also help to support uninterrupted tasks in QuickBooks. When QB POS finds any issue with the file, then it experiences XML errors. To know more about resolving the XML error in QuickBooks POS, make sure to stick around till the end.
Before you head to the causes and fixation methods, it is very much important for you to perform a few customizations and settings. These customizations and settings include the following:
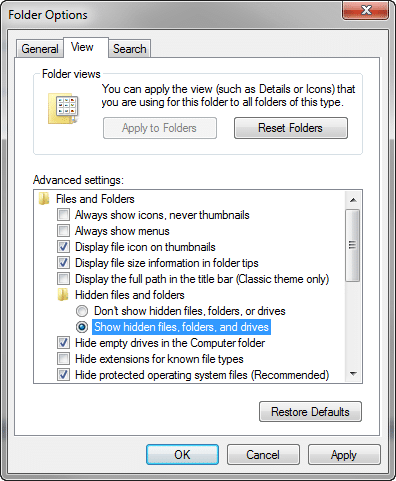
Unhide the hidden files and folders
For this, you are supposed to press Windows + E keys for opening the Windows file manager.
Then click on Organize and pick the Folder and search options.
A dialog box will be seen where you are suggested to pick the View tab.
Furthermore, search and click on Show hidden files and Folders tab.
And then, untick the Hide protected system operating files option.
End the process by clicking on Apply and OK tab.
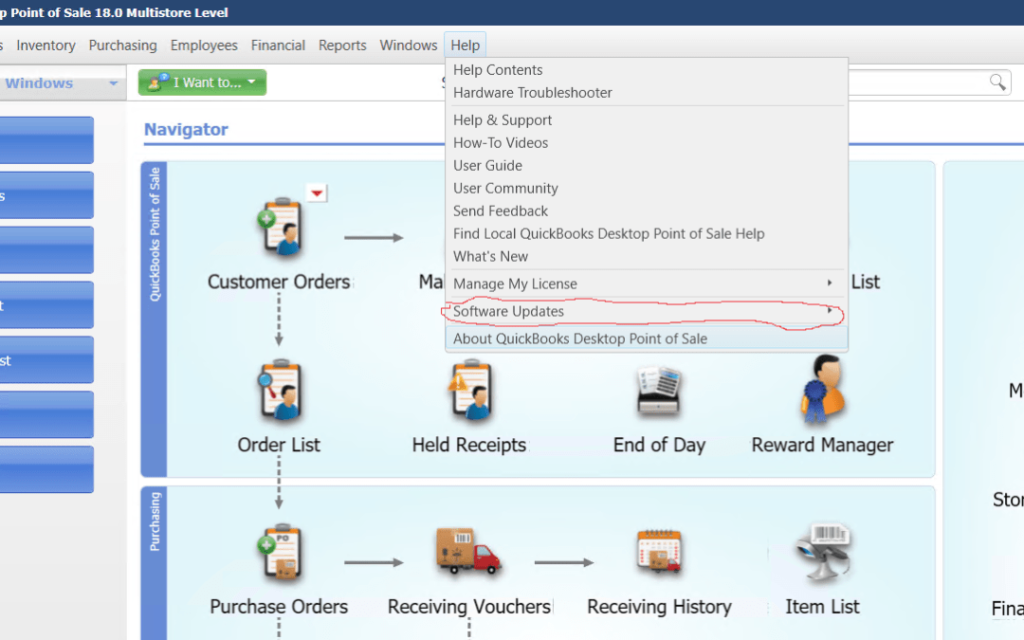
Update QuickBooks Point of Sale
Inside the QuickBooks point of sale, select the About QuickBooks point of sale tab under the Help tab.
And also, check if the installed version if QuickBooks point of sale 18.0, else perform the steps further.
Now hit a click on the Help menu once again and pick the software Updates tab.
Causes and Troubleshooting Steps for QuickBooks XML Error
QuickBooks POS xml errors can be triggered by a handful of factors, which we have discussed in this piece of writing, along with the necessary troubleshooting steps. Thus, head forward and unleash the secrets behind rectifying xml errors in QuickBooks.
Cause 1: Incomplete installation of QuickBooks point of sale
Solution: Repairing the QuickBooks desktop point of sale
In order to repair the QuickBooks desktop point of sale installation, It is supposed to ensure that point of sale is not running and also perform the discussed steps for the operating system. Let us explore the steps involved in here:
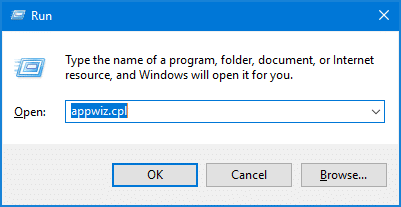
Press Windows + E keys to open the computer Window.
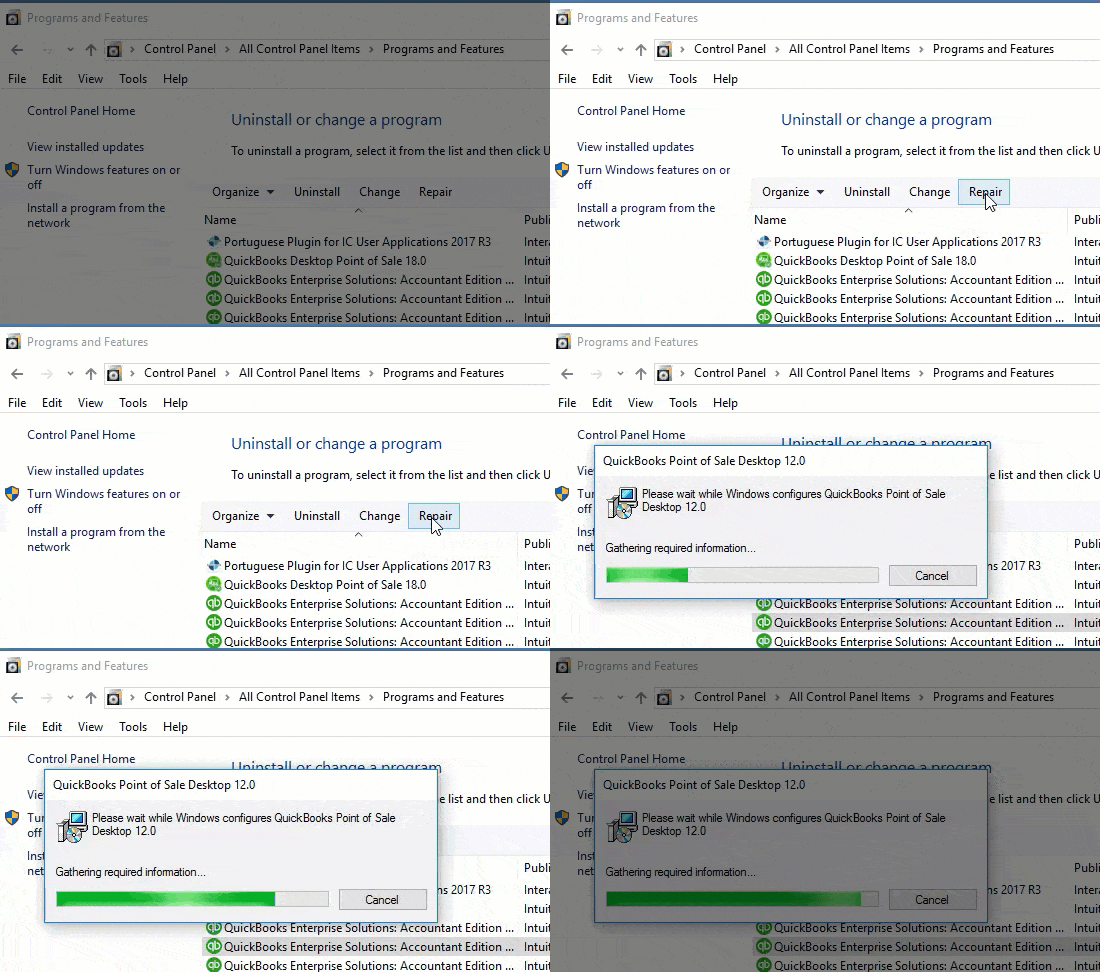
Further, click on Uninstall or change a program is recommended. In certain versions of Windows, it might just say repair.
Moving ahead, pick the Version of QuickBooks desktop point of sale and then click on to Uninstall/change.
Next step is to click on Next in the point of sale Installation Window and then pick the repair Radio tab.
Now click on to the Next tab again and also click on Repair.
End the process by clicking on to Finish tab, and the installation of POS should be repaired.
Cause 2: QuickBooks point of sale entitlement client folder gets damaged
Solution 1: Eliminating files within the entitlement folder
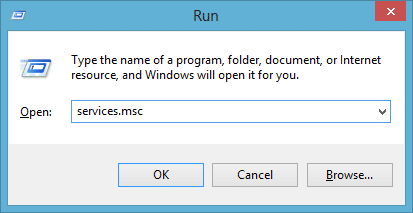
Under this process, Press Windows + R keys to open the Search bar.
In the search field, it is recommended to type in services.msc and hit Enter tab.
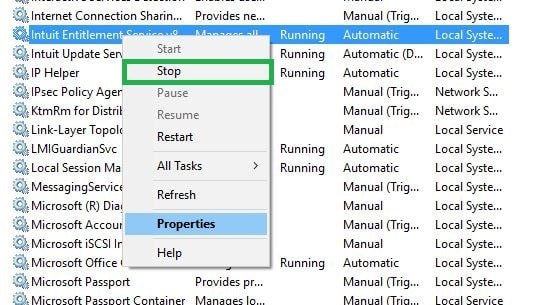
Now right-click Intuit Entitlement Service vX and choose the Stop option.
Next step is to close the window and head forward by performing the steps associated with Display hidden files and folders or searching for files using Windows.
Later on, you are required to ensure to select Show hidden files, folders, and drives, and also click to Clear hide protected system operating files checkbox.
Lastly, head to the C:ProgramDataIntuitEntitlement ClientvX, and also remove all the files within the folder.
In case the above causes and solutions didn’t work for your concern, then we highly recommend you to perform the below stated set of steps.
Solution 2: Change the name of the entitlement client folder
One can easily rename the entitlement client folder by first opening the Windows file manager.
And then heading to the address i.e. C:ProgramDataIntuitEntitlement Client v(xx)
Then simply required to rename the version 12.0 folder to v8, version 2013 to V8 and version 10.0 to V6
If none of the files are shown, then try unhiding the system files as shown above.
Cause 3: SessionData.xml file is damaged or corrupted
Solution: Renaming the session data files
In this case, it is supposed to press the Windows + R tabs and also type in services.msc
Furthermore, hit enter and look for Intuit entitlement services option.
Next step is to right click over it and select the STOP option.
Later on, head to this address C:ProgramDataIntuitEntitlement Clientv
Moving ahead, find the sessiondata.xml file and also right-click on the same.
Now pick the Rename option and then type in .OLD at the end of the file name.
The final step to be followed is to open QuickBooks point of sale again to check if the XML error still persist or not.
To wrap it up!
We sum up the segment over here, with the expectation that the above-stated steps would be more than enough to resolve the xml issues in QuickBooks POS. In spite of that, if you are unable to tackle the issue, then in that case, our XpertBooks Pro team of professionals will be there to rescue you. We have a team of technically sound accounting professionals who work day and night to cater the best possible accounting services.
FAQs
What is QuickBooks XML error?
This error is encountered when the XML file in the Entitlement Client folder is damaged.
What is XML file?
XML is the abbreviation for Extensible Markup Language. XML file represents a text file which can be saved with .XML extension.
How to import XML file into QuickBooks?
The steps for importing XML files in QuickBooks are: 1. Hit on the Gear icon, and then go to Tools. 2. Opt for the Import data option. 3. Herein, choose Sales receipts. 4. Thereafter, go for previewing what's required to import sales receipts. 5. Subsequently, hit on Browse. 6. Choose the CSV file to upload. 7. Hit on Next tab.
Seeking for the process to add a user license to your QuickBooks accounting software? If yes, then your search ends over here. In this piece of writing, we will be talking about the entire step-by-step process to add a user license to your QuickBooks software. One can purchase the licenses if needs, especially when someone wants to simultaneously access a QuickBooks desktop company file. The most important thing to note here is that QuickBooks desktop premier software permits up to 5 users and pro allows up to 3 users to work in a company file at the same time. Similarly, the QuickBooks pro version permits 3 users to work at the same time. Whereas, the number reaches to 30 users in QuickBooks desktop enterprise solutions.
The number also depends upon the number of licenses one has. You can continue reading this piece of information, to unleash the process to adding a user license to QuickBooks desktop. Whereas, if you don’t want to invest your time in performing these steps on your own, then make sure to connect with XpertBooks Pro accounting professionals right away.
Step 2: Find current pricing information for adding users to the license
If you want to find the current pricing information for adding users to the license, then the below stated set of steps would surely work.
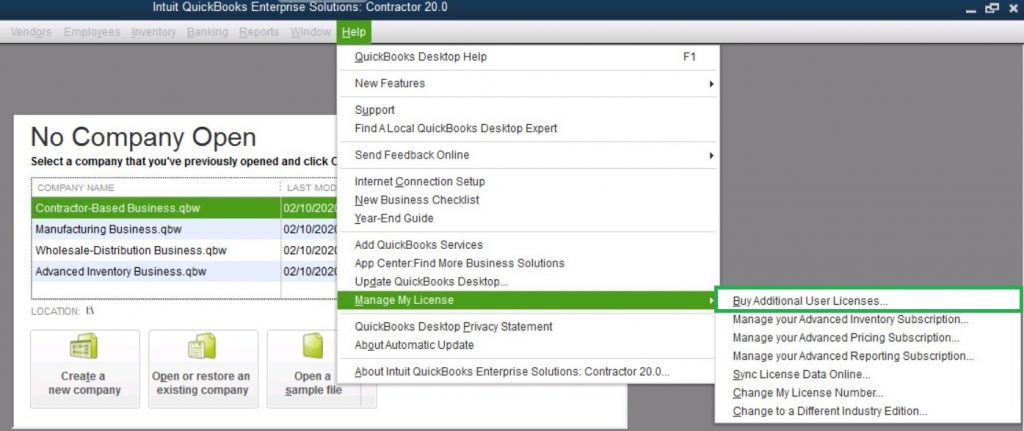
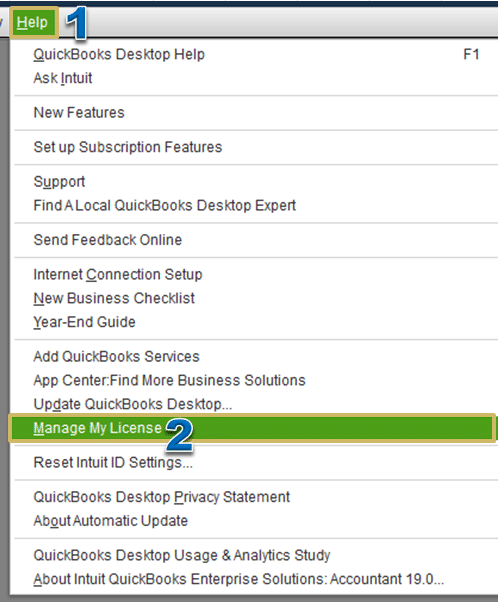
For finding the current pricing information, you are suggested to move to the Help menu in QuickBooks and then select Manage my license and then Buy additional user license.
And also, select the Add seats online link for current pricing.
Step 3: Purchase additional user licenses in QuickBooks
In case you want to purchase additional user licenses, then the below steps should be performed:
To start off with you should move to the Help menu in QuickBooks and then select Manage my license and buy additional user license. It should be noted that if the option “Buy additional user license isn’t available”, then the QuickBooks might already be at the maximum users permitted.
Furthermore, the page that opens will give you the option to Buy additional licenses online or by phone. In case you opts to use the phone option, then you will be given the phone number to contact intuit. In case you selected to use the online option, a new page will open allowing you to select the Number of licenses that are to be bought.
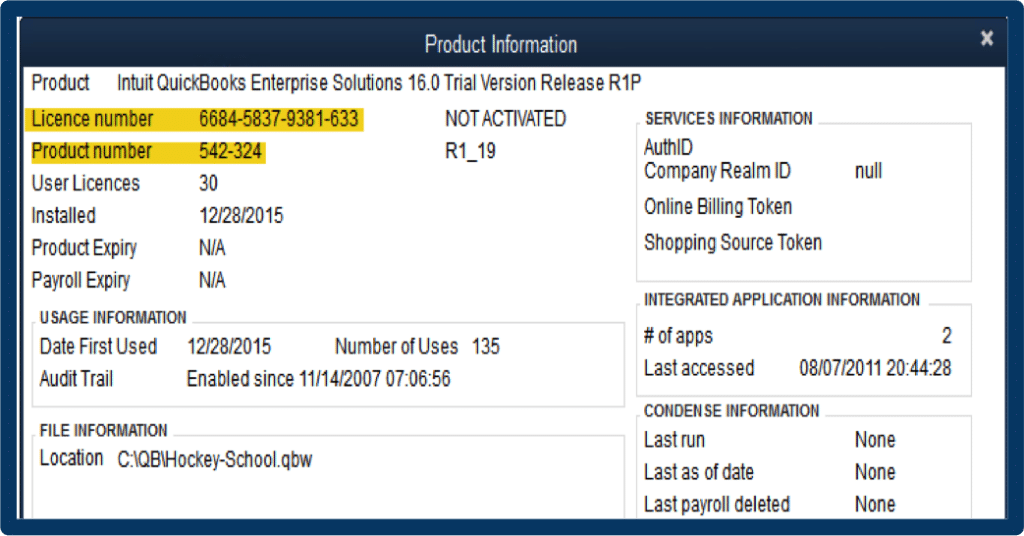
Next step is to install QuickBooks desktop on additional computers based on the number of licenses being purchases. It is suggested to Use the same license and product numbers that were used to originally install QuickBooks desktop.
Once installing it, you are suggested to follow the prompts to activate QuickBooks desktop. You can also go to the Help menu and then opt for Manage my license and then Sync license data online to update new license information.
In case you are installing QuickBooks on a computer that doesn’t have internet access, then one can manually update the new license information by selecting the Help menu and then choose manage my license and buy additional user licenses. You can also use the phone option to enter the same validation code that was received when you have purchased the additional license.
Conclusively, it is believed that the above-stated steps are more than enough to add a user license to the QuickBooks software successfully. Despite the above stated steps, if you aren’t able to successfully add a user license to QuickBooks, then we recommend you to connect with our accounting professionals and tech geeks right away.
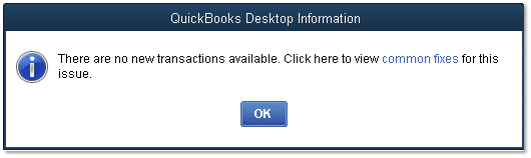
Often while importing the web connect file from the bank’s website, you might end up with an error message stating, “There are no new transactions available.” This error message might trouble you and end up hindering the smooth working process. In case you are also facing this sort of error, then need not worry anymore, as we have come up with this article, where we will be talking in detail about the causes and fixes of this issue.
Thus, ensure that you read this article carefully till the end. In case you need any technical assistance at any point in time, feel free to get in touch with our accounting software specialists team anytime. Help is available 24/7.
Factors triggering QuickBooks Web Connect Import Error “No New Transactions” message
QuickBooks users might land into such problem due to the following reasons:
In the case the web connect file doesn’t contain any new transactions.
Solutions to Error Message: "No new transactions" when importing web connect file
Well, now that you are aware of the factors causing the issue and other relevant information, below are some of the most pertinent solutions you need to carry out, to get rid of this issue.
Solution 1: Download a test company file
Making a test file and then downloading bank feed transactions basically helps in checking if the issue is with the company file, the bank account or with the web connect file. The steps involved in this process are as follows:
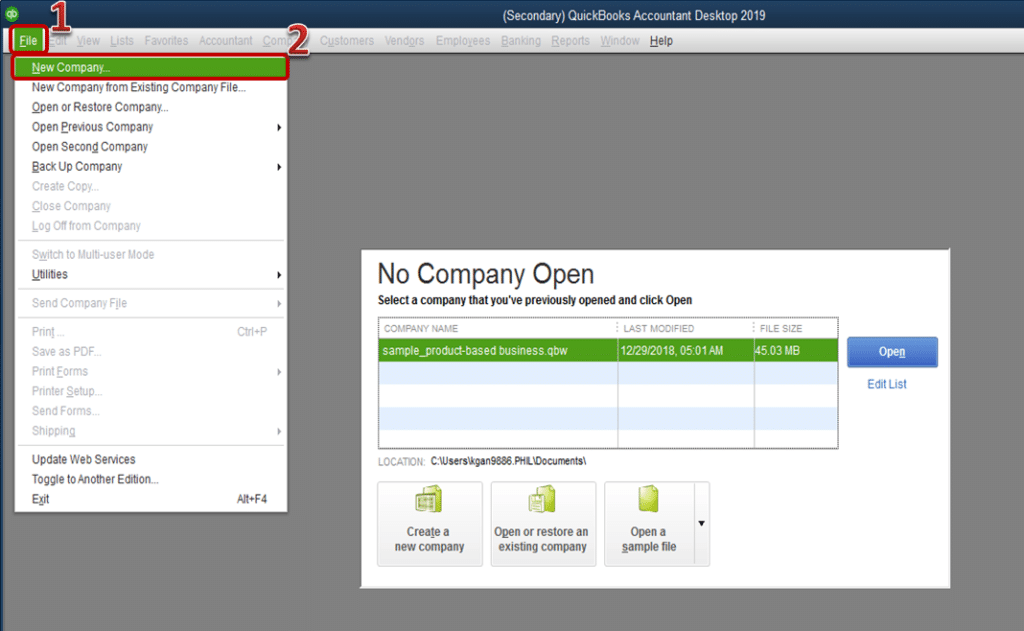
At first select the New company option from the File menu.
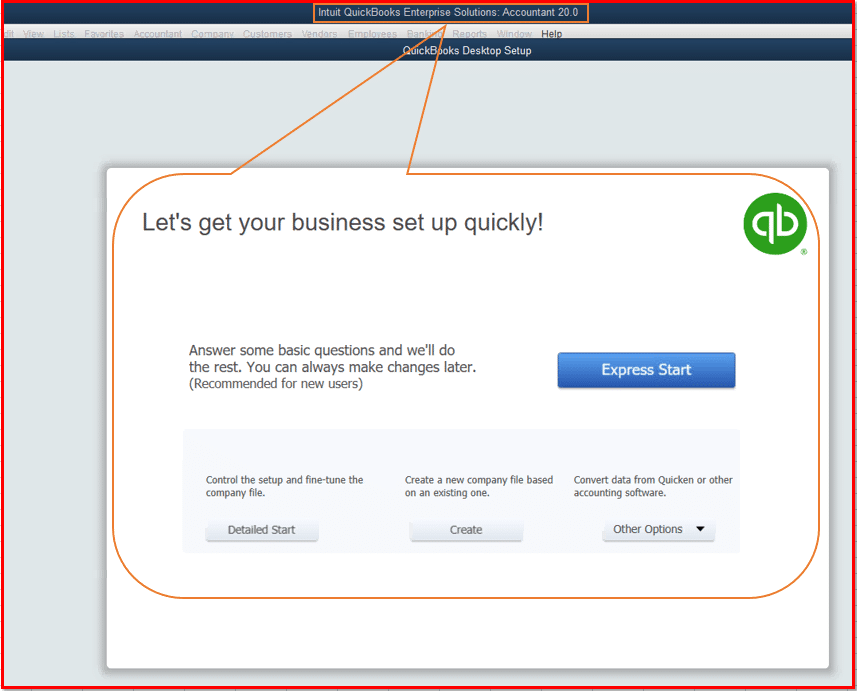
And then choose the Express start or Start setup.
Followed by, completing the Business information in the QuickBooks setup window, and also select Create company option.
Now choose the Start working option.
The next step is to Add to the chart of accounts the bank account getting the issues on the newly Created test company. This can be done by:
And then choose the Account drop down in the chart of accounts and then hit New.
Next step is to opt for the Bank for the account type and then hit Continue.
Followed by naming the account checking.
You will then have to select Save and close.
Also, set up the account for the Bank feeds.
Finally, download the Bank feed transactions to test the account.
Important points:
In case the new transactions download into the new file, then the issue is with the bank account or the company file, then the solution 2 will be of much help.
If the new transactions are now showing in the new file, then the issue is with the web connect file and it is recommended to opt for the solution 3.
Solution 2: Deactivating, creating new, merging and then reactivating
1: Deactivate bank feeds in QuickBooks desktop for windows
You need to move to the Lists menu and also choose Chart of Accounts.
Further, Deactivate the account by right-clicking on it and select Edit tab.
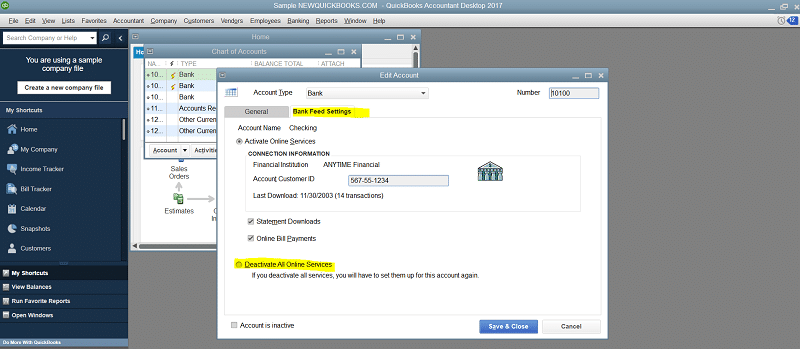
You are then required to get to the Bank settings tab and choose to Deactivate all online services.
Hit OK tab to confirm, and then click on Save and close.
2: Deactivate bank feeds from QuickBooks from Mac users
You now have to move to File menu and also click on Charts of Accounts.
Next, go for the Account and also click on the Pencil icon to hit the Edit tab.
You will now require to click on Online Settings.
Choose Not Enabled option from the Download transactions to the drop-down list.
Summarize the process by clicking on Confirm and Closewindow.
3: Make a new bank account
Under this step, you need to move to List menu and choose the Chart of Accounts.
Heading forward, right-click anywhere in the Chart Of Accounts window and also click on New tab.
Choose a bank for the Account type.
Moreover, write the bank name in the account.
Conclude the process by clicking on Save and Close.
4: Merge accounts
Herein, you are suggested to Rename the old account by simply right clicking on to it.
Furthermore, click on Edit tab.
Give the New account name in the Account name field.
Solution 3: Check the web connect download for errors
Another method to fix this issue can be to check the web connect download for errors. This can be done by carrying out the steps below:
Initially, download and save the .QBO file to the desktop.
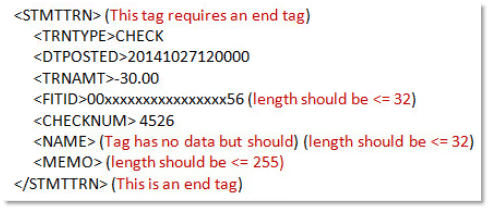
And then edit the .QBO file, and also right-click the Open with and select Notepad.
Now check the download for possible errors.
You need to remove the invalid characters. And also check if the file is having ampersands and other invalid character strings.
Followed by Adding or Editing missing data.
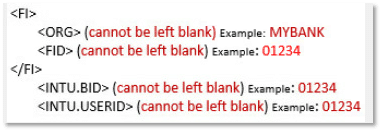
Also, ensure that all the tags are having the data.
If the payee NAME field exceeds the prescribed limit for the characters, then the other payee information might appear in the MEMO field. Moreover, it should be noted that the QuickBooks software cannot auto-match the payee information that appears in the MEMO field. Check the transactions manually and tally them. In case the QBO download file can’t be spotted, then the transactions might not be imported. For this, hit a click on the following steps:
Click on QuickBooks version to look for the Unique BID information for the bank.
You will also have to test importing the corrected .QBO file into the test file created.
Also, report the formatting errors to the bank for resolution in future downloads.
Solution 4: Checking the dates
Ensure that the date range for the imported Web Connect file is accurate and and is also not overlapping. To make it easy to understand, let us take an example: In case you have downloaded and imported the transactions for August 1-30 without any hindrance, then ensure that the date range for the current download is September 1 and later.
When none of the above methods work, it is recommended to move to the register mode. This can be done by carrying out the steps below:
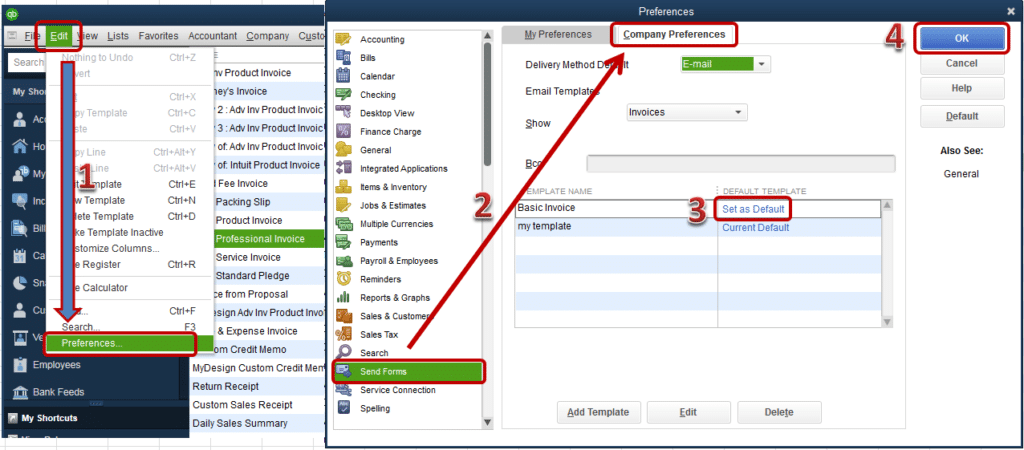
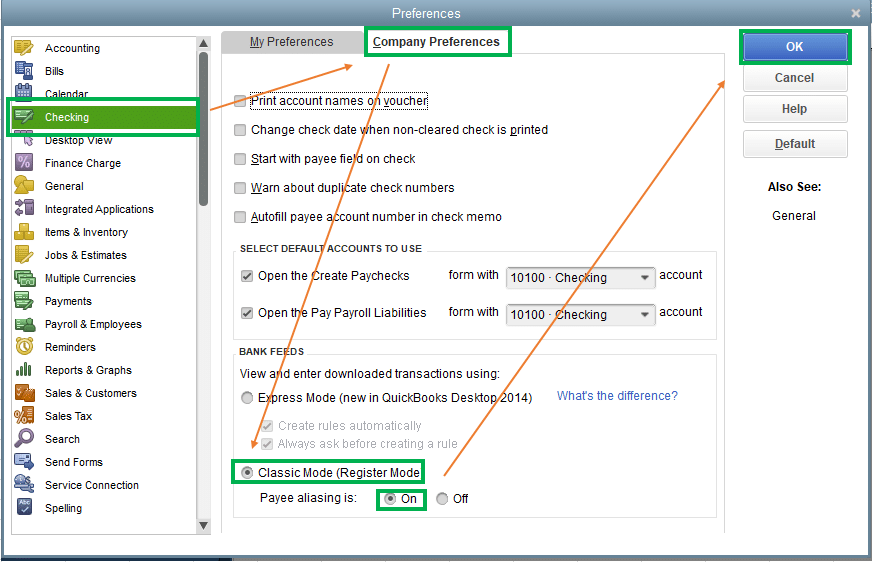
At first, move to the Preferences from the Edit menu.
And after that, opt for checking and navigate to the Company Preferences tab.
Now, in the bank feeds selection, go for the Classic mode, which is the Register mode.
And lastly, hit Ok tab.
Miscellaneous steps to follow
If all of the above methods fail to fix the issue for you, then try fixing the issue with the steps below:
You need to speak to the bank
The bank is basically responsible for the .QBO download format and content. And in case the .qbo file is not formatted in a proper manner, then the import into QuickBooks might lead to unexpected results.
Moreover, the banks own a support channel
When you contact the bank, make sure to ask them to transfer the case to the bank representative familiar with the QuickBooks online banking and account activation.
Also, you might need to give the exact error message and a copy of the issue download file for review.
In case the error continues, then get your hands on the online banking log files and then speak to a technical support team.
By now, the error “no new transactions” while importing the web connect file might have been resolved successfully. But if you would rather save time and avoid unnecessary downtime, you can reach out to XpertBooks Pro. As an independent service provider, we offer quick technical assistance for various accounting software related issues. Our goal is to help users resolve problems efficiently while minimizing disruptions to their daily workflow. We are a team of independent accounting professionals, who do not leave any stone unturned in providing the best possible support services to all users.
FAQs
What does the error message "No New Transactions" mean in QuickBooks Web Connect?
The error message "No New Transactions" in QuickBooks Web connect typically infers that there are no new transactions available to import from the selected Web connect file.
Can I manually enter the transactions from the Web Connect file if I encounter the "No New Transactions" error?
Yes! If you encounter the "No New Transactions" error and there are indeed new transactions in the Web Connect file, you can manually enter those transactions into QuickBooks. Review the transactions in the Web Connect file and enter them manually in the appropriate accounts and categories in QuickBooks.
Are there any specific file formatting requirements for the Web Connect file to avoid the "No New Transactions" error?
Yes! The Web Connect file must conform to specific formatting requirements for successful import into QuickBooks. The correct file format is QBO or QFX.
Can a QuickBooks company file issue cause the "No New Transactions" error in Web Connect?
Data corruption in the QuickBooks company file can potentially trigger the "No New Transactions" error in Web Connect.
Need to backup company file, but unable to do it due to a warning message appearing on the screen? Well, in that case, you have landed on the right page, where you will get the most relevant information related tofixing backup issues in QuickBooks company files. You might come across messages related to the password or assisted payroll data, you can resolve these issues and successfully restore your data by performing a certain set of procedures. Backup related issues can be serious sometimes, and you can’t afford to ignore it.
This article is crafted especially for you with the aim to assist you in fixing the QuickBooks unable to backup company file error. Dive in deep to unleash the further process! When this error occurs, you may see the following error messages:
Error Message:
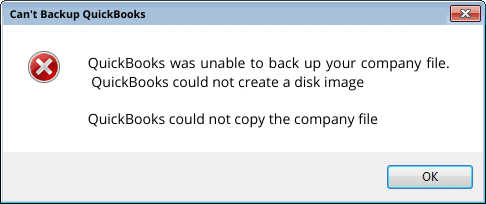
QuickBooks Unable to Backup Company File or Backup failed.
Error:
This QuickBooks file may be missing some of the payroll data that you have already sent to the Payroll Service. Before creating any new transactions, you need to restore the missing data by clicking Send Payroll Data from the Employees menu and then clicking the Send button.
Perform these quick steps given below, if you are getting the following error message:
You will have to go to the Employee menu and also select Send payroll data.
Now check the Items to send field. In case you are having 0 paychecks for $0.00, then it is recommended to select Send tab.
In case there are any of the transactions listed, then it is recommended to avoid selecting Send tab. You might create duplicate the transactions on accident.
Procedures you can implement to fix backup company file issues in QuickBooks
Now that you know the basic causes, you are all set to perform the necessary steps. Let us explore each of the methods one by one:
Cause 1: Incorrect admin password
One of the common causes behind the company file backup issue is providing an incorrect admin password. By resetting the password, you can fix this error. Follow the DIY solutions discussed below.
Solution: Resetting the password
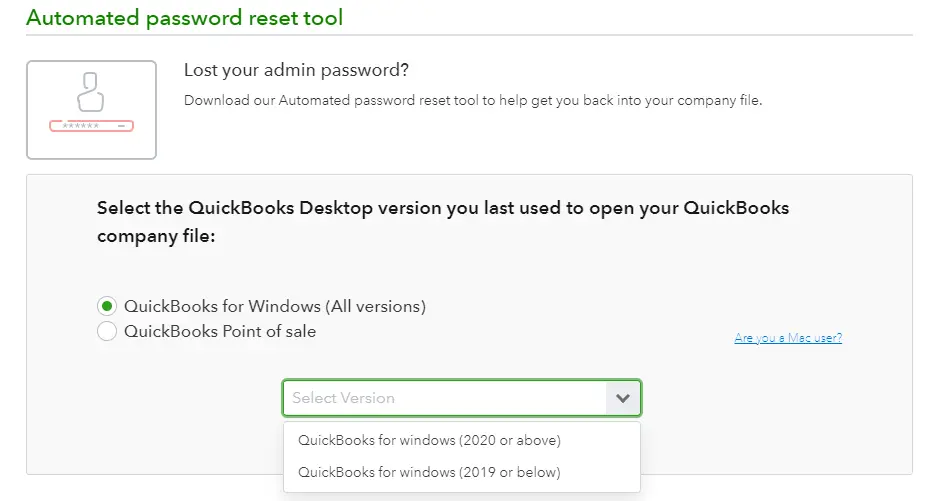
If you are facing an error message that states “Your data has not been restore if you failed to enter the correct admin password”, then you can follow the below given steps to use automated password reset tool. After resetting the password, you should restore the backup file once again. Follow the steps to use automated password reset tool:
Start off with downloading the automated password tool for QuickBooks Desktop. You can also use this for resetting the QuickBooks admin password in any version of QuickBooks Desktop for Windows.
Further, choose the Version of QuickBooks desktop.
It should be noted that the phone number should be 10 digits with no extension at the end. You should avoid using 1 (+1) at the beginnings. You can change the country by opting for select country tab and then manually edit the phone number and then click on Save.
Moreover, accept the License agreement.
Followed by, clicking on Save, if asked to run or save the file.
Now run the automated password reset tool and then enter the token number received on mail.
Once done, select the QuickBooks version from the QuickBooks Desktop products drop-down.
And further, click on Browse buttonfor company file and select the Company file you wish to reset the password for.
It should be noted that, entering the correct company file admin user name is recommended to avoid any issue.
Enter the New password and also confirm the New password and select reset and end the process.
The point to be noted here is to create temporary password only as QuickBooks will ask you to change the password again when you opens up the company file
Lastly, you need to select Reset password to end the process.
Cause 2: The backup is being restored by you over an existing company file
This error can also triggers, when you try to restore a company file backup over an existing company file.
Solution: Avoid overwriting an existing file
Under this process, you are supposed to Save the file on a location that can be accessed easily.
Just in case the file name resembles the other file name, then a message would appear on the screen “The file name exists. Would you like to overwrite this file?”
Cause 3: If the company file itself is causing error
Sometimes, certain issues related to company file itself may lead to backup related issues.
Solution: Backing up the company file to an external drive or flash drive
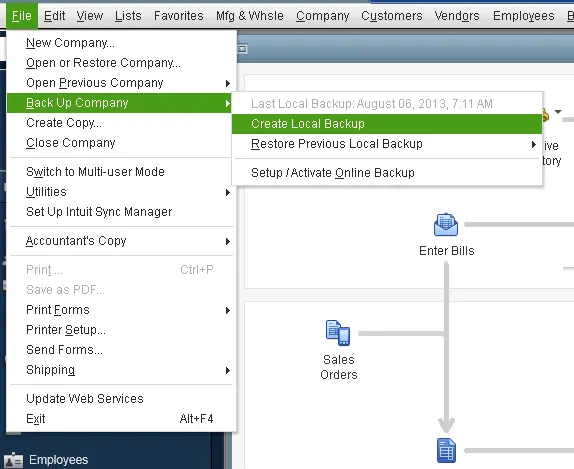
You are required to move the File menu and select the Save copy or backup.
After that, select the backup company and click on Next tab.
Followed by, pick the Local backup option and hit Next tab.
Then select Save it now, when asked, and hit the Next tab.
Once done, browse to a location on the Local drive and select on save tab.
Minimize the QuickBooks desktop and locate the backup file on the local drive.
Now hit a right-click on the file and select Copy tab.
Open the Windows explorer window.
The next step is to double-click the Driver letter that corresponds to the external drive or flash drive to open it.
End the process by right-clicking on the Empty space that is inside the window and hit the Paste tab.
Cause 4: Any special character in the file
The company file name might containing unnecessary blank spaces or special characters.
Solution: Renaming the company file and removing special character from the name
For this, you simply have to launch the QuickBooks desktop and open the company file.
And further, press F2 or Ctrl +1 key for opening the Product information window.
You are then supposed to note the Location of the company file listed in the file information field.
It is suggested, if the file name is too long, then it might appear with an Ellipsis.
You are then required to hover over the File name to display the Full name.
Heading forward, close QuickBooks desktop.
And head to the location of the company file.
Windows 11, 10, 8.1, and 8: You need to right-click the Windows Start tab and also choose File explorer.
Windows 7 and vista: In this scenario, you simply have to right click on the Windows start tab and also choose Open Windows explorer.
Now right-click on the File and go for Rename option.
As per your Windows folder options, you need to set to Show or hide extensions for known file types, the file name might appear as company name.qbw or just the company name.
You will then have to type in the New company file name and hit Enter tab.
Just in case the windows prompt to confirm the action, you are required to hit Yes tab.
In case the company file backup is saved in an external disk, then there is possibility for you to enter such an error Also, just in case the company file name is including any special character.
If the size of your company file is more than 3 GB.
Another reason can be if there is any other program that is running in the background.
Miscellaneous solutions to fix QuickBooks unable to backup company file error
Here are some miscellaneous solutions you can try to rectify this error:
Method 1: Backing up the company file to an external drive or flash drive
This error can be fixed by backing the company file to some external storage drive.
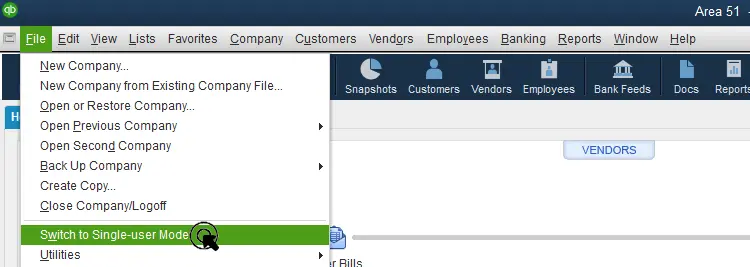
Under this step, you should visit the File menu and select the Switch to multi-user mode.
Moving ahead, select the Backup company or Save copy and select Next tab.
The next step is to pick the Local backup option and hit Next.
Further, select Save it now when asked and hit Next.
Browse to a location on the local drive and select Save tab.
Method 2: Running verify rebuild utility tools
One important in-built feature of QuickBooks is Verify and Rebuild utility. This utility lets you fix various type of company files issues. Checkout the following steps to run the utility:
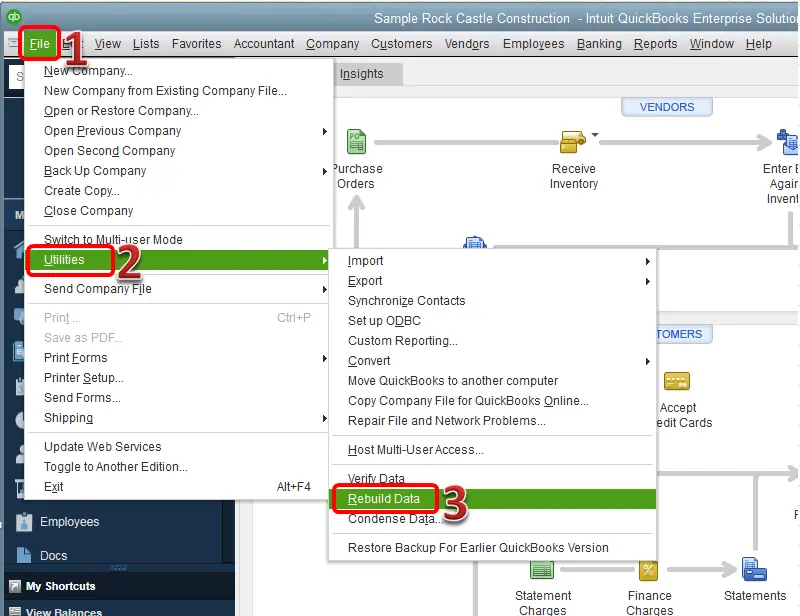
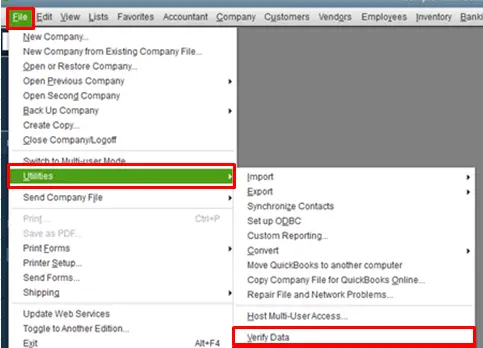
Manually repair QuickBooks file, by visiting the QuickBooks file menu and move to the Utilities tab and Rebuild data.
Visit the QuickBooks File menu and move to the Utilities and Verify data tab.
Method 3: Setting up QuickBooks desktop to use the new company file name
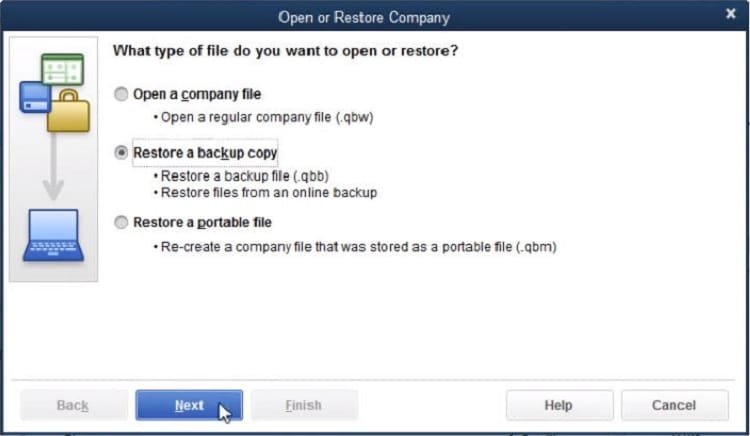
Herein, you simply need to click on open or restore an existing company file from the file menu.
Furthermore, go for Open a company file and hit Next.
Now choose New company file name and also click on Open tab.
Final Words..!
That was all you need to know about backing up issues in QuickBooks desktop company file or QuickBooks unable to back up company file issue. For any queries, concerns, or comments, contact our accounting software specialists! Our team at XpertBooks Pro will provide your business with the right assistance that it needs to eliminate errors and technical glitches, ensure success and save some serious money. We have the most relevant solutions to all your QuickBooks errors and other accounting software related issues.
FAQ's
Can I restore a backup from an older version of QuickBooks Desktop?
Yes! You can restore a backup from a previous QuickBooks version to a newer version.
Can I back up and restore only specific data or transactions in QuickBooks Desktop?
No! QuickBooks Desktop does not allow you to do that. You can backup and restore the whole company file.
Are there any precautions to take when storing QuickBooks Desktop backups in the cloud?
Yes, you need to take the following precautions: 1. Enabling the Encryption. 2. Turning on the two-factor authentication (2FA) 3. Updating the access permissions on a regular basis.
QuickBooks Accounting software is widely popular amongst various start-ups and established organizations because of its various advanced features and tools. It uses advanced Industry recognized standards to ensure that the data which is entered in the software is secured as well as encrypted. In this comprehensive blog post, we will discuss one prominent use of QuickBooks which is writing off bad debts in QuickBooks desktop.
Bad debts are one of the biggest issues any organization has to go through. This is why all organizations, whether big or small, want to ensure that they can write off their bad debts as soon as possible and with the least amount of hassle. And this is where QuickBooks desktop accounting software comes in. So, let us dive into the various aspects of the process.
Before we going to the process to write off bad debts in QuickBooks, you need to take note of the following points:
You can write off bad debts as deductions.
Once creating a bad debt account, you can get familiarize with all different types of bad debts and unpaid invoices.
There is an easy process to write off overpayments as well by utilizing the QuickBooks software.
What does writing off Bad Debts mean for an Organization?
In any organization, when the amount which was in the lucrative form and was supposed to be received from the customer fails to be recovered, it is termed Bad Debt. For those organizations that are already using QuickBooks Desktop, bad debts can be understood as invoices that become uncollectible over the course of time.
Writing off bad debts makes it convenient for an organization to track its profit and the average net turnaround. Although, the same can become quite tedious as well if the records are to be handled and managed manually without the help of any accounting software.
How can QuickBooks Desktop help in writing off bad debts?
QuickBooks Desktop software makes writing off bad debts relatively easy as it is dedicated to cloud-based accounting software. So, any organization, whether big or small, do not need to bother about hiring an Accountant to managing their finances as the QuickBooks software is highly user-friendly.
Methods to Write off Bad Debts in QuickBooks Desktop
Following are some of the methods which the users can follow in order to write off the bad debts using QuickBooks desktop without any hassle:
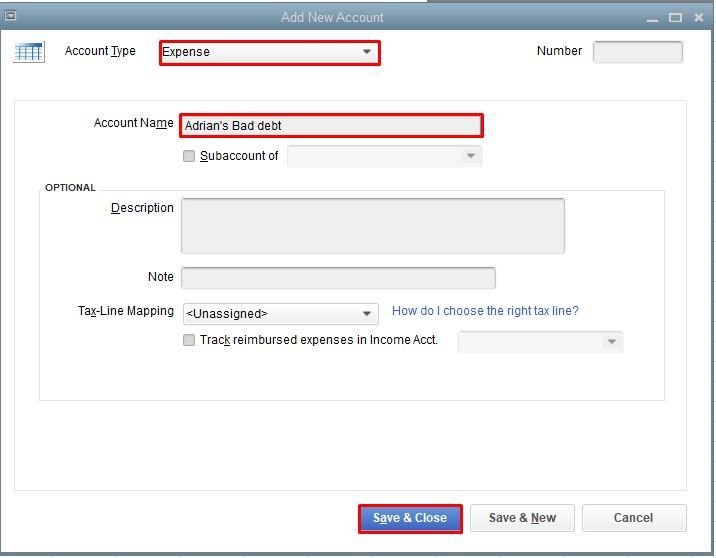
Step 1: Create a Bad Debts Expense Account
The first step demands the creation of an expense account for bad debts.
At first, you are required to open QuickBooks Desktop and go to the Settings option.
Then, on the top-right corner, select New to create a new account.
From the Account type dropdown, click on the Expenses option.
Here, in the Detail Type dropdown, click on the Bad Debts option.
Once the above-mentioned steps are complete, you need to click on Save and Close.
Step 2: Close out the unpaid invoices
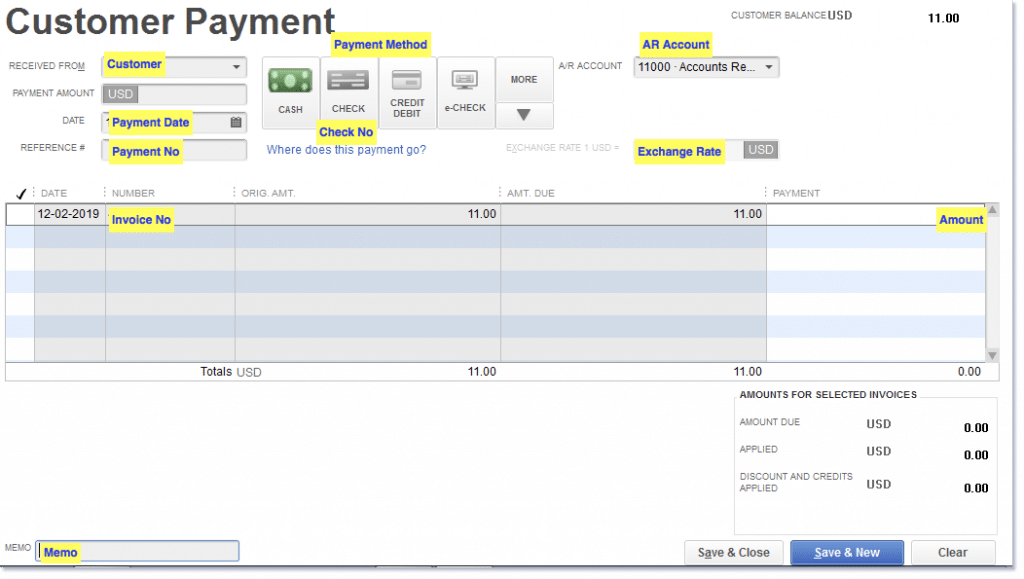
Open Customers menu and select the Receive Payments.
Type in the customer’s name in the Received from field.
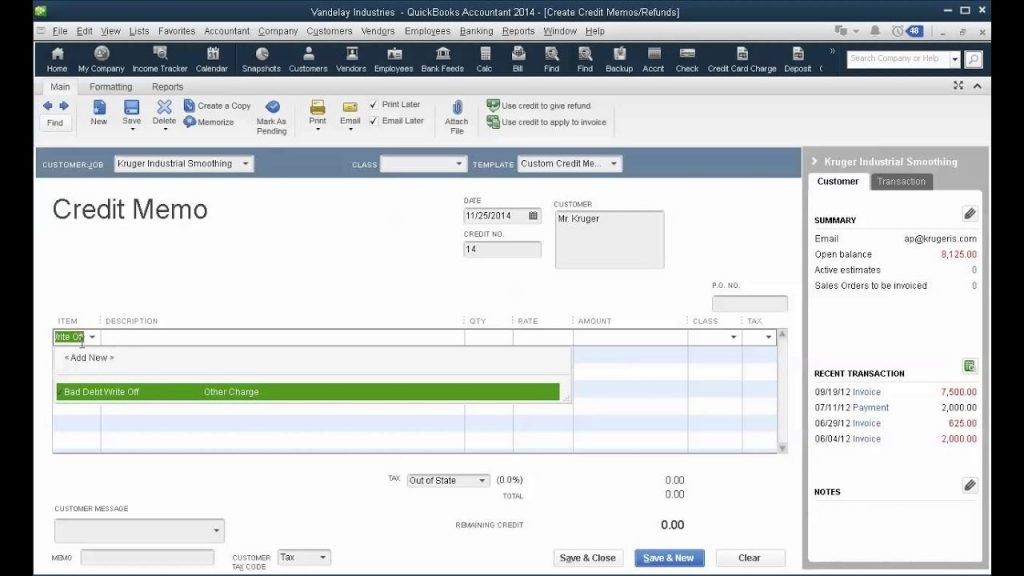
In the Payment amount space, enter $0.00 and choose Discounts and credits.
In the Amount of Discount field, put in the value that you would like to write off.
For Discount Account, select the account you added in the previous step, and select Done.
Conclude it by choosing Save and Close.
So, these were some of the methods that you can use to write off bad debts in QuickBooks Desktop software without any hassle. These methods are easy to follow and will help you to get the process automated.
We hope you find this article helpful and informative. If you're short on time or the issue continues despite trying every solution, let experienced professionals handle the troubleshooting. Our team at XpertBooks Pro works to identify the root cause and help you restore normal operations as quickly as possible. Our goal is to help users resolve problems efficiently while minimizing disruptions to their daily workflow.
FAQs
What is the allowance for bad debt in QuickBooks?
The allowance for doubtful accounts is an estimate of a company's outstanding accounts receivable that is unpaid.
What does it mean to write off bad debts in QuickBooks desktop and online?
Writing off bad debts in QuickBooks desktop and Online infers the process of acknowledging and removing uncollectible customer invoices or accounts receivable.
Can I recover or reinstate a written-off bad debt in QuickBooks?
Yes! If you recover a bad debt that was previously written off, you can reinstate it in QuickBooks.