Do you wish to delete a QuickBooks desktop company file? Well, your query will be resolved once you will go through this segment. Deleting the file will be helpful to prevent it from showing in the list of company files. You can locate and delete it like other files on the system. Furthermore, you can type one of the following into the search bar in the start menu. Before you start with the procedure, it is very much essential for you to ensure to include the asterisk before the extension type so as to ensure the search works correctly.
*.qbw (Working Files)
*.qbb (Back Up Files)
*.qba (Accountants Copy Files)
*.qbx (Accountants Transfer Files)
*.qby (Accountants Change Files)
To get a better insight, make sure to read ahead!
Important Instructions to Note Before Deleting the Company File
There are certain instructions to follow before deleting the company file from your QuickBooks account. The instructions are as follows:
You would have to Sign in to your QuickBooks Account
Furthermore, head to the Charts of Accounts.
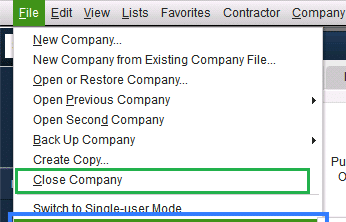
The next step is to look for the File menu.
You would have to click on the option of Close company.
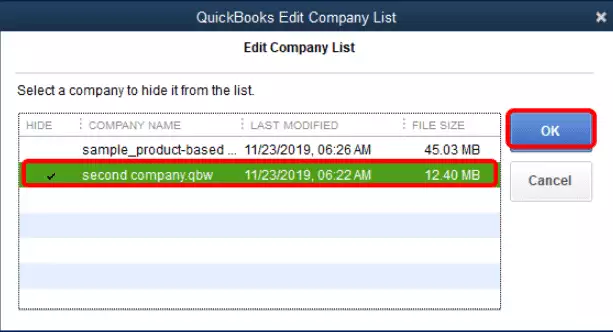
You will further see a drop-down will appear, and you will have to choose the Edit tab.
Select the Company file you want to delete and put a checkmark next to it.
Steps to Locate the Company File in QuickBooks Desktop
Locating the company file in the QuickBooks version involves certain steps, which include the following:
Locate the company file in QuickBooks Windows (Pro, Premier, and Enterprise)
You need to first head to the QuickBooks software and locate the file which you wish to delete.
In order to open the company, choose the option to Open a company file and click on the Next tab.
Furthermore, select the File which you want to Delete and click on Open.
You can get the location of the file, to do that, click the F2 key, which shows the path of the file stored in your computer.
Lastly, close the QuickBooks and then click on the File and Exit tab
Locate the company file in QuickBooks Mac
For QuickBooks Mac, the following steps need to be performed to detect a company file.
Herein, you would have to double-click the QuickBooks software and the company file which is to be deleted.
Head to the top menu bar and click on the Help tab and select options Product information.
You will see a new screen opening, and head to the bottom and see the file location.
Follow the File path to Delete the file.
The path would be as follows: Files > Intuit > QuickBooks > Company files > File name.
Lastly, close the screen, and you are good to go.
Alternative Method to Delete QuickBooks Desktop Company File
There are different guidelines to follow for different kinds of accounts. Check out to find which one suits you the most.
Just in case your account is older than 60 days in activation
It should be noted that you cannot purge the company data, just in case it has been active for more than 60 days. Under this process, we will cancel the account and take a new subscription.
Cancelling the account
The steps for the cancellation of the account are given as under:
You would first have to Sign into the QuickBooks Online company file.
And then, head to the Gear icon and opt for it.
You would then have to Browse to the account.
And click on Update credit card.
Move to the Subscription status section and click on the Cancel Subscription link.
At last, carry out the prompts that appear on your screen and complete the cancellation process.
Start a new account
After the cancellation of the account, it is now time for you to set up a new account, the steps for which are given below:
For this, you would have to Sign in to QuickBooks on Intuit from your browser and then hit Enter tab.
Use the same old ID and password to login or use the new credentials.
Just in case your account is not older than 60 days in activation and you require to import the QuickBooks desktop company file.
Note that the QuickBooks online data, once deleted or replaced, cannot be restored.
You are supposed to Sign in first.
And head to the upper right corner of the screen and select the Gear icon.
Click on the Import desktop data option.
And further, go for the appropriate version and perform the on-screen instructions to import the data.
That was all you need to know in order to completely delete a company file in the QuickBooks desktop version. As always, if you have any queries, comments, or concerns, contact us at XpertBooks Pro! We're a center of accounting experts who are tech-savvy and work all day and night to offer the best possible accounting services. Therefore, do not hesitate to schedule a call and our accounting professionals will contact you within a short time.
FAQ's
Is it possible to delete a QuickBooks Desktop company file directly from within the software?
No! The Company file cannot be directly deleted from within QuickBooks Desktop. You need to locate the file on your computer's hard drive or network location and subsequently delete it manually.
Can I recover a deleted company file in QuickBooks?
The deleted company files can only be recovered if they haven't been emptied from the recycle bin. However, if you used the "Ctrl + Shift + delete" short key to delete the file, or emptied the recycle bin, then the file cannot be recovered.
Is it possible to delete a QuickBooks Desktop company file if it is being used by another user?
It is advised not to delete a Company file if another user is using it, as deleting the file may cause data corruption and ancillary technical issues.
Can I archive or compress a QuickBooks Desktop company file?
Yes! You can go for the compression of the company file to reduce its size. However, it is pertinent to note that such compressed files won't be accessible through QuickBooks.
While performing your accounting operations in QuickBooks, did you encounter the Negative Inventory issues? Don't worry, you need to try the assorted convenient tips included in this article to get this technical error rooted out of your QuickBooks accounting software. We will cover the following aspects related to the Negative inventory issues in this blog post:
An Overview of Negative Inventory
Causes and implications of Negative Inventory on your company file
Easy procedure to fix Negative Inventory issues
What is Negative Inventory? An Overview
You may encounter Negative Inventory issues in QuickBooks desktop, if you enter sales transactions before entering the corresponding purchase transactions. In other words, these issues erupt when you sell the inventory items that are not in stock with you.
When selling inventories that have been entered into the company file
When using the Items Tab on the item receipt, invoice, check or credit card transaction, debiting item entry and crediting A/P, Cash or Credit Card Payable to purchase items.
You do not sell more items on invoices or on sales receipts than you have on hand.
The sales transactions register the Sales/Receivable transaction, debiting A/R and crediting Sales, and the Inventory/COGS transaction, crediting Inventory and debiting COGS.
You run P&L and expense reports showing the invoices and sales receipts as they have records of both the income and the expenses.
You run B/S reports showing item receipts, invoices, checks, and credit card charges because they record increases in inventory, and they show invoices and sales receipts because they record the decreases in inventory.
When you sell items that have NOT been entered into your company file
The invoice keeps records of the Sales/Receivable transaction as expected.
In terms of the Inventory/COGS transaction, QuickBooks accounting software by default considers that the average cost of the items not on hand is either equal to the items you had on hand or the Item Cost from the Item List.
QuickBooks keeps records of the Inventory/COGS transaction through the assumed cost.
If the next transaction or purchase is not at the cost assumed by QuickBooks, the purchase transaction must register an adjustment to Inventory and COGS to adjust the appropriate difference.
Since the bill now affects COGS, it shows up on the P&L and other reports that show expenses.
Please remember that the Inventory/COGS transaction report does not appear on the transaction, but you can find it by running the Transaction Journal report. Also, invoices, checks, and credit card transactions with Inventory/COGS adjustments can be found on the Transaction Detail by Account and Account Quick Report for a Cost of Goods Sold (COGS) account.
Steps to identify Negative Inventory
Negative Inventory can appear on your Balance Sheet. However, it mostly shows on the following reports:
Inventory Valuation Detail (IVD) report.
Negative Item Listing Report.
Inventory Valuation Detail (IVD) report
This report is the one used to evaluate the level of your Negative Inventory. In the Quantity on Hand (QOH) column, the inventory (negative) shows negative numbers.
Visit to the Reports menu.
After that, choose Inventory followed by Inventory Valuation.
Negative Item Listing Report
You can use the Negative Item Listing Report in QuickBooks Enterprise 15.0 or later versions. Please note that this report shows the current negative quantities and doesn’t show the past negative quantities.
Move to the Reports menu.
Then select Inventory and then Negative Item Listing.
QuickBooks Premier or Enterprise 2014 or earlier users without Advanced Inventory can use Inventory Center.
Go to the Vendors menu.
Choose Inventory Activities followed by Inventory Center.
On the top left of the Inventory Center window, change the filter from Active Inventory to Assembly to QOH <=Zero.
Easy procedure to fix Negative Inventory issues in QuickBooks
Before you start performing the troubleshooting steps that we are going to describe here, make sure that you create backup copies of your QuickBooks company file. Confirm with your accountant to be sure that the changes are legitimate and that you don’t have sufficient inventory to bring the current QOH to a positive value. Make sure that each occurrence of negative QOH is eliminated. In case the Negative Inventory is so extensive that you can’t repair it that easily, you can consider starting a data.
If sales are your first transaction(s) for an item
If you realize that your inventory reports have errors because you have not established an average cost, you can get them to show you the correct values by assuring that the earliest dated transaction for an item is not a sale but a bill, check, credit card charge or Adjust Qty/Value on Hand:
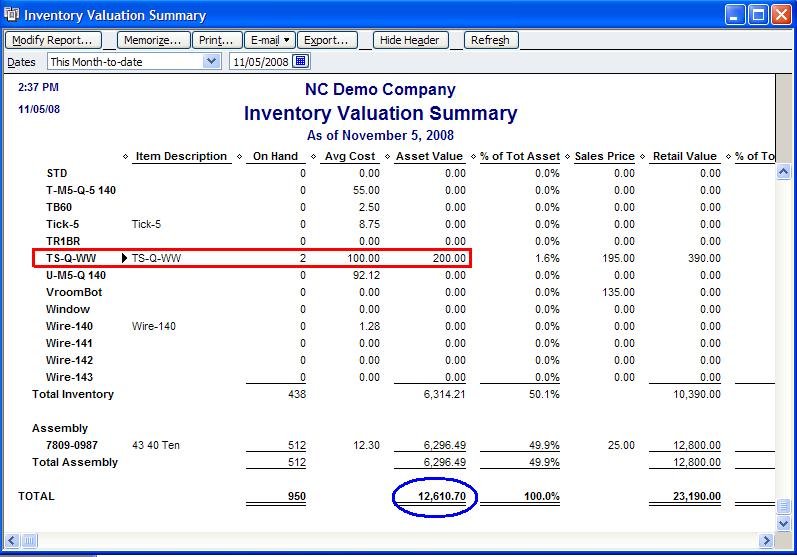
Go to the QuickBooks Reports menu, select Inventory, followed by Inventory Valuation Summary.
QuickZoom an item with incorrect values by double-clicking the item name, and the Inventory Valuation Detail report for the item will appear. The transactions related to this item are listed in order by date.
QuickZoom the first Bill on the list to open the Enter Bills window.
Make appropriate changes in the date on the bill to a date prior to the first invoice listed on the detail report you opened in the second step.
Tap on Save & Close and record the bill with the new date.
Now, perform Steps 2 through 5 again for each incorrect item.
You sold your inventory items and didn’t record the purchases
Perhaps you entered Bills with accounts and forgot the inventory items. If that’s the case, edit or change the entries from the Expenses Tab to the Item Tab. Remember, this step may alter your inventory expenses. You must consult your accountant before undertaking this process.
Purchases or adjustments were entered before entering sales
If possible legitimately, alter the transaction dates and adjust them such that bills are dated before invoices:
On the menu bar, opt for Reports, followed by Inventory, and then Inventory Valuation Detail.
Choose the Dates drop-down arrow and click on All.
Scroll through the report to an item displaying a negative amount in the On Hand column.
If doable legitimately, adjust the bills dates and invoices to ensure that the bill dates are before the invoice dates.
Repeat steps 2 to 4 for each item with a negative amount in the On Hand column.
Tips to avoid Negative Inventory issues in QuickBooks
You can do a couple of things to make sure that this issue doesn’t reoccur. 1. Do not sell any inventory items until you have them with you and have entered them into QuickBooks.
Set up inventory items with an opening balance
Create a fresh inventory item and put in the necessary information.
Enter your QOH and Value at the bottom in order to establish an average cost.
In case you have no units on hand, put in a purchase before entering a sale.
Use Sales Orders or Estimate to enter sales for the inventory that you lack
Enter the Customer order in place of the Sales Order OR -
Enter the Customer order as an Invoice and mark the Invoice as Pending (Edit > Mark Invoice as pending).
Purchase the Inventory items and enter the purchase into your company data file.
Convert the Sales Order to an Invoice or put the Invoice as final (Edit > Mark Invoice as Final).
Utilize Pending Invoices to enter sales for which you do have inventory
Use the Customer order as an Invoice.
Click on Edit on the menu bar and click Mark Invoice as Pending.
Purchase the Inventory items and include them in your company data file.
Tap on Edit in the menu bar and pick Mark Invoice as Final.
Adjust the Invoice date to the date the goods are sent to the customer.
Problems Caused due to Negative Inventory Issues in QuickBooks
There is a long list of issues that may be incited due to negative inventory. Some major issues are enlisted in the following lines:
There is no average cost for a new inventory.
If you don’t mention an initial QOH/VOH while creating a new inventory item with an Item Cost, the item will be left without an average cost.
The sale put the item into Negative Inventory.
The invoice that has no average cost to credit inventory and debit COGS, uses the Item List for the Item Cost.
You purchase the item for a cost that’s not the same as /2ent than the Item Cost.
The bill consists of an adjustment to Inventory and COGS for the difference between the Item Cost and the real purchase cost, therefore resulting to show on the P&L report.
The first transaction displayed to use the item was an invoice rather than a bill, check, credit card transaction or Adjust Qty/Value On Hand (IAD).
If you sell inventory that isn’t available with you drives your Quantity On Hand (QOH) negative and at times causes incorrect Cost of Goods Sold (COGS) on your P&L report.
You include a new inventory item without an Item Cost.
You sell that inventory item without purchasing any unit of that item.
QuickBooks accounting software consists of no information offering to calculate the average cost thus it must use an average cost of $0.00.
This cause often distorts your COGS and inventory.
The issue may not be set right until you establish an average cost with a bill, check, credit card charge or Adjust Qty/Value On Hand.
Negative Inventory causes errors on vendor reports
You can generally find the Inventory/COGS transaction on the invoice. If you sell out-of-stock inventory, it may cause your next bill to contain an adjusting Inventory/COGS transaction. These adjustments are in connection with the vendor and appear on vendor reports.
Inventory Assemblies show incorrect COGS on job costing reports
If you sell more assembly items than you have with you, and later, when you create assembly items with a cost that isn’t same as the average cost, the build transaction will consist of an adjusting Inventory - COGS transaction, generally included in the invoice. The build transaction lets you enter either a customer: job name or a class to not include the adjusting transactions in the job costing and class reports.
In order to maintain inventory records that include COGS, it is imperative to keep inventory quantities from reaching a negative status. You can avoid selling out assembly items when you don’t have a sufficient quantity available. If you process a sale when the records with QuickBooks have not been updated with build information, make sure that you enter the build transaction before the sales transaction for correct reporting.
We hope now that after going through this writing, you should be successful in pursuit to fix negative inventory issues in the QuickBooks desktop. However, if the negative inventory issue still persists on your application, feel free to get in touch with XpertBooks Pro for more advanced solutions.
FAQ's
What are negative inventory issues in QuickBooks Desktop?
Negative inventory-related issues pop up in QuickBooks Desktop when the quantity of items sold or used in transactions overtakes the available quantity, resulting in a negative quantity on hand.
Can negative inventory issues affect financial reports in QuickBooks?
Yes! Negative inventory can severely affect the accuracy of financial reports. It can result in the distortion of the valuation of inventory and affect the Cost Of Goods Sold (COGS).
Can I use the "Adjust Quantity/Value on Hand" feature to fix negative inventory issues?
Yes! The 'Adjust Quantity/Value' on Hand feature can be used for adjusting the inventory quantities and values.
At the time of using the Statement writer, users might often face several issues. Today, we will be talking about the processes to fix the error with Statement writer. The causes of this error can be many, which include automatic Windows updates, sudden changes with QuickBooks, among other causes. Thus, if you are facing any kind of issue with statement writer, then today’s post will be of great help in fixing the issue.
Procedures to Fix the QuickBooks Statement Writer Issues When Opening File
There are a couple of solutions that the users can implement in order to get rid of the performance issues due to QuickBooks statement writer error (QSW).
Solution 1: Editing the QBDSK.INI file
This solution will fix the QuickBooks SDK invalid result error while creating a new report in QuickBooks statement writer.
This can be done by moving to the location of the file C:\ProgramData\Intuit\QuickBooks\QBDSK.INI
And then, right-click the QBDSK.INI file and tap on Open with, followed by choosing Notepad.
Now, add the following:
''[Log]
Level=verbose
UnlimitedSize=Y
[Parser]
DumpRequestData=Y
SdkAccelerator=N''
You need to save the changes by moving to the file and then save in Notepad.
Also, reboot the QuickBooks desktop and inspect if the QuickBooks statement writer error got resolved.
Solution 2: Reviewing the .log file
Examination of the log file can give you an idea of the cause of this error. To review the same, proceed as follows:
You need to navigate to the location of the file: C:\ProgramData\Intuit\Statement Writer.
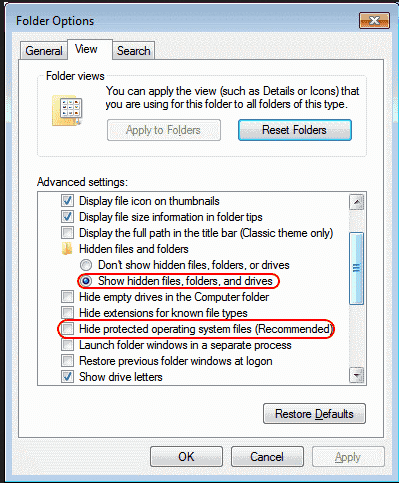
Also, note that you might need to display Hidden files and folders in the folder in case the folder is not appearing.
After that, open isw.YYYY.log. This file shows the user activity and errors that have occurred.
Now, check the cause behind the QuickBooks statement writer error.
The steps to run the QuickBooks Statement Writer Diagnostics are given as under:
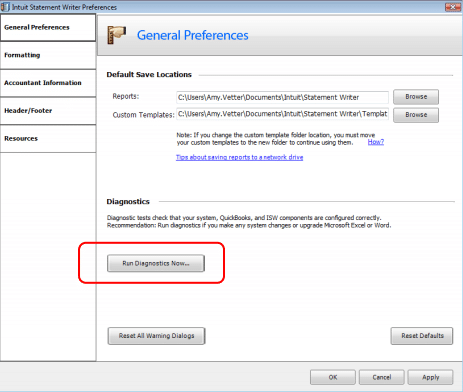
For this, select Preferences and Formats from the Statement Writer welcome page.
And then, choose Run Diagnostics now.
Also, follow the wizard to diagnose and fix the error listed.
Solution 4: Refreshing QSW’s access permission
The issue may also erupt due to limited access permission. In such a case, the user should refresh the access permission related to Quickbooks Statement Writer as follows:
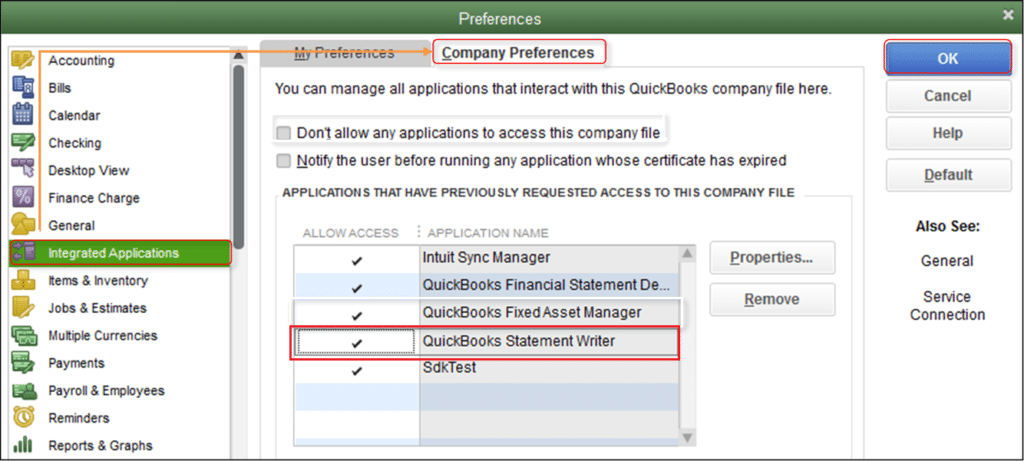
In this method, you need to select Preferences from the Edit menu.
And then, choose Integrated Application and move to the Company Preferences tab.
Also, select QuickBooks statement writer and opt for Remove.
The next step is to close then relaunch the QuickBooks.
The last step is to open the statement writer.
Solution 5: Choose a different alternative to access .QSM file
In case you are unable to open the QSW data file over a network, then you need to save the file locally.
And then, access the QSW file while using a different company file. In case the file opens, you need to try out some basic data damage fixation methods.
Solution 6: Ensuring the compatibility of M.S Excel
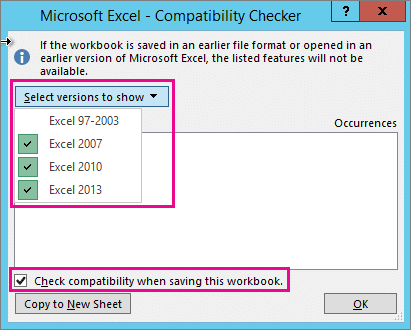
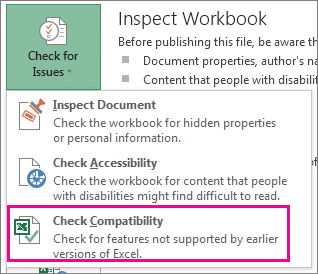
QuickBooks statement writer 2014 and later versions are compatible with Microsoft Excel 2007, 2010, and 2013.
Solution 7: Making changes in Windows settings
Specific alterations made to the Windows settings can help in rooting out this issue related to the QuickBooks statement writer. The same is explained as under:
You are supposed to change the regional settings in Windows.
And then, change user settings:
Enable the User account control
Also, ensure you are not running QuickBooks or Excel as an admin.
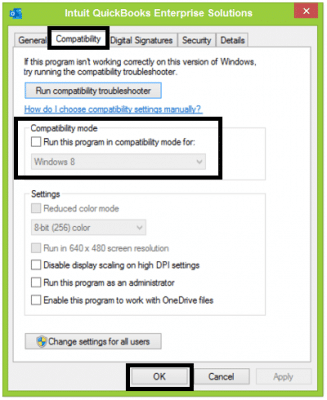
And then, right-click the Version of QuickBooks and or Excel you are using from the Programs menu and then choose Properties.
Also, go to the Compatibility tab and ensure no boxes are checked.
Solution 8: Updating your copy of QuickBooks desktop
This drives us towards the conclusion of this article, where our team of experts hopes that the methods framed herein should successfully fix the QuickBooks Statement Writer error. But if in case the error continues by any chance, then do waste another second. All you need to do is contact our accounting professionals. Reach out to XpertBooks Pro team, and let our accounting professionals handle the situation for you.
FAQs related to QuickBooks Statement Writer Error
What are some common performance issues when using QuickBooks Statement Writer?
Some common performance issues when using QuickBooks Statement Writer include slow system performance, QuickBooks crashing, and delays in generating statements.
Can performance issues in QuickBooks Statement Writer be caused by outdated software or drivers?
Yes! Outdated software or drivers can contribute to performance issues in Statement Writer.
Can the size of the data file impact the performance of QuickBooks Statement Writer?
Yes! The size of the data file can profoundly impact the performance of QuickBooks Statement Writer.
Can using third-party plugins or add-ons impact the performance of QuickBooks Statement Writer?
Yes! Third-party plugins or add-ons integrated with QuickBooks can potentially impact the performance of QuickBooks Statement Writer.
Is it recommended to work with a local copy of the QuickBooks company file to improve performance in QuickBooks Statement Writer?
Using a local copy of the QuickBooks company file can enhance the performance in some cases. This can especially help when accessing the file over a network or using remote access.
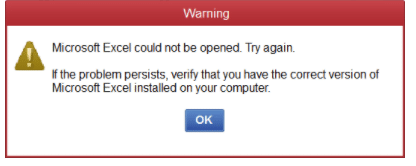
Have you been bothered by the impedance caused due to the QuickBooks crashes while exporting reports to Excel? No need to worry, as this article will cut the roots of this issue and bring your QuickBooks operations back on track while ensuring that the issue doesn't annoy you in the future. You might see the following error message on your Desktop screen:
A vast majority of small- to medium-sized enterprises have proven to benefit greatly from the usage of QuickBooks accounting software. It provides a variety of useful cloud-based services for its clients, making it simple to transport financial records. With the evolution of this software, fewer employees are needed to manage all the responsibilities that contribute to controlling corporate expenses. But everything in this world faces tough circumstances, and QuickBooks also begins to have issues when these times arrive.
What causes the QuickBooks crashes while exporting reports to excel?
Several causes may contribute to this QuickBooks desktop crashes issue. Some of the chief ones include the following:
The QuickBooks isn't supported and is unable to export data to Excel.
The File registry isn't functioning properly.
A QuickBooks Desktop that has only been partially updated may be to blame for the mistake.
Current version of QuickBooks that you are now using is outdated.
The inability to export data from QuickBooks to Excel may be due to faulty Microsoft Excel software.
Easy Ways to Resolve QuickBooks Crashing Issues While Exporting Reports to Excel
Let us now jump to the easy methods for uprooting the issue. Just implement each of the methods one after another and keep checking if the issue got fixed.
Method 1: Check the Compatibility of your Software with MS Excel
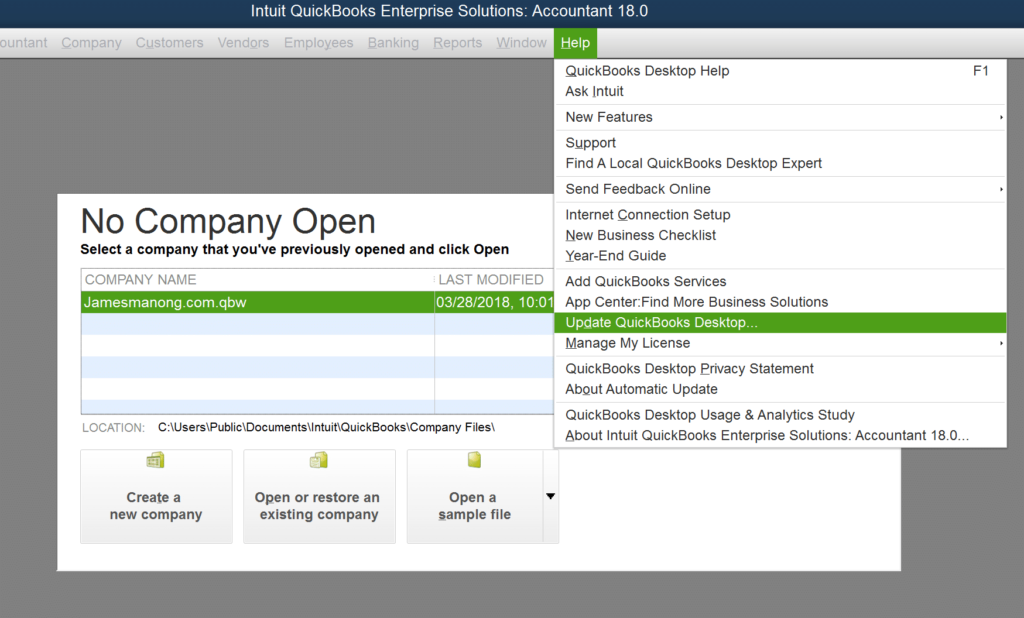
Upgrade your copy of QuickBooks Desktop to the most recent version. Follow these procedures to upgrade your QuickBooks Desktop:
First, sign in to your QuickBooks account with the proper credentials.
You should prefer to invest in the most recent QuickBooks release. For this, download it to your computer.
To prevent unwelcome technical difficulties, follow the setup instructions and remove the previous software version.
The creation of a sample employee may help in fixing the QuickBooks crash caused while exporting reports to Excel. To implement the process, follow the easy directions provided below:
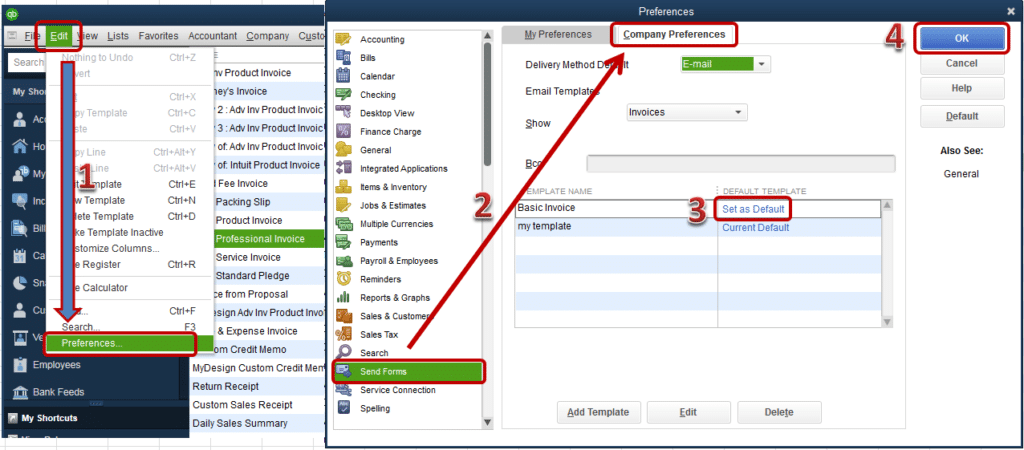
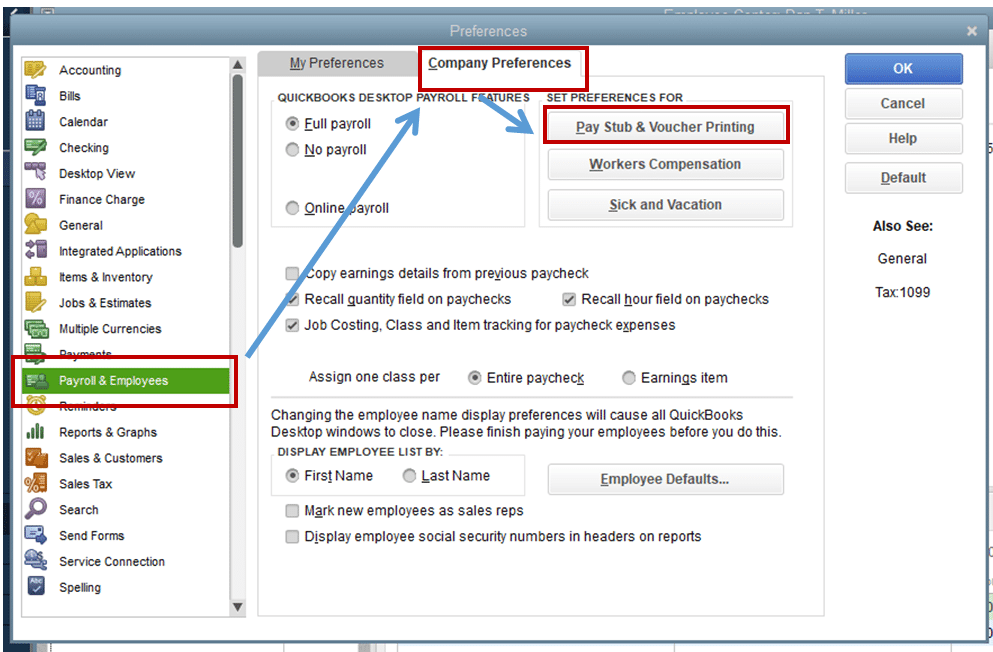
In the first step, you need to head for the Edit tab and then move to Preferences
Then, head for the Payroll and Employees option.
Choose the Company Preference tab.
Now, you have to opt for the Full Payroll option and create a sample of the Employee.
In the last step, you need to set up a new QuickBooks Online account.
Method 4: Relocate your company files to a different location
Changing the default location of the company files can assist in fixing the issue. All you need to do is to transfer your files to a different location and then access them from that location. Follow the lead:
Before starting this process, you must make an exit from the QuickBooks Desktop.
Then, copy the company files and paste them onto the Desktop.
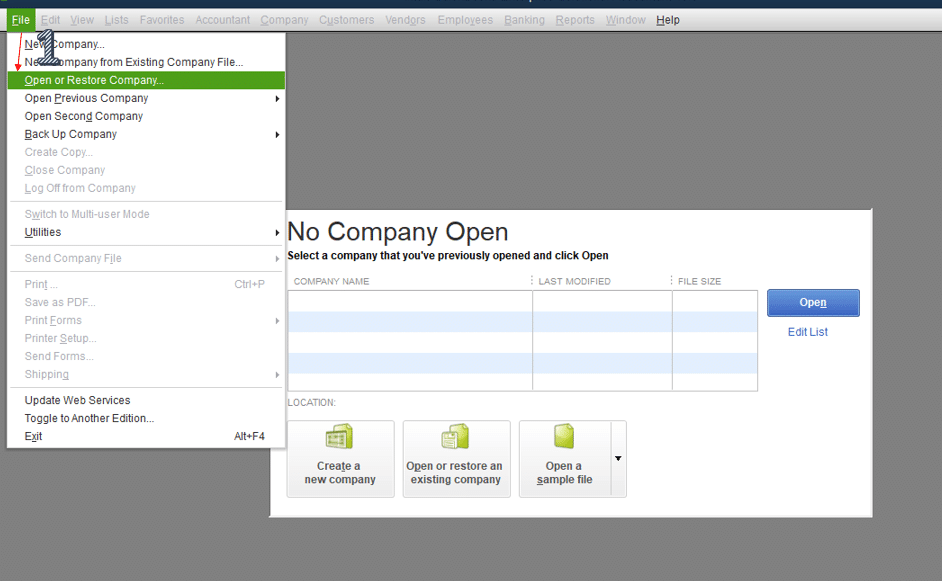
Reopen QuickBooks Desktop now, then opt for the File menu.
Finally, you must choose Open or Restore Company from the menu after saving the company file data.
Method 5: Include Intuit website in the list of trustworthy websites
If the methods listed above do not work in your favor, then it is advisable to add the official website of Intuit to the list of trustworthy websites. To do so, implement the walkthrough provided below:
To begin, launch QuickBooks and enter the login information.
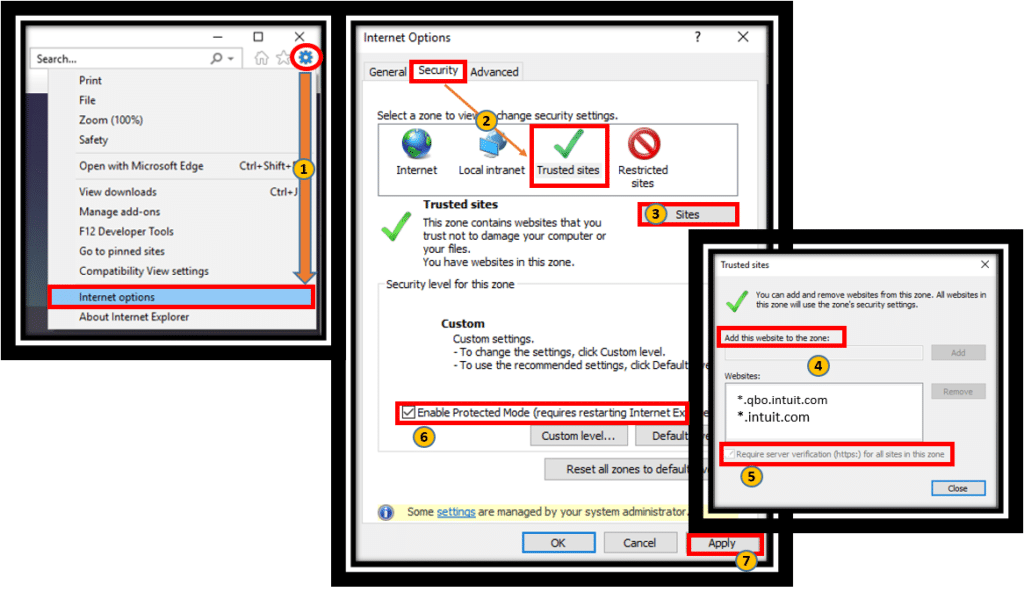
Next, move to Internet Options from the Settings menu by tapping on it and then choose the Security option.
Next, hit on the Trusted Sites option.
Next, uncheck the box next to Enable Protected Mode.
To continue, tap on Sites and enter 'https://.intuit.com' from the list of trustworthy sites.
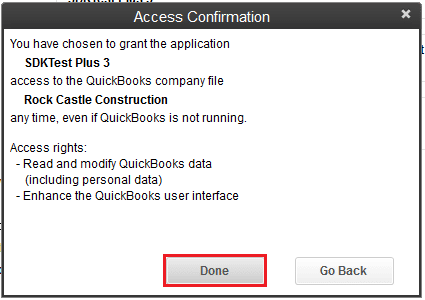
Finally, hit on Done to end the process and close the software.
The easy-to-follow methods mentioned in this article should have helped you in getting rid of the QuickBooks crashes while exporting reports to Excel error. You can even consider updating/reinstalling your Microsoft Office if the issue doesn't get sorted by implementing the methods listed above. However, if even that doesn't help, then contact our XpertBooks Pro team via our helpline i.e., 1.800.761.1787. Our professionals will make sure that the issue gets rooted out of your system.
FAQs
Are there alternative methods to export reports from QuickBooks if exporting to Excel continues to crash?
Yes! Some of these methods for exporting the report from QuickBooks include: 1: Exporting to CSV or TSV format 2: Next, printing or Saving as PDF 3: Using the authorized third-party Tools.
Can I export QuickBooks reports to other spreadsheet programs instead of Excel?
Yes! In addition to using Excel, QB allows users to go for exporting of reports to other spreadsheet programs.
Can third-party add-ons or integrations cause QuickBooks to crash while exporting reports to Excel?
Yes! Resorting to conflicting third-party add-ons can potentially culminate in the QB crashing issue when exporting reports to Excel.
Setting up QuickBooks workforce account for QuickBooks desktop might seem to be a tedious task to many users. QuickBooks workforce is basically a feature that permits the users to share paycheck details with the employees. The QuickBooks Workforce also allows an employer to invite their employees to View and Print their paychecks and W-2s from any system or smartphone browser over the internet.
With the workforce, the employees can access their paychecks, along with the timesheets, through TSheets. This also involves Skip printing and mailing stubs and forms to the employees. If you are in search of a comprehensive guide to set up QuickBooks workforce, then you have landed in the right place. In today’s article, we are going to help you with an easy process to set up QuickBooks workforce for QuickBooks desktop. So, keep reading!
Whereas, if you are having any related doubts regarding the QuickBooks workforce or for any further information, feel free to contact our XpertBooks Pro team. Our accounting consultants will provide you with the best possible accounting services.
What is QuickBooks Workforce?
QuickBooks Workforce is basically an online portal tool in QuickBooks that helps maintain a clear connection between you and your employees. It allows employees to allow their payroll-related details anytime (24/7) without depending on manual updates.
It works as a part of QuickBooks payroll services, where employees simply need to enter their login credentials to view, download and print pay stubs and W-2 forms easily. Along with that, they also receive email notifications whenever their pay stubs are ready, which makes the whole process more convenient and automated. On the employer’s side, once the QuickBooks Workforce is installed, you can easily manage employee payments like salaries, bonuses, and overtime directly through the payroll feature.
One important thing to keep in mind is that QuickBooks Workforce is compatible with Intuit QuickBooks 2009 and later versions. So, before setting it up, it is important to Set up QuickBooks Workforce in updated QuickBooks version to avoid any compatibility issues.
Requirements to Setting up QuickBooks Workforce Account
There are certain requirements for setting up QuickBooks workforce account, which include the following:
Steps to Set up QuickBooks Workforce in QuickBooks Desktop
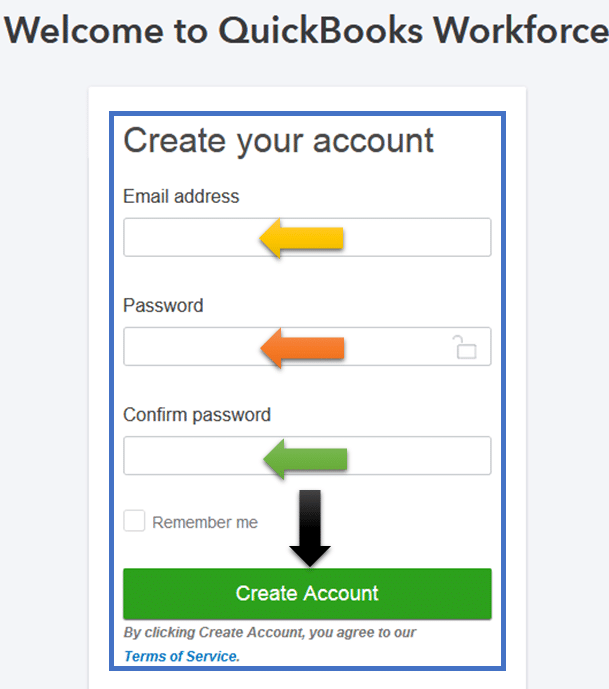
To set up your QuickBooks Workforce account, you simply need to use the invitation link sent by your employer. The setup process is quite simple and takes only a few steps to complete. Once your account is successfully set up, it allows payroll to be managed more smoothly in QuickBooks. Employees start receiving automatic notifications whenever their paychecks are generated, and they can easily log in to view their payroll details anytime without any hassle.
Following are the steps for setting up the QuickBooks Workforce:
Activating QuickBooks Workforce
QuickBooks users can easily access the Workforce feature after logging into their account, but it needs to be activated first before you start using it.
Before you begin, make sure you’re running the latest version of QuickBooks Desktop and that your payroll service is updated. If you’re using an outdated version, you or your employees may face issues while logging in or even encounter errors when accepting Workforce invitations. Once everything is up to date, you can move ahead with setting up Intuit Workforce in QuickBooks Desktop by following the required steps.
Use the QuickBooks desktop latest maintenance release and also the latest payroll updates.
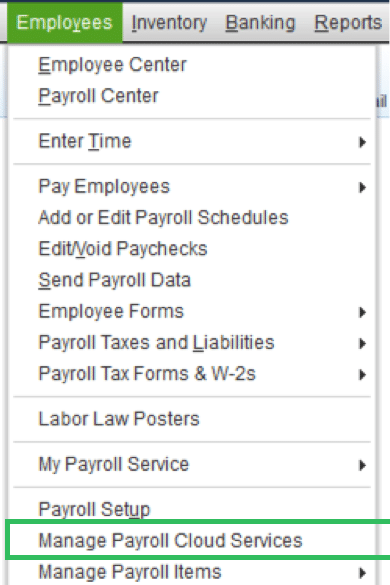
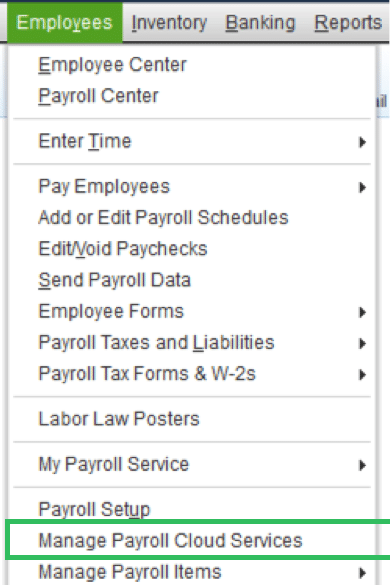
In QuickBooks desktop company, choose Employees option and then Manage payroll cloud services. In case you don’t see the Manage payroll cloud services tab, you need not have the latest QuickBooks desktop.
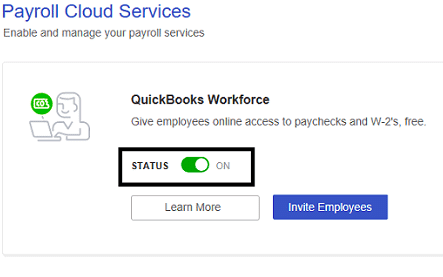
You are then required to toggle the status to ''ON'' status in the Payroll cloud services window under the QuickBooks workforce.
And then opt for the return to QuickBooks in the confirmation window.
When you runs payroll, it is important to Upload the paycheck info to Intuit when asked. It should be noted you need to upload the pay stubs. For uploading paycheck info after each payroll, you can carry the steps below:
In QuickBooks Desktop company file, you need to create paychecks as it is done normally.
Ensure to click on Send to Intuit on the confirmation and then next steps screen.
Now on Send/receive data window, hit a click on Send.
When asked, enter the Payroll service PIN.
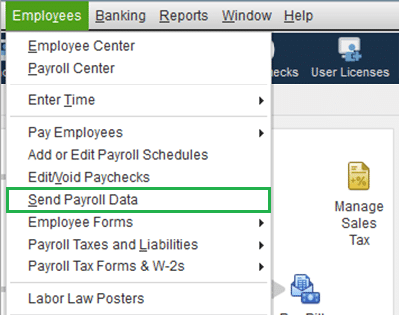
The point to be noted here is that, if you ever forget to choose to Send to Intuit after creating paychecks, you can always visit the Employees and then choose to Send payroll data.
In case this is your first time setting up the QuickBooks workforce, then you will have to upload Historical paychecks, for the employees to view their Pay Stubs issues prior to setting up the workforce.
Upload Historical Pay Data
If you are a first-time user and want your employees to access their payment details through QuickBooks Workforce, you may need to upload their historical payroll data. This step is optional and only required if Workforce is not already set up or if past payroll information hasn’t been shared earlier. Uploading historical paychecks is quite simple and can be done by following the instructions provided by Intuit on their official platform. Once the data is uploaded, employees will be able to view their previous pay stubs and payroll history directly from their Workforce account.
Upload and send your payroll data to Intuit, and make sure to select the correct date range for the data you want to share.
Before uploading and for future pay stubs, select current calendar year payroll data using your QuickBooks PIN. This ensures that the data gets properly linked to your employees info in Workforce.
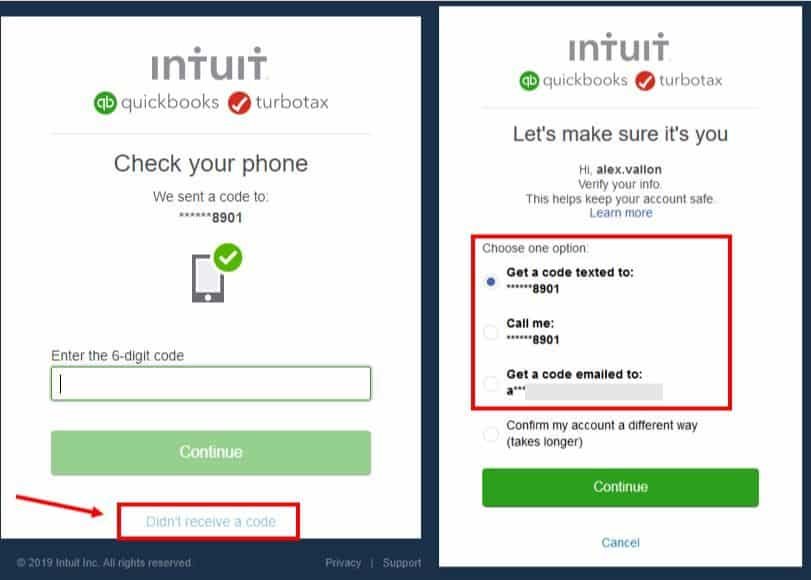
Confirming your account information via a code
If asked to confirm the account information with a code, the below steps should be followed:
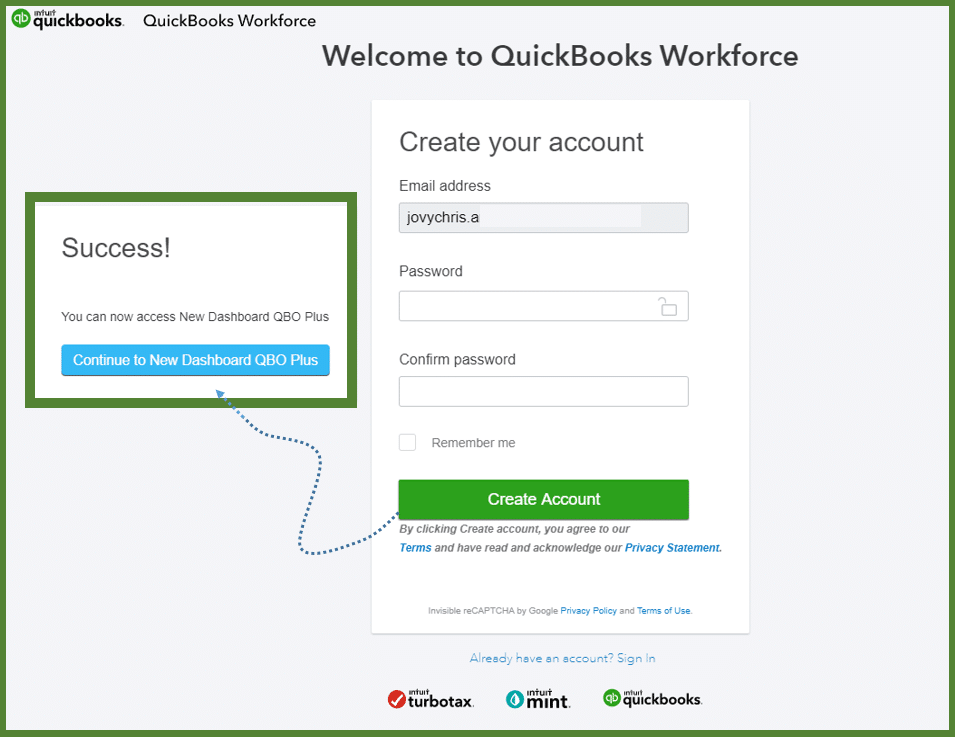
When you sign in to QuickBooks Workforce using the Intuit account login, you might be asked to confirm the account information with the help of a confirmation code.
Choose How you would like to receive the code?
And then select Continue, and the code will be sent to you.
If you are not having access to the email listed, then you need to select the Confirm my account a different way for updating email.
Also do not leave the screen before entering the confirmation code. You need to open another window if needed.
After that Retrieve the confirmation code. This might take some time, and the code might arrive in the mailbox after a couple of minutes. You might also be required to check the Bulk/junk/spam mail folder to see if the code went there.
And then, Enter the code and hit Continue.
If you did not receive any code, then choose the Didn’t receive a code option.
After you have been verified, you will be automatically signed in to the QuickBooks workforce.
Set up Intuit Workforce in QuickBooks Online Payroll
Before the date of October 31, 2019, Intuit online payroll used the paycheck record feature for sending paychecks to the employees. But now, the QuickBooks workforce is used for this purpose. The steps below can be used to set up workforce for QuickBooks online payroll.
Access Intuit online payroll and then visit the Employees option to select the Employee’s name.
And then, opt for the Employees site access section and then choose the Edit menu.
Next step is to enter the Employee’s email ID registered with QuickBooks workforce in the online pay stubs access window.
Followed by check-marking the box stated access their pay stubs online and then send the Email.
Lastly, the employees can View the paycheck and W-2s after the email is received.
Now that you know the process to set up workforce in QuickBooks, it is time to invite employees. The steps involved in this process are as follows:
Step 1: Logging in to Intuit account in QuickBooks
If you have already logged in to the Intuit account in QuickBooks, then directly jump on to the next step.
It should be noted that the Intuit account login is different from that of the company file login. The steps involved in here are:
Opt for My company option after heading to the Company menu.
And then select the Sign in on the top right corner.
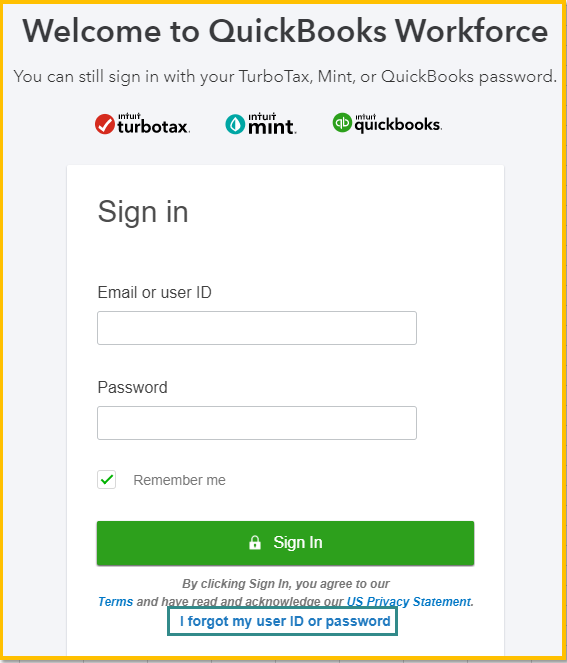
Now log in using the Intuit ID and password.
Facing issues while signing in?
Having issues in signing in? You can choose the I forgot my user ID or password.
Entering incorrect password or user ID.
Some technical glitches can also prevent you from signing into QuickBooks.
You can choose the I forgot my user ID or password.
Step 2: Sending an invite
For this, select the Manage payroll cloud services from the Employee’s menu. Also, note that if you do not see Manage payroll cloud services, you need to Update QuickBooks.
Now under QuickBooks workforce, you need to toggle the status to ON and then choose Invite employees.
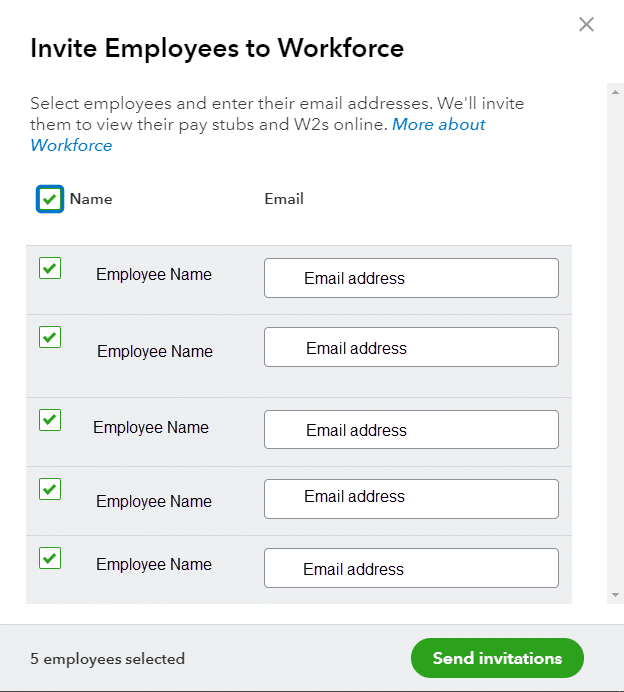
After that the Employees list will appear on the screen. And you are then required to select the Employees to give access and then Add the email addresses. The point to be noted here is that if the Invite page doesn’t load, then you need to ensure to Turn on ActiveX controls in Internet Explorer.
And lastly, choose the Send invite. After you have sent it, you should see “Invited” under the STATUS column.
Removing Employee access
When you can’t remove an employee’s access to your own paychecks, you can turn off the QuickBooks workforce’s access to the QuickBooks payroll. This is not recommended, as it can affect the employees. But if you still want to do that, then carry out the steps below:
Select Manage payroll cloud services from the Employees menu.
Under QuickBooks workforce, toggle the status to OFF and then hit Save.
Conditions and Solutions regarding the process to Set up Workforce for QuickBooks
In case you haven’t given paycheck access to the employees before, then here is further information that you might find helpful.
In case you remove or change an employee’s email
After the employee accepts the invite and logs in to the QuickBooks Workforce, then changing their email in QuickBooks desktop payroll will not affect the account or access.
If you deleted a Negative paycheck
A negative check might display as a negative net amount, which would result in a net zero payroll.
Also, deleted or voided checks get removed from the workforce.
In case you opt for disk delivery
Under such a circumstance, the QuickBooks workforce is not available for disk delivery. You need to sign up to payroll for QuickBooks desktop to let the employees access their paychecks and W-2s online.
Summing Up!
We have tried to sum up all possible information related to the process to set up workforce for QuickBooks desktop. And we hope this information might help you in some or the other way. If not, then need not worry, as we are there to help you. Our accounting consultants can help identify the root causes and guide you through the appropriate troubleshooting process.
FAQs
What is the function of QuickBooks Workforce?
Workforce connects an online portal for QuickBooks Desktop and Online Payroll. It's function is to let users get access to their payroll info and also review the same.
Is there any app for QuickBooks Workforce?
Yes! QuickBooks Workforce has an application which has been made available on Android and iOS platforms.
What is the pricing of QuickBooks Workforce?
There is no cost for setting up QuickBooks Workforce.
Any security related issue in QuickBooks Workforce?