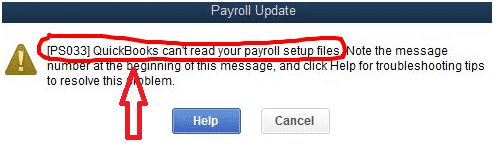
Downloading QuickBooks Payroll Update and suddenly interrupted by QuickBooks payroll error PS033? Well, this error usually emerges with a warning message on the screen stating: [PS033] QuickBooks can’t read your payroll setup files. This error is encountered in case the CPS folder gets damaged file. You should note the error message at the beginning of this message, and click help for troubleshooting tips to resolve this problem. This particular error can further be experienced when QuickBooks failed to read the setup files while you try opening the company file. A bunch of reasons can land you into such an error. To find out what those reasons are, along with what measures you can take to get rid of this issue, make sure you stick around this piece of writing.
What is QuickBooks Payroll Update Error PS033?
QuickBooks Payroll update error PS033 usually appears when QuickBooks is unable to read or verify your payroll setup files. This error directly affects your payroll updates and in some cases, this error can even prevent you from accessing the company file or downloading the latest payroll tax tables. You may also face this issue while opening the company file or when you don’t have the required permissions to access it. There can be multiple reasons behind the occurrence of this error, which we will be discussing further in this section. You might see the following error message in your desktop screen:
“QuickBooks cannot read your payroll setup files [Error PS033].”
What can drag you into QuickBooks update error PS033?
Getting into QuickBooks error PS033 is a result of a bunch of factors. These factors include:
If the version of QuickBooks being used is outdated.
If the UAC settings aren’t configured properly.
Company file issues or damaged data.
Damaged INI QuickBooks desktop file can also lead to this error.
If the QuickBooks CPS folder is damaged or corrupted.
In case there are conflicting programs running in the background.
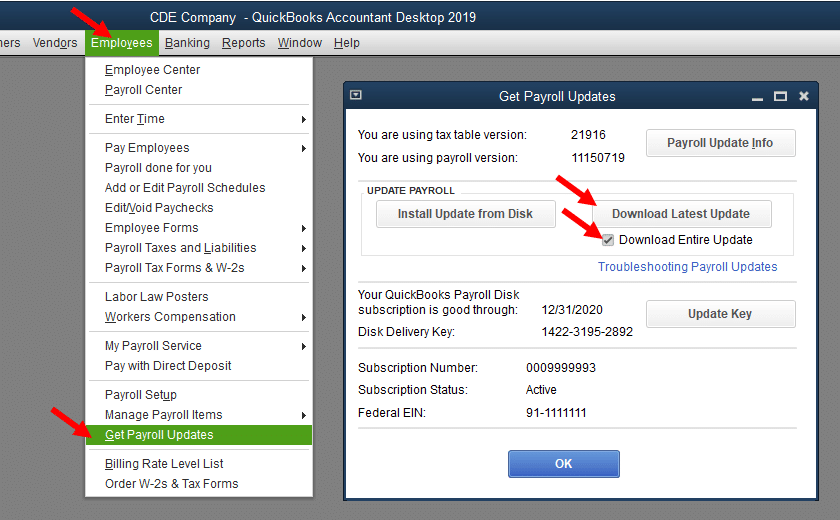
Open the QuickBooks program and move to Employees tab.
Click on Get Payroll Updates.
Make sure to Download the entire payroll update.
Finally click on the Update option.
Fix 2: Rename the QuickBooks CPS folder
QuickBooks CPS folder contains essential installation files. There can be scenarios when these files get corrupted. In such a case, you need to rename the folder. The steps to do that are:
Close QuickBooks and locate the given folder location– C:\Program Files\Intuit\QuickBooks 20XX\Components\Payroll\CPS
XX are in the above step is for reference to the yearly edition such as 2022, 2023, 2024 or previous versions.
Open the CPS folder using the above location.
Next step is to right click on CPS folder and select rename it to CPGYF.
Now click on enter to save changes.
Once the steps done, check whether the error is solved or not.
Fix 3: Disable User Account Control (UAC) settings
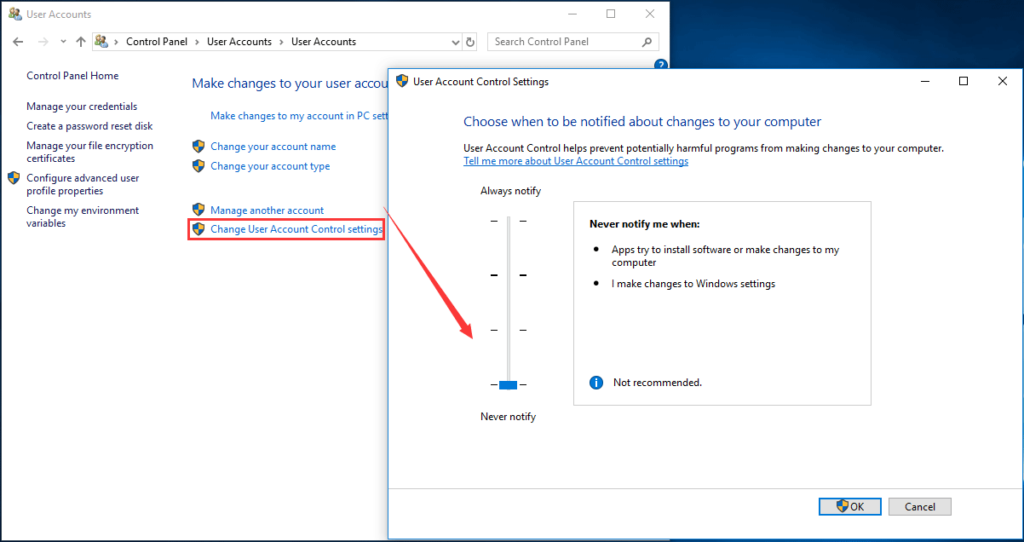
Under this method, press the Start tab and choose Control panel.
Select the User accounts option.
Locate the User accounts and hit a click on OK to open it.
Next step is to click on Change user account control settings tab and also click on Yes if prompted by UAC.
Turn the slider next to Never notify option.
Also click on OK tab. This will disable the UAC.
If the problem is solved after the above steps, then reactivate the UAC by toggling the switch to Always Notify and click on OK.
Now reboot the system and try to download the updates again.
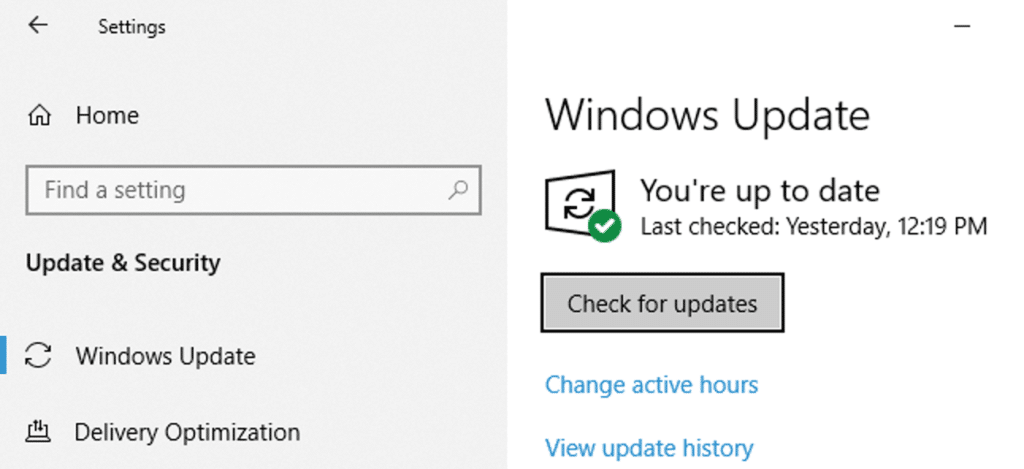
Under this methods, you need to press the Start button.
After that type Update Windows on search bar.
Then click on Check for updates.
This process will take some time and check the available updates.
Mark the updates then download them.
Once done, restart the system and let these updates get installed.
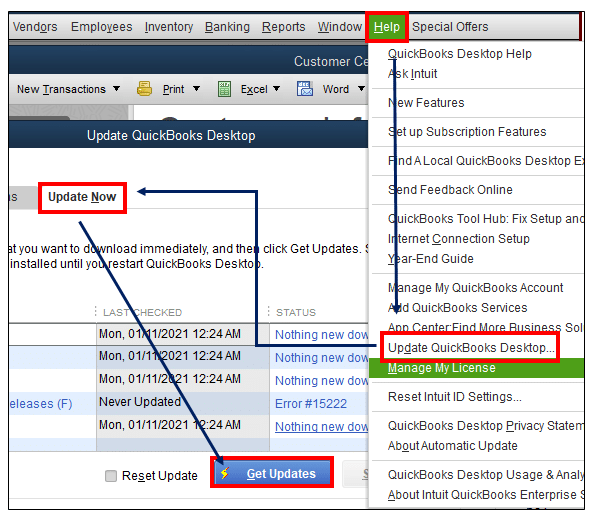
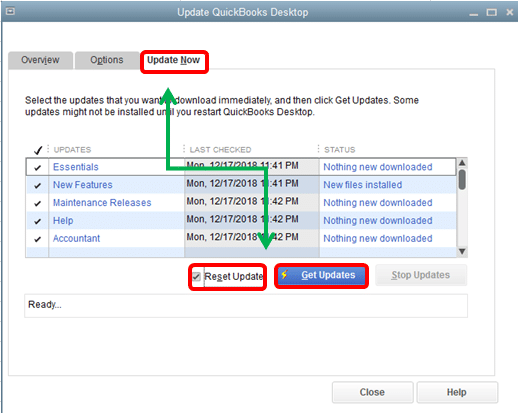
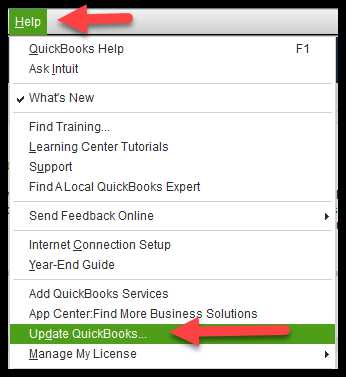
Fix 7: Update QuickBooks Desktop
Updating QuickBooks works in majority of cases and the QuickBooks payroll update error PS033 is usually seen due to outdated QuickBooks software. The steps to update QB are as follows:
Close all company files and search for QB icon and right click on the same.
By far we believe that you might have understood what it takes to eliminate QuickBooks payroll update error PS033. However, if you fail to do so, or if you are stuck at some point in time, then feel free to connect with XpertBooks Pro and all your queries will be addressed immediately. Our accounting professionals will ensure that your issues are fixed and you are successfully able to update payroll.
Trying to export reports to Excel but Excel failed to open the QuickBooks data file? No worries, we got you covered. At times, when the software is unable to spot the installed Excel, then "QuickBooks Excel could not open the data file" issue occurs. This particular glitch usually shows up when you try to export the data to Excel or at the time of upgrade. In scenarios where you are unable to update or upgrade your QuickBooks software successfully, you might end up in this error. Or if the updated version of QuickBooks isn’t compatible with your existing Microsoft Excel or vice versa.
To help you with this error where QuickBooks Excel could not open the data file, here we are with this write-up, sharing the entire details related to this issue. To learn further about this error, make sure to scroll through it carefully.
What is QuickBooks excel could not open the data file error and why it occurs?
QuickBooks Excel could Not open the data file issue is related to opening of QuickBooks data file (.qbw). This file may show a mismatch in excel or may be damaged due to which this error shows up.
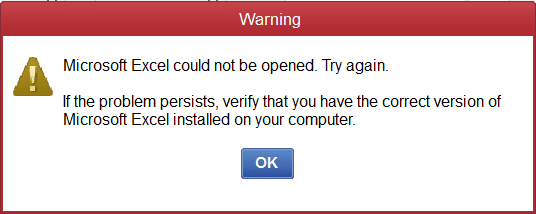
The error message typically reads “Microsoft Excel could not be opened. Try again” or “The file you are trying to open is a type of file that is blocked by your registry policy setting.”
What led to QuickBooks Excel could not open the data file issue?
Not many, but a few reasons are there causing QuickBooks Excel could not open the data file issue. These reasons include:
A common reason can be Microsoft Excel being damaged.
Or if the file registry isn’t working properly.
Another possible reason can be when QuickBooks gets damaged or corrupted.
QuickBooks Desktop might be corrupted. Also, the last installation of the program was incomplete.
Insufficient space on the Mac system may also lead to this snag.
Effective Methods to Eliminate QuickBooks Excel Could Not Open the Data File Issue
Now that you know the reasons behind the occurrence of such an error, here are some quick fixes to QuickBooks Excel that couldn’t open the data file error. Let us explore each of the methods one by one:
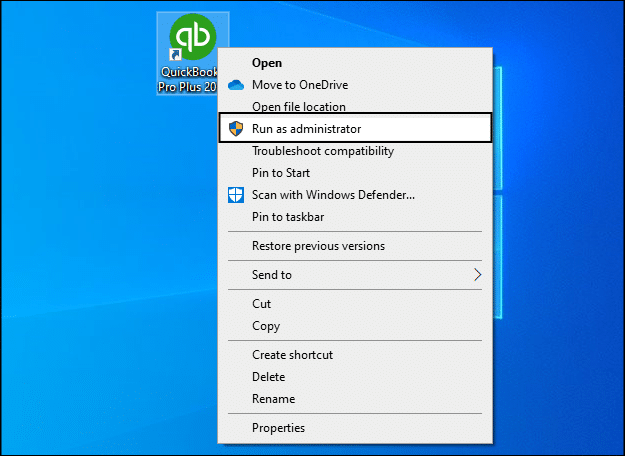
Solution 1: Run QuickBooks as admin
At first, hit a right-click on QuickBooks.exe file on your desktop,
After that select Run as Administrator option.
Next step is to select Reports menu and further try to open a list of report.
Furthermore, you need to choose Excel and confirm that all the export functions are available including Excel.
Towards the end, you need to check if the issue is resolved or not.
Solution 2: Verify system requirements and compatibility
Step 1: Check System requirements first
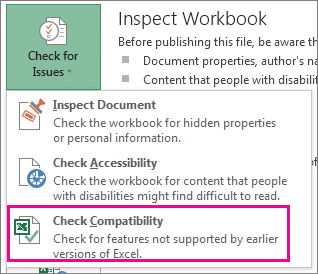
If you have upgraded or trying to upgrade QuickBooks, then it is essential that you keep an eye on the system requirements. Every particular QuickBooks software needs a particular Microsoft Excel version to work smoothly. And if you aren’t meeting the set requirements, then all you need is to either upgrade your QuickBooks or Microsoft Excel.
Step 2: Verify whether the software are compatible with each other
One of the biggest reasons behind the occurrence of this issue can be the compatibility between Microsoft Excel and QuickBooks. Thus, you simply have to perform the below steps:
You need to first, login to the QuickBooks software using appropriate credentials such as Username and password.
Once done with that, Download the latest version on your system.
After you are done with the setup, check whether it is working with the Microsoft version now or not.
You need to check the Windows UAC setting. In case anything restricts the export feature, then reset the feature itself. You can do this by performing the steps below:
You need to first press Windows Start tab.
After that, enter User account control settings in the Search bar.
The next step is to open the same.
And then, you need to drag your mouse to Never notify option.
The last step here is to click on OK and try rebooting the system.
Solution 6: Clean Install QuickBooks
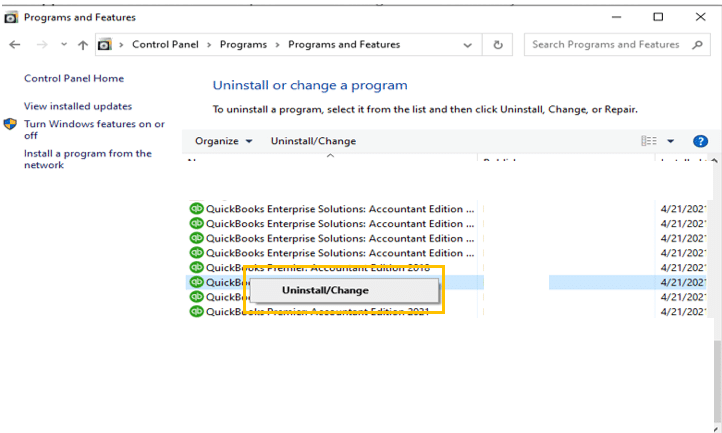
First, open the Control Panel.
Then, proceed to Programs and Features.
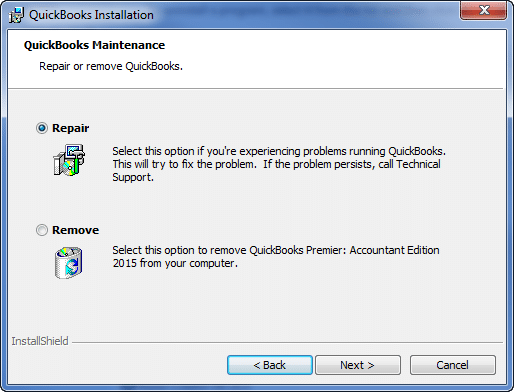
In the next step, you need to pick the QuickBooks option and select Uninstall/Change.
Still can’t get over with QuickBooks Excel could not open the data file error? Well, XpertBooks Pro is just a call away. You can simply get in touch with our independent accounting professionals, and let them assist you with your queries. We understand what it takes to eliminate all sorts of errors in QuickBooks.
FAQ's
How to Fix errors and unexpected results when importing?
To fix errors and unexpected results when importing, you can try the following steps: 1. Check the syntax of your import statement 2. Verify that the module or package you are trying to import exists 3. Make sure you are importing the correct version of the module or package. 4. Also, check for conflicts with other modules or packages that may be causing the issue 5. Lastly, try to restart your IDE or interpreter.
How to fix Excel cannot open data file error?
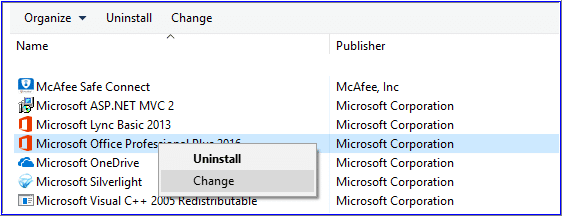
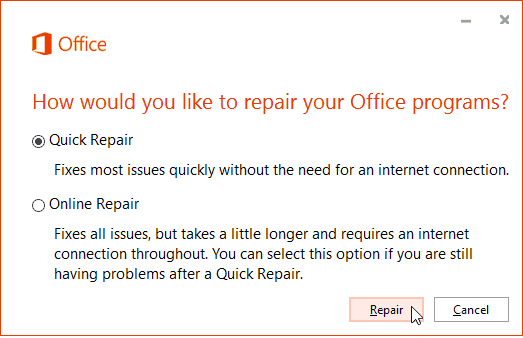
To fix the "Excel cannot open data file" error, you can try the following steps: 1. Rename the file with a different file extension, such as .xlsx, .xls, or .csv, and try opening it again. 2. Try repairing Microsoft Office or reinstalling it.
Why do I get technical errors when exporting to excel?
There could be various reasons for technical errors when exporting to Excel, including incompatible file formats, data formatting issues etc.
Did you stumble upon IIF Import Error in QuickBooks Desktop? Well, this is definitely not the most common error that you might come across when working QuickBooks. Talking about IIF, it basically stands for Intuit Interchange format that are files encoded in ASCII text format also termed as CSV files. To understand it simply, IIF files are used in QuickBooks desktop for importing or exporting the transaction list across different platforms. As such, transferring the transactions becomes much easier and systemized. And further helps users with a data import summary. As creating these files from scratch involves a lot of technicalities, due to which one might bump into some sort errors when using QuickBooks.
We have curated this segment to help you with the right way to import IIF files and avoid QuickBooks desktop IIF Import errors. To understand it better, stick around this piece of writing.
A brief info about the IIF Import kit
IIF files lets QuickBooks import list data and transactions. The Intuit Interchange Format (IIF) Import kit is an easy way to import bulk data in QuickBooks Desktop. This tool allows users to import their data easily and fast. Users can download and install the IIF Import tool from the official Intuit website.
The IIF Kit constitutes the following:
IIF Import Manual: It discusses some of the common .iif issues and methods for rectification
IIF Example Files: It is a folder that contains some samples of .iif transactions that are determined to across versions
IIF Header Help: The column headings are used for importing the list data in QuickBooks Desktop
Steps to Fix IIF Import Error in QuickBooks Desktop
IIFs generally works for exporting and importing QuickBooks desktop data to other applications or to various other versions of the same software. You can create IIF files to transfer data like bank transactions, accountant’s changes, general journal entries, customer and vendor lists, and both transactions. To fix QuickBooks desktop IIF import errors, this process has some DIY steps:
To start off with Sign in as admin into the company file.
Furthermore, head to opening the File menu.
And also choose Switch to single-user mode.
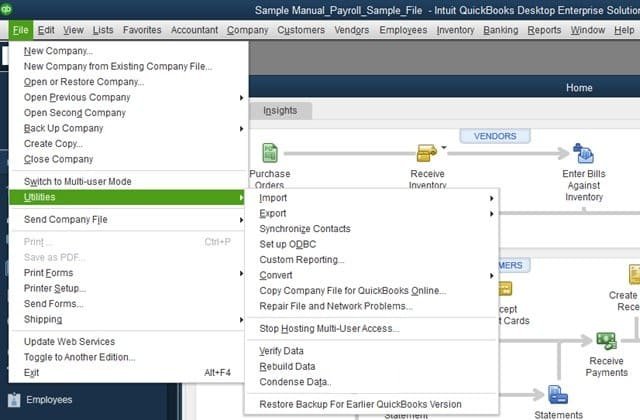
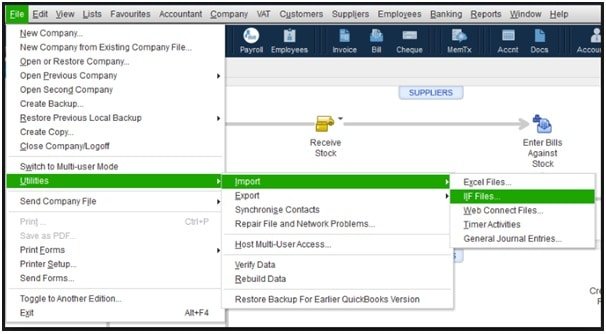
Followed by head to the File menu and further go for Utilities.
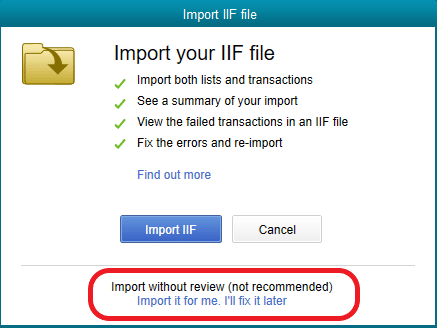
You now have to select the Import option and then go for Import IIF files.
Now, look for the Import IIF file and click on the same.
After selecting it, click on Import it for me. I’ll fix it later option.
The next step is to click on Open tab and also hit OK to confirm that your data was imported successfully.
Fix QuickBooks 2019 IIF File Import Error
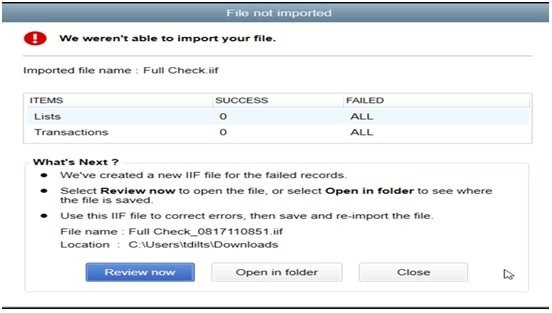
If you come across QuickBooks 2019 IIF file Import issue, then here is how you can fix and review it. It is also termed as file not imported error.
In case the file not imported error shows up on the screen, you first need to choose Review now.
Head to the Issue and explore for the error core reason.
Now fix the issue and save the file.
You now have to close the file not imported window.
And then, import the new fixed QuickBooks 2019 IIF.
Changing the IIF file extension to fix IIF Import Error in QuickBooks Desktop
You need to create a copy of the IIF file and further right click on the same.
The next step is to Rename it and change the extension to XLSX.
Followed by double clicking on it to open it on Excel.
Now, head to where you have faced IIF Line error in QuickBooks.
And find out if the issue persists.
Read this also: How to Use Alternate Vendors In QuickBooks Enterprise Solutions?
Changing Extension of Journal Entries to fix IIF import issue
Usually the journal entries are imported to the company file from the previous software with a QBJ extension. You need to perform the steps below to import journal entries with modified extension, to avoid IIF import issue in QuickBooks.
To start with, head to the File menu.
And further, select Utilities tab.
The next step is to choose General journal entries and also click on Import.
The user will then have to select the .QBJ file that has been downloaded and saved on the system.
Furthermore, click on Add GJE’s.
And also, after the general journal entries summary window shows up, go for the OK tab.
You can further edit the failed items in the list by performing the steps below:
You need to right click the Export file and also choose Open with.
The next step is to choose Microsoft Office Excel.
And then, select Yes tab, if you see incompatible features message.
You are then required to select Save and modify Incorrect data from the file menu.
And lastly, close excel and if it asks to save again, click on NO tab.
Fixing QuickBooks IIF Import Error using Import Tool
You can simply try out the following steps, if the error still persists:
Choose Lists and then click on the Item list.
Double tap the item that you want to Update.
The item will show up where you simply need to modify the account to either dummy or another account.
The next step is to Update an existing transaction and further click on Yes tab.
After that, open the Item again and further modify account to the correct one.
The last step is to click on Yes to update all the existing transaction.
Heading towards the end of this segment, we believe that one might be able to successfully fix IIF Import Error in QuickBooks Desktop. Just in case you still have some queries unanswered, then all you need is to contact our XpertBooks Pro team, and they will address all your issues immediately. We have a team of techies who understand what it takes to fix all sorts of issues in QuickBooks.
FAQ'S
When you import IIF files it doesn't link transactions?
When you import IIF files into QuickBooks, it should create new transactions or update existing ones in the correct areas of the software.
Can an IIF File be imported into QBO?
Yes, IIF (Intuit Interchange Format) files can be imported into QuickBooks Online (QBO) using a third-party conversion tool.
How do I import an IIF File into Excel?
To import an IIF (Intuit Interchange Format) file into Excel, you can follow these steps: 1. Open Microsoft Excel on your computer and click on the Data. 2. Select Get External Data from drop-down menu, then select From Text. 3. Go to the location where your IIF file is saved and select it. 4. In Import Wizard window, select Delimited as the file type and click Next. 5. Select delimiter that separates the data in your IIF file, which is usually a comma or a tab, and click Next. 6. In Data Preview window, you can review your data and make any important changes. 7. Lastly, click on Finish.
What are Common IIF Import Errors in QuickBooks?
Here are some of the most common IIF import errors in QuickBooks: "Duplicate Name Exists", "Invalid Account Type", "Invalid Date", "Transaction Amounts Are Out of Balance", "Unable to Determine the Account Type for This Transaction"
To avoid these errors, it's important to review and validate the IIF file before importing it into QuickBooks
QuickBooks unable to sync license? Well, this is a serious issue that you might come across when trying to sync the license data with QuickBooks. Also, this error widely encountered by users who upgraded from QuickBooks 2017 to QuickBooks 2020.This error shows up on the screen stating:
There was an issue in syncing your QuickBooks data with Intuit. Please try again later.
At times, this error might abruptly appear on the screen stating:
QuickBooks unable to sync license.
Well, don’t worry, it is definitely fixable and we will help you do that. This error basically indicates that the system is unable to connect to the license server. We have curated this segment with the intent to help you fix QuickBooks unable to sync license issues. To understand this error in a better way, let us scroll through this segment carefully.
Possible reasons causing QuickBooks unable to sync license issues
You can come across this issue due to the following reasons:
If your recent QuickBooks upgrade isn’t compatible with your current Windows configuration.
Furthermore, you can expect this issue if the company file gets damaged and ends up in an incomplete update.
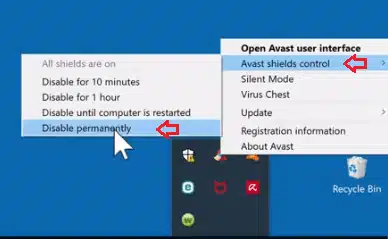
Also, if the antivirus is causing some sort of issue.
Or in case there are mismatched files or corrupted program files.
You can also come across this issue due to network issues and connectivity errors.
Some common symptoms that come along with the Sync License Issue
Error messages when trying to sync data, such as “Sync License Error” or “License Expired.”
It is important to address QuickBooks sync license issues promptly to avoid problems in financial reporting and potential legal and financial risks. Resolving sync license issues may require updating licenses, reinstalling software, or contacting technical support for assistance.
Solution 7: Configure Internet Explorer Preferences
You need to first Reset Internet explorer preferences.
Furthermore, launch the internet explorer.
The next step is to head to the Tools menu.
And then, select the Internet options.
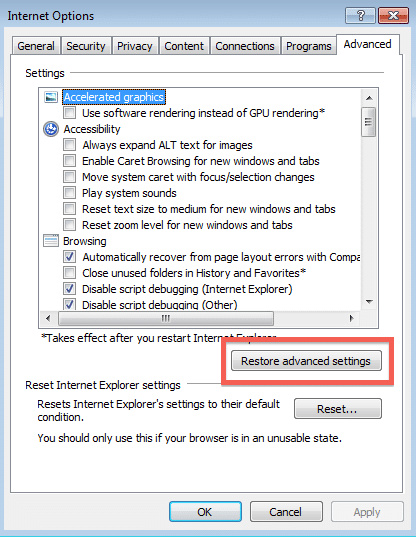
You now have to head to the Advanced tab.
The user will then have to choose Restore advanced settings.
And furthermore, reset Internet Explorer settings and click on the Reset option.
You now have to reset the Internet Explorer settings window.
After that, click on the Reset tab.
And also, click on the Done and close tabs respectively.
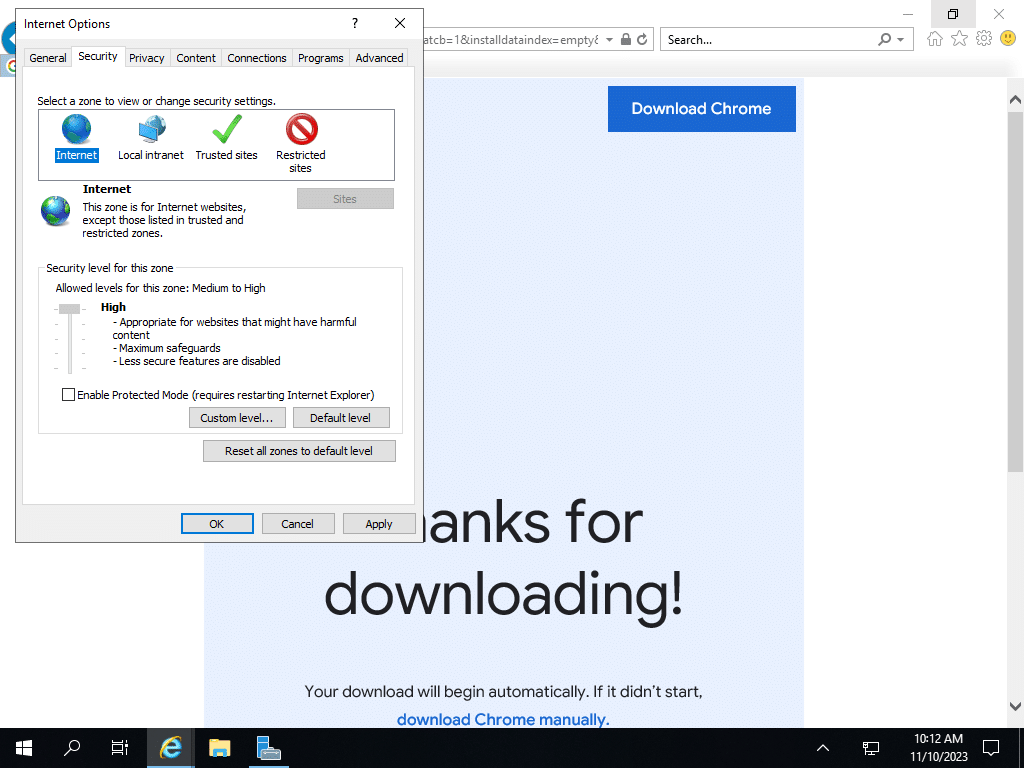
You are then required to head to the Security tab.
And also click on the Internet icon.
Moving ahead, you need to click on the button Custom level.
Followed by selecting the Medium-high default option.
And then, click on the OK tab to save the changes.
The last step here is to click on the Apply tab and also click on the OK tab.
Summing Up!
Most probably, you will be able to get rid of this QuickBooks Unable to Sync License issue, after performing the steps we have elaborated in this segment. However, if you failed to do so, then contacting our XpertBooks Pro team is something we suggest. You can take assistance from our accounting consultants and get answers to all your queries immediately.
Frequently Asked Questions:
Why is QuickBooks Sync manager not working?
There could be several reasons why QuickBooks Sync Manager is not working, including: Outdated version, Connectivity issues, Firewall blocking Sync Manager, etc.
Why is QuickBooks not connecting to my company file?
There could be several reasons why QuickBooks is not connecting to your company file, including: Incorrect file location, Damaged or corrupt company file, File is already open etc.
When do I get an error when syncing license data?
If you are getting an error when syncing license data in QuickBooks, it could be due to several reasons: 1. Firewall or antivirus blocking QuickBooks 2. QuickBooks version is outdated 3. Damaged or corrupt license data file 4. User account issues
Just upgraded to Windows 11, but now QuickBooks isn’t opening. Well, often after upgrades such technical issues are experienced, just due to the fact that both the software might not be compatible with each other. You might see an error message in some cases that states: QuickBooks needs a subscription, which might indicate that this is an unsupported version of QuickBooks desktop. QuickBooks not opening after Windows 11 update or QuickBooks crashes on Windows 11 can be a bit annoying for the users. So, to make sure that this error isn’t dragged much, we are here with this segment sharing the complete information related to this issue, along with the causes and fixes for the same. Let’s dive in deep to get a better insight.
Quick Reasons Behind QuickBooks Not Opening After Windows 11 Update
A bunch of factors can drag you into such an error. Let us understand them in a better way:
In case the company name is a bit too large than the said limit.
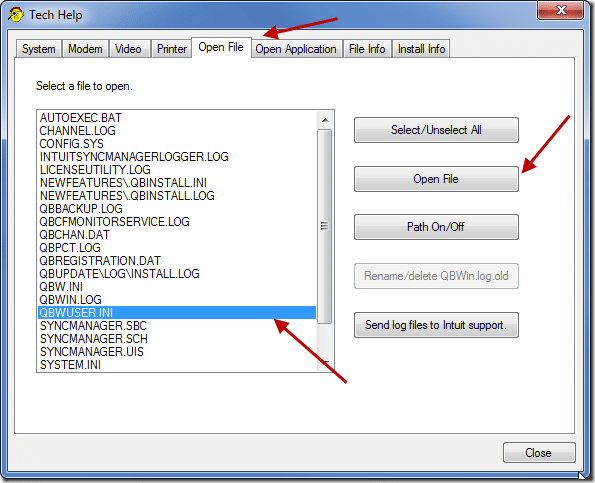
The recent update of the Windows O/S may have damaged the QBWUSER.INI file.
Another reason can be damaged software installation.
And after you are done with that, start QuickBooks and open the data file.
Check if the issue still continues.
Fix 5: Create a new user account to manage QuickBooks
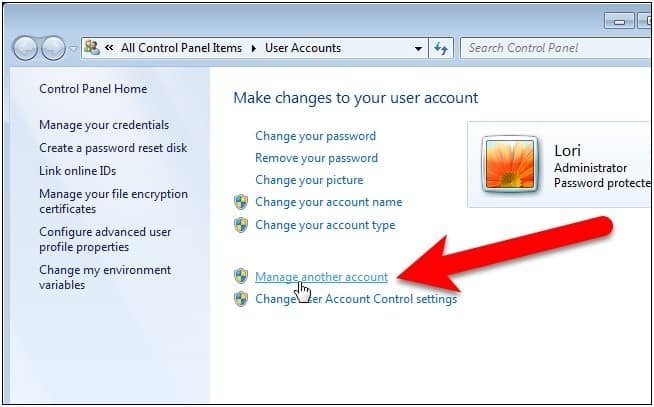
Try to open Control panel and then select User accounts from there.
Click on Manage another account.
This will take you to the Manage accounts section.
Followed by, adding a new user to the local PC and you simply need to click on the Add a new user in PC settings.
This will further direct you to the window where you can simply Add a new user to the local system.
The next step is to try running QuickBooks in the windows admin user.
And also, check if the issue is fixed or not.
Fix 6: Update QuickBooks to latest version
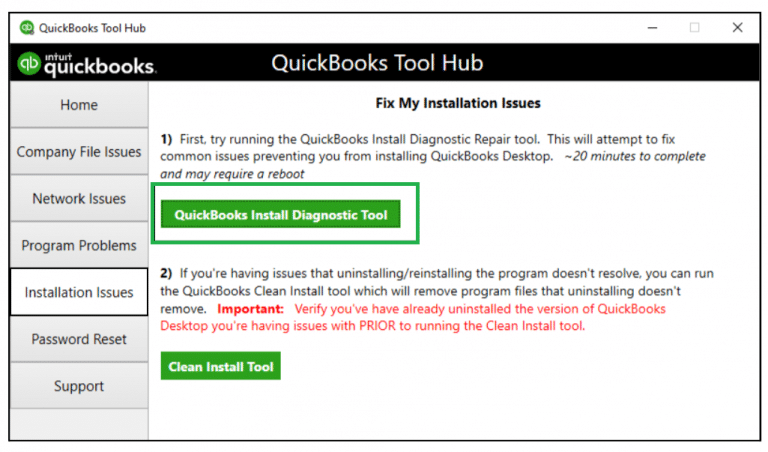
If you have upgraded to Windows 11, there is a possibility that you need QuickBooks latest version to work on it. Thus, try updating to QuickBooks latest release. Hopefully, this fixes the issue for you up to certain extent. Or you can also try reinstalling QuickBooks desktop and fix the issue that is currently restricting you from accessing the software.
Fix 7: Verify if the issue is with the file or the program
At times a simple data damage can also stop you from opening QuickBooks. In such scenario, you need to check if the issue is with the file or the program.
Open the file with all windows closed
Try opening the QuickBooks software.
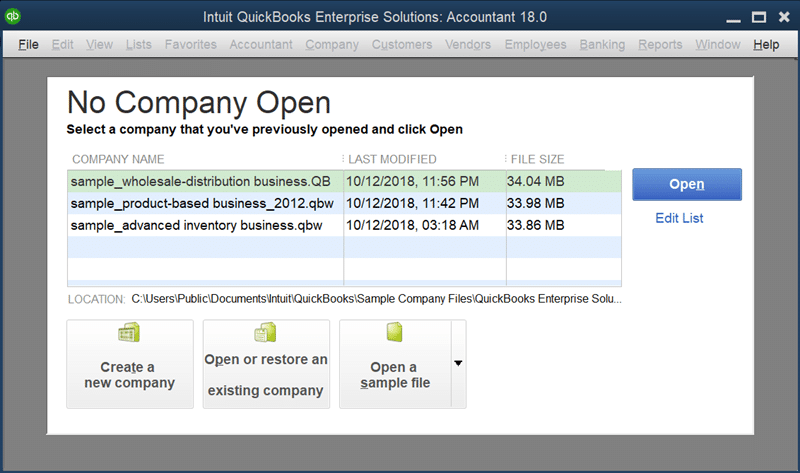
Now, in the No company open window, choose Company file.
After that, press and hold ALT key.
Choose Open tab.
Don’t leave the ALT tab till the file opens up.
In case you are asked to sign in, release Alt and enter the password.
Now press Alt again and click on OK tab.
Conclusion!
QuickBooks not opening after Windows 11 update error can be easily addressed, once you implement the steps enumerated in this segment. However, troubleshooting technical issues can sometimes take longer than expected. If you would rather save time and avoid unnecessary downtime, you can reach out to XpertBooks Pro. As an independent service provider, we offer quick technical assistance for accounting software related issues. Our team works to identify the root cause and help you restore normal operations as quickly as possible.