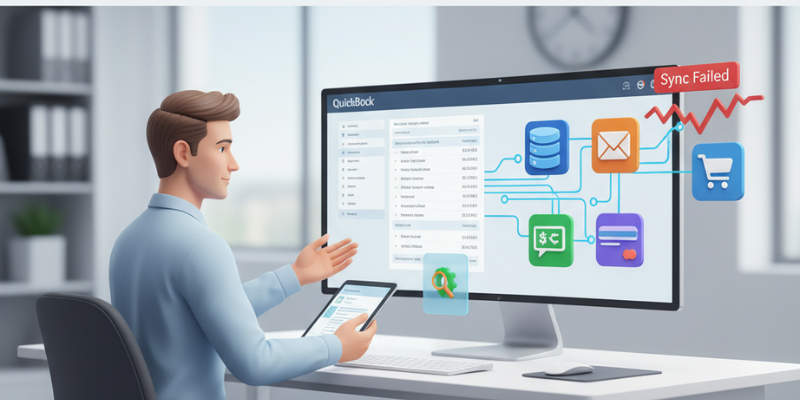
Keeping your QuickBooks Desktop updated is an important thing for ensuring smooth business operations. Regular updates not only fix bugs but also enhance data security, improve performance, and introduce useful new features that make accounting simpler. We always recommend staying on the latest release to get the best out of your QuickBooks software.
Ways to Update QuickBooks Desktop
Method 1 – Update QuickBooks Automatically
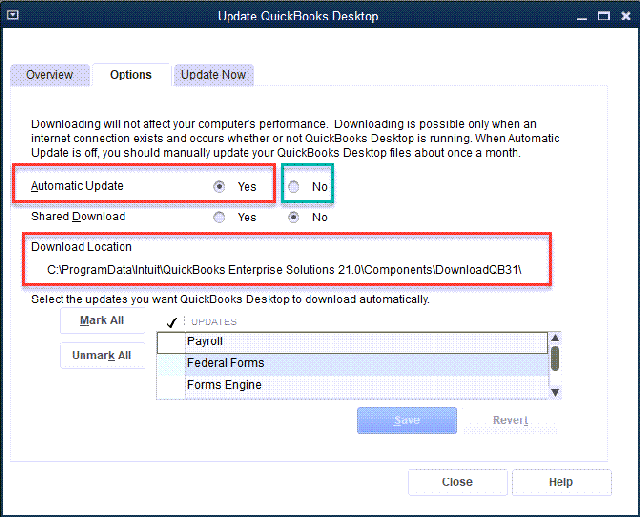
If you prefer not to worry about manual updates, QuickBooks allows you to enable automatic updates. Once this option is turned ON, the system automatically downloads and installs the latest releases as soon as they’re available on the server.
Note: You can also schedule updates for a specific time — for instance, outside of working hours — so that your workflow remains uninterrupted.
Method 2 – Update QuickBooks Manually
Of you prefer to handle updates yourself, then this method is just for you. QuickBooks gives you the flexibility to update manually whenever you’re ready.
Steps to Update Manually:
Open your QuickBooks Desktop.
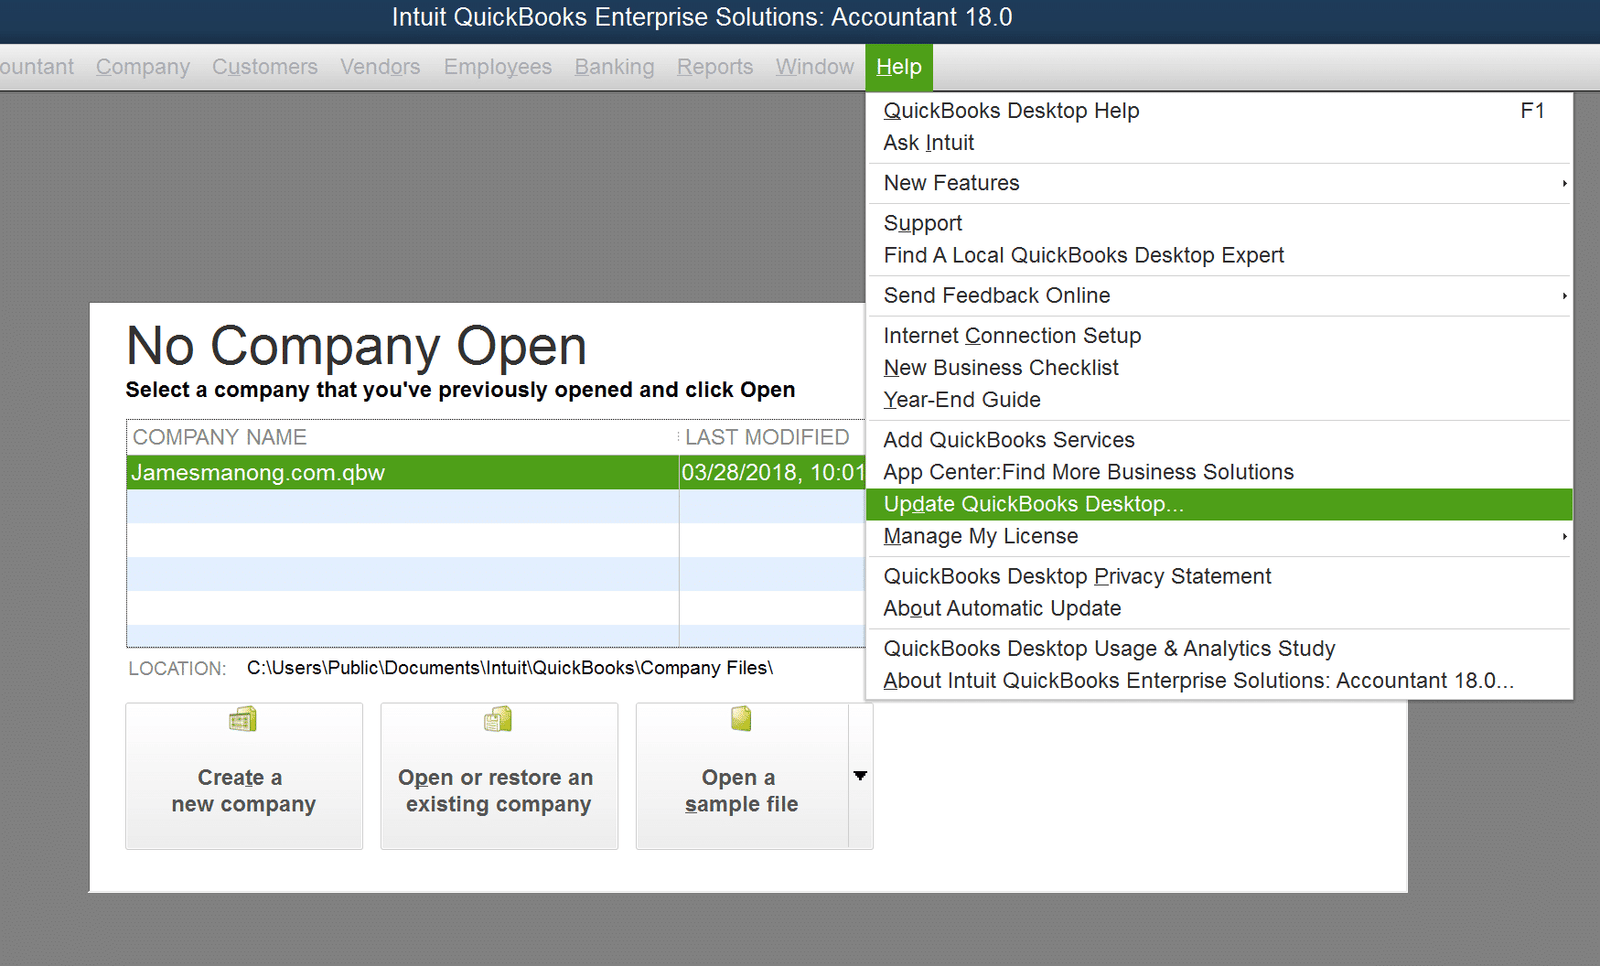
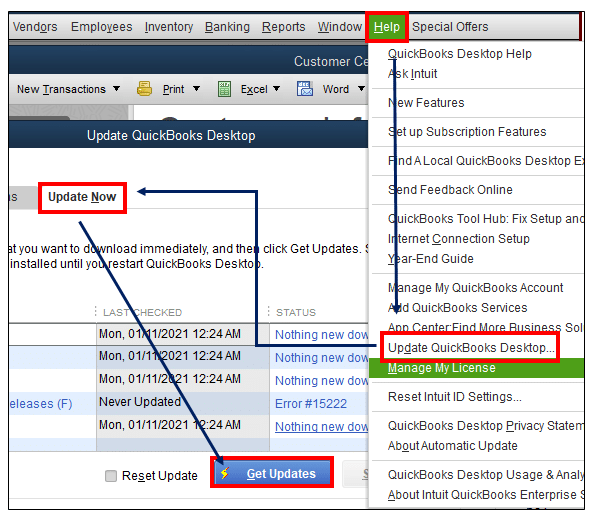
Navigate to Help menu and select Update QuickBooks Desktop.
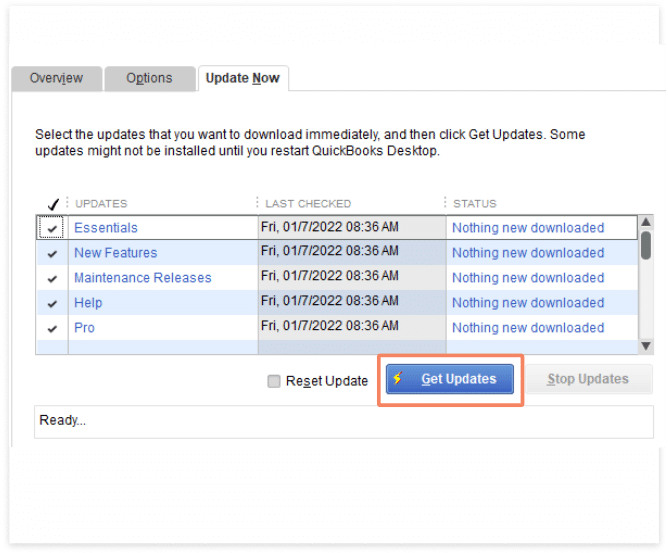
Select the Update Now tab.
Check the box next to Reset Update to clear any previous downloads.
Click Get Updates and wait for the process to finish.
Restart QuickBooks to install the update.
This ensures your software gets a clean, fresh update without carrying over old files.
Method 3 – On-Demand Update via Ultra-Light Patch (ULIP)
QuickBooks also offers an Ultra-Light Patch (ULIP) feature for on-demand updates. This method lets you download smaller, critical updates that don’t require a full installation. It’s an efficient way to apply urgent fixes or enhancements instantly without slowing down your system.
If it doesn’t match the latest one listed online, it’s time to update.
Update Payroll Tax Tables
If you use QuickBooks Payroll, keeping your payroll tax tables up to date is just as important as updating the main software. Outdated tables can cause inaccurate tax calculations or compliance issues.
To Update Payroll Tax Table:
At first, go to Employees menu and select Get Payroll Updates.
Then check Download Entire Update.
Click Download Latest Update.
Once the download completes, you’ll see a confirmation message. Regular payroll updates ensure your employee's paychecks and tax filings remain accurate and compliant.
Check Your QuickBooks Release Version
Want to verify your QuickBooks version? Simply press F2 key on your keyboard while QuickBooks is open. This opens the Product Information window, where you can view the current version, release number, and license details.
Fix Update Errors while Updating QuickBooks to Latest Release
Sometimes, errors such as 15223, 15227, or 15243 can occur during updates. These typically happen due to incomplete downloads or configuration issues.
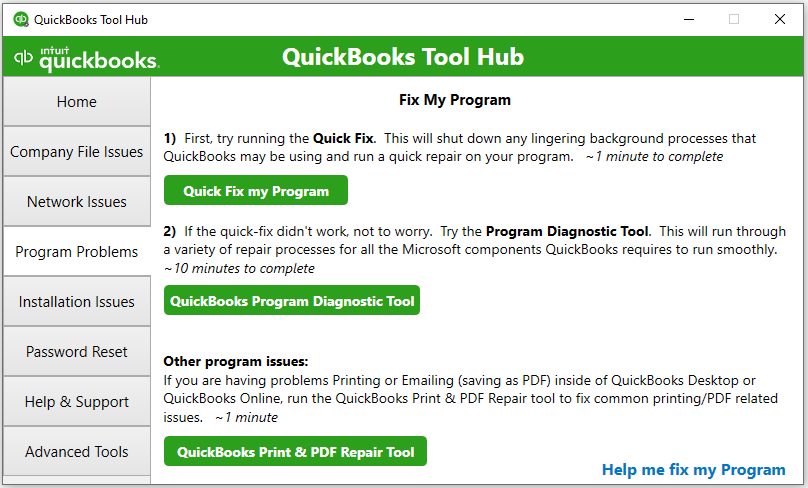
Open it and navigate to the Program Problems section.
Run the recommended fix for update-related issues.
Summing Up!
Regularly updating QuickBooks Desktop is essential for maintaining performance, security, and compliance. Whether you choose automatic, manual, or on-demand updates, keeping your software up to date helps ensure a smoother and more reliable accounting experience. If you encounter issues while updating QuickBooks desktop or need additional technical guidance, XpertBooks Pro is available to assist you. As an independent service provider, we offer quick technical assistance for accounting software related issues. Our experienced accounting software specialists can help review update-related problems, payroll update issues, and other technical concerns.
Frequently Asked Questions (FAQs)
How do I update QuickBooks Desktop to the latest release?
Updating QuickBooks Desktop to the latest release is simple. You can either allow QuickBooks to download updates automatically or choose to do it manually.
1. For an automatic update, open QuickBooks and go to Help > Update QuickBooks Desktop. Next, go to the Options tab and select Yes to turn on automatic updates. 2. For a manual update, go to the Help menu and select Update QuickBooks Desktop. Then, move to the Update Now tab, check Reset Update, and click Get Updates. Once the update is complete, restart QuickBooks to install it.
Why is it important to keep QuickBooks Desktop updated?
Regular updates are essential because they bring the latest security patches, fix bugs, and improve software stability and performance. Updates also ensure compatibility with new features like payroll tax tables and third-party integrations. By keeping your QuickBooks up to date, you minimize the risk of data corruption or software crashes.
What should I do if I face errors while updating QuickBooks?
Sometimes, you may encounter update errors such as 15223, 15227, or 15243. These errors usually occur due to internet connection problems, outdated Windows files, or partial downloads. To fix these issues: 1. Download and install the QuickBooks Tool Hub from Intuit's official website. 2. Open the Tool Hub and click Program Problems. 3. Run the Quick Fix my Program tool to resolve the update issues.
How can I update my QuickBooks Payroll tax tables?
Updating payroll tax tables ensures that employee paychecks and tax calculations are accurate. To update: 1. Open QuickBooks Desktop. 2. Go to Employees and select Get Payroll Updates. 3. Check the box next to Download Entire Update. 4. Click Download Latest Update. 5. Once the download is complete, you'll receive a confirmation message indicating that your payroll tax tables have been updated successfully.
All that you needed to know about QuickBooks Database Server Manager - Install Update and Set Up
QuickBooks is one of the most used accounting and bookkeeping software available in the market today. This application by Intuit makes day to day business operations very easy and also saves time. That’s why small and medium-sized businesses depend a lot on QuickBooks. A key tool of this application is the QuickBooks Database Server Manager. As it has been observed that most of the users have to go through a lot of hassle to install, update and set up the QuickBooks Database Server Manager. So, in this article we will discuss in depth all about the QuickBooks Database Server Manager.
What is QuickBooks Database Server Manager?
Below are the features of this tool.
The QuickBooks Database Server Manager basically creates Network Data Files. This tool does it for all the company files that are stored in the host workstation. If you are on multiple versions of QuickBooks Desktop, then in that case you have to install QuickBooks Database Server Manager for each of them.
If you install this tool, you will be permitted to multiple version of QuickBooks processes.
Ensure that you install QuickBooks Database Server Manager for each QuickBooks Desktop that are installed in the system
Note that this tool once you install on your computer adds a user to the QuickBooks Desktop
Make sure that the latest version of QuickBooks Database Server Manager is installed.
The QuickBooks Desktop Database Server Manager also helps the users to make optimal usage of QuickBooks desktop software and also to create the network data file for the company on the host computer.
Few Facts about QuickBooks Database Server Manager
Below listed are few facts related to QuickBooks Database Server Manager:
The QuickBooks Database Server Manager is responsible for generating Network Data documents for any provider files that are saved on the server computer. In case, the user is making use of a number of versions of QuickBooks Desktop then in that case the user have to install each version of the Database Server Manager
By installing multiple version of the Database Server Manager the user can also get multiple variations of processes. Most of the users confuse it with multiple versions of software which is incorrect. This tool basically provides the users with multiple variations of processes but not multiple versions of the software
In case, the user is using multiple version of QuickBooks Desktop then it is very important to set up the Database Server Manager for every version in the chronological order.
The loading of the Database Server Manager guarantee that the year’s database is presently running in the background. In the Windows services interface, these types of services are listed as the QuickBooksDBXX. The xx here represents the version number.
When QuickBooks Database Manager is installed for every QuickBooks variant it adds a user.
How to Download QuickBooks Database Server Manager?
The first thing to do is to open the QuickBooks Installer, and start with the Installation Wizard
After this you have to connect with the internet and the click on Next
Now read the Software Agreement carefully and then accept the Terms and Conditions followed by clicking on Next
Once done you have to click on Custom or Network Options
Now select the method of installation
If needed, you have to type your license number
Tap on Yes and then Allow access
Once done, follow rest of the instruction and complete the installation process
How to Install QuickBooks database server manager?
Step 1: Firstly, the user has to double click on the installer to the QuickBooks and then start with the Installation Setup Wizard.
Step 2: Once done, choose the Next option if the system has internet and is equipped to download an upgrade. Or else select the No option then click on the Next tab.
Step 3: Now shut down any active application and then hit on the Next option
Step 4: Once done, you have to read the terms of the “Software License Agreement“. After reading select the “I accept the terms in the license agreement“, followed by selecting the “Next” tab.
Step 5: After this the user have to choose the ‘Custom or Network options icon.
Step 6: Now you have to click on the setup type:
‘I’ll be utilizing QuickBooks on this computer AND I will be saving’… if you will run the QuickBooks program on this computer system.
Now choose ‘I will NOT be using QuickBooks on this computer’… if you will only store QuickBooks information on this computer.
Step 7: Nowselect the “Yes” option and then click on allow access.
Step 8: After this you have to enter the ‘License Number and Product Number’ (the text at
the bottom of the window lets you know where to look for this).
Step 9: Now you have to follow the on-screen
instructions to complete the installation process.
Step 10: Once done, setup the Database Server
Manager
Step 11: You also need to Set your firewall
permissions.
Step 12: Finally Update Database Server Manager
How to Update the QuickBooks Database Server Manager (QBDSM)?
The updation of QuickBooks Database Server Manager is needed due to few reasons. You should note that, when a new version of QuickBooks is installed in the system or a new update is released then it is compulsory for the user to update the QuickBooks database server manager. Below are the steps to update the QuickBooks Database Server Manager.
Step 1: Firstly, you need to download the patch
from “Update QuickBooks Desktop to the release”
Step 2: After the patch setup is complete, reboot
the host. This is considered a very important step.
Step 3: Now that the server has been updated, on the
workstations, you will get the following message stating: “The company file has to be updated to work with this version of
QuickBooks Desktop“
Step 4: Now will come across a prompt “Create a backup”. This is needed since these updates can change the database structure
Step 5: In the last step you have to follow the prompt message and complete the backup process and once this is done you will be able to open the company file.
How to Use and Set-up QuickBooks Database Server Manager (QBDSM)?
Like the upgradation process, you also need to follow few steps to set up the QuickBooks Database Server Manager. So, below are few steps that you need to abide by do complete the set up process of the tool.
Step 1: The first thing to do is open
“QuickBooks database server manager” and then scan
the files that are to be used for the multi-user access.
Step 2: After that you have to scan the “Company files” on the server, so as to make sure that the files are configured properly to provide them access to the multiple users. Below are few steps that you are required to follow:
Go to the start button first
After that click on the All Programs option, as well as on QuickBooks folder. You will also need to tap on Scan folders.
Now scan the folders and verify the folders as well that stores the QuickBooks company files. In case, you are not aware of the file location, then he/she can select to Scan the entire disks.
Once done, you have to click on the Scan button and start with the scanning procedure.
After all the folders are scanned, the other users will be have the access to open company files remotely.
Step 3: To ‘Add new company files’ to the
server you can use the Monitored Drivers feature’ and then keep the database server manager up to
date.
Now go to the Start button and then click on the Program option
You will also have to click on QuickBooks and also on the QuickBooks database Server Manager
In case, you want to keep a check on the local drive for the company file, especially the ones that have been added, removed, or renamed then you have to click on the select option.
Step 4: You have to ensure that the company files are connected to the server and all users are logged into the company files
Step 5: If you want to modify the ‘Status of the Service’ then you have to implement the ‘Service administrator tool’ and then you have to configure the service
Step 6: Lastly you have to use the ‘Update features’ tab and then download the latest update to the QuickBooks Server.
For this, you have to tap on the Start button and then click on the program option
After that you will have to click on QuickBooks and also on the QuickBooks Database server manager
Now choose the Updates option
You can install the updates by following the below mentioned instructions
Dynamic Ports is used by QuickBooks Desktop 2019. These are basically port numbers that are assigned during the installation so as to make sure that QuickBooks Desktop is given port entirely. You will come across all these numbers in the QuickBooks Database Server Manager.
QuickBooks Database server manager tool can:
An essential aspect of multi-user access is that QBDSM can scan folders and QuickBooks company files
This tool also checks the local storage devices to look for a new company file on its own
System features
To find any information about the system, where the database server is installed, makes use of the system feature.
The user will have to click on program in the start menu, and then on QuickBooks and on QuickBooks database server manager
After that, the user will have to click on system option
And lastly, check the system information for the system which has the database server installed
Conclusion!
Through the above ways you can install, update and set up the QuickBooks Database Server Manager. However, if you face any kind of issue in doing these steps then you can always seek assistance from QuickBooks support service providers who are basically well-trained experts.
QuickBooks is an important accounting software trusted by millions, but even robust software like this can run into technical hiccups. Among the most frequently reported issues are the 8004 series in QuickBooks errors - a group of errors that generally occur when QuickBooks fails to open, access, or communicate with the company file.
If you are getting error codes similar to 80040408, 80070057, or 80029c4apop up on your screen, then you’re not alone. These errors usually indicate that there is some configuration problems, file corruption, or interference from Windows settings or security software. In this article, we’ll break down the most common 8004 series QuickBooks errors, explain why they occur, and show you how to fix them step-by-step. Let's get started!
List of Common 8004 Series of QuickBooks Errors
Below are the most frequent errors in the 8004 series that QuickBooks users encounter:
Error Code
Error Message / Description
80040408
“QuickBooks is unable to start because of an error.” Usually appears when QuickBooks fails to open the company file or communicate with the Database Server Manager
80070057
“The parameter is incorrect.” This occurs when QuickBooks doesn’t have permission to open the company file or when the file is damaged.
80029c4a
“Error loading type library/DLL.” Typically linked to missing or damaged QuickBooks system components or Windows registry entries.
80040401
Appears when QuickBooks tries to communicate with another application but fails due to integration issues.
80040402
Occurs when QuickBooks is unable to connect with an external service or API.
80040403
Happens when QuickBooks tries to open a file that was moved, renamed, or corrupted.
Main Reasons for QuickBooks 8004 Series of Error
Understanding what triggers these errors can help prevent them in the future. Below are the most common reasons:
Corrupt or Missing Company File Components: Damaged .QBW, .ND, or .TLG files can prevent QuickBooks from locating or reading the company file properly.
Incorrect File Access Permissions: If QuickBooks doesn’t have full access to the company file or its folder, it will throw an 8007- or 8004-series error.
Incomplete QuickBooks Installation: Improper installation or missing DLL files can lead to launch and runtime errors.
Outdated QuickBooks or Windows Version: Running outdated software can cause compatibility issues and unexpected crashes.
Firewall or Antivirus Blocking QuickBooks Processes: Security software often mistakenly blocks QuickBooks services, preventing it from opening or connecting to the network.
Integration or Sync Failures with Third-Party Apps: Errors like 80040401 or 80040408 can occur when QuickBooks integrations fail to sync properly.
Fixes for QuickBooks Error 8004 Series of Errors
Let’s go over how to resolve these issues one by one.
Fix 1: Repair QuickBooks Error 80040408
When it Happens:
QuickBooks fails to start or open the company file.
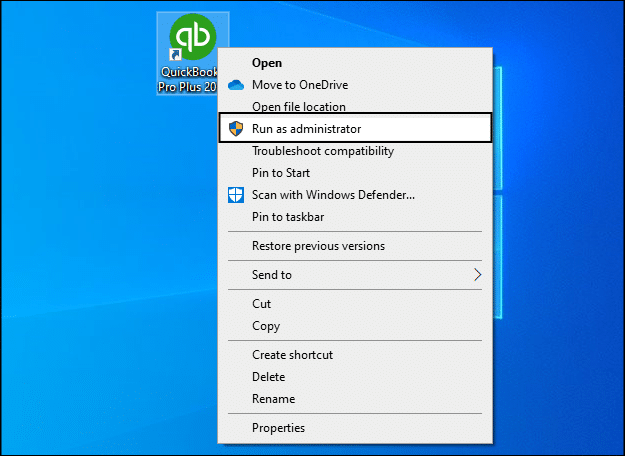
Method 3: Run QuickBooks in Admin Mode and Disable Compatibility Settings
Firstly, hit a right-click on the QuickBooks desktop icon.
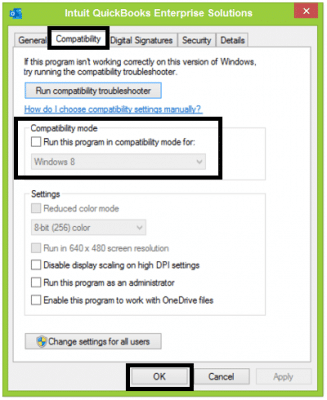
Then select Properties and select Compatibility tab.
Now uncheck Run this program in compatibility mode.
Also, click on Apply and OK.
Then right-click the icon again and choose Run as Administrator.
This ensures QuickBooks gets the necessary permissions to access system components and files.
Conclusion
The 8004 series in QuickBooks errors including 80040408, 80070057 and 80029c4a are among the most common issues you may face when QuickBooks fails to open or connect to its company files. However, they can be fixed quickly with the right approach. If the problem persists after applying the above methods, then reach out to XpertBooks Pro team. Our accounting professionals can diagnose the exact cause and restore your software in no time.
QuickBooks Desktop allows businesses to connect with various 3rd party applications such as CRMs, eCommerce platforms, payroll software, and inventory tools. These integrations make business management easier — until something goes wrong. At times, users encounter QuickBooks integration errors when syncing data between QuickBooks and connected applications. You may see messages like:
QuickBooks failed to connect with the application.
An unexpected error occurred while communicating with QuickBooks.
QuickBooks error 80040408 or 80029c4a while syncing with third-party app.
These errors typically occurs due to communication breakdowns, outdated SDK components, or damaged QuickBooks Web Connector files. In this article, we’ll explore the most common integration errors, why they occurs, and how you can fix them step-by-step. Thus, keep read on!
What are the Common QuickBooks Integration Errors?
Below are some of the most frequent errors users face while connecting or syncing third-party apps with QuickBooks:
QuickBooks Error Codes and Descriptions
Error Code / Message
Description
QuickBooks Error 80040408
QuickBooks cannot start or connect to the company file during integration.
QuickBooks Error 80029c4a
Integration fails due to missing or corrupted system files.
QuickBooks Sync Manager Error
Occurs when QuickBooks Sync Manager stops working or becomes outdated.
Web Connector Error QBWC1085
QuickBooks Web Connector log file is missing or damaged.
QuickBooks Error 80070057
App cannot access the company file due to permission issues.
QuickBooks SDK Connection Error
Outdated or corrupted SDK prevents communication with the third-party app.
These errors interrupt data synchronization, delay processes, and may even lead to data inconsistencies between QuickBooks and the external application.
Why QuickBooks Integration Errors Occur?
There are multiple factors that can disrupt integration between QuickBooks and connected apps. Below are the most common causes:
The Web Connector is responsible for facilitating communication between QuickBooks Desktop and integrated apps.
If it becomes corrupted or outdated, sync operations fail.
Third-party apps require the latest QuickBooks SDK (Software Development Kit) to work properly.
If QuickBooks Desktop or its SDK isn’t updated, you may face compatibility issues.
Incorrect login details or misconfigured connection settings within the app can cause QuickBooks to deny access.
A corrupt or oversized company file may prevent successful data transmission between QuickBooks and the external app.
Security software may block the ports or processes required by QuickBooks to communicate with other applications.
Here you need to browse and select your company file (Damaged/Corrupted File).
Choose Check your file and network and tap on Continue.
Lastly, enter your QuickBooks Admin password and click Next.
Once the repair is complete, try syncing your app again.
Fix 5: Configure Firewall and Security Settings
If your firewall or antivirus blocks communication between QuickBooks and the app, follow these steps:
Open Windows Defender Firewall and Allow an app through firewall.
Then make sure QuickBooks, QuickBooks Web Connector, and Database Server Manager are allowed for both private and public networks.
Add inbound/outbound rules for QuickBooks ports:
8019, 56728, 55378–55382 (depends on QuickBooks version).
Restart your system.
Fix 6: Use the QuickBooks Tool Hub to Resolve Program Problems
QuickBooks Tool Hub includes multiple utilities to fix integration-related errors.
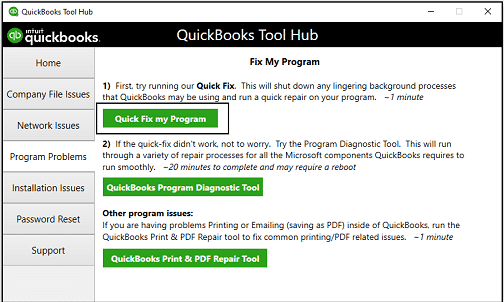
Open QuickBooks Tool Hub and navigate to the Program Problems.
Then select Quick Fix my Program to close background processes and refresh program components.
Once done, relaunch QuickBooks and test the integration.
Prevention Tips for Smooth QuickBooks Integrations
To avoid future integration errors and sync failures, follow these preventive measures:
Keep QuickBooks Desktop and third-party apps updated.
Always use the latest version of QuickBooks Web Connector.
Avoid running multiple versions of QuickBooks on one system.
Schedule regular company file maintenance using the Verify and Rebuild Data utility.
Add QuickBooks to the firewall and antivirus exclusion list.
Use stable network connectivity when syncing large data.
Conclusion
QuickBooks integration errors can interrupt business workflows and prevent seamless data synchronization between QuickBooks and other apps. However, by updating your software or repairing your company file you can easily fix most sync failures issues. In the meanwhile, If you stuck in complex integration issues, then XpertBooks Pro is available to assist you. Our experts specialize in resolving QuickBooks desktop, web connector, and API-related errors ensuring your integrations work flawlessly.
In today’s business environment, agility is everything. Whether you’re a small startup or a growing enterprise, managing your books efficiently is crucial — but maintaining an in-house accounting team is often costly and time-consuming. That’s why more businesses are turning to remote bookkeeping — a smarter, leaner, and more secure way to handle financial operations without compromising control or accuracy.
With remote bookkeeping, your accounting data is managed by experienced professionals using cloud-based systems, giving you real-time visibility, cost savings, and peace of mind — all without hiring a full-time bookkeeper.
In this article, we’ll explore how remote bookkeeping works, its advantages, how businesses maintain financial control, and why outsourcing bookkeeping might be the most strategic decision your business makes this year.
What Is Remote Bookkeeping?
Remote bookkeeping is the process of managing your company’s financial records, transactions, and reporting virtually, using cloud accounting platforms and secure online workflows.
Instead of maintaining on-site accountants, you partner with a specialized remote bookkeeping team that performs all bookkeeping tasks — including data entry, reconciliation, payroll, and reporting — from a secure, remote environment.
Common Tasks Managed by Remote Bookkeepers
Recording daily financial transactions
Reconciling bank and credit card accounts
Managing accounts payable and receivable
Preparing invoices and processing payments
Generating monthly, quarterly, and annual reports
Supporting tax preparation and audits
This approach blends human expertise with technology automation, ensuring that your financial operations run seamlessly, accurately, and efficiently.
Why Businesses Are Switching to Remote Bookkeeping
The shift toward remote financial management has accelerated due to digital transformation, rising labor costs, and the need for business continuity.
Here’s why thousands of small and mid-sized businesses are making the switch:
Major Cost Savings
Hiring an in-house accountant or bookkeeper can be expensive — not just in salary, but also in benefits, training, and overhead costs. Remote bookkeeping eliminates these expenses, providing professional-grade accounting services at a fraction of the cost. Businesses typically save 30–60% annually compared to maintaining internal staff.
Real-Time Access to Financial Data
Cloud-based bookkeeping gives you 24/7 access to your financial information from anywhere in the world. Whether you’re in the office, at home, or traveling, you can view cash flow, invoices, or reports instantly.
Scalable and Flexible Solutions
Remote bookkeeping scales effortlessly as your business grows. Need more support during tax season or financial audits? Your provider can allocate additional resources without the hassle of hiring or onboarding.
Expert Financial Oversight
Partnering with experienced remote accountants ensures that your books are handled by certified professionals who stay current on accounting standards, tax laws, and technology tools.
Modern remote bookkeeping systems use encrypted cloud storage, two-factor authentication, and regular backups, ensuring that your financial data is protected from cyber threats or accidental loss.
How Remote Bookkeeping Works
Remote bookkeeping is designed to integrate smoothly with your existing systems.
Here’s how a typical workflow looks:
Step 1: Setup and Data Migration
Your remote bookkeeping provider connects your existing financial data to a secure, cloud-based accounting platform. This ensures seamless data transfer and continuity.
Step 2: System Integration
Integrate key tools — such as banking apps, invoicing systems, payment processors, and payroll software — to automate data flow and reduce manual entry.
Step 3: Ongoing Bookkeeping Operations
Your remote team records transactions daily, manages bills and invoices, reconciles accounts, and monitors cash flow. You’ll receive real-time updates and financial dashboards for full visibility.
Step 4: Reporting and Advisory
Monthly or quarterly financial statements are prepared and shared for review. Many providers, including QuickBooks desktop, also offer advisory insights — helping you understand your numbers, improve cash flow, and make better business decisions.
Step 5: Continuous Support
Remote bookkeepers remain available for audits, compliance checks, or tax season preparation — ensuring your books are always ready for review.
Maintaining Control While Outsourcing Your Books
One of the most common concerns business owners have about outsourcing bookkeeping is loss of control — but with today’s systems, the opposite is true.
How You Stay in Control:
You retain 100% ownership of all accounting data and software.
Real-time dashboards let you track transactions and balances instantly.
Approval workflows ensure no payment or transaction is processed without your authorization.
Transparent communication channels (via email, chat, or shared dashboards) keep you in the loop on every financial update.
Monthly review meetings provide clarity on trends, cash flow, and projections.
With the right provider, remote bookkeeping gives you more visibility, fewer errors, and stronger control — not less.
Is Remote Bookkeeping Secure?
Security is often the top concern when it comes to online financial management — and rightly so. Leading remote bookkeeping providers implement enterprise-grade protections to keep your data safe.
Security Measures You Should Expect:
Bank-level encryption (256-bit SSL) for all data transmission
Secure cloud platforms (with regular system audits)
Multi-factor authentication (MFA) for all logins
Automatic daily data backups in secure data centers
Restricted user access — only authorized personnel can view sensitive information
Non-disclosure agreements (NDAs) for confidentiality
At XpertBooks Pro, data security is non-negotiable. We use industry-standard encryption and compliance protocols to safeguard your financial information around the clock.
Advantages of Remote Bookkeeping
To summarize, here are the major benefits businesses experience when they switch to remote bookkeeping:
Benefit
Impact
Cost Savings
Reduce bookkeeping costs by up to 60%
Real-Time Access
View financial data from anywhere, anytime
Accuracy
Minimize human errors through automation and expert review
Scalability
Easily adjust services as your business grows
Security
Bank-level encryption and regular data backups
Focus
Free up internal resources to focus on growth and operations
Remote bookkeeping provides a balanced blend of affordability, accuracy, and control — helping businesses make informed decisions without the burden of managing a full accounting department.
Best Practices for Transitioning to Remote Bookkeeping
If you’re ready to make the shift, here’s how to ensure a smooth transition:
Choose a reputable provider — verify credentials, client reviews, and data security standards.
Clarify access levels — define which team members can approve transactions or view reports.
Start with a pilot phase — test the system with one department or month of data before full rollout.
Maintain open communication — schedule regular check-ins and performance reviews.
Train your staff — ensure your internal team understands new workflows and approval systems.
By following these steps, you can adopt remote bookkeeping confidently — knowing your financial management is in expert hands.
Remote bookkeeping isn’t just a trend — it’s the future of smart business management. By outsourcing your bookkeeping to trusted professionals, you gain financial clarity, accuracy, and scalability — without the overhead or administrative burden of maintaining an in-house team.
The result? More time to focus on what truly matters: growing your business.
Next Step: Try Our Remote Bookkeeping Demo for Free
At XpertBooks Pro, we help businesses of all sizes implement secure, efficient, and customized remote bookkeeping solutions that save time and money — while giving you complete financial control. Our certified experts handle everything from setup to daily operations, so you can focus on running your business.
See firsthand how our cloud-based accounting systems simplify financial management, enhance accuracy, and improve your bottom line.